2018 CHEVROLET CRUZE lock
[x] Cancel search: lockPage 115 of 404

Chevrolet Cruze Owner Manual (GMNA-Localizing-U.S./Canada/Mexico-
11348462) - 2018 - crc - 5/15/17
114 Instruments and Controls
2. Touch Time and Date, thenAuto Set.
3. Select from the available selections.
4. Touch
0.
Setting the 12/24 Hour Format
1. Press{, then touch
SETTINGS.
2. Touch Time and Date, then select 12h or 24h format.
3. Touch
0.
Setting the Month and Day
Format
1. Press{, then touch
SETTINGS.
2. Touch Time and Date, then Set Date Format.
3. Select DD/MM/YYYY (day/ month/year), MM/DD/YYYY
(month/day/year), or YYYY/
MM/DD (year/month/day)
format.
4. Touch
0.
Uplevel Radio Using Center
Stack Controls
The infotainment system controls
are used to access the time and
date settings through the menu
system. See “Using the System”
under “Introduction” in the
infotainment manual.
To set the time or date:
1. Press
{, then select
SETTINGS.
2. Select Time and Date, then the desired function.
3. Turn the MENU knob to increase or decrease the value.
4. Press the MENU knob to go to the next value. After the last
value is selected, the system
will update and return to the
Settings menu. Press
oBACK
to go to the last menu and
save the changes.
Auto Set requires an OnStar
service plan. If auto timing is set, the time
displayed on the clock may not
update immediately when driving
into a new time zone.
To set the clock display:
1. Select SETTINGS from the Home Page, then select Time
and Date.
2. Select Clock Display.
3. Turn the MENU knob to Off or On.
4. Press the MENU knob to select.
Press
oBACK to go to the last
menu and save the changes.
Uplevel Radio Using
Infotainment Display Controls
To set the time:
1. Touch SETTINGS from the Home Page, then touch Time
and Date.
Page 116 of 404

Chevrolet Cruze Owner Manual (GMNA-Localizing-U.S./Canada/Mexico-
11348462) - 2018 - crc - 5/15/17
Instruments and Controls 115
2. Touch Set Time and touch«
orªto increase or decrease
hours, minutes, and AM or PM.
Touch 12–24 Hr for 12 or
24 hour clock.
3. Touch
}to go back to the
previous menu.
Auto Set requires an OnStar
service plan.
If auto timing is set, the time
displayed on the clock may not
update immediately when driving
into a new time zone.
To set the date: 1. Touch SETTINGS from the Home Page, then touch Time
and Date.
2. Touch Set Date and touch
«
orªto increase or decrease
month, day, or year.
3. Touch
}to go back to the
previous menu.
To set the clock display: 1. Touch SETTINGS and touch Time and Date. 2. Touch Clock Display and touch
OFF or ON to turn the clock
display off or on.
3. Touch
}to go back to the
previous menu.
The clock settings can also be
accessed by touching the time
display, then touching Set.
Power Outlets
Power Outlet 12-Volt Direct
Current
The accessory power outlet can be
used to plug in electrical equipment,
such as a cell phone or MP3 player.
There is an accessory power outlet
on the center console in front of the
shift lever. This outlet is powered
when the ignition is on or in ACC/
ACCESSORY, or until the driver
door is opened within 10 minutes of
turning off the vehicle. See Retained
Accessory Power (RAP) 0215.
Open the cover to access.
Caution
Leaving electrical equipment
plugged in for an extended period
of time while the vehicle is off will
drain the battery. Always unplug
electrical equipment when not in
use and do not plug in equipment
that exceeds the maximum
20 amp rating.
Certain electrical accessories may
not be compatible with the
accessory power outlet and could
overload vehicle or adapter fuses.
If a problem is experienced, see
your dealer.
When adding electrical equipment,
be sure to follow the installation
instructions included with the
equipment. See Add-On Electrical
Equipment 0257.
Page 133 of 404

Chevrolet Cruze Owner Manual (GMNA-Localizing-U.S./Canada/Mexico-
11348462) - 2018 - crc - 5/15/17
132 Instruments and Controls
The vehicle may not pass
inspection if:
.The light is on when the engine
is running.
. The light does not come on
when the ignition is on with the
engine not running for Key
Access or in Service Mode for
Keyless Access.
. Critical emission control systems
have not been completely
diagnosed. If this happens, the
vehicle would not be ready for
inspection and might require
several days of routine driving
before the system is ready for
inspection. This can happen if
the 12-volt battery has recently
been replaced or run down, or if
the vehicle has been recently
serviced.
See your dealer if the vehicle will
not pass or cannot be made ready
for the test.Brake System Warning
Light
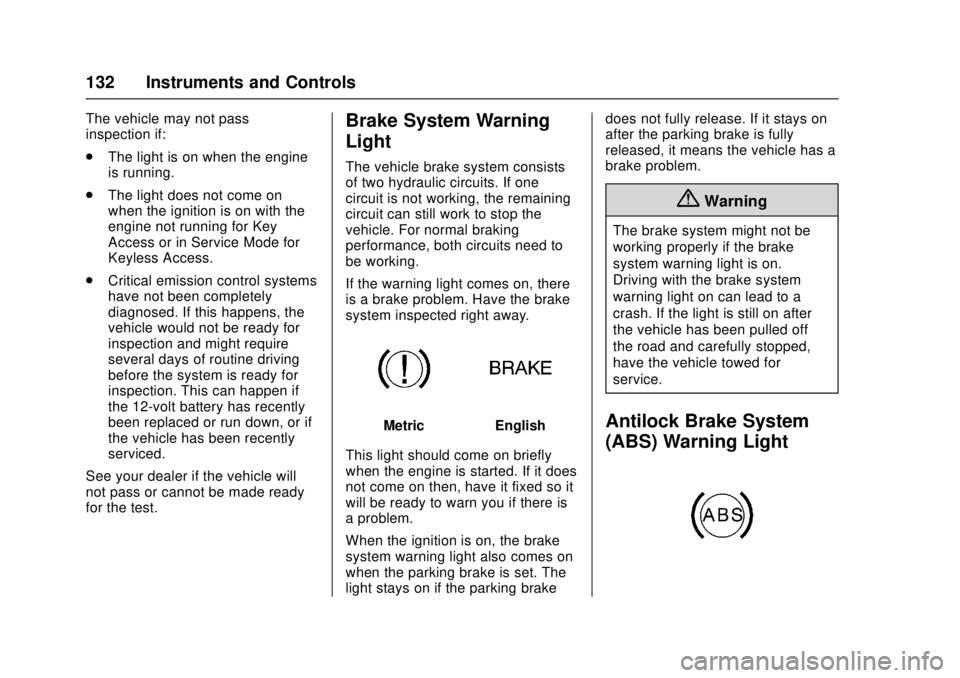
The vehicle brake system consists
of two hydraulic circuits. If one
circuit is not working, the remaining
circuit can still work to stop the
vehicle. For normal braking
performance, both circuits need to
be working.
If the warning light comes on, there
is a brake problem. Have the brake
system inspected right away.
MetricEnglish
This light should come on briefly
when the engine is started. If it does
not come on then, have it fixed so it
will be ready to warn you if there is
a problem.
When the ignition is on, the brake
system warning light also comes on
when the parking brake is set. The
light stays on if the parking brake does not fully release. If it stays on
after the parking brake is fully
released, it means the vehicle has a
brake problem.
{Warning
The brake system might not be
working properly if the brake
system warning light is on.
Driving with the brake system
warning light on can lead to a
crash. If the light is still on after
the vehicle has been pulled off
the road and carefully stopped,
have the vehicle towed for
service.
Antilock Brake System
(ABS) Warning Light
Page 134 of 404

Chevrolet Cruze Owner Manual (GMNA-Localizing-U.S./Canada/Mexico-
11348462) - 2018 - crc - 5/15/17
Instruments and Controls 133
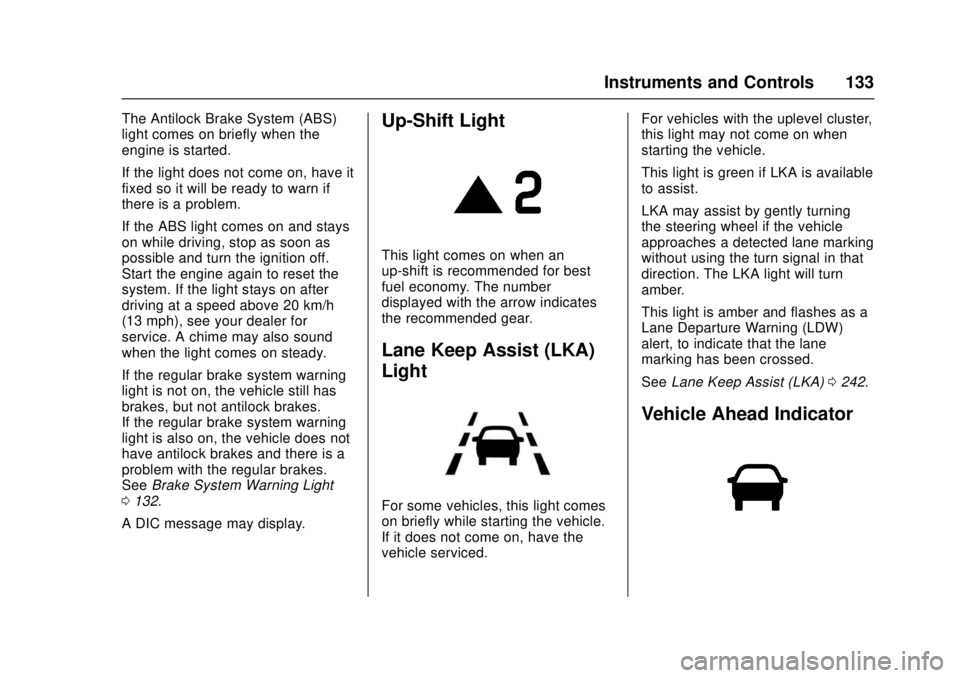
The Antilock Brake System (ABS)
light comes on briefly when the
engine is started.
If the light does not come on, have it
fixed so it will be ready to warn if
there is a problem.
If the ABS light comes on and stays
on while driving, stop as soon as
possible and turn the ignition off.
Start the engine again to reset the
system. If the light stays on after
driving at a speed above 20 km/h
(13 mph), see your dealer for
service. A chime may also sound
when the light comes on steady.
If the regular brake system warning
light is not on, the vehicle still has
brakes, but not antilock brakes.
If the regular brake system warning
light is also on, the vehicle does not
have antilock brakes and there is a
problem with the regular brakes.
SeeBrake System Warning Light
0 132.
A DIC message may display.Up-Shift Light
This light comes on when an
up-shift is recommended for best
fuel economy. The number
displayed with the arrow indicates
the recommended gear.
Lane Keep Assist (LKA)
Light
For some vehicles, this light comes
on briefly while starting the vehicle.
If it does not come on, have the
vehicle serviced. For vehicles with the uplevel cluster,
this light may not come on when
starting the vehicle.
This light is green if LKA is available
to assist.
LKA may assist by gently turning
the steering wheel if the vehicle
approaches a detected lane marking
without using the turn signal in that
direction. The LKA light will turn
amber.
This light is amber and flashes as a
Lane Departure Warning (LDW)
alert, to indicate that the lane
marking has been crossed.
See
Lane Keep Assist (LKA) 0242.
Vehicle Ahead Indicator
Page 146 of 404

Chevrolet Cruze Owner Manual (GMNA-Localizing-U.S./Canada/Mexico-
11348462) - 2018 - crc - 5/15/17
Instruments and Controls 145
Vehicle
Personalization
Use the audio system controls to
access the personalization menus
for customizing vehicle features.
The following are all possible
personalization features. Depending
on the vehicle, some may not be
available.
Base Radio Audio System
Controls
{:Press to access the Home
Page Menu.
QorR: Touch to scroll through the
menus or setup items.
0: Touch to exit or return to the
previous screen or menu.
Uplevel Radio Audio System
Controls
1. Touch the desired feature to display a list of available
options.
2. Touch to select the desired feature setting. 3. Press BACK on the center
stack or touch
hto return to the
previous menu or exit.
Turn the ignition on to access the
Settings menu, then select
SETTINGS from the Home Page on
the infotainment display.
Personalization Menus
The following list of menu items may
be available:
. Time and Date
. Rear Seat Reminder
. Language
. Teen Driver
. Valet Mode
. Radio
. Vehicle
. Bluetooth
. Apple CarPlay
. Android Auto
. USB Auto Launch
. Voice
. Display .
Rear Camera
. Return to Factory Settings
. Software Information
. Wi-Fi
Detailed information for each menu
follows.
Time and Date
Manually set the time and date. See
Clock 0113.
Rear Seat Reminder
This allows for a chime and a
message when the rear door has
been opened before or during
operation of the vehicle.
Select Off or On.
Language
Select Language, then select from
the available language(s).
The selected language will display
on the system, and voice
recognition will reflect the selected
language.
Page 147 of 404

Chevrolet Cruze Owner Manual (GMNA-Localizing-U.S./Canada/Mexico-
11348462) - 2018 - crc - 5/15/17
146 Instruments and Controls
Teen Driver
See“Teen Driver” under“Settings”
in the infotainment manual.
Valet Mode
This will lock the infotainment
system and steering wheel controls.
It may also limit access to vehicle
storage locations, if equipped.
To enable valet mode:
1. Enter a four-digit code on the keypad.
2. Select Enter to go to the confirmation screen.
3. Re-enter the four-digit code.
Touch Lock or Unlock to lock or
unlock the system. Touch Back to
go back to the previous menu.
Radio
Select and the following may
display:
. Manage Favorites
. Number of Favorites Shown
. Audible Touch Feedback
. Text Scroll .
Tone Settings
. Auto Volume
. Maximum Startup Volume
. Audio Cue Volume
Manage Favorites
This allows favorites to be edited.
See “Storing a Station as a
Favorite” inAM-FM Radio 0166 or
“Manage Favorites” in“Settings”
under “Radio” in the infotainment
manual.
Number of Favorites Shown
Select to set the number of favorites
to display.
Select the desired number or select
Auto and the infotainment system
will automatically adjust the number
of favorites shown.
Audible Touch Feedback
This allows Audible Touch
Feedback to be turned on or off.
Select Off or On. Text Scroll
Select to see text scroll on the
screen.
Select Off or On.
Tone Settings
Select to adjust the radio tone. See
Operation
0164 or“Tone Settings”
under “AM-FM Radio” in the
infotainment manual.
Auto Volume
This feature adjusts the volume
based on vehicle speed and
ambient noise.
Select Off, Low, Medium-Low,
Medium, Medium-High, or High.
Maximum Startup Volume
This feature sets the maximum
startup volume. If the vehicle is
started and the volume is greater
than this level, the volume is
adjusted to this level. To set the
maximum startup volume, turn the
MENU knob or touch + or −to
increase or decrease.
Page 148 of 404

Chevrolet Cruze Owner Manual (GMNA-Localizing-U.S./Canada/Mexico-
11348462) - 2018 - crc - 5/15/17
Instruments and Controls 147
Audio Cue Volume
This feature sets the volume of
audio files played at system startup
and shutdown.
Select On, then touch + or−to
increase or decrease the volume.
Vehicle
Select and the following may
display:
. Climate and Air Quality
. Collision/Detection Systems
. Comfort and Convenience
. Lighting
. Power Door Locks
. Remote Lock, Unlock, Start
Climate and Air Quality
Select and the following may
display:
.Auto Fan Speed
. Auto Defog
. Auto Rear Defog Auto Fan Speed
This feature will set the auto fan
speed.
Select Low, Medium, or High.
Auto Defog
When turned on and high humidity
is detected, the climate control
system may adjust to outside air
supply and turn on the air
conditioner or the heater. The fan
speed may slightly increase to help
prevent fogging. When high
humidity is no longer detected, the
system will return to its prior
operation.
Select Off or On.
Auto Rear Defog
When on, this feature turns on the
rear defogger at vehicle start when
the interior temperature is cold and
fog is likely. The auto rear defog
function can be canceled by
pressing
1. See
“Rear Window
Defogger” underClimate Control
Systems (With Heater Only) 0188 or
Climate Control Systems (With
Air Conditioning) 0186 orAutomatic
Climate Control System 0190.
Select Off or On.
Collision/Detection Systems
Select and the following may
display:
. Park Assist
. Rear Cross Traffic Alert
. Lane Change Alert
Park Assist
If equipped, this feature can assist
in backing up and parking the
vehicle. See Assistance Systems for
Parking or Backing 0236.
Select On or Off.
Rear Cross Traffic Alert
This allows the Rear Cross Traffic
Alert feature to be turned on or off.
Select Off or On. See “Rear Cross
Traffic Alert (RCTA)” inAssistance
Systems for Parking or Backing
0 236.
Page 149 of 404

Chevrolet Cruze Owner Manual (GMNA-Localizing-U.S./Canada/Mexico-
11348462) - 2018 - crc - 5/15/17
148 Instruments and Controls
Lane Change Alert
This allows the Lane Change Alert
feature to be turned on or off.
Select Off or On. SeeLane Change
Alert (LCA) 0240.
Comfort and Convenience
Select and the following may
display:
.
Chime Volume
. Auto Wipe in Reverse Gear
Chime Volume
This allows the selection of the
chime volume level.
Touch + or −to adjust the volume.
Auto Wipe in Reverse Gear
Select to set the Auto Wipe in
Reverse Gear feature on or off.
When on, and the front wipers are
on, the rear window wiper will turn
on automatically when the vehicle is
shifted into R (Reverse).
Select Off or On.
Lighting
Select and the following may
display:
. Vehicle Locator Lights
. Exit Lighting
Vehicle Locator Lights
This feature will flash the exterior
lamps and allows some of the
exterior lamps and most of the
interior lamps to turn on briefly when
Kon the Remote Keyless Entry
(RKE) transmitter is pressed to
locate the vehicle.
Select Off or On.
Exit Lighting
This allows the selection of how
long the exterior lamps stay on
when leaving the vehicle when it is
dark outside.
Select Off, 30 Seconds, 60 Seconds,
or 120 Seconds.
Power Door Locks
Select and the following may
display:
. Unlocked Door Anti Lock Out .
Auto Door Unlock
. Delayed Door Lock
Unlocked Door Anti Lock Out
When on, this feature will keep the
driver door from locking until the
door is closed. If this feature is
turned on, the Delayed Door Lock
menu will not be available.
Select Off or On.
Auto Door Unlock
This allows selection of which of the
doors will automatically unlock when
the vehicle is shifted into P (Park)
with an automatic transmission or
when the vehicle is turned off with a
manual transmission.
Select Off, All Doors, or Driver Door.
Delayed Door Lock
When on, this feature will delay the
locking of the doors. To override the
delay, press the power door lock
switch on the door.
Select Off or On.