2018 CHEVROLET CRUZE tow
[x] Cancel search: towPage 250 of 404
Chevrolet Cruze Owner Manual (GMNA-Localizing-U.S./Canada/Mexico-
11348462) - 2018 - crc - 5/15/17
Driving and Operating 249
Biodiesel Blends in Canada
Biodiesel blends that meet the CAN/
CGSB-3.522 specifications up to
20% (B20) can be used. Avoid the
use of biodiesel blends above 20%,
as they may damage the engine
and fuel system. For detailed
information on the use of biodiesel,
seeBiodiesel 0249.
Refueling
Diesel fuel can foam when filling the
tank. This can cause the automatic
pump nozzle to shut off, even if the
tank is not full. If this happens, wait
for the foaming to stop, and then fill
the tank more slowly. See Filling the
Tank 0254.
{Warning
Heat coming from the engine can
cause the fuel to expand and
force the fuel out of the tank.
If something ignites the fuel, a fire
could start. To help avoid this, fill
the tank slowly and only until the
nozzle shuts off. Do not top it off.
Clean up any spilled fuel. Accidental Refueling with
Gasoline
Caution
If the vehicle is accidentally
refueled with gasoline, do not
continue driving the vehicle
except to get to a location where
it can be stopped safely. Driving
the vehicle will damage the fuel
system. Have the vehicle towed
to a qualified technician to have
the gasoline removed from the
tank and fuel system. Flush the
fuel system with Ultra Low Sulfur
Diesel fuel to ensure all gasoline
is removed.
Biodiesel
Biodiesel is a renewable fuel
produced from vegetable oils or
animal fats that have been
chemically modified to make it
compatible with diesel fuel.
Caution
Do not use home-made biodiesel
or home test kits because the
quality cannot be verified by
approved scientific methods. Do
not use raw vegetable oil or other
unmodified bio-oils, fats,
or blends of vegetable oil with
diesel. They could damage the
fuel system and engine, and
damages would not be covered
by the vehicle warranty.
Caution
Do not use blends containing
more than 20% biodiesel. Any
engine, fuel system, or exhaust
after-treatment system damage
would not be covered by the
vehicle warranty.
Biodiesel fuel quality degrades with
time and exposure to high
temperature quicker than Ultra Low
Sulfur Diesel fuel. More frequent
Page 258 of 404
Chevrolet Cruze Owner Manual (GMNA-Localizing-U.S./Canada/Mexico-
11348462) - 2018 - crc - 5/15/17
Driving and Operating 257
Trailer Towing
General Towing
Information
The vehicle is neither designed nor
intended to tow a trailer.
Conversions and
Add-Ons
Add-On Electrical
Equipment
{Warning
The Data Link Connector (DLC) is
used for vehicle service and
Emission Inspection/Maintenance
testing. SeeMalfunction Indicator
Lamp (Check Engine Light) 0130
. A device connected to the DLC
— such as an aftermarket fleet or
driver-behavior tracking device —
may interfere with vehicle
systems. This could affect vehicle
operation and cause a crash.
Such devices may also access
information stored in the vehicle’s
systems.
Caution
Some electrical equipment can
damage the vehicle or cause
components to not work and
would not be covered by the
vehicle warranty. Always check
with your dealer before adding
electrical equipment.
Add-on equipment can drain the
vehicle's 12-volt battery, even if the
vehicle is not operating.
The vehicle has an airbag system.
Before attempting to add anything
electrical to the vehicle, see
Servicing the Airbag-Equipped
Vehicle 085 and Adding Equipment
to the Airbag-Equipped Vehicle
0 86.
Page 260 of 404

Chevrolet Cruze Owner Manual (GMNA-Localizing-U.S./Canada/Mexico-
11348462) - 2018 - crc - 5/15/17
Vehicle Care 259
Tire Chains . . . . . . . . . . . . . . . . . . . 317
If a Tire Goes Flat . . . . . . . . . . . . 318
Tire Sealant andCompressor Kit . . . . . . . . . . . . . 319
Storing the Tire Sealant and
Compressor Kit . . . . . . . . . . . . . 326
Tire Changing . . . . . . . . . . . . . . . . 326
Compact Spare Tire . . . . . . . . . . 332
Jump Starting
Jump Starting - North America . . . . . . . . . . . . . . . . . . . . . 333
Towing the Vehicle
Towing the Vehicle . . . . . . . . . . . 336
Recreational VehicleTowing . . . . . . . . . . . . . . . . . . . . . . 336
Appearance Care
Exterior Care . . . . . . . . . . . . . . . . . 339
Interior Care . . . . . . . . . . . . . . . . . . 344
Floor Mats . . . . . . . . . . . . . . . . . . . . 347
General Information
For service and parts needs, visit
your dealer. You will receive
genuine GM parts and GM-trained
and supported service people.
Genuine GM parts have one of
these marks:
California Proposition
65 Warning
{Warning
Most motor vehicles, including
this one, as well as many of its
service parts and fluids, contain
and/or emit chemicals known to
the State of California to cause
cancer and birth defects or other
reproductive harm. Engine
exhaust, many parts and
systems, many fluids, and some
component wear by-products
contain and/or emit these
chemicals. For more information
go to www.P65Warnings.ca.gov/
passenger-vehicle.
See Battery - North America 0279
and Jump Starting - North America
0 333 and the back cover.
Page 266 of 404
Chevrolet Cruze Owner Manual (GMNA-Localizing-U.S./Canada/Mexico-
11348462) - 2018 - crc - 5/15/17
Vehicle Care 265
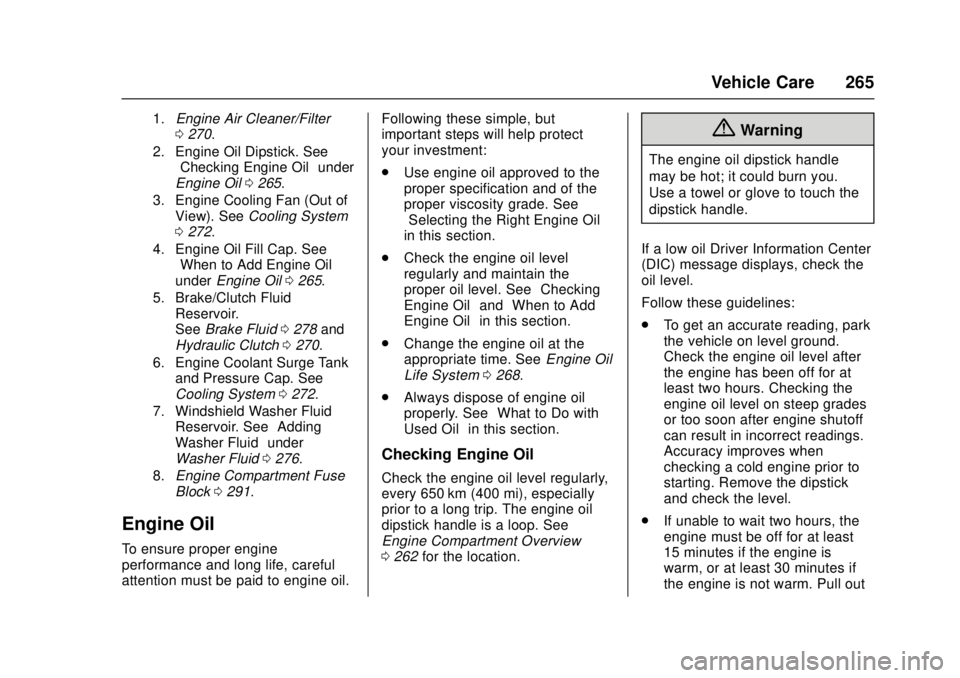
1.Engine Air Cleaner/Filter
0270.
2. Engine Oil Dipstick. See “Checking Engine Oil” under
Engine Oil 0265.
3. Engine Cooling Fan (Out of View). See Cooling System
0 272.
4. Engine Oil Fill Cap. See “When to Add Engine Oil”
under Engine Oil 0265.
5. Brake/Clutch Fluid Reservoir.
See Brake Fluid 0278 and
Hydraulic Clutch 0270.
6. Engine Coolant Surge Tank and Pressure Cap. See
Cooling System 0272.
7. Windshield Washer Fluid Reservoir. See “Adding
Washer Fluid” under
Washer Fluid 0276.
8. Engine Compartment Fuse
Block 0291.
Engine Oil
To ensure proper engine
performance and long life, careful
attention must be paid to engine oil. Following these simple, but
important steps will help protect
your investment:
.
Use engine oil approved to the
proper specification and of the
proper viscosity grade. See
“Selecting the Right Engine Oil”
in this section.
. Check the engine oil level
regularly and maintain the
proper oil level. See “Checking
Engine Oil” and“When to Add
Engine Oil” in this section.
. Change the engine oil at the
appropriate time. See Engine Oil
Life System 0268.
. Always dispose of engine oil
properly. See “What to Do with
Used Oil” in this section.
Checking Engine Oil
Check the engine oil level regularly,
every 650 km (400 mi), especially
prior to a long trip. The engine oil
dipstick handle is a loop. See
Engine Compartment Overview
0262 for the location.
{Warning
The engine oil dipstick handle
may be hot; it could burn you.
Use a towel or glove to touch the
dipstick handle.
If a low oil Driver Information Center
(DIC) message displays, check the
oil level.
Follow these guidelines:
. To get an accurate reading, park
the vehicle on level ground.
Check the engine oil level after
the engine has been off for at
least two hours. Checking the
engine oil level on steep grades
or too soon after engine shutoff
can result in incorrect readings.
Accuracy improves when
checking a cold engine prior to
starting. Remove the dipstick
and check the level.
. If unable to wait two hours, the
engine must be off for at least
15 minutes if the engine is
warm, or at least 30 minutes if
the engine is not warm. Pull out
Page 267 of 404
Chevrolet Cruze Owner Manual (GMNA-Localizing-U.S./Canada/Mexico-
11348462) - 2018 - crc - 5/15/17
266 Vehicle Care
the dipstick, wipe it with a clean
paper towel or cloth, then push it
back in all the way. Remove it
again, keeping the tip down, and
check the level.
When to Add Engine Oil
Gasoline
Diesel
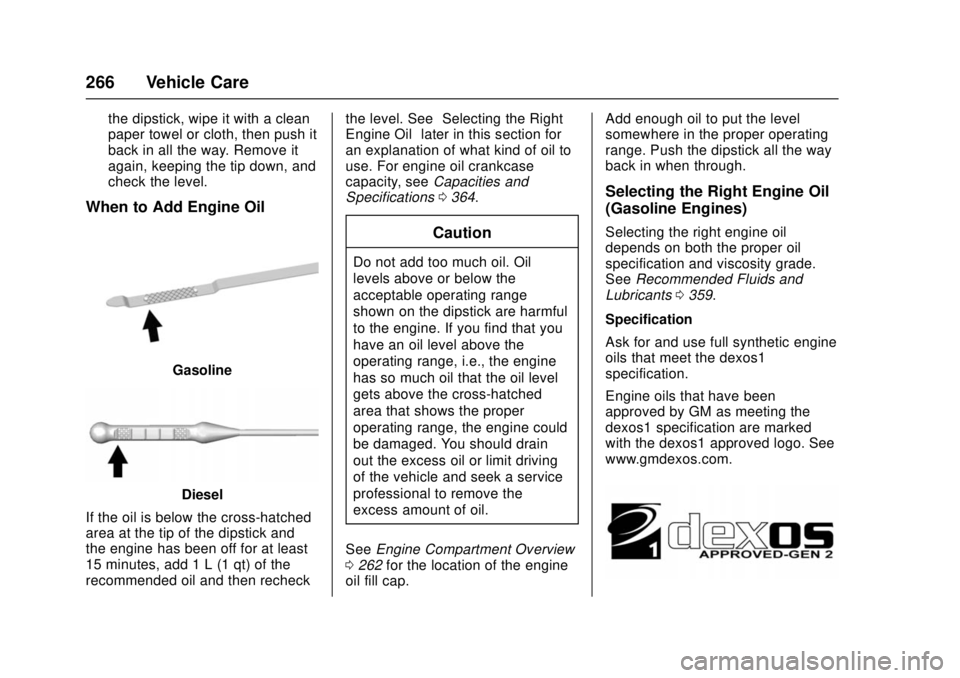
If the oil is below the cross-hatched
area at the tip of the dipstick and
the engine has been off for at least
15 minutes, add 1 L (1 qt) of the
recommended oil and then recheck the level. See
“Selecting the Right
Engine Oil” later in this section for
an explanation of what kind of oil to
use. For engine oil crankcase
capacity, see Capacities and
Specifications 0364.
Caution
Do not add too much oil. Oil
levels above or below the
acceptable operating range
shown on the dipstick are harmful
to the engine. If you find that you
have an oil level above the
operating range, i.e., the engine
has so much oil that the oil level
gets above the cross-hatched
area that shows the proper
operating range, the engine could
be damaged. You should drain
out the excess oil or limit driving
of the vehicle and seek a service
professional to remove the
excess amount of oil.
See Engine Compartment Overview
0 262 for the location of the engine
oil fill cap. Add enough oil to put the level
somewhere in the proper operating
range. Push the dipstick all the way
back in when through.
Selecting the Right Engine Oil
(Gasoline Engines)
Selecting the right engine oil
depends on both the proper oil
specification and viscosity grade.
See
Recommended Fluids and
Lubricants 0359.
Specification
Ask for and use full synthetic engine
oils that meet the dexos1
specification.
Engine oils that have been
approved by GM as meeting the
dexos1 specification are marked
with the dexos1 approved logo. See
www.gmdexos.com.
Page 313 of 404
Chevrolet Cruze Owner Manual (GMNA-Localizing-U.S./Canada/Mexico-
11348462) - 2018 - crc - 5/15/17
312 Vehicle Care
Adjust the front and rear tires to
the recommended inflation
pressure on the Tire and
Loading Information label after
the tires have been rotated.
SeeTire Pressure 0305 and
Vehicle Load Limits 0202.
Reset the Tire Pressure Monitor
System. See Tire Pressure
Monitor Operation 0308.
Check that all wheel nuts are
properly tightened. See “Wheel
Nut Torque” underCapacities
and Specifications 0364.
{Warning
Rust or dirt on a wheel, or on the
parts to which it is fastened, can
make wheel nuts become loose
after time. The wheel could come
off and cause an accident. When
changing a wheel, remove any
rust or dirt from places where the
wheel attaches to the vehicle. In
an emergency, a cloth or a paper
(Continued)
Warning (Continued)
towel can be used; however, use
a scraper or wire brush later to
remove all rust or dirt.
Lightly coat the center of the
wheel hub with wheel bearing
grease after a wheel change or
tire rotation to prevent corrosion
or rust build-up. Do not get
grease on the flat wheel
mounting surface or on the
wheel nuts or bolts.
When It Is Time for New
Tires
Factors such as maintenance,
temperatures, driving speeds,
vehicle loading, and road conditions
affect the wear rate of the tires.
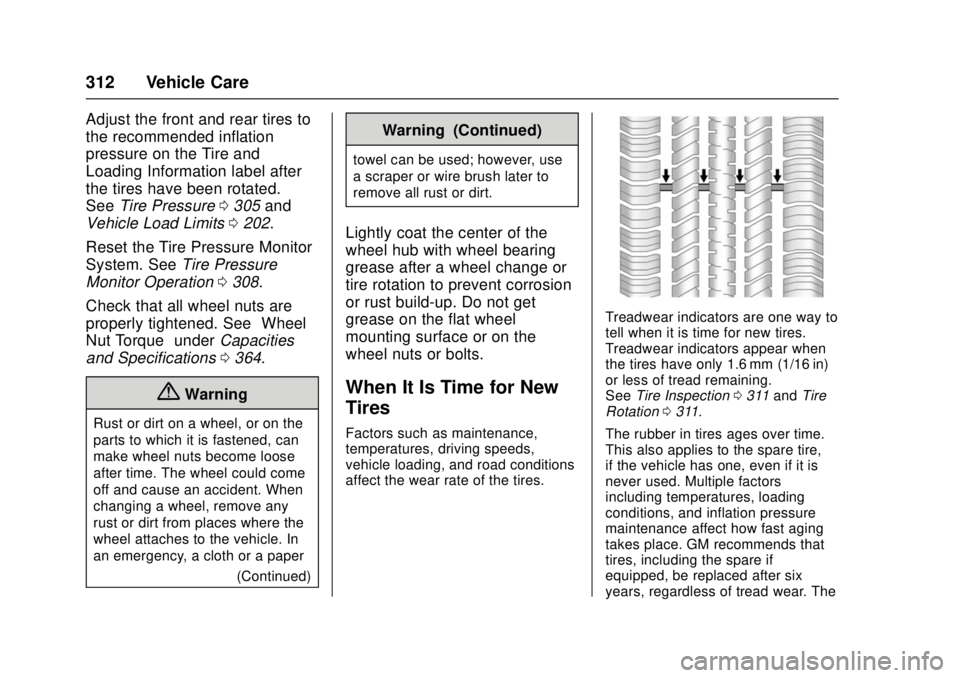
Treadwear indicators are one way to
tell when it is time for new tires.
Treadwear indicators appear when
the tires have only 1.6 mm (1/16 in)
or less of tread remaining.
SeeTire Inspection 0311 and Tire
Rotation 0311.
The rubber in tires ages over time.
This also applies to the spare tire,
if the vehicle has one, even if it is
never used. Multiple factors
including temperatures, loading
conditions, and inflation pressure
maintenance affect how fast aging
takes place. GM recommends that
tires, including the spare if
equipped, be replaced after six
years, regardless of tread wear. The
Page 319 of 404
Chevrolet Cruze Owner Manual (GMNA-Localizing-U.S./Canada/Mexico-
11348462) - 2018 - crc - 5/15/17
318 Vehicle Care
Caution
If the vehicle is equipped with
195/65R15 or 205/55R16 size
tires, use tire chains only where
legal and only when necessary.
Use low profile chains that add no
more than 12 mm thickness to the
tire tread and inner sidewall. Use
chains that are the proper size for
the tires. Install them on the tires
of the front axle. Do not use
chains on the tires of the rear
axle. Tighten them as tightly as
possible with the ends securely
fastened. Drive slowly and follow
the chain manufacturer's
instructions. If the chains contact
the vehicle, stop and retighten
them. If the contact continues,
slow down until it stops. Driving
too fast or spinning the wheels
with chains on will damage the
vehicle.
If a Tire Goes Flat
It is unusual for a tire to blow out
while driving, especially if the tires
are maintained properly. SeeTires
0 298. If air goes out of a tire, it is
much more likely to leak out slowly.
But if there ever is a blowout, here
are a few tips about what to expect
and what to do:
If a front tire fails, the flat tire
creates a drag that pulls the vehicle
toward that side. Take your foot off
the accelerator pedal and grip the
steering wheel firmly. Steer to
maintain lane position, and then
gently brake to a stop, well off the
road, if possible.
A rear blowout, particularly on a
curve, acts much like a skid and
may require the same correction as
used in a skid. Stop pressing the
accelerator pedal and steer to
straighten the vehicle. It may be
very bumpy and noisy. Gently brake
to a stop, well off the road,
if possible.{Warning
Driving on a flat tire will cause
permanent damage to the tire.
Re-inflating a tire after it has been
driven on while severely
underinflated or flat may cause a
blowout and a serious crash.
Never attempt to re-inflate a tire
that has been driven on while
severely underinflated or flat.
Have your dealer or an authorized
tire service center repair or
replace the flat tire as soon as
possible.
{Warning
Lifting a vehicle and getting under
it to do maintenance or repairs is
dangerous without the
appropriate safety equipment and
training. If a jack is provided with
the vehicle, it is designed only for
changing a flat tire. If it is used for
anything else, you or others could
(Continued)
Page 327 of 404

Chevrolet Cruze Owner Manual (GMNA-Localizing-U.S./Canada/Mexico-
11348462) - 2018 - crc - 5/15/17
326 Vehicle Care
12. Turn the air only hose (10)counterclockwise to remove it
from the tire valve stem.
13. Replace the tire valve stem cap.
14. Return the air only hose (10) and power plug (9) back to
their original storage location.
15. Return the equipment to its original storage location in the
vehicle.
The tire sealant and compressor kit
has accessory adapters located in a
compartment on the bottom of its
housing that can be used to inflate
air mattresses, balls, etc.
Storing the Tire Sealant
and Compressor Kit
The tire sealant and compressor kit
is in the trunk under the load floor.
To remove the kit: 1. Open the trunk or liftgate. See Trunk 048 orLiftgate
0 50.
2. Remove the compressor (1)
and the tire sealant
canister (2).
To store the inflator kit, reverse the
steps.
Tire Changing
Removing the Spare Tire and
Tools
To access the spare tire and tools:
Vehicles with a Trunk
1. Tow Hook
2. Jack
3. Wrench
4. Screwdriver (If Equipped)