Page 1 of 20
2018 CRUZE
GETTING TO KNOW YOUR
chevrolet.com
Review this Quick Reference Guide for an overview of some important feat\
ures in your Chevrolet Cruze. Some optional equipment described in this guide may not\
be included in your vehicle. More information can be found in your Owner’s Manual and at my.chevrolet.com/learn. For easy reference, keep this guide with your Owner’s Manual in your \
glove box.
Certain restrictions, precautions, and safety procedures apply to your v\
ehicle. Please read your Owner’s Manual for complete instructions.
Page 2 of 20
2
Low Fuel
Traction Control Off
Brake System
Cruise Control
StabiliTrak Active
StabiliTrak Off
Forward Collision Alert
Security
Lights On Reminder
Airbag Readiness
Engine Oil Pressure
Check Engine
SYMBOLS
INSTRUMENT PANEL
Exterior Lamp Control/Instrument Panel Illumination Control
Windshield Wipers Lever
Trunk/Liftgate Release
Steering Wheel Adjustment Lever
Power Mirror ControlF
Turn Signal Lever
Audio Next/Previous Favorite Station ControlsF (behind steering wheel)
Hood Release (pull 2x to open)
Heated Steering WheelF/Cruise ControlF/Forward Collision AlertF/Lane Keep AssistF Buttons
Audio Volume ControlsF (behind steering wheel
Engine Start/Stop ButtonF
Voice Recognition ButtonsF/Driver Information Center ControlsF
Driver Information CenterF
Page 3 of 20
3
Refer to your Owner’s Manual to learn about the information being relayed by the lights, gauges and indicators of the instrument cluster.
See In Brief in your Owner’s Manual.
Infotainment System Touch ScreenFHazard Warning Flashers Button
Infotainment System Controls
Driver Shift Control
Rear Parking Assist ButtonF
Driver’s Heated Seat ButtonF
Climate Controls
Passenger’s Heated Seat ButtonF
USB Port/Accessory Power Outlets
Traction Control and StabiliTrak Button
Lane Keep Assist
Vehicle Ahead
Antilock Brake System
Low Tire Pressure
Door Ajar
Charging System
Driver Safety Belt Reminder
2 Passenger Safety Belt Reminder
F Optional equipment *Screen measured diagonally
Infotainment system with 8-inch* diagonal screenF shown
Page 4 of 20

4F Optional equipment
Lock
Press to lock all doors.
Unlock
Press to unlock the driver’s door.
Press again to unlock all doors.
Trunk/Liftgate
Press twice quickly to open the trunk/liftgate.
Vehicle Locator/Panic Alarm
Press and release to locate your vehicle.
Press and hold to activate the alarm.
REMOTE KEYLESS ENTRY TRANSMITTER
Remote Vehicle StartF
Press and release the Lock button and then press and hold the button until the turn signal lamps flash to start the engine from outside the vehicle. After entering the vehicle, turn on the ignition.
• During a remote start, the engine will run for 15 minutes.
• Press and hold the button until the parking lamps turn off to cancel a remote start.
Key ReleaseF (Keyless Access transmitter)
In case of loss of vehicle power, press the button on the side of the transmitter to pull out the door lock key. Remove the cap on the rear part of the driver’s door handle to access the lock.
The Keyless Access System enables operation of the doors, ignition and t\
runk/liftgate without removing the Remote Keyless Entry transmitter from a pocket or p\
urse. The transmitter must be within 3 feet of a door or the trunk/liftgate.
KEYLESS UNLOCKING
With the transmitter within range:
Press the lock button on the driver’s door handle to unlock the driver’s door; press it again within 5 seconds to unlock all doors.
Press the lock button on a passenger’s door handle to unlock all doors.
Press the touchpad either above the license plate or at the base of the liftgate to open the trunk/liftgate.
KEYLESS LOCKING
With the ignition off, the transmitter out of the vehicle, and all doors\
closed:
Press the lock button on any door handle to lock all doors immediately.
If Passive Locking is turned on, all doors will lock automatically after\
a short delay once all doors are closed.
Note: To change the door lock and unlock settings, go to Settings > Vehicle > Remote Lock, Unlock, Start.
See Keys, Doors and Windows in your Owner’s Manual.
KEYLESS ACCESS SYSTEMF
Note: To change the remote lock, unlock, and remote start settings, go to Settings > Vehicle > Remote Lock, Unlock, Start.
Keyless Access System with Remote Start shown
See Keys, Doors and Windows in your Owner’s Manual.
Page 5 of 20
 STARTF
The Remote Keyless Entry transmitter must be in the vehicle to turn on the ignition.
STARTING THE ENGINE
With the transmission in Park or Neutral, pr")
5F Optional equipment
KEYLESS (PUSHBUTTON) STARTF
The Remote Keyless Entry transmitter must be in the vehicle to turn on the ignition.
STARTING THE ENGINE
With the transmission in Park or Neutral, press the brake pedal (and clutch pedal, if equipped) and then press the ENGINE START/STOP button. The button indicator will be green.
Note: If the transmitter battery is weak, place the transmitter in the front cupholder in the center console to enable the engine to start. Replace the transmitter battery as soon as possible.
STOPPING THE ENGINE/OFF
Shift to Park (automatic transmission) or 1st or Reverse (manual tran\
smission) and press the ENGINE START/STOP button.
ACCESSORY MODE
With the engine off and the brake pedal not depressed, press the ENGINE START/STOP button. The button indicator will be amber.
See Driving and Operating in your Owner’s Manual.
AUTO ENGINE STOP/START OPERATION (IF EQUIPPED)
An automatic stop/start system has been integrated with the engine and a\
utomatic transmission to help conserve fuel. While driving, when the brake is app\
lied and the vehicle is at a complete stop, the automatic engine stop/start system ma\
y turn off the engine, referred to as an Auto Stop. In Auto Stop mode, the tachometer g\
auge will read AUTO STOP. The audio system, climate controls and other accessories will\
continue to operate. Upon releasing the brake pedal or applying the accelerator peda\
l, the engine will restart. After parking the vehicle and turning off the engine, the tacho\
meter gauge will read OFF.
The engine may remain running or restart when the vehicle is stopped if:\
• A minimum vehicle speed is not reached.
• The engine or transmission is not at the required operating temperature.\
• The outside temperature is not in the required operating range.
• The shift lever is in any gear other than Drive (D).
• The battery state of charge is low.
• The climate control system requires the engine to run based on the clima\
te control or defog setting. Select the Eco air conditioning setting (green A/C in\
dicator) to maxi-mize the frequency and duration of Auto Stops.
• The Auto Stop time is greater than 2 minutes.
See Driving and Operating in your Owner’s Manual.
Page 6 of 20
6F Optional equipment
FRONT SEATS
With the vehicle parked, push down the lever on the left side of the steering
column to adjust the steering wheel. The steering wheel can then be moved up or down and in or out. Pull up the lever to lock the steering wheel in place.
See Instruments and Controls in your Owner’s Manual.
STEERING WHEEL ADJUSTMENT
MANUAL DRIVER’S SEAT
A. Seat Adjustment
Lift the handle under the front of the seat near the console to slide the seat forward or rearward.
B. Seat Height Adjustment
Ratchet the middle lever to raise or lower the seat.
C. Seatback Recline Adjustment
Lift the rear lever to recline or raise the seatback.
POWER DRIVER’S SEATF
A. Seat Adjustment
Move the horizontal control to move the seat forward or rearward and to tilt, raise or lower the seat.
B. Seatback Recline Adjustment
Move the vertical control to recline or raise the seatback.
See Seats and Restraints in your Owner’s Manual.
CBA
BA
Page 7 of 20
F
Use the controls on the right side of the steering wheel to view the Info (includes trip and fuel information), \
Audio, Phone, Navigation, and Options menus.
Press the")
7
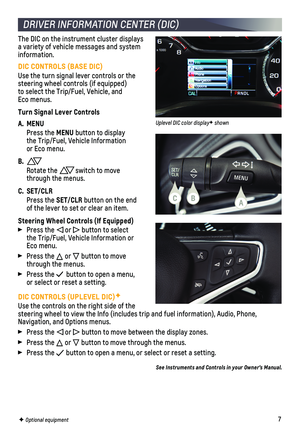
DIC CONTROLS (UPLEVEL DIC)F
Use the controls on the right side of the steering wheel to view the Info (includes trip and fuel information), \
Audio, Phone, Navigation, and Options menus.
Press the or button to move between the display zones.
Press the or button to move through the menus.
Press the button to open a menu, or select or reset a setting.
See Instruments and Controls in your Owner’s Manual.
DRIVER INFORMATION CENTER (DIC)
F Optional equipment
DIC CONTROLS (BASE DIC)
Use the turn signal lever controls or the steering wheel controls (if equipped)to select the Trip/Fuel, Vehicle, and Eco menus.
Turn Signal Lever Controls
A. MENU
Press the MENU button to display the Trip/Fuel, Vehicle Information or Eco menu.
B.
Rotate the switch to move through the menus.
C. SET/CLR
Press the SET/CLR button on the end of the lever to set or clear an item.
Steering Wheel Controls (If Equipped)
Press the or button to select the Trip/Fuel, Vehicle Information or Eco menu.
Press the or button to move through the menus.
Press the button to open a menu, or select or reset a setting.
The DIC on the instrument cluster displays a variety of vehicle messages and system information.
CBA
Uplevel DIC color displayF shown
Page 8 of 20
8
/VOL Power/Volume
MENU Tune radio stations/Open and select menus
RADIO Select AM, FM, SiriusXMF
MEDIA Select the media source
BACK Move back one level in the menus
ApplicationsF: Touch the screen icon to access the application
Interaction Selector: Display pages of favorite radio stations
Home page SEEK Previous/Next radio station or track
CHEVROLET MYLINK INFOTAINMENT SYSTEM
Refer to your Owner’s Manual for important information about using the infotainment system while driving.
F Optional equipment *Screen measured diagonally
CHEVROLET MYLINK
Chevrolet MyLink uses a Bluetooth or USB connection to link to a compati\
ble device, such as a smartphone, cell phone, USB flash drive or portable audio pl\
ayer/iPod®. For assistance with the MyLink system, contact Customer Assistance at 1-855-\
4-SUPPORT (1-855-478-7767) or visit my.chevrolet.com/learn.
8-inch* diagonal screenF shown