2018 Alfa Romeo Stelvio cargo area
[x] Cancel search: cargo areaPage 28 of 276
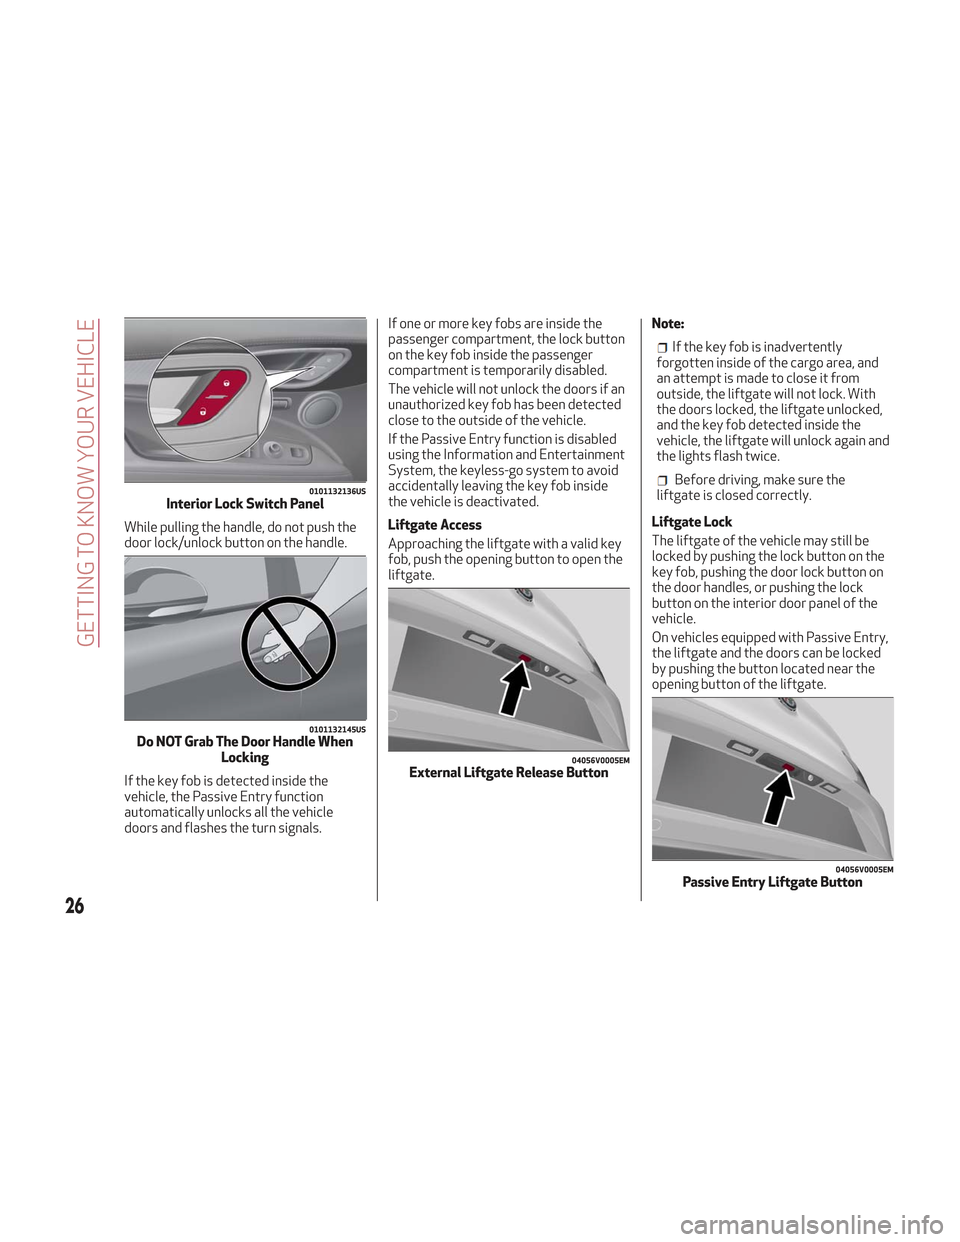
While pulling the handle, do not push the
door lock/unlock button on the handle.
If the key fob is detected inside the
vehicle, the Passive Entry function
automatically unlocks all the vehicle
doors and flashes the turn signals.If one or more key fobs are inside the
passenger compartment, the lock button
on the key fob inside the passenger
compartment is temporarily disabled.
The vehicle will not unlock the doors if an
unauthorized key fob has been detected
close to the outside of the vehicle.
If the Passive Entry function is disabled
using the Information and Entertainment
System, the keyless-go system to avoid
accidentally leaving the key fob inside
the vehicle is deactivated.
Liftgate Access
Approaching the liftgate with a valid key
fob, push the opening button to open the
liftgate.
Note:
If the key fob is inadvertently
forgotten inside of the cargo area, and
an attempt is made to close it from
outside, the liftgate will not lock. With
the doors locked, the liftgate unlocked,
and the key fob detected inside the
vehicle, the liftgate will unlock again and
the lights flash twice.
Before driving, make sure the
liftgate is closed correctly.
Liftgate Lock
The liftgate of the vehicle may still be
locked by pushing the lock button on the
key fob, pushing the door lock button on
the door handles, or pushing the lock
button on the interior door panel of the
vehicle.
On vehicles equipped with Passive Entry,
the liftgate and the doors can be locked
by pushing the button located near the
opening button of the liftgate.0101132136USInterior Lock Switch Panel
0101132145USDo NOT Grab The Door Handle When Locking
04056V0005EMExternal Liftgate Release Button
04056V0005EMPassive Entry Liftgate Button
26
GETTING TO KNOW YOUR VEHICLE
Page 30 of 276
Unlocking The Doors With A Discharged
Battery
Proceed as follows to unlock the doors if
the vehicle battery is discharged.
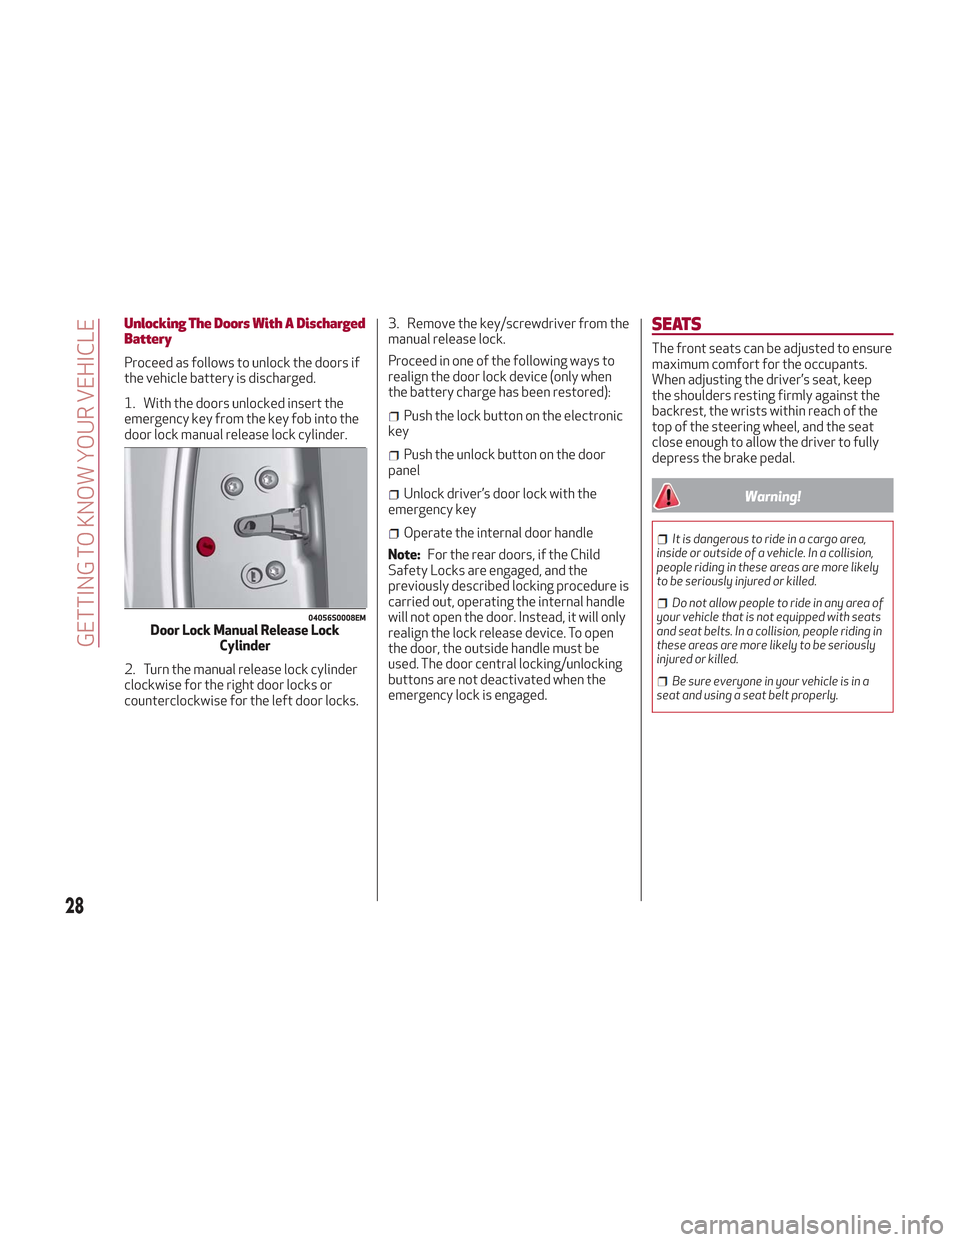
1. With the doors unlocked insert the
emergency key from the key fob into the
door lock manual release lock cylinder.
2. Turn the manual release lock cylinder
clockwise for the right door locks or
counterclockwise for the left door locks.3. Remove the key/screwdriver from the
manual release lock.
Proceed in one of the following ways to
realign the door lock device (only when
the battery charge has been restored):
Push the lock button on the electronic
key
Push the unlock button on the door
panel
Unlock driver’s door lock with the
emergency key
Operate the internal door handle
Note: For the rear doors, if the Child
Safety Locks are engaged, and the
previously described locking procedure is
carried out, operating the internal handle
will not open the door. Instead, it will only
realign the lock release device. To open
the door, the outside handle must be
used. The door central locking/unlocking
buttons are not deactivated when the
emergency lock is engaged.
SEATS
The front seats can be adjusted to ensure
maximum comfort for the occupants.
When adjusting the driver’s seat, keep
the shoulders resting firmly against the
backrest, the wrists within reach of the
top of the steering wheel, and the seat
close enough to allow the driver to fully
depress the brake pedal.
Warning!
It is dangerous to ride in a cargo area,
inside or outside of a vehicle. In a collision,
people riding in these areas are more likely
to be seriously injured or killed.
Do not allow people to ride in any area of
your vehicle that is not equipped with seats
and seat belts. In a collision, people riding in
these areas are more likely to be seriously
injured or killed.
Be sure everyone in your vehicle is in a
seat and using a seat belt properly.
04056S0008EMDoor Lock Manual Release Lock Cylinder
28
GETTING TO KNOW YOUR VEHICLE
Page 63 of 276
Cargo Area Features
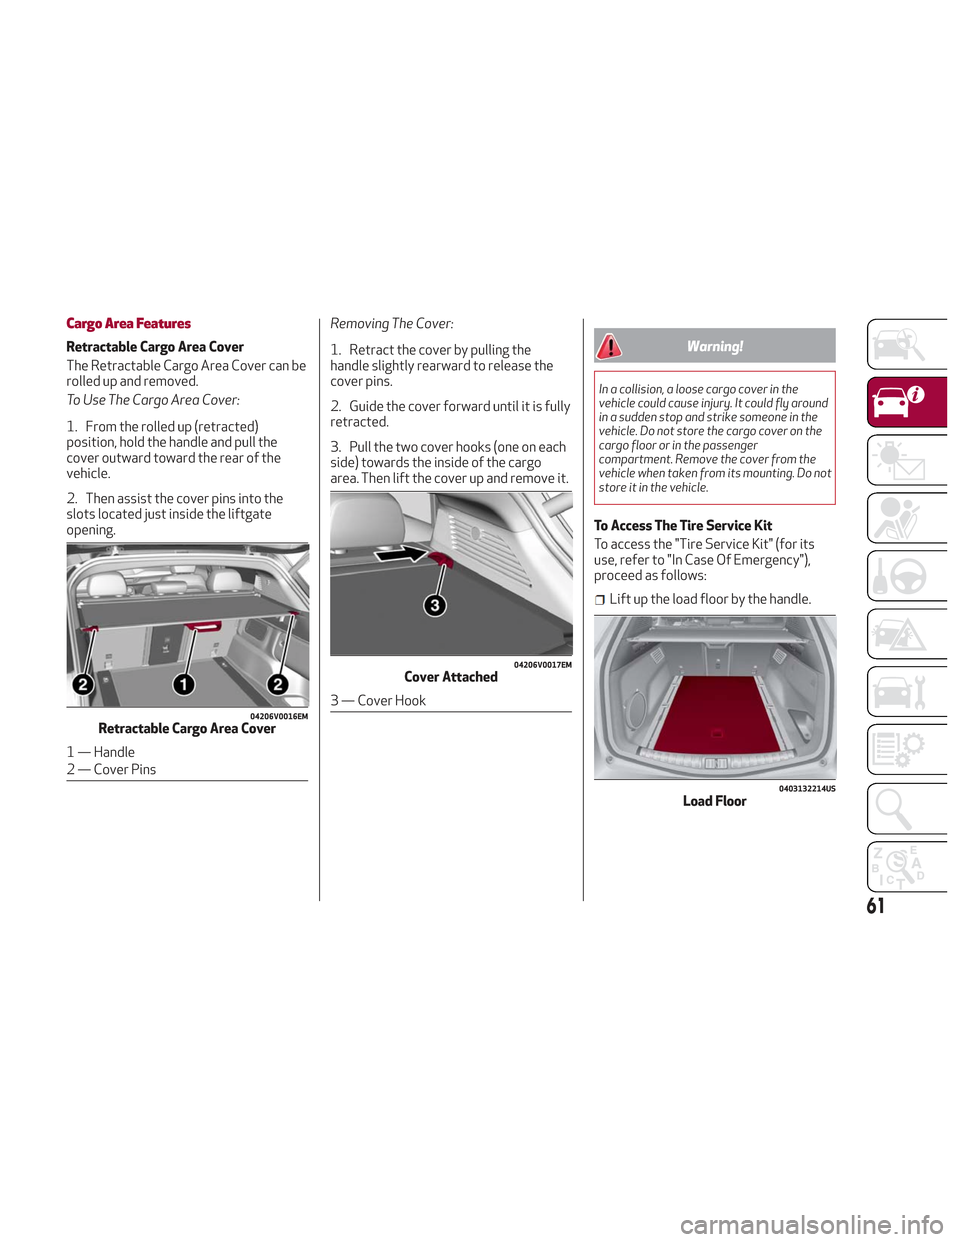
Retractable Cargo Area Cover
The Retractable Cargo Area Cover can be
rolled up and removed.
To Use The Cargo Area Cover:
1. From the rolled up (retracted)
position, hold the handle and pull the
cover outward toward the rear of the
vehicle.
2. Then assist the cover pins into the
slots located just inside the liftgate
opening.Removing The Cover:
1. Retract the cover by pulling the
handle slightly rearward to release the
cover pins.
2. Guide the cover forward until it is fully
retracted.
3. Pull the two cover hooks (one on each
side) towards the inside of the cargo
area. Then lift the cover up and remove it.Warning!
In a collision, a loose cargo cover in the
vehicle could cause injury. It could fly around
in a sudden stop and strike someone in the
vehicle. Do not store the cargo cover on the
cargo floor or in the passenger
compartment. Remove the cover from the
vehicle when taken from its mounting. Do not
store it in the vehicle.
To Access The Tire Service Kit
To access the "Tire Service Kit" (for its
use, refer to "In Case Of Emergency"),
proceed as follows:
Lift up the load floor by the handle.
04206V0016EMRetractable Cargo Area Cover
1 — Handle
2 — Cover Pins
04206V0017EMCover Attached
3 — Cover Hook
0403132214USLoad Floor
61
Page 64 of 276
Cargo Area Anchors
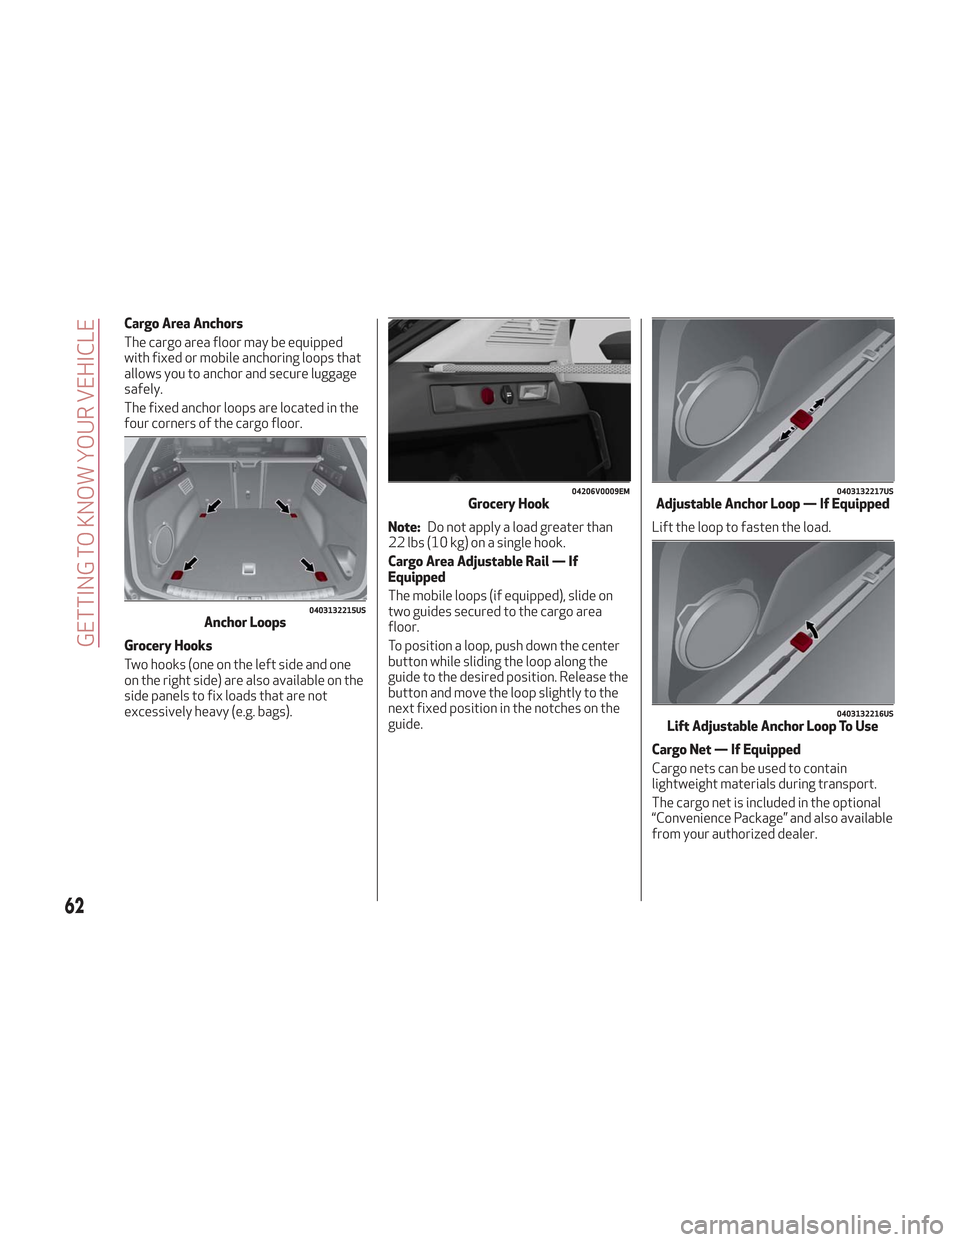
The cargo area floor may be equipped
with fixed or mobile anchoring loops that
allows you to anchor and secure luggage
safely.
The fixed anchor loops are located in the
four corners of the cargo floor.
Grocery Hooks
Two hooks (one on the left side and one
on the right side) are also available on the
side panels to fix loads that are not
excessively heavy (e.g. bags).Note:
Do not apply a load greater than
22 lbs (10 kg) on a single hook.
Cargo Area Adjustable Rail — If
Equipped
The mobile loops (if equipped), slide on
two guides secured to the cargo area
floor.
To position a loop, push down the center
button while sliding the loop along the
guide to the desired position. Release the
button and move the loop slightly to the
next fixed position in the notches on the
guide. Lift the loop to fasten the load.
Cargo Net — If Equipped
Cargo nets can be used to contain
lightweight materials during transport.
The cargo net is included in the optional
“Convenience Package” and also available
from your authorized dealer.
0403132215USAnchor Loops
04206V0009EMGrocery Hook0403132217USAdjustable Anchor Loop — If Equipped
0403132216USLift Adjustable Anchor Loop To Use
62
GETTING TO KNOW YOUR VEHICLE
Page 121 of 276
Warning!
Relying on the air bags alone could lead to
more severe injuries in a collision. The air
bags work with your seat belt to restrain
you properly. In some collisions, the air bags
won’t deploy at all. Always wear your seat
belt even though you have air bags.
In a collision, you and your passengers can
suffer much greater injuries if you are not
properly buckled up. You can strike the
interior of your vehicle or other passengers,
or you can be thrown out of the vehicle.
Always be sure you and others in your
vehicle are buckled up properly.
It is dangerous to ride in a cargo area,
inside or outside of a vehicle. In a collision,
people riding in these areas are more likely
to be seriously injured or killed.
Do not allow people to ride in any area of
your vehicle that is not equipped with seats
and seat belts.
Be sure everyone in your vehicle is in a
seat and using a seat belt properly.
Occupants, including the driver, should
always wear their seat belts whether or not
an air bag is also provided at their seating
position to minimize the risk of severe injury
or death in the event of a crash.
Wearing your seat belt incorrectly could
make your injuries in a collision much worse.
You might suffer internal injuries, or you
could even slide out of the seat belt. Follow
these instructions to wear your seat belt
safely and to keep your passengers safe,
too.
Two people should never be belted into a
single seat belt. People belted together can
crash into one another in a collision, hurting
one another badly. Never use a lap/shoulder
belt or a lap belt for more than one person,
no matter what their size.
Warning!
A lap belt worn too high can increase the
risk of injury in a collision. The seat belt
forces won’t be at the strong hip and pelvic
bones, but across your abdomen. Always
wear the lap part of your seat belt as low as
possible and keep it snug.
A twisted seat belt may not protect you
properly. In a collision, it could even cut into you.
Be sure the seat belt is flat against your body,
without twists. If you can’t straighten a seat
belt in your vehicle, take it to your authorized
dealer immediately and have it fixed.
A seat belt that is buckled into the wrong
buckle will not protect you properly. The lap
portion could ride too high on your body,
possibly causing internal injuries. Always buckle
your seat belt into the buckle nearest you.
A seat belt that is too loose will not protect
you properly. In a sudden stop, you could move
too far forward, increasing the possibility of
injury. Wear your seat belt snugly.
A seat belt that is worn under your arm is
dangerous. Your body could strike the inside
surfaces of the vehicle in a collision,
increasing head and neck injury. A seat belt
worn under the arm can cause internal injuries. Ribs aren’t as strong as shoulder
bones. Wear the seat belt over your
shoulder so that your strongest bones will
take the force in a collision.
A shoulder belt placed behind you will not
protect you from injury during a collision.
You are more likely to hit your head in a
collision if you do not wear your shoulder
belt. The lap and shoulder belt are meant to
be used together.
A frayed or torn seat belt could rip apart
in a collision and leave you with no
protection. Inspect the seat belt system
periodically, checking for cuts, frays, or
loose parts. Damaged parts must be
replaced immediately. Do not disassemble
or modify the seat belt system. Seat belt
assemblies must be replaced after a
collision.
Lap/Shoulder Belt Operating
Instructions
1. Enter the vehicle and close the door.
Sit back and adjust the seat.
2. The seat belt latch plate is above the
back of the front seat, and next to your
arm in the rear seat (for vehicles
equipped with a rear seat). Grasp the
latch plate and pull out the seat belt.
Slide the latch plate up the webbing as
far as necessary to allow the seat belt to
go around your lap.
3. When the seat belt is long enough to
fit, insert the latch plate into the buckle
until you hear a “click.”
119
Page 129 of 276

SABICs may help reduce the risk of head
and other injuries to front and rear seat
outboard occupants in certain side
impacts, in addition to the injury
reduction potential provided by the seat
belts and body structure.
The SABIC deploys downward, covering
the side windows. An inflating SABIC
pushes the outside edge of the headliner
out of the way and covers the window.
The SABICs inflate with enough force to
injure occupants if they are not belted
and seated properly, or if items are
positioned in the area where the SABICs
inflate. Children are at an even greater
risk of injury from a deploying air bag.
The SABICs may help reduce the risk of
partial or complete ejection of vehicle
occupants through side windows in
certain side impact events.
Warning!
Do not mount equipment, or stack
luggage or other cargo up high enough to
block the deployment of the SABICs. The
trim covering above the side windows where
the SABIC and its deployment path are
located should remain free from any
obstructions.
In order for the SABICs to work as
intended, do not install any accessory items
in your vehicle which could alter the roof. Do
not add an aftermarket sunroof to your
vehicle. Do not add roof racks that require
permanent attachments (bolts or screws) for installation on the vehicle roof. Do not
drill into the roof of the vehicle for any
reason.
Side Impacts
The Side Air Bags are designed to
activate in certain side impacts. The
Occupant Restraint Controller (ORC)
determines whether the deployment of
the Side Air Bags in a particular impact
event is appropriate, based on the
severity and type of collision. The side
impact sensors aid the ORC in
determining the appropriate response to
impact events. The system is calibrated
to deploy the Side Air Bags on the impact
side of the vehicle during impacts that
require Side Air Bag occupant protection.
In side impacts, the Side Air Bags deploy
independently; a left side impact deploys
the left Side Air Bags only and a
right-side impact deploys the right Side
Air Bags only. Vehicle damage by itself is
not a good indicator of whether or not
Side Air Bags should have deployed.
The Side Air Bags will not deploy in all
side collisions, including some collisions
at certain angles, or some side collisions
that do not impact the area of the
passenger compartment. The Side Air
Bags may deploy during angled or offset
frontal collisions where the front air bags
deploy.
Side Air Bags are a supplement to the
seat belt restraint system. Side Air Bags
deploy in less time than it takes to blink
your eyes.
Warning!
Occupants, including children, who are up
against or very close to Side Air Bags can be
seriously injured or killed. Occupants,
including children, should never lean on or
sleep against the door, side windows, or
area where the side air bags inflate, even if
they are in an infant or child restraint.
Seat belts (and child restraints where
appropriate) are necessary for your
protection in all collisions. They also help
keep you in position, away from an inflating
Side Air Bag. To get the best protection
from the Side Air Bags, occupants must
wear their seat belts properly and sit
upright with their backs against the seats.
Children must be properly restrained in a
child restraint or booster seat that is
appropriate for the size of the child.
Warning!
Side Air Bags need room to inflate. Do not
lean against the door or window. Sit upright
in the center of the seat.
Being too close to the Side Air Bags
during deployment could cause you to be
severely injured or killed.
127
Page 143 of 276
Warning!
An incorrectly anchored tether strap
could lead to increased head motion and
possible injury to the child. Use only the
anchorage position directly behind the child
seat to secure a child restraint top tether
strap.
If your vehicle is equipped with a split rear
seat, make sure the tether strap does not
slip into the opening between the seatbacks
as you remove slack in the strap.
Center Tether Special Instructions
Center Tether Attachment:
1. Lower the center head restraint to the
full down position.
2. Route the tether strap over the
seatback and head restraint.
3. Attach the tether strap hook of the
child restraint to the center tether
anchorage located on the back of the
seat.
4. Remove slack in the tether strap
according to the child restraint
manufacturer’s instructions.
Transporting Pets
Air Bags deploying in the front seat could
harm your pet. An unrestrained pet will be
thrown about and possibly injured, or
injure a passenger during panic braking or
in a collision.
Pets should be restrained in the rear seat
in pet harnesses or pet carriers that are
secured by seat belts.
SAFETY TIPS
Transporting Passengers
NEVER TRANSPORT PASSENGERS IN
THE CARGO AREA.
Warning!
Do not leave children or animals inside
parked vehicles in hot weather. Interior heat
build-up may cause serious injury or death.
It is extremely dangerous to ride in a
cargo area, inside or outside of a vehicle. In
a collision, people riding in these areas are
more likely to be seriously injured or killed.
Do not allow people to ride in any area of
your vehicle that is not equipped with seats
and seat belts.
Be sure everyone in your vehicle is in a
seat and using a seat belt properly.
Exhaust Gas
Warning!
Exhaust gases can injure or kill. They contain
carbon monoxide (CO), which is colorless and
odorless. Breathing it can make you
unconscious and can eventually poison you. To
avoid breathing (CO), follow these safety tips:
Do not run the engine in a closed garage
or in confined areas any longer than needed
to move your vehicle in or out of the area.
141
Page 184 of 276
Warning!
Never have any smoking materials lit in or
near the vehicle when the fuel door is open
or the tank is being filled.
Never add fuel when the engine is running.
This is in violation of most state and federal
fire regulations and may cause the MIL to
turn on.
A fire may result if gasoline is pumped
into a portable container that is inside of a
vehicle. You could be burned. Always place
gas containers on the ground while filling.
Note: If the filler compartment is
washed with a pressure washer, keep it at
a distance of at least 8 inches (20 cm).
VEHICLE LOADING
Certification Label
As required by National Highway Traffic
Safety Administration regulations, your
vehicle has a certification label affixed to
the driver's side door or pillar.
This label contains the month and year of
manufacture, Gross Vehicle Weight
Rating (GVWR), Gross Axle Weight Rating
(GAWR) front and rear, and Vehicle
Identification Number (VIN). A
Month-Day-Hour (MDH) number is
included on this label and indicates the
Month, Day and Hour of manufacture. The
bar code that appears on the bottom of
the label is your VIN.
Gross Vehicle Weight Rating
(GVWR)
The GVWR is the total permissible
weight of your vehicle including driver,
passengers, vehicle, options and cargo.
The label also specifies maximum
capacities of front and rear axle systems
(GAWR). Total load must be limited so
GVWR and front and rear GAWR are not
exceeded.
Payload
The payload of a vehicle is defined as the
allowable load weight a truck can carry,
including the weight of the driver, all
passengers, options and cargo.
Gross Axle Weight Rating (GAWR)
The GAWR is the maximum permissible
load on the front and rear axles. The load
must be distributed in the cargo area so
that the GAWR of each axle is not
exceeded.
Each axle GAWR is determined by the
components in the system with the
lowest load carrying capacity (axle,
springs, tires or wheels). Heavier axles or
suspension components sometimes
specified by purchasers for increased
durability does not necessarily increase
the vehicle's GVWR.
Tire Size
The tire size on the Vehicle Certification
Label represents the actual tire size on
your vehicle. Replacement tires must be
equal to the load capacity of this tire size.
Rim Size
This is the rim size that is appropriate for
the tire size listed.
Inflation Pressure
This is the cold tire inflation pressure for
your vehicle for all loading conditions up
to full GAWR.
182
STARTING AND OPERATING