2018 Alfa Romeo Stelvio air condition
[x] Cancel search: air conditionPage 50 of 276

Automatic Dual-Zone Climate Control System
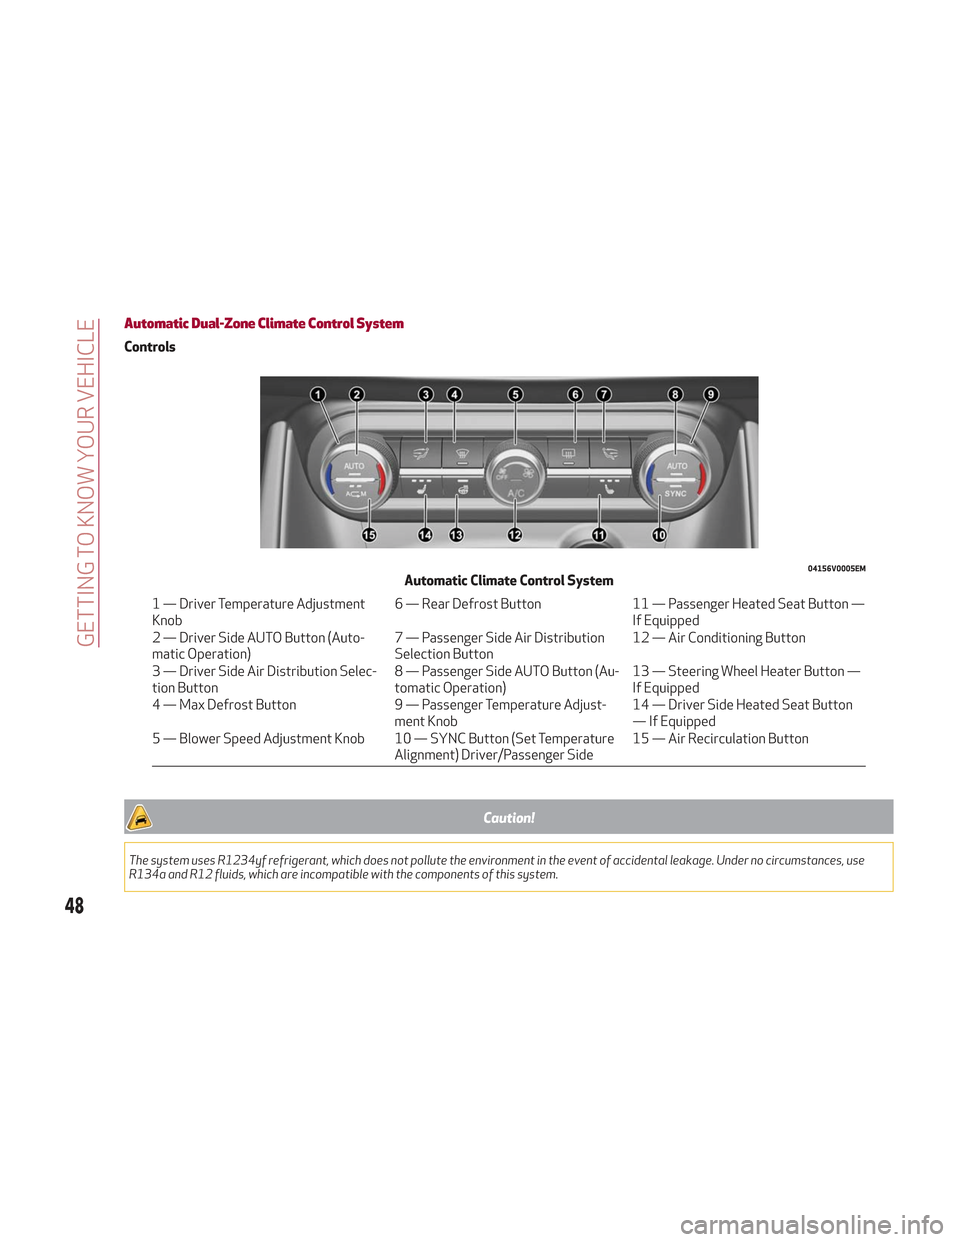
Controls
Caution!
The system uses R1234yf refrigerant, which does not pollute the environment in the event of accidental leakage. Under no circumstances, use
R134a and R12 fluids, which are incompatible with the components of this system.
04156V0005EMAutomatic Climate Control System
1 — Driver Temperature Adjustment
Knob6 — Rear Defrost Button
11 — Passenger Heated Seat Button —
If Equipped
2 — Driver Side AUTO Button (Auto-
matic Operation) 7 — Passenger Side Air Distribution
Selection Button12 — Air Conditioning Button
3 — Driver Side Air Distribution Selec-
tion Button 8 — Passenger Side AUTO Button (Au-
tomatic Operation)13 — Steering Wheel Heater Button —
If Equipped
4 — Max Defrost Button 9 — Passenger Temperature Adjust-
ment Knob 14 — Driver Side Heated Seat Button
— If Equipped
5 — Blower Speed Adjustment Knob 10 — SYNC Button (Set Temperature Alignment) Driver/Passenger Side15 — Air Recirculation Button
48
GETTING TO KNOW YOUR VEHICLE
Page 51 of 276

Description
The Automatic Dual Zone Climate
Control System adjusts the temperature
and air distribution independently
between the driver and passenger.
The system maintains the set
temperature inside the passenger
compartment and compensates for
outside temperature change.
Note:The reference temperature is 72
°F (22 °C) for optimal comfort
management.
The automatic setting will adjust the
following to maintain comfort within the
passenger compartment:
Air temperature from the driver/front
passenger side vents
Air distribution from the driver/front
passenger side vents
Fan speed (continuous variation of the
air flow)
Compressor variations (for
cooling/dehumidifying the air)
Air recirculation
The Climate Control System can also be
operated manually by using the buttons
and knobs on the faceplate. Manual selections will override the
automatic settings, which are stored until
the AUTO button is pushed. If the system
intervenes for safety reasons, the
automatic setting will take control of the
system.
The below operations will not deactivate
the automatic (AUTO) function:
Air Recirculation activation/
deactivation
A/C activation/deactivation
SYNC function activation
Rear Window Defrost activation/
deactivation
When in AUTO mode, the vehicle’s
internal temperature is controlled
according to the set temperature.
The following can be manually set or
adjusted:
Driver/passenger air temperature
Blower speed (continuous variation)
Air distribution (seven positions for
driver and passenger)
A/C activation
Front Defroster
Air recirculation
Rear Defroster
System deactivation
Operating Mode
The Climate Control system can be
activated in different ways. It is
recommended to use the automatic
function. Push the AUTO button and set
the desired temperatures.
The automatic system adjusts the
temperature, quantity, and distribution
of air introduced into the passenger
compartment. It also controls air
recirculation and the activation of the air
conditioner.
At any time during automatic operation,
you can change the temperature, activate
or deactivate the Rear Defroster,
activate SYNC, activate or deactivate
the air conditioner, and activate or
deactivate air recirculation. The system
will automatically adjust to the new
settings.
49
Page 53 of 276

Air flow distribution between the
windshield demisting/defrosting
vents, and side/central dashboard
vents. This distribution setting
sends air to the windshield in sunny
conditions.
Air flow distribution to all vents on
the vehicle.
In AUTO mode, the Climate Controls
automatically manage the air
distribution. When set manually, the
respective symbols on the Information
and Entertainment System indicate the
air distribution setting.
Fan Speed Adjustment
Turn the Blower Speed Knob to increase
or decrease the blower speed. The speed
is displayed with lighted indicators in the
Information and Entertainment System
display.
Maximum fan speed = all indicators
illuminated on the Information and
Entertainment System display
Minimum fan speed = one indicator
illuminated on the Information and
Entertainment System display
The fan can be turned off by rotating the
Blower Speed Knob clockwise to position
O (all segments on the Information and
Entertainment System display are turned
off).
Note: To restore automatic control of
the fan speed, push the AUTO button.
AUTO Button
When the AUTO button is pushed
(indicator illuminated), the Climate
Control system automatically adjusts the
following settings:
Quantity and distribution of air flow in
the passenger compartment
The air conditioner
Air recirculation
Cancels any manual settings
Selecting the AUTO function illuminates
the indicator on the A/C button.
If air distribution or the fan speed is
manual adjusted, the AUTO button
indicator will turn off to indicate that the
Climate Control system is no longer in
AUTO mode.
After a manual adjustment, push the AUTO
button to resume the automatic system.
SYNC Button
Push the SYNC button (indicator
illuminated) to sync the passenger side
air temperature with the driver side air
temperature.
This function makes temperature
regulation easier when the driver is
traveling alone.
Turn the passenger Temperature
Adjustment Knob or push the passenger
side Air Distribution Selection Button to
change the passenger side air
temperature and return to separate air
temperature management.
Air Recirculation And Air Quality
System (AQS)
Air Recirculation is managed according to
the following operating mode:
Automatic engagement: indicator is
illuminated above the “A” on the Air
Recirculation Button
Forced activation (air circulation
always activated): indicator illuminated
above the
icon on the Air
Recirculation Button
Forced deactivation (air recirculation
always off with intake of outside air):
both indicators not illuminated on the Air
Recirculation Button
The three operating conditions are
obtained by pushing the Air Recirculation
Button
in sequence.
Enabling The Air Quality System (AQS)
Function — If Equipped
When the automatic recirculation
function is selected, the AQS function
automatically activates internal air
recirculation when the outside air is
polluted (e.g. in heavy traffic and tunnels).
At low external temperatures or in high
humidity, the automatic function turns
off to avoid fogging up the windows. The
user can select the function again by
pushing the Air Recirculation Button.
51
Page 54 of 276

In automatic operation, air recirculation
will be controlled by the system
according to outside environmental
conditions.
Note:
With the AQS function active and
after the internal air recirculation
system has been functioning for a set
amount of time, the Climate Control
System enables air intake to cycle the
air in the passenger compartment for a
set time. The AQS function is disabled
during the air changes.
The engagement of the recirculation
system makes it possible to reach the
required heating or cooling conditions
faster. It is, however, inadvisable to use
it on rainy/cold days as it can increase
the possibility of the windows fogging.
When the outside temperature is low,
recirculation is forced off to prevent the
windows from fogging up.
A/C Compressor
Push the A/C button or theicon to
activate or deactivate the A/C
compressor (indicator illuminated when
activated). The A/C compressor will
remain off even after the engine has
stopped. When the A/C compressor is turned off,
the system deactivates air recirculation
to prevent the windows from fogging up.
If the climate control system can
maintain the temperature, with the A/C
turned off, the AUTO feature will remain
on and the AUTO button indicator light
will not switch off.
To restore automatic control of the A/C
compressor, push the A/C button or the
icon or the AUTO button. With the A/C
compressor off, the air speed can be set
manually using the Air Speed Adjustment
Knob.
When the A/C compressor is on, and the
engine is running, air speed cannot be
lower than the minimum speed (only one
indicator light is lit).
Note: When the A/C is off, the Climate
Control system can not produce air that
is colder than the current outside
temperature. Under certain
environmental conditions, windows could
fog up rapidly since the air is not
dehumidified.
Front Defroster And MAX-DEF
Function
Push the Front Defroster button(indicator illuminated) to defrost the
windshield and side windows.
While in MAX-DEF function, the air
conditioner will:
Activate the air conditioner
compressor when the weather allows
Turn air recirculation off
Set the maximum air temperature (HI)
on both the driver and passenger side
Activate a blower speed based on the
temperature of the engine coolant
Adjust the air flow towards the
windshield and front side windows
Activate the Rear Window Defroster
Display the fan speed (indicators
illuminated) and current air distribution
setting
Note: The MAX-DEF function remains
active for approximately three minutes
once the engine coolant reaches the
proper temperature.
When the function is on, AUTO mode will
deactivate. The only manual operations
possible are adjusting blower speed and
turning off the Rear Window Defroster.
Pushing the
button switches off the
MAX-DEF function.
Rear Defroster
Push the Rear Defrosterbutton to
activate (indicators illuminated) the Rear
Defroster.
The Rear Defroster will turn off after
20 minutes or once the engine is turned
off. To reactive the Rear Defroster, push
the Rear Defroster
button.
Note: To avoid damage, do not apply
stickers over the interior heating
filaments of the Rear Defroster.
52
GETTING TO KNOW YOUR VEHICLE
Page 55 of 276

Humidity Sensor
The Humidity Sensor helps to prevent the
windows from fogging up. The AUTO
function (indicator illuminated) must be
on for the Humidity Sensor to function.
When outside temperature is low, the
system may turn the compressor on and
turn air recirculation off for safer driving.
Switching Off/On The Climate Control
System
Switching Off The Climate Control
System
Rotate the Air Speed Adjustment Knob
completely counterclockwise to turn off
the Climate Control System.
With the air conditioner off:
Air recirculation is on
The A/C compressor is off
The fan is off
The heated rear window can be
activated/deactivated
Note: The climate control system stores
the previously set temperatures and
resumes operation when any button on
the system is pushed.
Switching On The Climate Control
System
To switch the climate control system on
in automatic mode, push the AUTO
button.
Stop/Start
The Stop/Start system shuts off the
engine when vehicle speed is 0 mph
(0 km/h), and the climate control system
will continue to maintain comfort within
the vehicle.
Stop/Start will deactivate in the
following scenarios:
The climate control system is in AUTO
mode (indicator illuminated), and the
vehicle has yet to reach the set
temperature
The climate control system is in LO
maximum cooling
The climate control system is in HI
maximum heating
The climate control system is in the
MAX-DEF status
When the Stop/Start system is active,
the engine will restart if the inside
temperature changes significantly, or if
the LO setting, or MAX-DEF setting, is
activated.
With Stop/Start system on, air flow is
reduced to keep the compartment
comfort conditions for longer.
Until the temperature drastically
changes within the cabin, the climate
control system will continue to maintain
the temperature while the engine is off.
By deactivating the Stop/Start system
with the
button located on the dashboard, the climate control system
will take priority over the engine shutting
off.
Note:
In harsh climate conditions, limit the
use of the Stop/Start system to prevent
the compressor from continuously
switching on and off. This will cause
rapid misting of the windows and the
accumulation of humidity in the
passenger compartment.
When the Stop/Start system is on,
the climate control system will always
take air in from outside, reducing the
probability of the windows fogging up.
System Maintenance
In winter, the Climate Control System
must be turned on at least once a month
for approximately ten minutes.
Have the system inspected at an
authorized dealer before the summer.
53
Page 68 of 276

2. When the HomeLink indicator begins
to flash slowly, move the portable remote
control 1 to 3 inches from the system
(keeping the programmable button
pressed down).
If the indicator does not begin to flash
quickly, change the distance between the
HomeLink and the portable remote
control and try the procedure again.
The HomeLink indicator flashes, first
slowly and then quickly. When the
indicator starts to flash quickly, release
both buttons on the remote control.
The system previously programmed to
HomeLink has now been deleted and the
new system is ready to use. This does not
affect the other two HomeLink buttons in
any way.
Deleting Programmed Keys
It is recommended to delete HomeLink
programming before selling the vehicle.
All three keys are deleted
simultaneously.
Proceed as follows:
1. Push and hold the outer buttons
(1 and 3). After about ten seconds, the
indicator will start to flash.
2. Release both keys. Technical Information For After Sales
Service
If you are unable to set up HomeLink
successfully after following the above
instructions, contact After Sales Service
(HomeLink free hotline number
1-800-355-3515 ) with the following
information:
Vehicle make and model, including
manufacturing year and country of
purchase;
Make, model, age and frequency of use
of the original portable remote control (if
known).
General Information
The following regulatory statement
applies to all Radio Frequency (RF)
devices equipped in this vehicle:
This device complies with Part 15 of the
FCC Rules and with Industry Canada
license-exempt RSS standard(s).
Operation is subject to the following two
conditions:
1. This device may not cause harmful
interference, and
2. This device must accept any
interference received, including
interference that may cause undesired
operation.
Note: Changes or modifications not
expressly approved by the party
responsible for compliance could void the
user’s authority to operate the
equipment.
Power Outlets
The Instrument Panel Power Outlet is
located under the air conditioning control
panel. It will only operate when the
ignition is ON.
Note: Do not connect devices, with a
power rating higher than 180 W, to the
outlet. Do not use power adaptors that
do not fit the outlet as this may damage
it.
0313132162USInstrument Panel Power Outlet
66
GETTING TO KNOW YOUR VEHICLE
Page 73 of 276

Warning!
A hot engine cooling system is dangerous.
You or others could be badly burned by
steam or boiling coolant. You may want to
call an authorized dealer for service if your
vehicle overheats. If you decide to look under
the hood yourself, see “Maintaining Your
Vehicle”. Follow the warnings under the
Cooling System Pressure Cap paragraph.
Caution!
Driving with a hot engine cooling system
could damage your vehicle. If the
temperature gauge reads “H” pull over and
stop the vehicle. Idle the vehicle with the air
conditioner turned off until the pointer drops
back into the normal range. If the pointer
remains on the “H”, turn the engine off
immediately and call an authorized dealer
for service.
3. Instrument Cluster Display
The instrument cluster display
features a driver-interactive display.
Refer to “Instrument Cluster Display” in
“Getting To Know Your Instrument Panel”
for further information.
4. Fuel Gauge
The digital bar gauge shows the
amount of fuel in the tank.
Thewarning light turns on, a
message is displayed and there is an
acoustic signal when about 2.4 gallons
(9 liters) of fuel are left in the tank.
The fuel pump symbol points to the
side of the vehicle where the fuel door is
located.
Note: If the low fuel warning light
switches on, refuel at the earliest
opportunity.
5. Speedometer
Indicates vehicle speed.
Note: The hard telltales will illuminate
for a bulb check when the ignition is first
cycled.
INSTRUMENT CLUSTER
DISPLAY
Instrument Cluster Display Description
This vehicle is equipped with a
driver-interactive display that is located
in the instrument cluster.
When one or more of the doors have been
opened or closed and the ignition is in the
OFF position, the instrument cluster will
display the vehicle mileage for a few
seconds.
71
Page 82 of 276

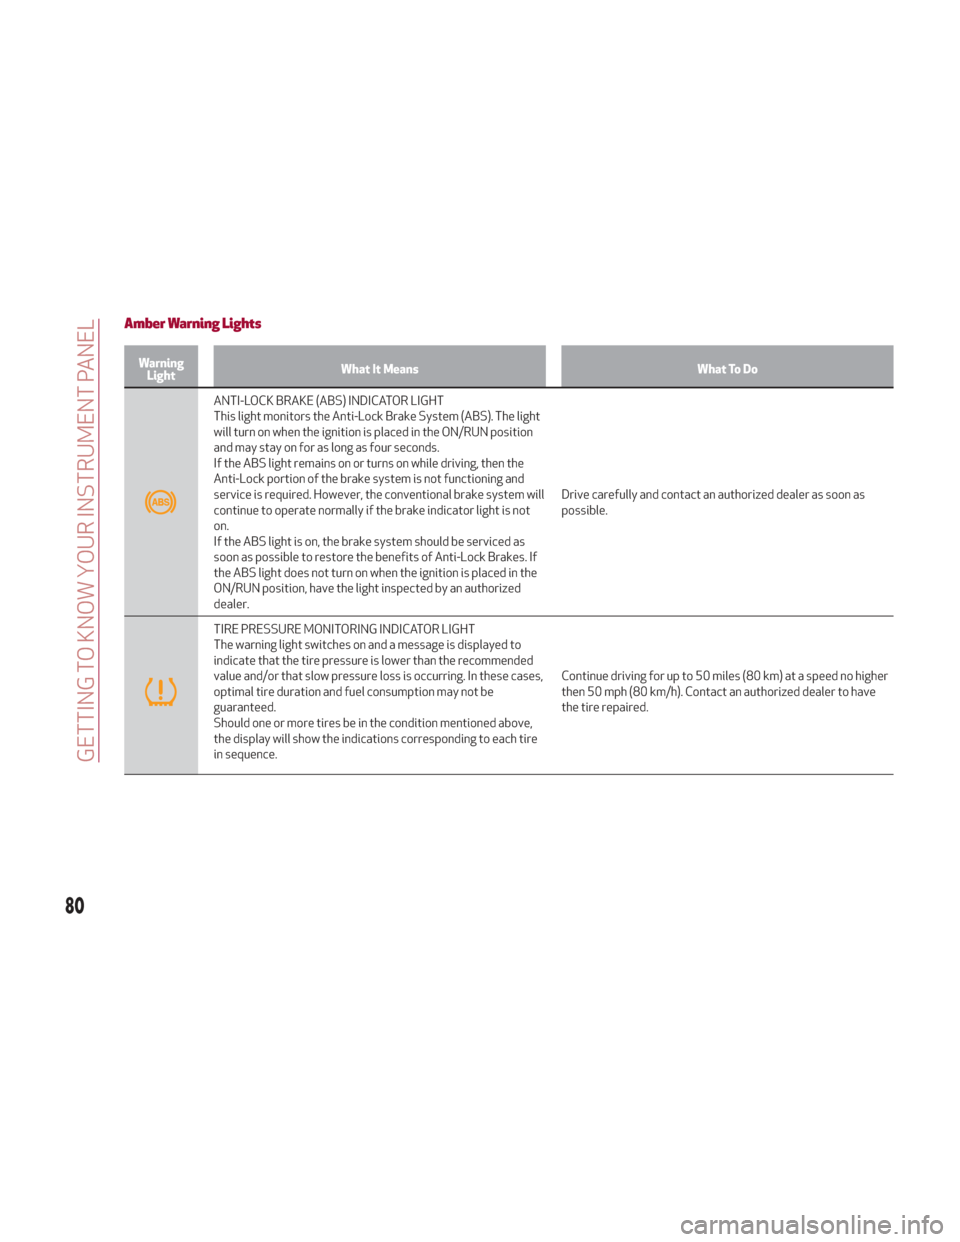
Amber Warning Lights
WarningLight What It Means What To Do
ANTI-LOCK BRAKE (ABS) INDICATOR LIGHT
This light monitors the Anti-Lock Brake System (ABS). The light
will turn on when the ignition is placed in the ON/RUN position
and may stay on for as long as four seconds.
If the ABS light remains on or turns on while driving, then the
Anti-Lock portion of the brake system is not functioning and
service is required. However, the conventional brake system will
continue to operate normally if the brake indicator light is not
on.
If the ABS light is on, the brake system should be serviced as
soon as possible to restore the benefits of Anti-Lock Brakes. If
the ABS light does not turn on when the ignition is placed in the
ON/RUN position, have the light inspected by an authorized
dealer. Drive carefully and contact an authorized dealer as soon as
possible.
TIRE PRESSURE MONITORING INDICATOR LIGHT
The warning light switches on and a message is displayed to
indicate that the tire pressure is lower than the recommended
value and/or that slow pressure loss is occurring. In these cases,
optimal tire duration and fuel consumption may not be
guaranteed.
Should one or more tires be in the condition mentioned above,
the display will show the indications corresponding to each tire
in sequence.
Continue driving for up to 50 miles (80 km) at a speed no higher
then 50 mph (80 km/h). Contact an authorized dealer to have
the tire repaired.
80
GETTING TO KNOW YOUR INSTRUMENT PANEL