2018 Alfa Romeo Stelvio height adjustment
[x] Cancel search: height adjustmentPage 31 of 276

Sparco Racing Seats — If Equipped
Forward/Rearward Adjustment
The adjustment lever is at the front of the
seat, near the floor. Pull the lever upward
to move the seat forward or rearward.
Release the lever once the seat is in the
desired position. Using body pressure,
move forward and rearward on the seat
to be sure that the seat adjusters have
latched.
Height Adjustment
Pull upward on the height adjustment
lever to raise the seat height, or push
downward on the lever to lower the seat
height.Seatback Recline
To adjust the seatback, lift the recline
lever located on the outboard side of the
seat, lean back to the desired position
and release the lever. To return the
seatback, lift the lever, lean forward and
release the lever.
Power Front Seats
The power seat switch is located on the
outboard side of the seat near the floor.
Use this switch to move the driver's seat
up, down, forward, and rearward, or to
recline the seatback.
Caution!
Do not place any article under a power seat
or impede its ability to move as it may cause
damage to the seat controls. Seat travel
may become limited if movement is stopped
by an obstruction in the seat's path.
Forward/Rearward Adjustment
Push the seat switch forward or rearward
to adjust to your desired position.
Seatback Recline
The angle of the seatback can be
adjusted forward or rearward. Push the
seatback switch forward or rearward,
and the seat will move in the direction of
the switch. Release the switch when the
desired position is reached.
Power Lumbar — If Equipped
Vehicles equipped with power driver or
passenger seats may also be equipped
with power lumbar. The power lumbar
switch is located on the outboard side of
the power seat. Push the switch forward
or rearward to increase or decrease the
lumbar support. Push the switch upward
or downward to raise or lower the lumbar
support.
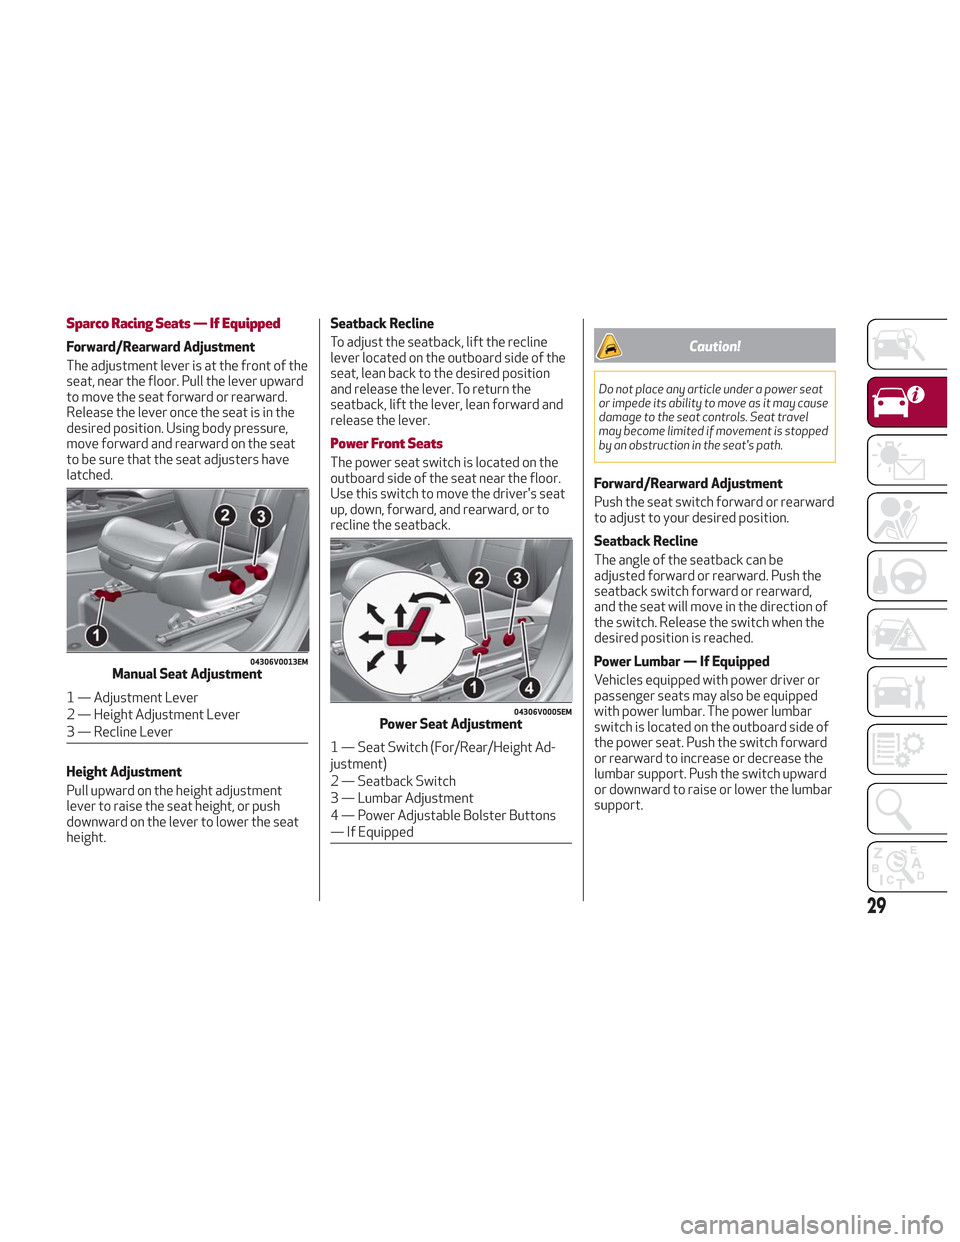
04306V0013EMManual Seat Adjustment
1 — Adjustment Lever
2 — Height Adjustment Lever
3 — Recline Lever04306V0005EMPower Seat Adjustment
1 — Seat Switch (For/Rear/Height Ad-
justment)
2 — Seatback Switch
3 — Lumbar Adjustment
4 — Power Adjustable Bolster Buttons
— If Equipped
29
Page 32 of 276

Height Adjustment
The height of the seats can be adjusted
up or down. Pull upward or push
downward on the seat switch, and the
seat will move in the direction of the
switch. Release the switch when the
desired position is reached.
Seat Angle Adjustment (Tilting) — If
Equipped
The seat angle can be adjusted in four
directions. Lift or push the front part of
seat switch to move the front part of the
seat in the corresponding direction.
Release the seat switch when the seat
has reached the desired position.
Power Bolster Adjustment — If
Equipped
Push the power bolster adjustment
buttons to regulate the width of the
backrest through the lateral padding.
Seat Cushion Extension — If Equipped
Lift the adjustment lever and push the
front of the cushion forward or rearward
to extend the cushion by a few inches
(centimeters).Driver Memory Seat
The driver memory seat buttons can
store and recall three different driver’s
seat positions, as well as outside power
mirror positions. Storing and recalling
can be done with the ignition in the ON
mode, vehicle speed at 0 mph (0 km/h),
and the driver’s side door closed, or for
3 minutes after having opened the
driver's side door. An audible chime is
heard to confirm a memory profile is set
or recalled. To set a memory profile, first
adjust your seat (and power mirror
position if desired) until you are in the
desired position. Then, push the memory
button you want to assign the set
position to for 1.5 seconds. When a new
seat position is memorized, the
previously memorized position on the
same button is automatically
overwritten. Recalling a memorizedposition can also be done for
approximately 3 minutes after the doors
are opened and for approximately
1 minute after the engine is stopped. To
recall a memorized position, push the
assigned button briefly.
04306V0011EMSeat Cushion Extension
6 — Adjustment Lever
0403132208USDriver Memory Seat Buttons Location
30
GETTING TO KNOW YOUR VEHICLE
Page 36 of 276

HEAD RESTRAINTS
Head restraints are designed to reduce
the risk of injury by restricting head
movement in the event of a rear impact.
Head restraints should be adjusted so
that the top of the head restraint is
located above the top of your ear.
Warning!
A loose head restraint thrown forward in
a collision or hard stop could cause serious
injury or death to occupants of the vehicle.
Always securely stow removed head
restraints in a location outside the occupant
compartment.
ALL the head restraints MUST be
reinstalled in the vehicle to properly protect
the occupants. Follow the re-installation
instructions above prior to operating the
vehicle or occupying a seat.
Do not place items over the top of the
Reactive Head Restraint, such as coats,
seat covers or portable DVD players. These
items may interfere with the operation of
the Reactive Head Restraint in the event of
a collision and could result in serious injury
or death.
Front Head Restraints (Adjustments)
Note: If the vehicle is equipped with
Sparco Racing Seats, the head restraints
are not adjustable or removable.
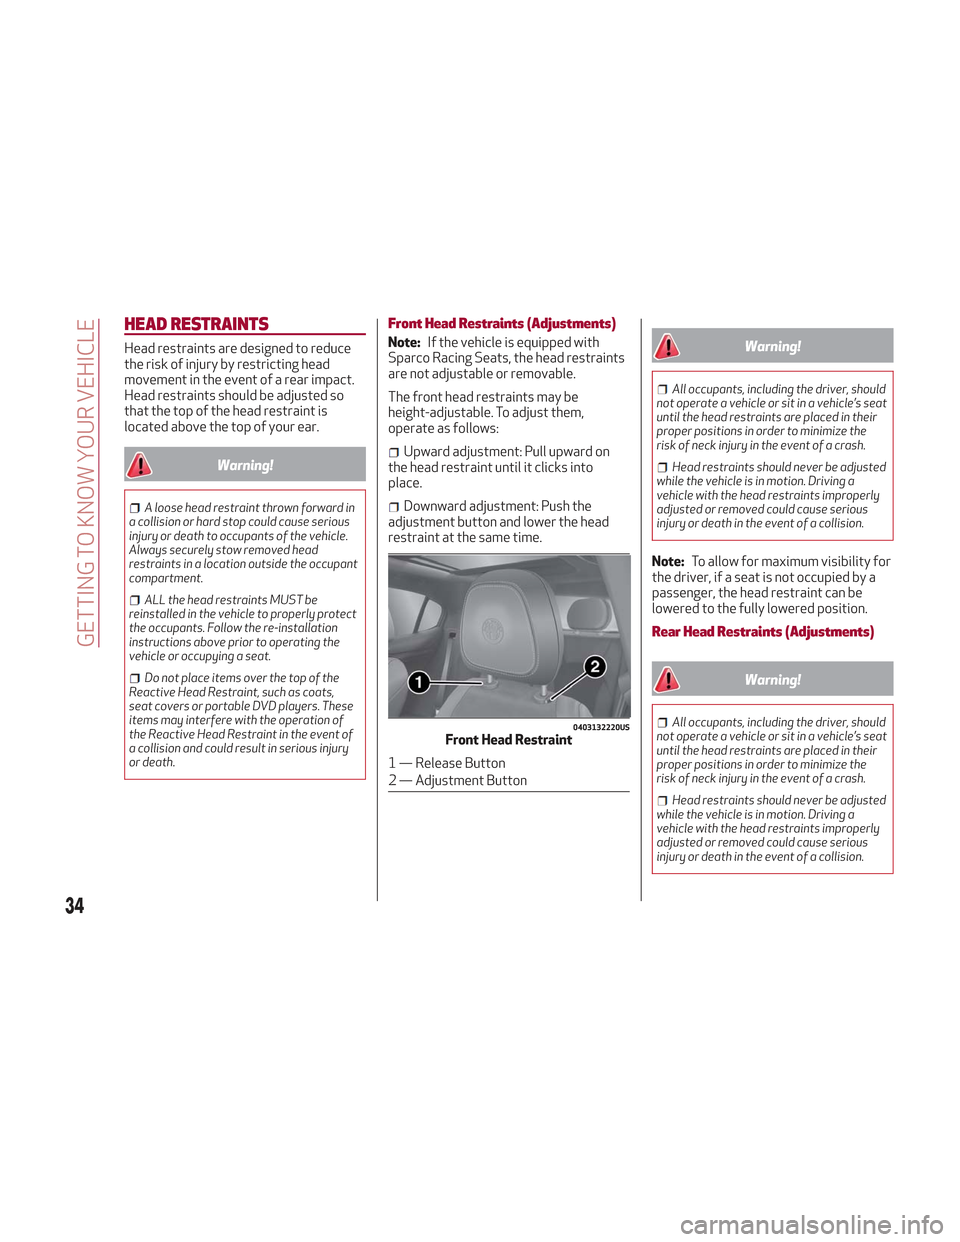
The front head restraints may be
height-adjustable. To adjust them,
operate as follows:
Upward adjustment: Pull upward on
the head restraint until it clicks into
place.
Downward adjustment: Push the
adjustment button and lower the head
restraint at the same time.
Warning!
All occupants, including the driver, should
not operate a vehicle or sit in a vehicle’s seat
until the head restraints are placed in their
proper positions in order to minimize the
risk of neck injury in the event of a crash.
Head restraints should never be adjusted
while the vehicle is in motion. Driving a
vehicle with the head restraints improperly
adjusted or removed could cause serious
injury or death in the event of a collision.
Note: To allow for maximum visibility for
the driver, if a seat is not occupied by a
passenger, the head restraint can be
lowered to the fully lowered position.
Rear Head Restraints (Adjustments)
Warning!
All occupants, including the driver, should
not operate a vehicle or sit in a vehicle’s seat
until the head restraints are placed in their
proper positions in order to minimize the
risk of neck injury in the event of a crash.
Head restraints should never be adjusted
while the vehicle is in motion. Driving a
vehicle with the head restraints improperly
adjusted or removed could cause serious
injury or death in the event of a collision.
0403132220USFront Head Restraint
1 — Release Button
2 — Adjustment Button
34
GETTING TO KNOW YOUR VEHICLE
Page 37 of 276

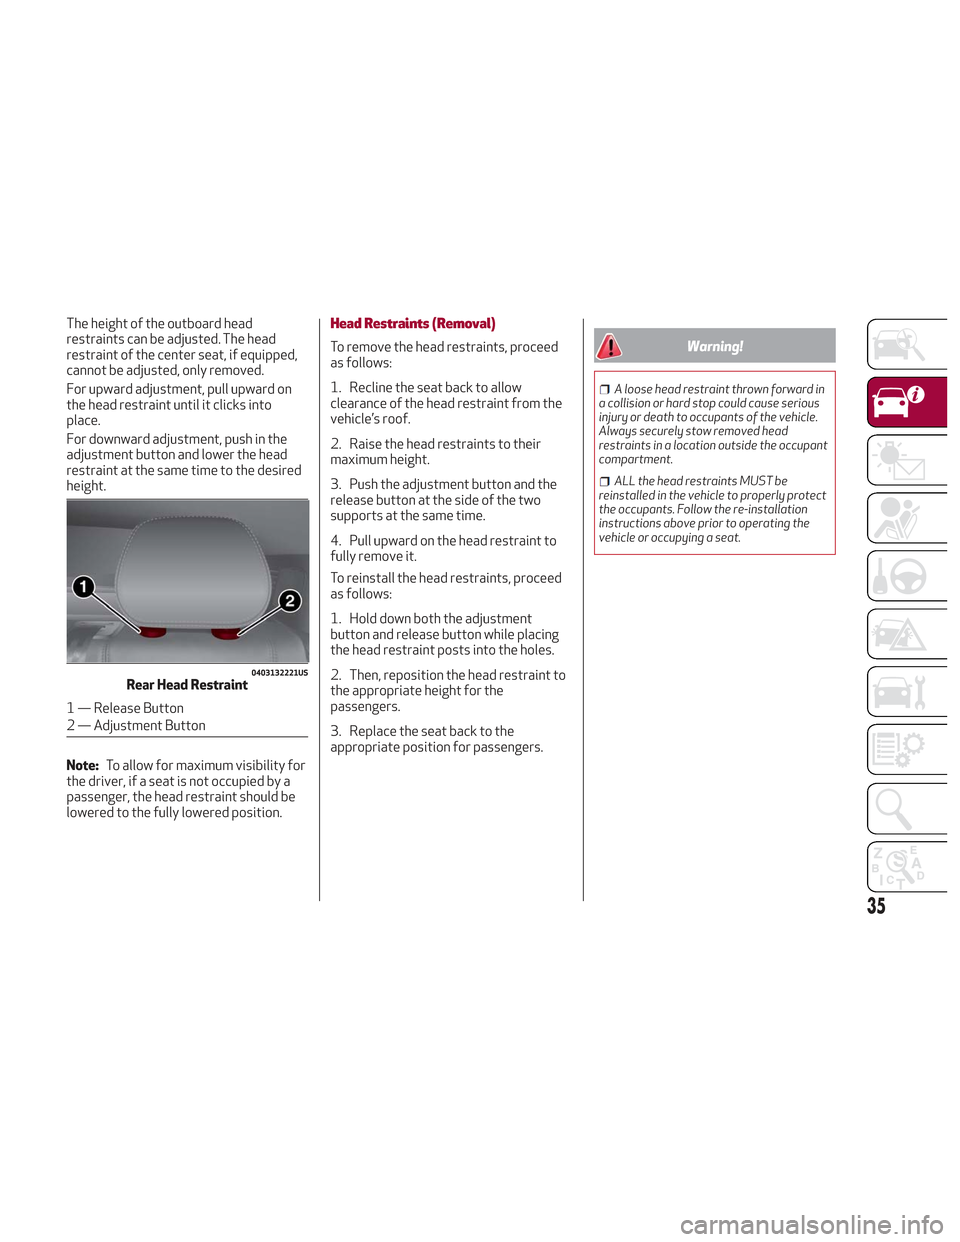
The height of the outboard head
restraints can be adjusted. The head
restraint of the center seat, if equipped,
cannot be adjusted, only removed.
For upward adjustment, pull upward on
the head restraint until it clicks into
place.
For downward adjustment, push in the
adjustment button and lower the head
restraint at the same time to the desired
height.
Note:To allow for maximum visibility for
the driver, if a seat is not occupied by a
passenger, the head restraint should be
lowered to the fully lowered position.Head Restraints (Removal)
To remove the head restraints, proceed
as follows:
1. Recline the seat back to allow
clearance of the head restraint from the
vehicle’s roof.
2. Raise the head restraints to their
maximum height.
3. Push the adjustment button and the
release button at the side of the two
supports at the same time.
4. Pull upward on the head restraint to
fully remove it.
To reinstall the head restraints, proceed
as follows:
1. Hold down both the adjustment
button and release button while placing
the head restraint posts into the holes.
2. Then, reposition the head restraint to
the appropriate height for the
passengers.
3. Replace the seat back to the
appropriate position for passengers.Warning!
A loose head restraint thrown forward in
a collision or hard stop could cause serious
injury or death to occupants of the vehicle.
Always securely stow removed head
restraints in a location outside the occupant
compartment.
ALL the head restraints MUST be
reinstalled in the vehicle to properly protect
the occupants. Follow the re-installation
instructions above prior to operating the
vehicle or occupying a seat.
0403132221USRear Head Restraint
1 — Release Button
2 — Adjustment Button
35
Page 273 of 276

Seat Belt Pretensioner.......121
Seat Belt Reminder ..........118
Seat Belt Reminder ...........118
Seat Belts ............. .118,142
Adjustable Shoulder Belt ......120
Adjustable Upper Shoulder
Anchorage .............. .120
Child Restraint ............131
Front Seat .............. .118
Inspection .............. .142
Pregnant Women ...........121
Pretensioners .............121
Rear Seat .............. .118
Untwisting Procedure ........120
Seats .....................28
Adjustment ...............29
Head Restraints ............34
Height Adjustment ...........29
Power ..................29
Tilting ..................29
Sentry Key Replacement .........18
Service Assistance ............262
Service Contract .............263
Service Manuals .............265
Servicing Procedures ..........219Shoulder Belts
............. .118
Signals, Turn ............. .41,143
Snow Chains ............... .240
Snow Tires ................ .239
Spare Tire ................ .237
Spare Tires .............237,238
Speed Control Accel/Decel ............. .165
Cancel ................ .166
Resume ............... .165
Set .................. .165
Speed Control (Cruise Control) . . . .166
Speed Limiter .............. .163
Starting .................
.203
Cold
Weather .............147
Starting And Operating .........203
Starting Procedures ...........203
Starting The Engine ...........146
Steering ................. .252
Tilt Column ...............36
Wheel Lock ...............20
Wheel, Heated .............37
Wheel, Tilt ................36
Steering Wheel ...............36
Stop/Start System ............161
Suggestions For Driving .........183
Sun Roof ...................55
Sun Visors ..................63 Supplemental Restraint
System - Air Bag ............123
Suspension ............... .251
Symbols ....................7
Telescoping Steering Column ......36
Tilt Steering Column ............36
Tire And Loading Information Placard ................ .230
Tire Markings .............. .226
Tire Safety Information .........226
Tire Service Kit ..............198
Tires ...........143,233,237,241
Aging (Life Of Tires) .........236
Air Pressure ..............233
Changing ............... .225
Compact Spare ............237
Flat Changing .............198
General Information ......233,237
General Information .........237
High Speed ..............234
Inflation Pressure ...........233
Jacking ................ .225
Life Of Tires ..............236
Load Capacity .............230
Load Capacity .............230
Quality
Grading ............241
Radial ................. .235