2018 Alfa Romeo Stelvio warning light
[x] Cancel search: warning lightPage 161 of 276
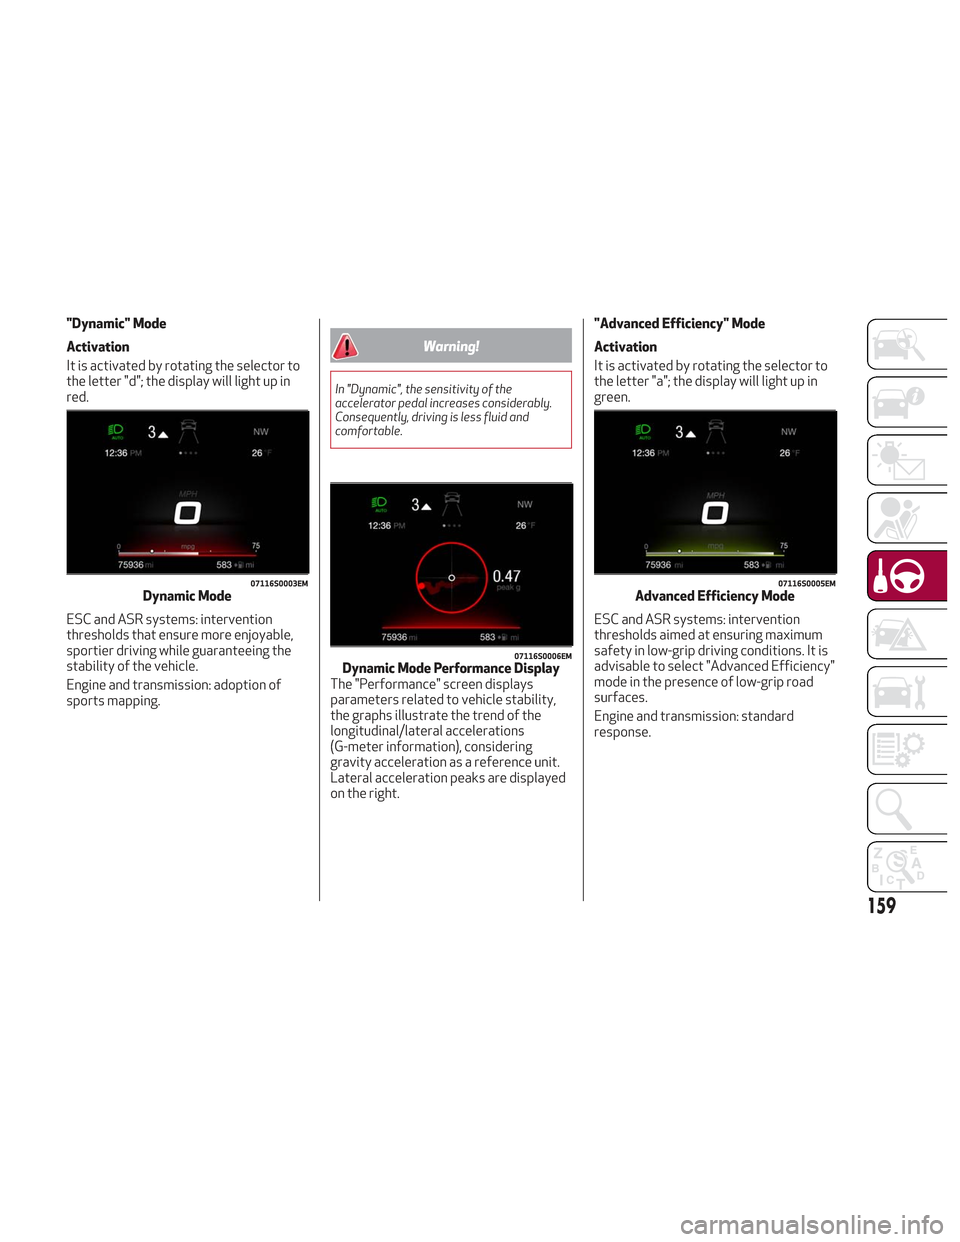
"Dynamic" Mode
Activation
It is activated by rotating the selector to
the letter "d"; the display will light up in
red.
ESC and ASR systems: intervention
thresholds that ensure more enjoyable,
sportier driving while guaranteeing the
stability of the vehicle.
Engine and transmission: adoption of
sports mapping.
Warning!
In "Dynamic", the sensitivity of the
accelerator pedal increases considerably.
Consequently, driving is less fluid and
comfortable.
"Advanced Efficiency" Mode
Activation
It is activated by rotating the selector to
the letter "a"; the display will light up in
green.
ESC and ASR systems: intervention
thresholds aimed at ensuring maximum
safety in low-grip driving conditions. It is
advisable to select "Advanced Efficiency"
mode in the presence of low-grip road
surfaces.
Engine and transmission: standard
response.
07116S0003EMDynamic Mode
07116S0006EMDynamic Mode Performance Display
The "Performance" screen displays
parameters related to vehicle stability,
the graphs illustrate the trend of the
longitudinal/lateral accelerations
(G-meter information), considering
gravity acceleration as a reference unit.
Lateral acceleration peaks are displayed
on the right.
07116S0005EMAdvanced Efficiency Mode
159
Page 162 of 276
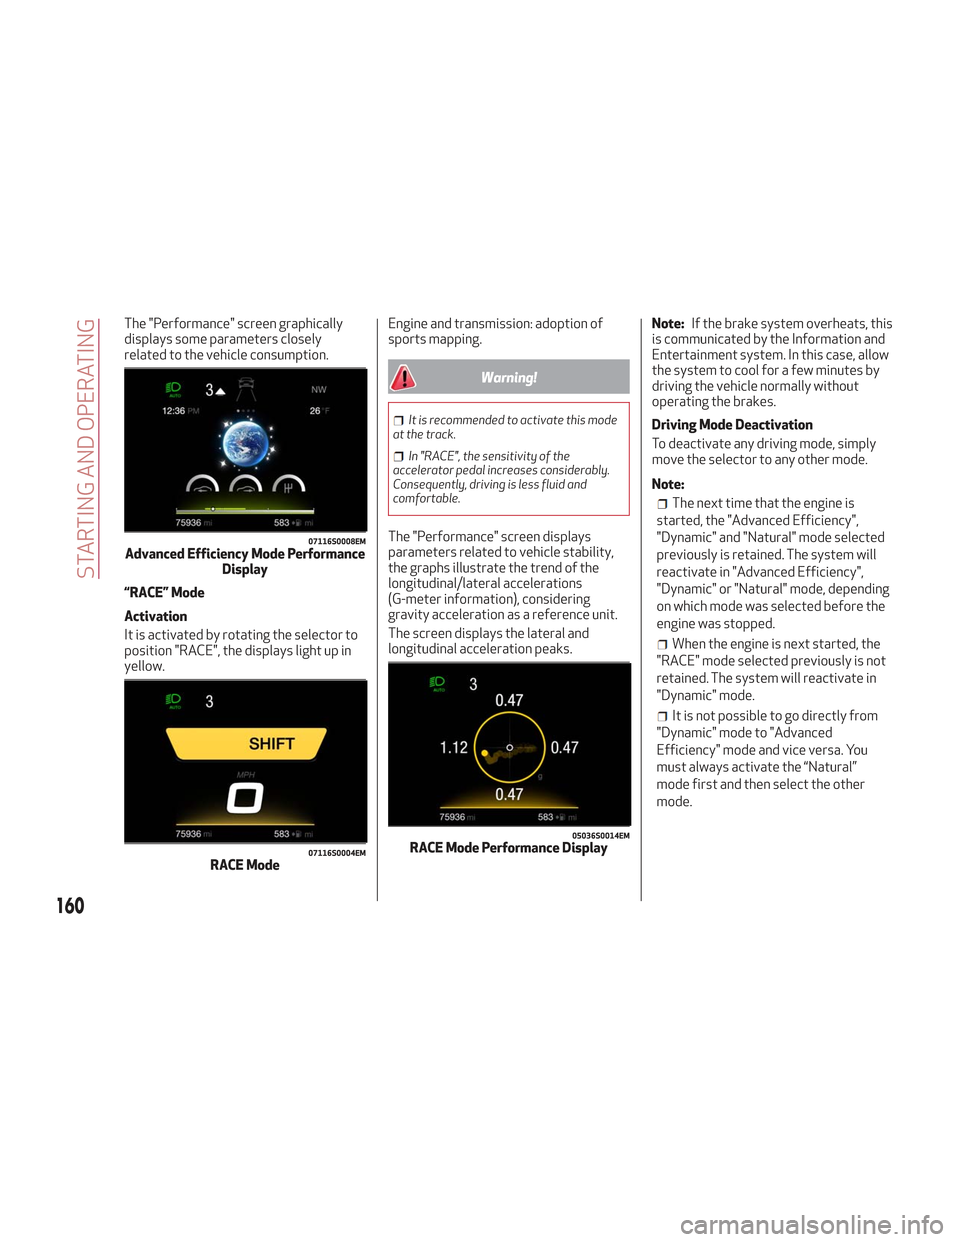
The "Performance" screen graphically
displays some parameters closely
related to the vehicle consumption.
“RACE” Mode
Activation
It is activated by rotating the selector to
position "RACE", the displays light up in
yellow.Engine and transmission: adoption of
sports mapping.
Warning!
It is recommended to activate this mode
at the track.
In "RACE", the sensitivity of the
accelerator pedal increases considerably.
Consequently, driving is less fluid and
comfortable.
The "Performance" screen displays
parameters related to vehicle stability,
the graphs illustrate the trend of the
longitudinal/lateral accelerations
(G-meter information), considering
gravity acceleration as a reference unit.
The screen displays the lateral and
longitudinal acceleration peaks. Note:
If the brake system overheats, this
is communicated by the Information and
Entertainment system. In this case, allow
the system to cool for a few minutes by
driving the vehicle normally without
operating the brakes.
Driving Mode Deactivation
To deactivate any driving mode, simply
move the selector to any other mode.
Note:
The next time that the engine is
started, the "Advanced Efficiency",
"Dynamic" and "Natural" mode selected
previously is retained. The system will
reactivate in "Advanced Efficiency",
"Dynamic" or "Natural" mode, depending
on which mode was selected before the
engine was stopped.
When the engine is next started, the
"RACE" mode selected previously is not
retained. The system will reactivate in
"Dynamic" mode.
It is not possible to go directly from
"Dynamic" mode to "Advanced
Efficiency" mode and vice versa. You
must always activate the “Natural”
mode first and then select the other
mode.
07116S0008EMAdvanced Efficiency Mode Performance Display
07116S0004EMRACE Mode
05036S0014EMRACE Mode Performance Display
160
STARTING AND OPERATING
Page 164 of 276

System Activation
The activation of the system is indicated
by the
symbol lighting up on the
display. In this condition, the light on the
button is off.
System Deactivation
A message will appear on the display
when the system is deactivated. In this
condition, the light on the button is on.
Note: Each time the engine is started,
the system is activated regardless of
where was when it was previously
switched off.
Possible Reasons The Engine Does Not
Autostop
For higher comfort and increased safety,
and to reduce emissions, there are
certain conditions where the engine will
not autostop despite the system being
active, such as:
Engine still cold.
Especially cold outside temperature.
Battery not sufficiently charged.
Driver's door not shut.
Driver's seat belt not fastened.
Reverse gear engaged (e.g. for parking
maneuvers).
With the automatic climate control
active, an adequate cabin heating or
cooling comfort has not been reached or
with MAX-DEF function active.
During the first period of use, to
initialize the system.
Steering angle beyond threshold.
Engine Restarting Conditions
Due to comfort, emission control, and
safety reasons, the engine can restart
automatically without any action by the
driver, under special conditions, such as:
Battery not sufficiently charged.
Reduced braking system vacuum (e.g.
if the brake pedal is pressed repeatedly).
Vehicle moving (e.g. when driving on
roads with a grade).
Engine stopping by the Stop/Start
system for more than approx. three
minutes.
With the automatic climate control
active, an adjustment in cabin heating or
cooling is made or with MAX-DEF
function active.
Safety Functions
When the engine is stopped through the
Stop/Start system, if the driver releases
their seat belt, opens the driver's or
passenger's door, or opens the hood from
inside the vehicle, the engine can be
restarted only by using the ignition.
This condition is indicated to the driver
both through a buzzer and a message on
the instrument cluster display.
Energy Saving Function
If the driver does not carry out any action
for more than three minutes after the
automatic engine restart, the Start/Stop
system will switch off the engine in order
to prevent fuel consumption.
In this situation, the engine can only be
restarted using the ignition device.
Note: It is possible to keep the engine
running by deactivating the system.
Irregular Operation
In the event of malfunction, the
Stop/Start system is deactivated.
For failure indications, refer to "Warning
Lights and Messages" paragraph in
"Getting To Know Your Instrument Panel".
Vehicle Inactivity
In the event of vehicle inactivity (or if the
battery is replaced), special attention
must be paid to the disconnection of the
battery power supply.
Proceed as follows:
Remove connector from socket to
disconnect sensor (battery status
monitoring) installed on the negative pole
of the battery. This sensor should never
be disconnected from the pole except if
the battery is replaced.
162
STARTING AND OPERATING
Page 166 of 276
Programmed Speed Icon Flashing
The programmed speed will flash in the
following scenarios:
When the accelerator pedal has been
fully pressed and the vehicle has
exceeded the programmed speed.
Activating the system after setting a
limit below the effective speed of the
vehicle.
In the event of overtake acceleration.
Deactivation
The feature can be activated/
deactivated through the Information and
Entertainment System.
Deactivating The Device
To access this feature on the main menu,
select the following items in sequence:
"Settings", "Safety", “Speed Limiter” and
“OFF”.
Automatic Deactivation Of The Device
The device deactivates automatically in
the event of fault in the system. In this
case, contact an authorized dealer.
Temporary Signal Loss
When the devices loses the signal, the
white symbol without the speed
indication illuminates on the display.
System Failure
If there is a system failure, the amber
symbol
illuminates on the display.
SPEED CONTROL (CRUISE
CONTROL)
Speed Control Description
This is an electronically controlled driving
assistance feature that allows the
desired vehicle speed to be maintained,
without having to press the accelerator
pedal. This feature can be used at a speed
above 25 mph (40 km/h) on long
stretches of dry, straight roads with few
variations (highways).
The speed control buttons are located on
the left side of the steering wheel.
Note:
To ensure correct operation, the
speed control is designed to deactivate
if more than one function is operated
simultaneously. In this case, the system
can be reactivated by pushing the on/off
button
and setting the desired
speed.
It is not recommended to use this
feature in city traffic.
While driving downhill, the system
could brake the vehicle to keep the set
speed the same.
Warning!
Speed Control can be dangerous where the
system cannot maintain a constant speed.
Your vehicle could go too fast for the
conditions, and you could lose control and
have an accident. Do not use Speed Control
in heavy traffic or on roads that are winding,
icy, snow-covered or slippery.
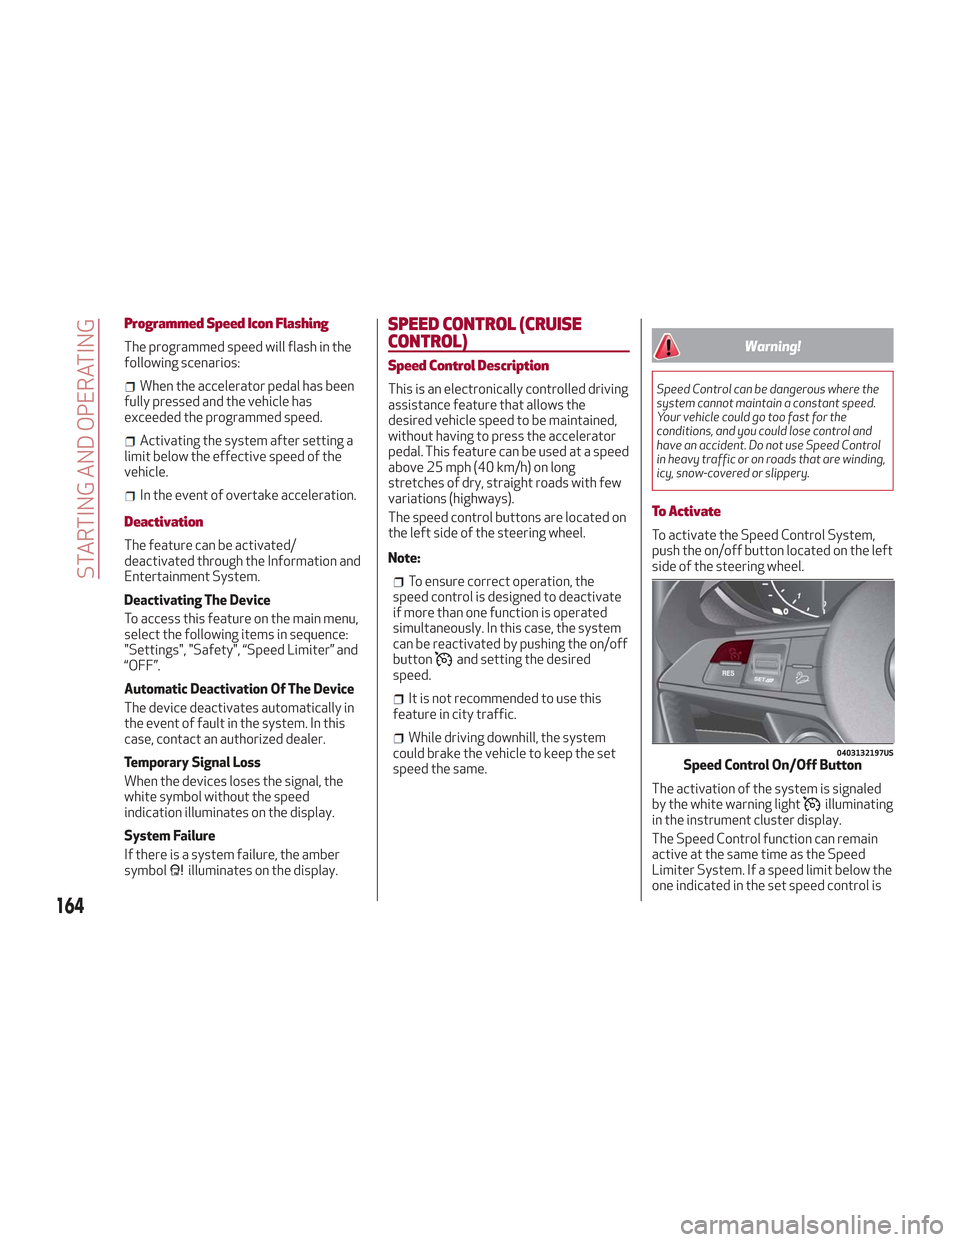
To Activate
To activate the Speed Control System,
push the on/off button located on the left
side of the steering wheel.
The activation of the system is signaled
by the white warning light
illuminating
in the instrument cluster display.
The Speed Control function can remain
active at the same time as the Speed
Limiter System. If a speed limit below the
one indicated in the set speed control is
0403132197USSpeed Control On/Off Button
164
STARTING AND OPERATING
Page 167 of 276
set, the speed control speed will be
lowered to that of the Speed Limiter.
Warning!
Leaving the Speed Control system on when
not in use is dangerous. You could
accidentally set the system or cause it to go
faster than you want. You could lose control
and have an accident. Always leave the
system OFF when you are not using it.
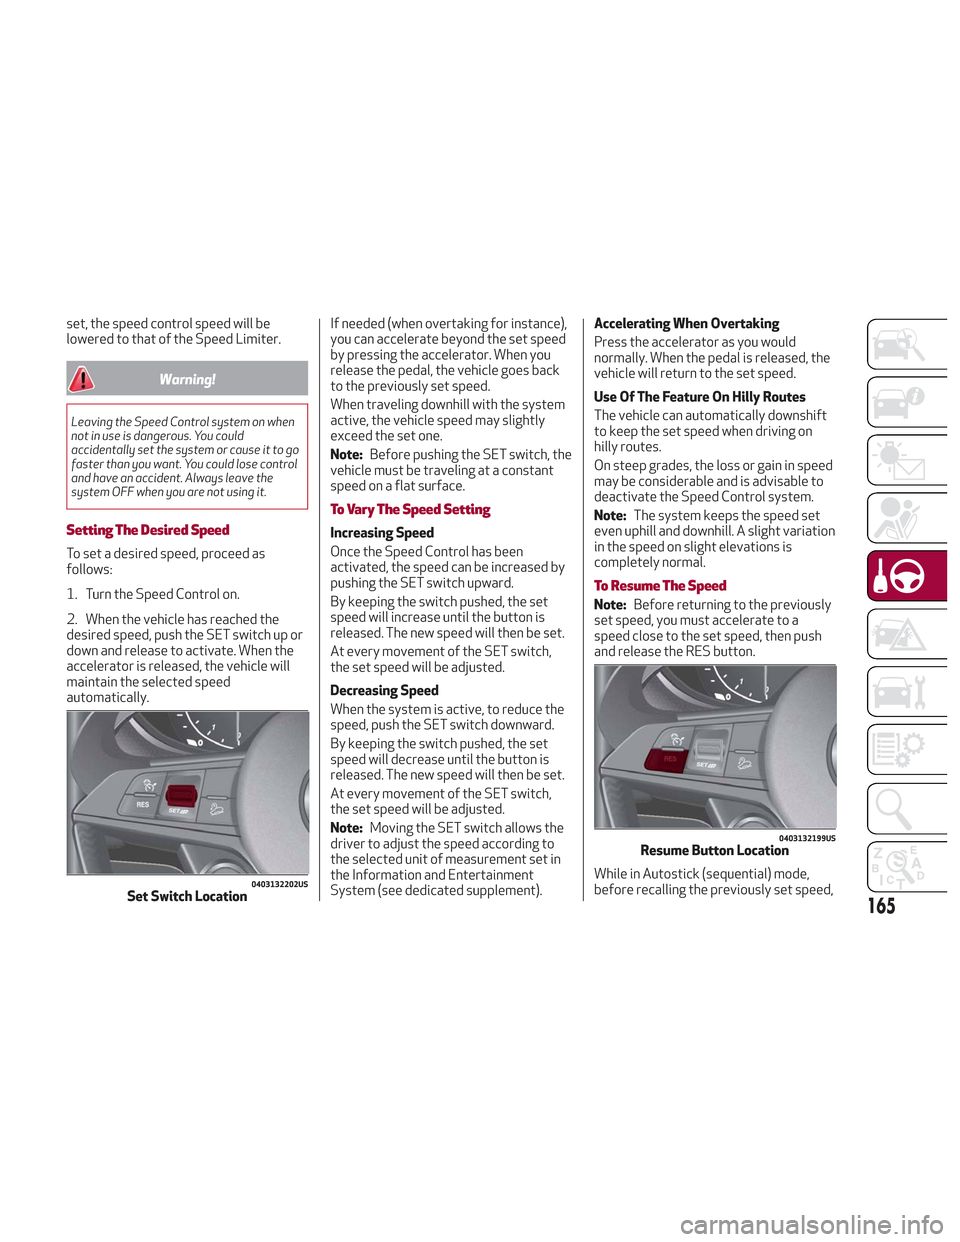
Setting The Desired Speed
To set a desired speed, proceed as
follows:
1. Turn the Speed Control on.
2. When the vehicle has reached the
desired speed, push the SET switch up or
down and release to activate. When the
accelerator is released, the vehicle will
maintain the selected speed
automatically.If needed (when overtaking for instance),
you can accelerate beyond the set speed
by pressing the accelerator. When you
release the pedal, the vehicle goes back
to the previously set speed.
When traveling downhill with the system
active, the vehicle speed may slightly
exceed the set one.
Note:
Before pushing the SET switch, the
vehicle must be traveling at a constant
speed on a flat surface.
To Vary The Speed Setting
Increasing Speed
Once the Speed Control has been
activated, the speed can be increased by
pushing the SET switch upward.
By keeping the switch pushed, the set
speed will increase until the button is
released. The new speed will then be set.
At every movement of the SET switch,
the set speed will be adjusted.
Decreasing Speed
When the system is active, to reduce the
speed, push the SET switch downward.
By keeping the switch pushed, the set
speed will decrease until the button is
released. The new speed will then be set.
At every movement of the SET switch,
the set speed will be adjusted.
Note: Moving the SET switch allows the
driver to adjust the speed according to
the selected unit of measurement set in
the Information and Entertainment
System (see dedicated supplement). Accelerating When Overtaking
Press the accelerator as you would
normally. When the pedal is released, the
vehicle will return to the set speed.
Use Of The Feature On Hilly Routes
The vehicle can automatically downshift
to keep the set speed when driving on
hilly routes.
On steep grades, the loss or gain in speed
may be considerable and is advisable to
deactivate the Speed Control system.
Note:
The system keeps the speed set
even uphill and downhill. A slight variation
in the speed on slight elevations is
completely normal.
To Resume The Speed
Note: Before returning to the previously
set speed, you must accelerate to a
speed close to the set speed, then push
and release the RES button.
While in Autostick (sequential) mode,
before recalling the previously set speed,
0403132202USSet Switch Location
0403132199USResume Button Location
165
Page 176 of 276

System Activation/Deactivation
When the REVERSE gear is engaged and
the system is on, the front and rear
sensors are activated. If the vehicle
moves from REVERSE to a forward gear,
the rear sensors are deactivated, while
the front sensors remain active until the
speed of 9 mph (15 km/h) is exceeded.
Note:In certain operating conditions, the
system could start detecting an obstacle
only after the vehicle has moved slightly
(a few inches).
Acoustic Signal
In the presence of an obstacle at the
front or the rear of the vehicle, an
acoustic signal with variable frequency
will sound:
The acoustic signal increases in
frequency as the distance between the
vehicle and the obstacle decreases.
The acoustic signal becomes
continuous when the distance between
the vehicle and the obstacle is less than
11 inches (30 cm), and stops if the
distance increases.
The acoustic signal is constant if the
distance between the vehicle and the
obstacle is unchanged.
Note: If the sensors detect several front
and rear obstacles, the closest obstacle
is considered. An intermittent signal will
sound if the obstacles are at the same
distance (front and rear). When the system emits an acoustic
signal, the volume of the Information and
Entertainment System, if activated, is
automatically lowered.
Indication On Display
The driver can select the type of warning
they would like to be displayed through
the Information and Entertainment
System. To access the function on the
main menu, select in the following order:
1. “Settings.”
2. “Driver Assistance.”
3. “ParkSense.”
4. “Mode.”
5. “Sound-Display.”
Visual Indications
The system indicates the presence of an
obstacle by displaying a single red arc in
the detected areas, in relation to the
distance of the object and the position of
the vehicle.
If the obstacle is detected in the front or
rear central area, a single red arc will be
displayed as the obstacle approaches,
first constant, then flashing, in addition
to an acoustic signal.
If the obstacle is detected in the front or
rear left and/or right area, a single red
flashing arc will be shown in the
corresponding area on the display and
the system will emit an acoustic signal,
either at frequent intervals or constantly.If several obstacles are detected
simultaneously in the front and rear area,
the display will show all of them,
regardless of the area in which they were
detected.
In general, the vehicle is closer to the
obstacle when a single or several flashing
arcs are shown on the display and the
acoustic signal becomes continuous.
It is not possible to exit from the display
screen while the vehicle is in REVERSE.
Fault Indication
Parking sensor faults, if any, will be
indicated by a message on the display on
the instrument cluster. Refer to "Warning
Lights And Messages On The Instrument
Panel" in "Getting To Know Your
Instrument Panel" for further
information.
Messages On The Display
In case of system failure, a dedicated
message appears on the instrument
cluster for about 5 seconds.
Cleaning the front or rear sensors
:If
the display shows a message requiring
the sensors to be cleaned, make sure that
the outer surface and the underside of
the front and rear bumpers are free of
debris (e.g. snow, mud, ice, etc.). Once
these areas are clear, place the ignition in
STOP mode. Then, return it to ON mode.
If the message is still displayed, contact
your authorized dealer.
174
STARTING AND OPERATING
Page 178 of 276

LANE DEPARTURE WARNING
(LDW) SYSTEM — IF EQUIPPED
Description
The Lane Departure Warning system uses
a forward looking camera located on the
windshield to detect lane markings and
measure vehicle position within the lane
boundaries.
When one or both lane limits are
detected and the vehicle passes over one
without an activated turn signal, the
system emits a visual as well as an
acoustic signal.
If the vehicle continues to go beyond the
line of the lane without any intervention
from the driver, the surpassed line will
light up on the display (left or right) to
urge the driver to bring the vehicle back
into the limits of the lane.
Caution!
Do not tamper with nor operate on the
camera. Do not close the openings in the
aesthetic cover located under the interior
rear view mirror. In the event of a failure of
the camera, contact your authorized dealer.
The camera may have limited or absent
operation due to weather conditions such
as: heavy rain, hail, thick fog, heavy snow,
formation of ice layers on the windshield.
Camera operation may also be
compromised by the presence of dust,
condensation, dirt or ice on the windshield,
by traffic conditions (e.g. vehicles that are
driving not aligned with yours, vehicle
driving in a transverse or opposite way on
the same lane, bend with a small radius of
curvature), by road surface conditions and
by driving conditions (e.g. off-road driving).
Make sure the windshield is always clean.
Use specific detergents and clean cloths to
avoid scratching the windshield. The camera
operation may also be limited or absent in
some driving, traffic and road surface
conditions.
If the windshield must be replaced due to
scratches, chipping or breakage, contact
exclusively your authorized dealer. Do not
replace the windshield on your own. It is
advisable to replace the windshield if it is
damaged in the area of the camera.
System Activation/Deactivation
The system is activated/deactivated by
pushing the button located on the end of
the multifunction lever.
Note: When the engine is started, the
system maintains the operating mode
that was selected when it was turned
OFF.
Activation Conditions
Once turned on, the system becomes
active only if the following conditions are
met:
The vehicle speed is above 37 mph
(60 km/h).
The lane limit lines are visible at least
on one side.
07226S0001EMLane Departure Warning System Activation/Deactivation Button
176
STARTING AND OPERATING
Page 181 of 276
REAR BACK-UP CAMERA /
DYNAMIC GRIDLINES
Description
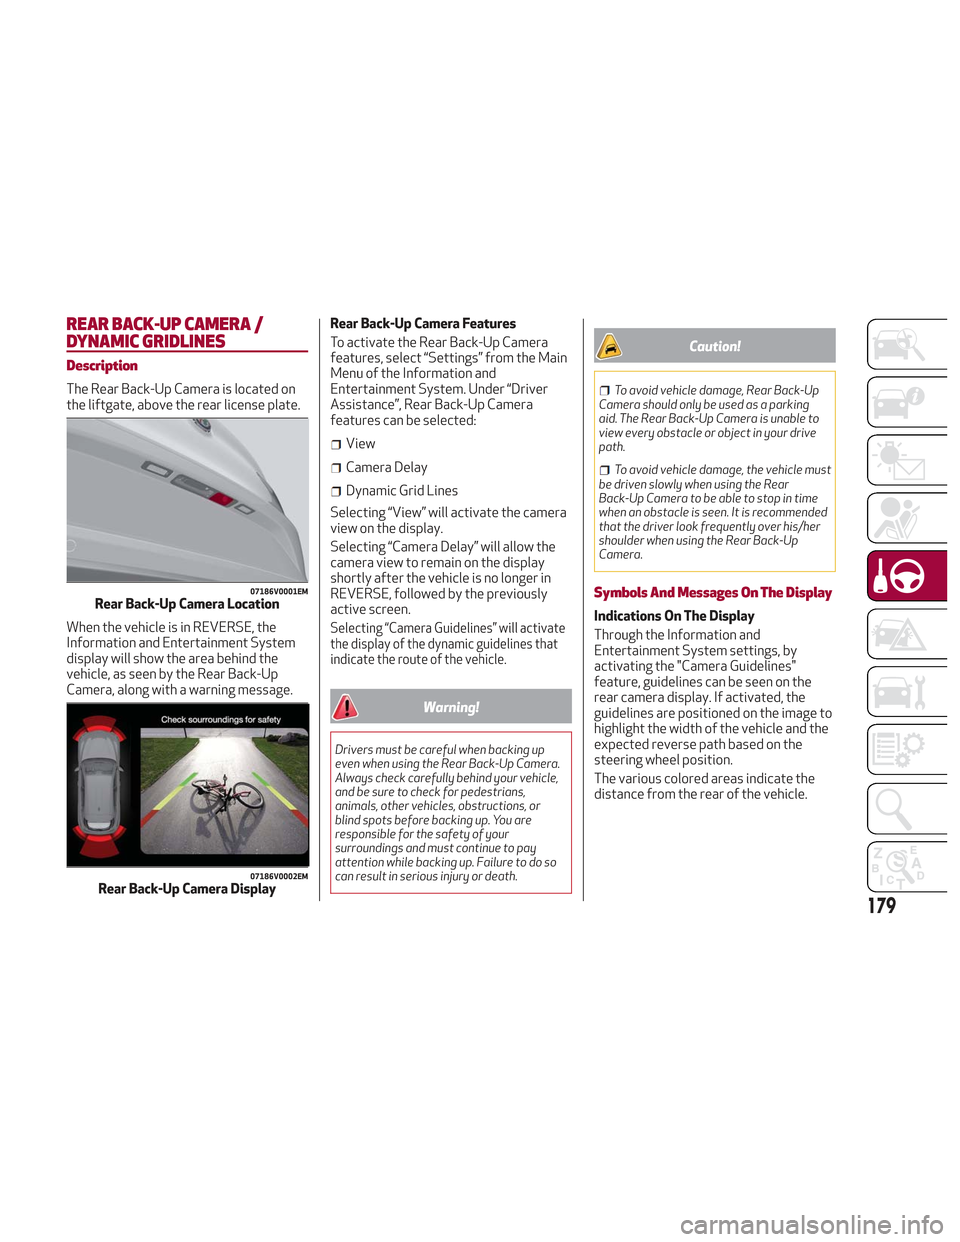
The Rear Back-Up Camera is located on
the liftgate, above the rear license plate.
When the vehicle is in REVERSE, the
Information and Entertainment System
display will show the area behind the
vehicle, as seen by the Rear Back-Up
Camera, along with a warning message.Rear Back-Up Camera Features
To activate the Rear Back-Up Camera
features, select “Settings” from the Main
Menu of the Information and
Entertainment System. Under “Driver
Assistance”, Rear Back-Up Camera
features can be selected:
View
Camera Delay
Dynamic Grid Lines
Selecting “View” will activate the camera
view on the display.
Selecting “Camera Delay” will allow the
camera view to remain on the display
shortly after the vehicle is no longer in
REVERSE, followed by the previously
active screen.
Selecting “Camera Guidelines” will activate
the display of the dynamic guidelines that
indicate the route of the vehicle.
Warning!
Drivers must be careful when backing up
even when using the Rear Back-Up Camera.
Always check carefully behind your vehicle,
and be sure to check for pedestrians,
animals, other vehicles, obstructions, or
blind spots before backing up. You are
responsible for the safety of your
surroundings and must continue to pay
attention while backing up. Failure to do so
can result in serious injury or death.
Caution!
To avoid vehicle damage, Rear Back-Up
Camera should only be used as a parking
aid. The Rear Back-Up Camera is unable to
view every obstacle or object in your drive
path.
To avoid vehicle damage, the vehicle must
be driven slowly when using the Rear
Back-Up Camera to be able to stop in time
when an obstacle is seen. It is recommended
that the driver look frequently over his/her
shoulder when using the Rear Back-Up
Camera.
Symbols And Messages On The Display
Indications On The Display
Through the Information and
Entertainment System settings, by
activating the "Camera Guidelines"
feature, guidelines can be seen on the
rear camera display. If activated, the
guidelines are positioned on the image to
highlight the width of the vehicle and the
expected reverse path based on the
steering wheel position.
The various colored areas indicate the
distance from the rear of the vehicle.
07186V0001EMRear Back-Up Camera Location
07186V0002EMRear Back-Up Camera Display
179