2018 Alfa Romeo Stelvio parking brake
[x] Cancel search: parking brakePage 164 of 276

System Activation
The activation of the system is indicated
by the
symbol lighting up on the
display. In this condition, the light on the
button is off.
System Deactivation
A message will appear on the display
when the system is deactivated. In this
condition, the light on the button is on.
Note: Each time the engine is started,
the system is activated regardless of
where was when it was previously
switched off.
Possible Reasons The Engine Does Not
Autostop
For higher comfort and increased safety,
and to reduce emissions, there are
certain conditions where the engine will
not autostop despite the system being
active, such as:
Engine still cold.
Especially cold outside temperature.
Battery not sufficiently charged.
Driver's door not shut.
Driver's seat belt not fastened.
Reverse gear engaged (e.g. for parking
maneuvers).
With the automatic climate control
active, an adequate cabin heating or
cooling comfort has not been reached or
with MAX-DEF function active.
During the first period of use, to
initialize the system.
Steering angle beyond threshold.
Engine Restarting Conditions
Due to comfort, emission control, and
safety reasons, the engine can restart
automatically without any action by the
driver, under special conditions, such as:
Battery not sufficiently charged.
Reduced braking system vacuum (e.g.
if the brake pedal is pressed repeatedly).
Vehicle moving (e.g. when driving on
roads with a grade).
Engine stopping by the Stop/Start
system for more than approx. three
minutes.
With the automatic climate control
active, an adjustment in cabin heating or
cooling is made or with MAX-DEF
function active.
Safety Functions
When the engine is stopped through the
Stop/Start system, if the driver releases
their seat belt, opens the driver's or
passenger's door, or opens the hood from
inside the vehicle, the engine can be
restarted only by using the ignition.
This condition is indicated to the driver
both through a buzzer and a message on
the instrument cluster display.
Energy Saving Function
If the driver does not carry out any action
for more than three minutes after the
automatic engine restart, the Start/Stop
system will switch off the engine in order
to prevent fuel consumption.
In this situation, the engine can only be
restarted using the ignition device.
Note: It is possible to keep the engine
running by deactivating the system.
Irregular Operation
In the event of malfunction, the
Stop/Start system is deactivated.
For failure indications, refer to "Warning
Lights and Messages" paragraph in
"Getting To Know Your Instrument Panel".
Vehicle Inactivity
In the event of vehicle inactivity (or if the
battery is replaced), special attention
must be paid to the disconnection of the
battery power supply.
Proceed as follows:
Remove connector from socket to
disconnect sensor (battery status
monitoring) installed on the negative pole
of the battery. This sensor should never
be disconnected from the pole except if
the battery is replaced.
162
STARTING AND OPERATING
Page 169 of 276
recommended to disable the system
under the following circumstances:
Driving in fog, heavy rain, or snow.
Driving in heavy traffic or
construction zones.
Driving on icy, snowy, slippery roads,
roads with steep climbs and descents, or
roads with numerous turns and bends.
Entering a turn lane.
When circumstances do not allow
safe driving at a constant speed.
Warning!
Adaptive Cruise Control (ACC) is a
convenience system. It is not a substitute
for active driving involvement. It is always
the driver’s responsibility to be attentive of
road, traffic, and weather conditions,
vehicle speed, distance to the vehicle ahead;
and, most importantly, brake operation to
ensure safe operation of the vehicle under
all road conditions. Your complete attention
is always required while driving to maintain
safe control of your vehicle. Failure to follow
these warnings can result in a collision and
death or serious personal injury.
The ACC system:
Does not react to pedestrians, oncoming
vehicles, and stationary objects (e.g., a
stopped vehicle in a traffic jam or a disabled
vehicle).
Cannot take street, traffic, and weather
conditions into account, and may be limited
upon adverse sight distance conditions.
Does not always fully recognize complex
driving conditions, which can result in wrong
or missing distance warnings.
Will bring the vehicle to a complete stop
while following a target vehicle and hold the
vehicle for approximately 3 minutes in the
stop position. If the target vehicle does not
start moving within 3 minutes the parking
brake will be activated, and the ACC system
will be canceled.
You should switch off the ACC system:
When driving in fog, heavy rain, heavy
snow, sleet, heavy traffic, and complex
driving situations (i.e., in highway
construction zones).
When entering a turn lane or highway off
ramp; when driving on roads that are
winding, icy, snow-covered, slippery, or have
steep uphill or downhill slopes.
When circumstances do not allow safe
driving at a constant speed.
Activation/Deactivation
The system has four operating states:
Enabled (speed not set)
Activated (speed set)
Paused
Deactivated Enabling / Activation
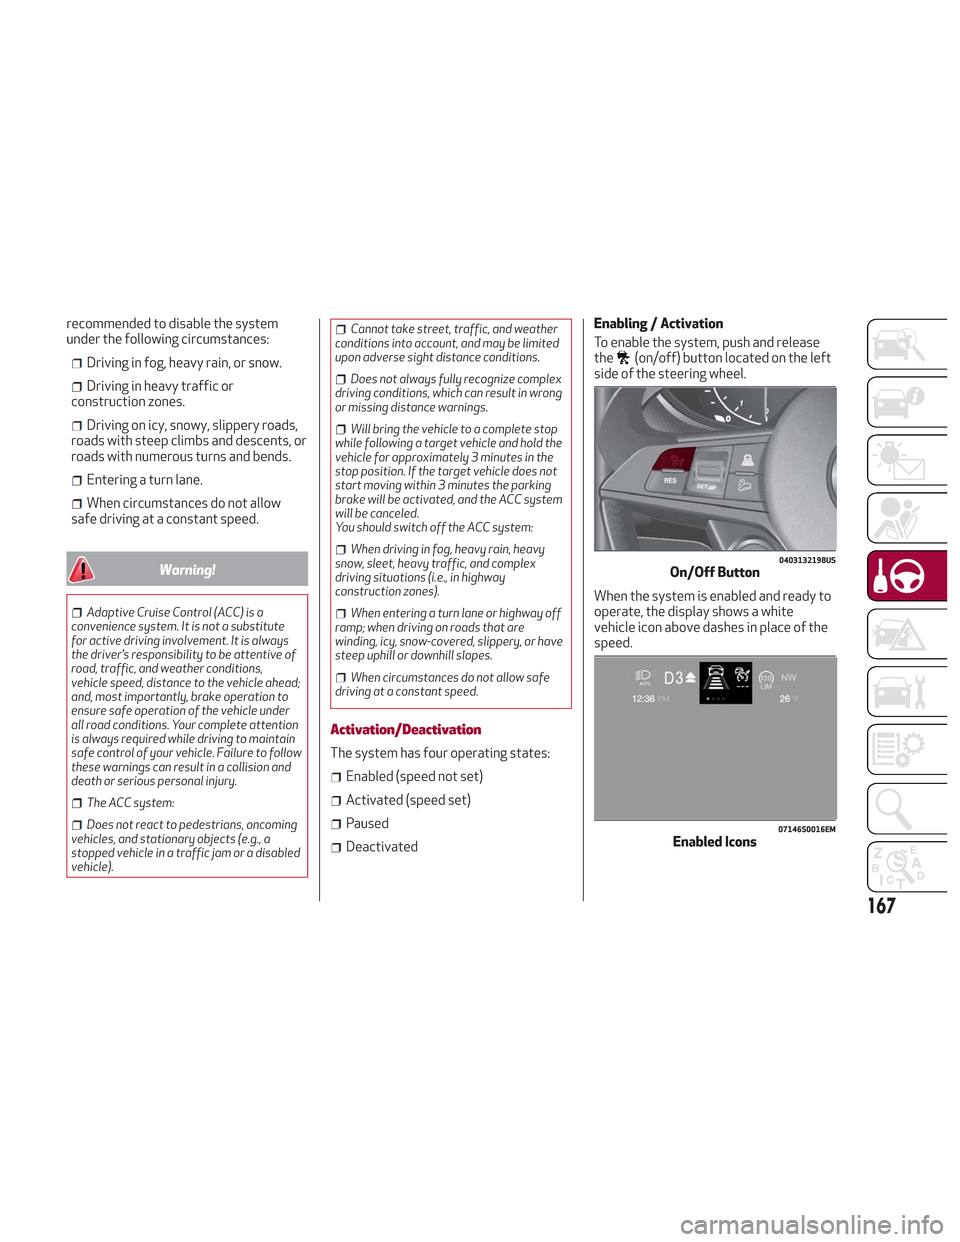
To enable the system, push and release
the
(on/off) button located on the left
side of the steering wheel.
When the system is enabled and ready to
operate, the display shows a white
vehicle icon above dashes in place of the
speed.
0403132198USOn/Off Button
07146S0016EMEnabled Icons
167
Page 177 of 276

Audio system not available: If the
display shows a message that the audio
system is not available, it means that the
acoustic signal will be emitted by the
instrument panel, and not through the
vehicles speakers.
Note: Some conditions may influence
the performance of the Park Sensors
System:
Reduced sensor sensitivity could be
due to the presence of ice, snow, mud, or
thick paint on the surface of the sensor.
The sensors may detect a false
obstacle (echo interference) due to
mechanical interference, for example
when washing the vehicle or in extreme
weather.
The signals sent by the sensors can
be altered by the presence of ultrasonic
systems (e.g. pneumatic brake systems
of trucks or pneumatic drills) near the
vehicle.
System performance can be
influenced by the position of the
sensors. For example, due to a change in
the ride setting (caused by wear to the
shock absorbers or suspension), by
changing tires, overloading the vehicle or
operations that require the vehicle to be
lowered.
Be sure not to place bumper stickers
or other adhesives over the sensors as
this will affect system performance.
Warning!
Before using the Park Sensors System, it
is strongly recommended that the ball
mount and hitch ball assembly is
disconnected from the vehicle when the
vehicle is not used for towing. Failure to do
so can result in injury or damage to vehicles
or obstacles because the hitch ball will be
much closer to the obstacle than the rear
fascia when the loudspeaker sounds the
continuous tone. Also, the sensors could
detect the ball mount and hitch ball
assembly, depending on its size and shape,
giving a false indication that an obstacle is
behind the vehicle.
Drivers must be careful when backing up
even when using the Park Sensors System.
Always check carefully behind your vehicle,
look behind you, and be sure to check for
pedestrians, animals, other vehicles,
obstructions, and blind spots before
backing up. You are responsible for safety
and must continue to pay attention to your
surroundings. Failure to do so can result in
serious injury or death.
Caution!
The Park Sensors System is only a
parking aid and it is unable to recognize
every obstacle, including small obstacles.
Parking curbs might be temporarily
detected or not detected at all. Obstacles
located above or below the sensors will not
be detected when they are in close
proximity.
The vehicle must be driven slowly when
using the Park Sensors System in order to
be able to stop in time when an obstacle is
detected. It is recommended that the driver
looks over his/her shoulder when using the
Park Sensors System.
175
Page 204 of 276
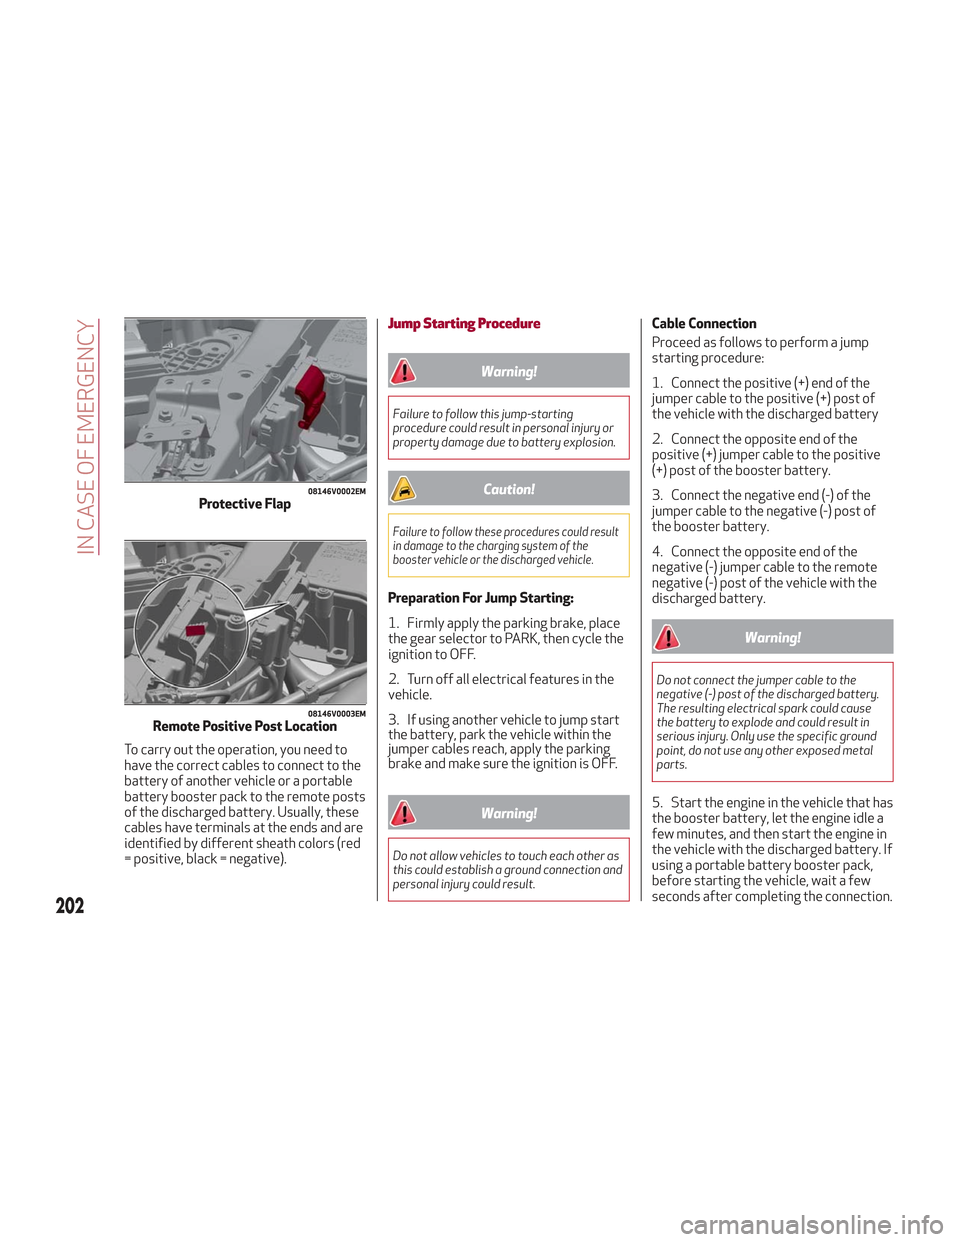
To carry out the operation, you need to
have the correct cables to connect to the
battery of another vehicle or a portable
battery booster pack to the remote posts
of the discharged battery. Usually, these
cables have terminals at the ends and are
identified by different sheath colors (red
= positive, black = negative).
Jump Starting Procedure
Warning!
Failure to follow this jump-starting
procedure could result in personal injury or
property damage due to battery explosion.
Caution!
Failure to follow these procedures could result
in damage to the charging system of the
booster vehicle or the discharged vehicle.
Preparation For Jump Starting:
1. Firmly apply the parking brake, place
the gear selector to PARK, then cycle the
ignition to OFF.
2. Turn off all electrical features in the
vehicle.
3. If using another vehicle to jump start
the battery, park the vehicle within the
jumper cables reach, apply the parking
brake and make sure the ignition is OFF.
Warning!
Do not allow vehicles to touch each other as
this could establish a ground connection and
personal injury could result.
Cable Connection
Proceed as follows to perform a jump
starting procedure:
1. Connect the positive (+) end of the
jumper cable to the positive (+) post of
the vehicle with the discharged battery
2. Connect the opposite end of the
positive (+) jumper cable to the positive
(+) post of the booster battery.
3. Connect the negative end (-) of the
jumper cable to the negative (-) post of
the booster battery.
4. Connect the opposite end of the
negative (-) jumper cable to the remote
negative (-) post of the vehicle with the
discharged battery.
Warning!
Do not connect the jumper cable to the
negative (-) post of the discharged battery.
The resulting electrical spark could cause
the battery to explode and could result in
serious injury. Only use the specific ground
point, do not use any other exposed metal
parts.
5. Start the engine in the vehicle that has
the booster battery, let the engine idle a
few minutes, and then start the engine in
the vehicle with the discharged battery. If
using a portable battery booster pack,
before starting the vehicle, wait a few
seconds after completing the connection.
08146V0002EMProtective Flap
08146V0003EMRemote Positive Post Location
202
IN CASE OF EMERGENCY
Page 241 of 276

Caution!
Do not use scouring pads, steel wool, a
bristle brush, metal polishes or oven cleaner.
These products may damage the wheel's
protective finish. Such damage is not
covered by the New Vehicle Limited
Warranty. Only car wash soap, Mopar Wheel
Cleaner or equivalent is recommended.
Note:If you intend parking or storing
your vehicle for an extended period after
cleaning the wheels with wheel cleaner,
drive your vehicle and apply the brakes to
remove the water droplets from the
brake components. This activity will
remove the red rust on the brake rotors
and prevent vehicle vibration when
braking.
Dark Vapor Chrome, Black Satin
Chrome, or Low Gloss Clear Coat Wheels
Caution!
If your vehicle is equipped with these
specialty wheels, DO NOT USE wheel
cleaners, abrasives, or polishing compounds.
They will permanently damage this finish
and such damage is not covered by the New
Vehicle Limited Warranty. HAND WASH
ONLY USING MILD SOAP AND WATER WITH
A SOFT CLOTH. Used on a regular basis; this
is all that is required to maintain this finish.
Tire Types
All Season Tires — If Equipped
All Season tires provide traction for all
seasons (Spring, Summer, Fall, and
Winter). Traction levels may vary
between different all season tires. All
season tires can be identified by the M+S,
M&S, M/S or MS designation on the tire
sidewall. Use all season tires only in sets
of four; failure to do so may adversely
affect the safety and handling of your
vehicle.
Summer Or Three Season Tires — If
Equipped
Summer tires provide traction in both
wet and dry conditions, and are not
intended to be driven in snow or on ice. If
your vehicle is equipped with Summer
tires, be aware these tires are not
designed for Winter or cold driving
conditions. Install Winter tires on your
vehicle when ambient temperatures are
less than 45°F (7°C) or if roads are
covered with ice or snow. For more
information, contact an authorized
dealer.
Summer tires do not contain the all
season designation or mountain/
snowflake symbol on the tire sidewall.
Use Summer tires only in sets of four;
failure to do so may adversely affect the
safety and handling of your vehicle.
Warning!
Do not use Summer tires in snow/ice
conditions. You could lose vehicle control,
resulting in severe injury or death. Driving
too fast for conditions also creates the
possibility of loss of vehicle control.
Snow Tires
Some areas of the country require the
use of snow tires during the Winter. Snow
tires can be identified by a
“mountain/snowflake” symbol on the tire
sidewall.
If you need snow tires,
select tires equivalent
in size and type to the
original equipment
tires. Use snow tires
only in sets of four;
failure to do so may
adversely affect the safety and handling
of your vehicle.
Snow tires generally have lower speed
ratings than what was originally equipped
with your vehicle and should not be
operated at sustained speeds over
75 mph (120 km/h). For speeds above
75 mph (120 km/h) refer to original
equipment or an authorized tire dealer
for recommended safe operating speeds,
loading and cold tire inflation pressures.
239
Page 245 of 276

Preserving The Bodywork
Paint
Touch up abrasions and scratches
immediately to prevent the formation of
rust.
Maintenance of paintwork consists of
washing the vehicle: the frequency
depends on the conditions and
environment where the vehicle is used.
For example, it is advisable to wash the
vehicle more often in areas with high
levels of atmospheric pollution or salted
roads.
Some parts of the vehicle may be
covered with a matte paint which, in
order to be maintained intact, requires
special care.
To correctly wash the vehicle, follow
these instructions:
If high pressure jets or cleaners are
used to wash the vehicle, keep a distance
of at least 15 inches (40 cm) from the
bodywork to avoid damage or alteration.
Build up of water could cause damage to
the vehicle in the long term.
To make it easier to remove any dirt
deposits in the area where the blades are
normally located it is recommended to
position the windshield wipers vertically
(service position), for more information,
refer to “Dealer Service” in this chapter.
Wash the bodywork using a low
pressure jet of water if possible.
Wipe a sponge with a slightly soapy
solution over the bodywork, frequently
rinsing the sponge.
Rinse well with water and dry with a
leather chamois.
Dry the less visible parts (e.g. door
frames, hood, headlight frames, etc.) with
special care, as water may stagnate more
easily in these areas. Do not wash the
vehicle after it has been left in the sun or
with the hood hot: this may alter the shine
of the paintwork.
Note: Avoid parking under trees; the
resin dropped by trees makes the
paintwork go opaque and increases the
possibility of corrosion.
Exterior plastic parts must be cleaned in
the same way as the rest of the vehicle.
If washing the vehicle in a service that
moves the vehicle, for vehicles with
automatic transmissions, proceed with
the following directions:
Ensure that the vehicle is on a flat
surface
Disable the automatic engagement of
the parking brake (refer to the “Electric
Park Brake” in “Starting And Operating”
for further information).
With the vehicle stationary, the gear in
NEUTRAL (N) and the brake pedal
depressed, push the START button. Note:
The vehicle will remain in
NEUTRAL (N) for 15 minutes before
PARK (P) will be engaged automatically.
Windows
Use specific detergents and clean cloths
to prevent scratching or altering the
transparency.
Caution!
Wipe the rear window inside gently with a
cloth following the direction of the filaments
to avoid damaging the heating device.
Front Headlights
Use a soft cloth soaked in water and
detergent for washing vehicles.
Note:
Never use aromatic substances (e.g.
gasoline) or ketones (e.g. acetone) for
cleaning the plastic lenses of the
headlights.
When cleaning with a pressure
washer, keep the pressure washer at
least eight inches (20 cm) away from the
headlights.
243
Page 252 of 276

BRAKES
VersionFront brakesRear brakesParking brake
2.9L V6 Engine Disc
Or
Carbon
Ceramic DiscDisc
Or
Carbon Ceramic Disc Electric
Caution!
Water, ice and salt spread on the roads may deposit on the brake discs, reducing braking efficiency the first time the brakes are applied.
To obtain the maximum efficiency of the braking system, a bedding-in period of about 300 miles (500 km) is needed: during this period it is
better to avoid sharp, repeated and prolonged braking.
250
TECHNICAL SPECIFICATIONS