2018 Alfa Romeo Stelvio lock
[x] Cancel search: lockPage 44 of 276

Note:Before exiting the vehicle, ensure
that the overhead lights are off. This will
prevent the battery from discharging
once the doors are closed. If a light is left
on accidently, the overhead lights will
turn off automatically approximately
15 minutes after the engine has been
cycled OFF.
Overhead Light Timing
On certain models, to assist getting in
and out of the vehicle at night or in
poorly-lit areas, two timed modes have
been provided.
Timing While Getting Into The Vehicle
— The overhead lights turn on according
to the following modes:
Will illuminate for a few seconds when
the doors are unlocked.
Will illuminate for approximately three
minutes when one of the doors is opened.
Will illuminate for a few seconds when
the doors are locked.
Timing is interrupted when the ignition is
cycled to ON mode.
Three Modes Are Available For Turning
Off Overhead Lighting:
When all doors are closed after
entering the vehicle, the three-minute
timer will stop and a seconds timer will
start for the interior lights. This timing
will stop when the ignition is cycled to ON
mode.
When doors are locked (either with key
fob or with key inserted on driver side
door), the overhead light turns off.
The interior lights will turn off after
15 minutes to preserve the battery.
Timing While Getting Out Of The
Vehicle — After cycling the ignition to
STOP mode, the overhead lights will turn
on as follows:
For a few seconds after the engine
stops.
For approximately three minutes when
one of the doors is opened.
For a few seconds when the last door
is closed.
The timing stops automatically when the
doors are locked.
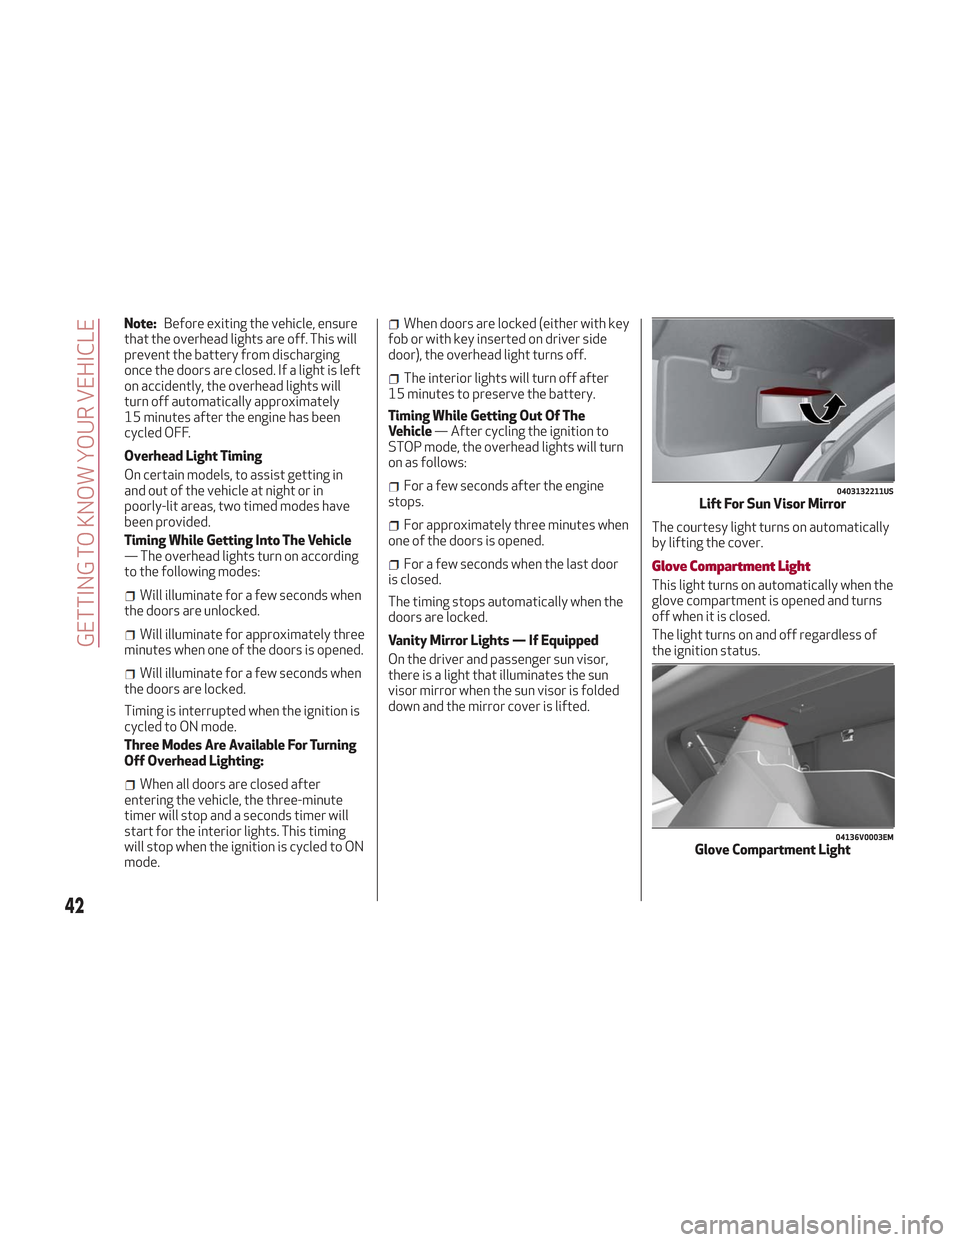
Vanity Mirror Lights — If Equipped
On the driver and passenger sun visor,
there is a light that illuminates the sun
visor mirror when the sun visor is folded
down and the mirror cover is lifted. The courtesy light turns on automatically
by lifting the cover.Glove Compartment Light
This light turns on automatically when the
glove compartment is opened and turns
off when it is closed.
The light turns on and off regardless of
the ignition status.
0403132211USLift For Sun Visor Mirror
04136V0003EMGlove Compartment Light
42
GETTING TO KNOW YOUR VEHICLE
Page 49 of 276

CLIMATE CONTROL
Passenger Compartment Air Vents
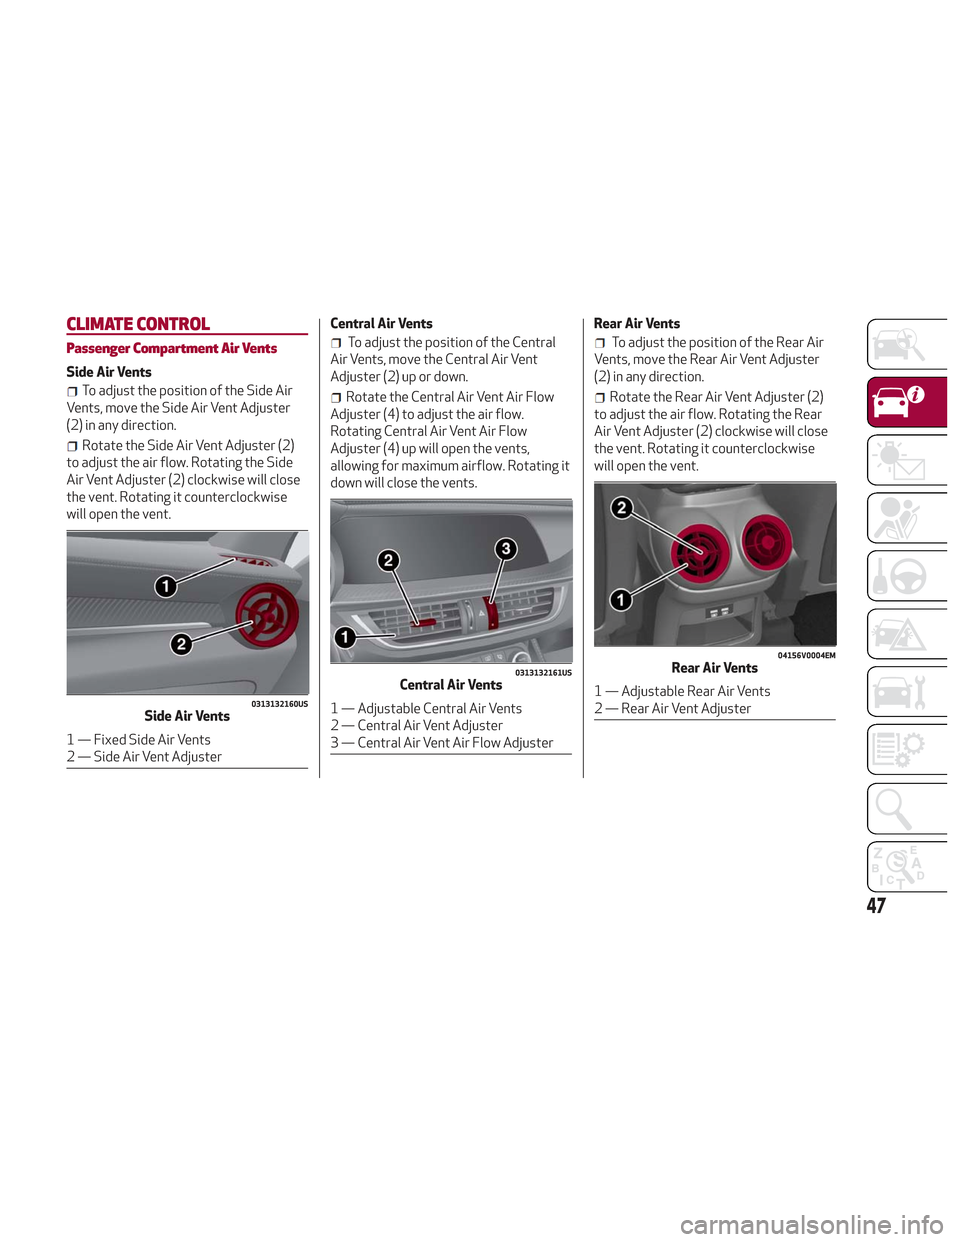
Side Air Vents
To adjust the position of the Side Air
Vents, move the Side Air Vent Adjuster
(2) in any direction.
Rotate the Side Air Vent Adjuster (2)
to adjust the air flow. Rotating the Side
Air Vent Adjuster (2) clockwise will close
the vent. Rotating it counterclockwise
will open the vent. Central Air Vents
To adjust the position of the Central
Air Vents, move the Central Air Vent
Adjuster (2) up or down.
Rotate the Central Air Vent Air Flow
Adjuster (4) to adjust the air flow.
Rotating Central Air Vent Air Flow
Adjuster (4) up will open the vents,
allowing for maximum airflow. Rotating it
down will close the vents. Rear Air Vents
To adjust the position of the Rear Air
Vents, move the Rear Air Vent Adjuster
(2) in any direction.
Rotate the Rear Air Vent Adjuster (2)
to adjust the air flow. Rotating the Rear
Air Vent Adjuster (2) clockwise will close
the vent. Rotating it counterclockwise
will open the vent.
0313132160USSide Air Vents
1 — Fixed Side Air Vents
2 — Side Air Vent Adjuster
0313132161USCentral Air Vents
1 — Adjustable Central Air Vents
2 — Central Air Vent Adjuster
3 — Central Air Vent Air Flow Adjuster
04156V0004EMRear Air Vents
1 — Adjustable Rear Air Vents
2 — Rear Air Vent Adjuster
47
Page 52 of 276

Climate Control Display Settings
The Climate Control settings are visible
on the Information and Entertainment
System radio screen.
The display on the Information and
Entertainment System is a pop up
window (1), which is activated by pushing
the buttons or turning the knobs on the
Climate Control system. The indicator
lights located on the buttons and knobs
indicate that the selected feature is
on/off. If no operation is performed for a
predetermined time, the pop-up will close
on the display.
Air Temperature Adjustment
Rotate the driver or passenger
Temperature Adjustment Knob clockwise
for warmer temperatures or
counterclockwise for cooler
temperatures. The set temperatures are
shown on the Information and
Entertainment System.
Push the SYNC button to sync the driver
and passenger air temperatures.
Rotate the passenger Temperature
Adjustment Knob to cancel the SYNC
function. This will set a new passenger
side temperature.
Rotate the Temperature Adjustment
Knob fully clockwise to engage the HI
(maximum heating) setting or fully
counterclockwise to engage the LO
(maximum cooling) setting. To deactivate
these functions, rotate the Temperature
Adjustment Knob to the desired
temperature.
Rear passengers’ temperature is linked
to driver side selection.
Air Distribution Selection
Push the Air Distribution Selection
button on the faceplate to change the
mode of air distribution. The follow
selectable option are explained below:
Air flow to the windshield and
demister window vents to
demist/defrost them.
Air flow at the central and side
dashboard vents to ventilate the
chest and the face.
Air flow to the front and rear floor
vents. This setting heats the
passenger compartment the
quickest.
Air flow distributed between the
floor vents (hotter air) and the
central and side dashboard vents
(cooler air). This air distribution
setting is useful on sunny days
during spring and autumn.
Air flow distributed between the
floor vents, windshield, and front
side window defrosting/demisting
vents. This distribution setting
warms the passenger compartment
while preventing the windows from
fogging up.0521128655USClimate Control Display Settings
1 — Climate Control Pop-up Display
50
GETTING TO KNOW YOUR VEHICLE
Page 53 of 276

Air flow distribution between the
windshield demisting/defrosting
vents, and side/central dashboard
vents. This distribution setting
sends air to the windshield in sunny
conditions.
Air flow distribution to all vents on
the vehicle.
In AUTO mode, the Climate Controls
automatically manage the air
distribution. When set manually, the
respective symbols on the Information
and Entertainment System indicate the
air distribution setting.
Fan Speed Adjustment
Turn the Blower Speed Knob to increase
or decrease the blower speed. The speed
is displayed with lighted indicators in the
Information and Entertainment System
display.
Maximum fan speed = all indicators
illuminated on the Information and
Entertainment System display
Minimum fan speed = one indicator
illuminated on the Information and
Entertainment System display
The fan can be turned off by rotating the
Blower Speed Knob clockwise to position
O (all segments on the Information and
Entertainment System display are turned
off).
Note: To restore automatic control of
the fan speed, push the AUTO button.
AUTO Button
When the AUTO button is pushed
(indicator illuminated), the Climate
Control system automatically adjusts the
following settings:
Quantity and distribution of air flow in
the passenger compartment
The air conditioner
Air recirculation
Cancels any manual settings
Selecting the AUTO function illuminates
the indicator on the A/C button.
If air distribution or the fan speed is
manual adjusted, the AUTO button
indicator will turn off to indicate that the
Climate Control system is no longer in
AUTO mode.
After a manual adjustment, push the AUTO
button to resume the automatic system.
SYNC Button
Push the SYNC button (indicator
illuminated) to sync the passenger side
air temperature with the driver side air
temperature.
This function makes temperature
regulation easier when the driver is
traveling alone.
Turn the passenger Temperature
Adjustment Knob or push the passenger
side Air Distribution Selection Button to
change the passenger side air
temperature and return to separate air
temperature management.
Air Recirculation And Air Quality
System (AQS)
Air Recirculation is managed according to
the following operating mode:
Automatic engagement: indicator is
illuminated above the “A” on the Air
Recirculation Button
Forced activation (air circulation
always activated): indicator illuminated
above the
icon on the Air
Recirculation Button
Forced deactivation (air recirculation
always off with intake of outside air):
both indicators not illuminated on the Air
Recirculation Button
The three operating conditions are
obtained by pushing the Air Recirculation
Button
in sequence.
Enabling The Air Quality System (AQS)
Function — If Equipped
When the automatic recirculation
function is selected, the AQS function
automatically activates internal air
recirculation when the outside air is
polluted (e.g. in heavy traffic and tunnels).
At low external temperatures or in high
humidity, the automatic function turns
off to avoid fogging up the windows. The
user can select the function again by
pushing the Air Recirculation Button.
51
Page 55 of 276

Humidity Sensor
The Humidity Sensor helps to prevent the
windows from fogging up. The AUTO
function (indicator illuminated) must be
on for the Humidity Sensor to function.
When outside temperature is low, the
system may turn the compressor on and
turn air recirculation off for safer driving.
Switching Off/On The Climate Control
System
Switching Off The Climate Control
System
Rotate the Air Speed Adjustment Knob
completely counterclockwise to turn off
the Climate Control System.
With the air conditioner off:
Air recirculation is on
The A/C compressor is off
The fan is off
The heated rear window can be
activated/deactivated
Note: The climate control system stores
the previously set temperatures and
resumes operation when any button on
the system is pushed.
Switching On The Climate Control
System
To switch the climate control system on
in automatic mode, push the AUTO
button.
Stop/Start
The Stop/Start system shuts off the
engine when vehicle speed is 0 mph
(0 km/h), and the climate control system
will continue to maintain comfort within
the vehicle.
Stop/Start will deactivate in the
following scenarios:
The climate control system is in AUTO
mode (indicator illuminated), and the
vehicle has yet to reach the set
temperature
The climate control system is in LO
maximum cooling
The climate control system is in HI
maximum heating
The climate control system is in the
MAX-DEF status
When the Stop/Start system is active,
the engine will restart if the inside
temperature changes significantly, or if
the LO setting, or MAX-DEF setting, is
activated.
With Stop/Start system on, air flow is
reduced to keep the compartment
comfort conditions for longer.
Until the temperature drastically
changes within the cabin, the climate
control system will continue to maintain
the temperature while the engine is off.
By deactivating the Stop/Start system
with the
button located on the dashboard, the climate control system
will take priority over the engine shutting
off.
Note:
In harsh climate conditions, limit the
use of the Stop/Start system to prevent
the compressor from continuously
switching on and off. This will cause
rapid misting of the windows and the
accumulation of humidity in the
passenger compartment.
When the Stop/Start system is on,
the climate control system will always
take air in from outside, reducing the
probability of the windows fogging up.
System Maintenance
In winter, the Climate Control System
must be turned on at least once a month
for approximately ten minutes.
Have the system inspected at an
authorized dealer before the summer.
53
Page 56 of 276

POWER WINDOWS
Power Window Switches
The power window switches work with
the ignition in the ON position and for
three minutes after the ignition has been
placed in the STOP position. When one of
the front doors is opened, this operation
is disabled.
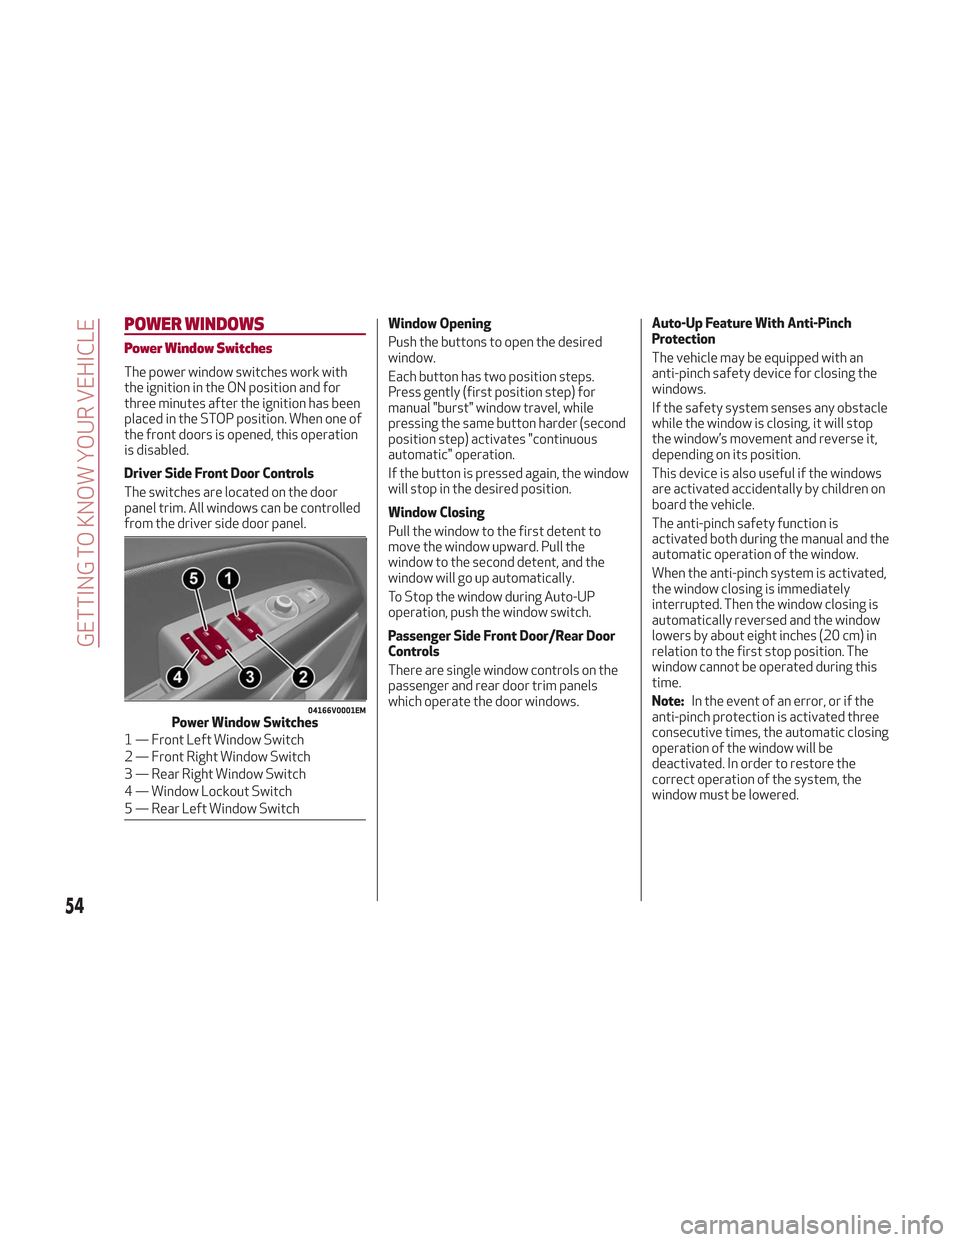
Driver Side Front Door Controls
The switches are located on the door
panel trim. All windows can be controlled
from the driver side door panel.Window Opening
Push the buttons to open the desired
window.
Each button has two position steps.
Press gently (first position step) for
manual "burst" window travel, while
pressing the same button harder (second
position step) activates "continuous
automatic" operation.
If the button is pressed again, the window
will stop in the desired position.
Window Closing
Pull the window to the first detent to
move the window upward. Pull the
window to the second detent, and the
window will go up automatically.
To Stop the window during Auto-UP
operation, push the window switch.
Passenger Side Front Door/Rear Door
Controls
There are single window controls on the
passenger and rear door trim panels
which operate the door windows.Auto-Up Feature With Anti-Pinch
Protection
The vehicle may be equipped with an
anti-pinch safety device for closing the
windows.
If the safety system senses any obstacle
while the window is closing, it will stop
the window’s movement and reverse it,
depending on its position.
This device is also useful if the windows
are activated accidentally by children on
board the vehicle.
The anti-pinch safety function is
activated both during the manual and the
automatic operation of the window.
When the anti-pinch system is activated,
the window closing is immediately
interrupted. Then the window closing is
automatically reversed and the window
lowers by about eight inches (20 cm) in
relation to the first stop position. The
window cannot be operated during this
time.
Note:
In the event of an error, or if the
anti-pinch protection is activated three
consecutive times, the automatic closing
operation of the window will be
deactivated. In order to restore the
correct operation of the system, the
window must be lowered.
04166V0001EMPower Window Switches
1 — Front Left Window Switch
2 — Front Right Window Switch
3 — Rear Right Window Switch
4 — Window Lockout Switch
5 — Rear Left Window Switch
54
GETTING TO KNOW YOUR VEHICLE
Page 57 of 276

Power Window System Initialization
If power supply is interrupted, the
electric window automatic operation
must be re-initialized.
To perform the initialization procedure,
which must be done on each door with the
doors closed, manually fully close the
window to be initialized.
Warning!
Never leave children unattended in a vehicle,
and do not let children play with power
windows. Do not leave the key fob in or near
the vehicle, or in a location accessible to
children. Occupants, particularly unattended
children, can become entrapped by the
windows while operating the power window
switches. Such entrapment may result in
serious injury or death.
POWER SUNROOF — IF
EQUIPPED
Power Sunroof
The power sunroof consists of a single
glass panel and is fitted with a power
sunshade the full length of the panel.
Operation of the sunroof is only possible
with the ignition in ON mode. Refer to
“Ignition System” in this chapter for
further information.
The sunroof has three preset positions:
Fully closed.
Comfort (intermediate opening).
Fully open.
Note: You cannot have the sunshade
closed when the sunroof is open.
Warning!
Never leave children unattended in a
vehicle, or with access to an unlocked
vehicle. Never leave the key fob in or near
the vehicle, or in a location accessible to
children. Do not leave the ignition of a
vehicle equipped with keyless ignition in the
ON mode. Occupants, particularly
unattended children, can become entrapped
by the power sunroof while operating the
power sunroof switch. Such entrapment
may result in serious injury or death.
In a collision, there is a greater risk of
being thrown from a vehicle with an open
sunroof. You could also be seriously injured or killed. Always fasten your seat belt
properly and make sure all passengers are
also properly secured.
Do not allow small children to operate the
sunroof. Never allow your fingers, other
body parts, or any object, to project through
the sunroof opening. Injury may result.
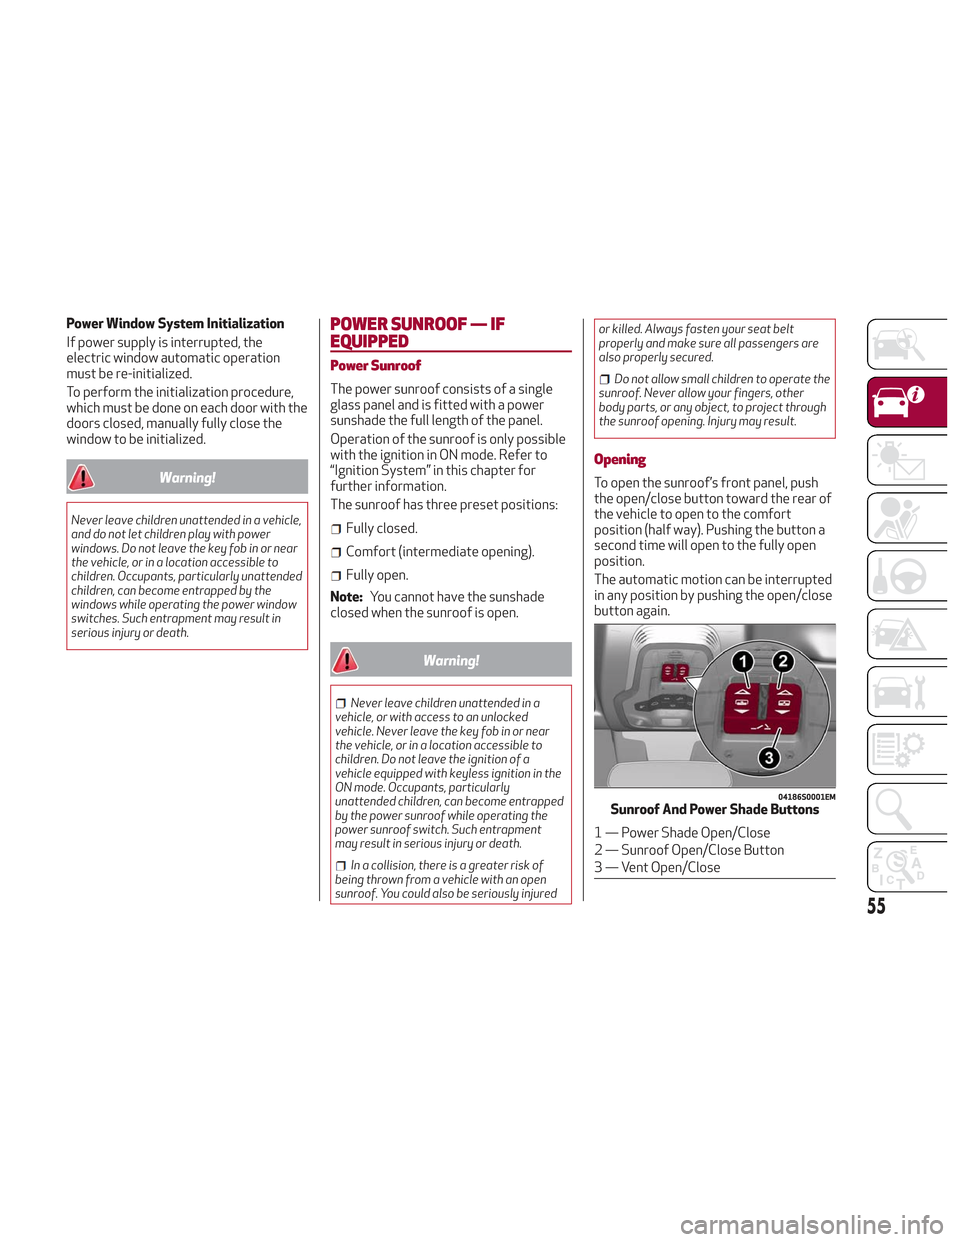
Opening
To open the sunroof’s front panel, push
the open/close button toward the rear of
the vehicle to open to the comfort
position (half way). Pushing the button a
second time will open to the fully open
position.
The automatic motion can be interrupted
in any position by pushing the open/close
button again.
04186S0001EMSunroof And Power Shade Buttons
1 — Power Shade Open/Close
2 — Sunroof Open/Close Button
3 — Vent Open/Close
55
Page 59 of 276

HOOD
Opening The Hood
To open the hood, proceed as follows:
1. Pull the release lever located on the
driver’s side kick panel.
2. Move to the outside of the vehicle and
position yourself in front of the grille.
3. Lift the hood slightly.
4. Move the under-hood latch from right
to left to release the hood.5. Raise the hood completely. The
operation is assisted by the addition of
two gas props which hold it in the open
position.
Note:
Use both hands to lift the hood.
Before lifting, check that the windshield
wiper arms are not raised from the
windshield or in operation. Also, ensure
that the vehicle is stationary and that
the electric park brake is engaged.
Do not tamper with the props.
Assist the hood while lifting it.
Closing The Hood
To close, lower the hood to
approximately 16 inches (40 cm) from
the engine compartment then let it drop.
Make sure that the hood is completely
closed and fully latched. Do this by trying
to open it. If it is not perfectly closed, do
not try to push the hood lid down, but
open it and repeat the procedure.
Note: Always check that the hood is
closed correctly to prevent it from
opening while the vehicle is travelling.
Since the hood is equipped with a double
locking system, one for each side, you
must check that it is closed on each side.
Warning!
Be sure the hood is fully latched before
driving your vehicle. If the hood is not fully
latched, it could open when the vehicle is in
motion and block your vision. Failure to
follow this warning could result in serious
injury or death.
0403132207USHood Release Lever
0403132304USHood Latch Location
57