2018 Alfa Romeo Stelvio ABS
[x] Cancel search: ABSPage 196 of 276

Fuse Extracting Pliers
To replace a fuse, use the pliers hooked
to the fuse box.
Grab the pliers from the upper tabs,
press them, and extract the pliers pulling
upwards.
The pliers have two different ends, both
of which are specifically designed to
remove the different types of fuses
present in the vehicle:After use, return the pliers to their proper
position by following the below
procedures:
Grasp the pliers from the upper tabs
and insert them into their housing.
Push downward on the pliers into their
housing until they click into place.
Warning!
When replacing a blown fuse, always use
an appropriate replacement fuse with the
same amp rating as the original fuse. Never
replace a fuse with another fuse of higher
amp rating. Never replace a blown fuse with
metal wires or any other material. Do not
place a fuse inside a circuit breaker cavity
or vice versa. Failure to use proper fuses
08036S0001EMBlade Fuses
1 — Electrical Circuit
2 — Blade Fuse With Good Electrical
Circuit
3—
Blade Fuse With Bad Electrical Circuit
08036S0002EMJ-CASE Fuse
1 — Electrical Circuit
2—
Case Fuse With Good Electrical Circuit
3—Case Fuse With Bad Electrical Circuit
08036V0053EMFuse Box
08036S0005EMFuse Extracting Pliers
1 — MINI fuse
2 — J-CASE fuse
194
IN CASE OF EMERGENCY
Page 201 of 276
Inflation Procedure
Warning!
Do not attempt to seal a tire on the side of
the vehicle closest to traffic. Pull far enough
off the road to avoid the danger of being hit
when using the Tire Service Kit.
Do not use Tire Service Kit or drive the
vehicle under the following circumstances:
If the puncture in the tire tread is
approximately 1/4 inch (6 mm) or larger.
If the tire has any sidewall damage.
If the tire has any damage from driving
with extremely low tire pressure.
If the tire has any damage from driving on
a flat tire.
If the wheel has any damage.
If you are unsure of the condition of the
tire or the wheel.
Keep Tire Service Kit away from open
flames or heat sources.
A loose Tire Service Kit thrown forward in
a collision or hard stop could endanger the
occupants of the vehicle. Always stow the
Tire Service Kit in the place provided. Failure
to follow these warnings can result in
injuries that are serious or fatal to you, your
passengers, and others around you.
Take care not to allow the contents of Tire
Service Kit to come in contact with hair,
eyes, or clothing. Tire Service Kit sealant is
harmful if inhaled, swallowed, or absorbed through the skin. It causes skin, eye, and
respiratory irritation. Flush immediately
with plenty of water if there is any contact
with eyes or skin. Change clothing as soon
as possible, if there is any contact with
clothing.
Tire Service Kit Sealant solution contains
latex. In case of an allergic reaction or rash,
consult a physician immediately. Keep Tire
Service Kit out of reach of children. If
swallowed, rinse mouth immediately with
plenty of water and drink plenty of water.
Do not induce vomiting! Consult a physician
immediately.
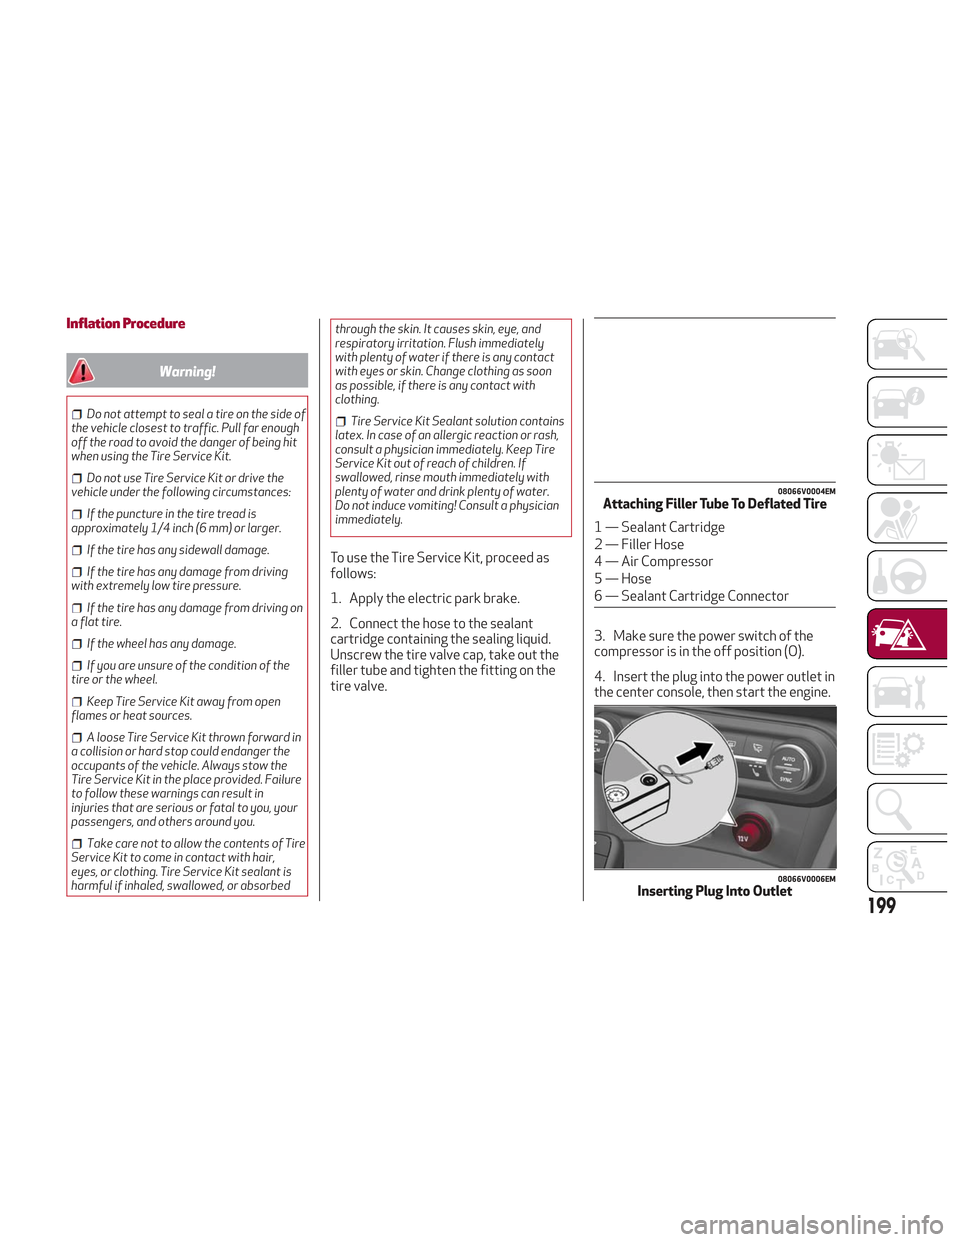
To use the Tire Service Kit, proceed as
follows:
1. Apply the electric park brake.
2. Connect the hose to the sealant
cartridge containing the sealing liquid.
Unscrew the tire valve cap, take out the
filler tube and tighten the fitting on the
tire valve. 3. Make sure the power switch of the
compressor is in the off position (O).
4. Insert the plug into the power outlet in
the center console, then start the engine.
08066V0004EMAttaching Filler Tube To Deflated Tire
1 — Sealant Cartridge
2 — Filler Hose
4 — Air Compressor
5 — Hose
6 — Sealant Cartridge Connector
08066V0006EMInserting Plug Into Outlet
199
Page 226 of 276

Note:
For topping up, refer to "Fluids And
Lubricants" in "Technical Specifications"
for proper coolant specifications.
Do not use pure water, alcohol-based
coolants, corrosions inhibitors or
additional anti-rust products because
they may be incompatible with the
engine coolant and cause the clogging
of the radiator. The use of propylene
glycol-based coolant is also not
recommended.
Engine Cooling/Intercooler System Cap
To prevent loss of engine coolant, make
sure that the expansion tank cap is
closed. If it is open, screw it completely
until you reach/hear the click.
Periodically check the cap and clean it
from any foreign bodies that may have
deposited on the external surface.
Warning!
Never add coolant with the engine hot or
overheated.
Do not attempt to cool an overheated
engine by loosening or removing the cap. The
heat causes a considerable increase in
pressure in the cooling system.
To prevent damage to the engine, only
use the engine cooling circuit caps provided.
Disposal of Used Coolant
Disposal of engine/intercooler coolant is
subject to legal requirements. Contact
the appropriate body to determine local
regulations.
Note:
To prevent the fluid from being
ingested by children or animals, do not
keep it in open containers or pour it on
the ground. If ingested, contact a doctor
immediately. Eliminate any traces of
fluid from the ground immediately.
When the vehicle stops after a short
trip, steam may be seen coming out
from front of the hood. This is a normal
phenomenon which is due to the
presence of rain, snow or a lot of
moisture on the surface of the radiator.
With engine and system cold, do not
top up with coolant beyond the
maximum level indicated on the
reservoir in the engine compartment.
Braking System
In order to guarantee the efficiency of
the braking system, periodically check its
components; for this operation, contact
an authorized dealer.
See the "Maintenance Plan" for the
correct servicing intervals.
Note: Driving with your foot resting on
the brake pedal may compromise its
efficiency, increasing the risk of accidents. When driving, never keep your
foot on the brake pedal and don’t put
unnecessary strain on it to prevent the
brakes from overheating. Excess pad
wear may cause damage to the braking
system.
When an insufficient oil level is
detected, contact an authorized dealer
to have the system checked.
Always keep the cap of the brake
fluid reservoir (in the engine
compartment) completely closed.
Warning!
Use only manufacturer's recommended
brake fluid. Refer to “Fluids And Lubricants”
in “Technical Specifications” for further
information. Using the wrong type of brake
fluid can severely damage your brake
system and/or impair its performance. The
proper type of brake fluid for your vehicle is
also identified on the original factory
installed hydraulic master cylinder
reservoir.
To avoid contamination from foreign matter
or moisture, use only new brake fluid or fluid
that has been in a tightly closed container.
Keep the master cylinder reservoir cap secured
at all times. Brake fluid in a open container
absorbs moisture from the air resulting in a
lower boiling point. This may cause it to boil
unexpectedly during hard or prolonged braking,
resulting in sudden brake failure. This could
result in a collision.
224
SERVICING AND MAINTENANCE
Page 228 of 276
TIRES
Tire Safety Information
Tire safety information will cover aspects
of the following information: Tire
Markings, Tire Identification Numbers,
Tire Terminology and Definitions, Tire
Pressures, and Tire Loading.
Tire MarkingsNote:
P (Passenger) — Metric tire sizing is
based on U.S. design standards.
P-Metric tires have the letter “P” molded
into the sidewall preceding the size
designation. Example: P215/
65R15 95H.
European — Metric tire sizing is
based on European design standards.
Tires designed to this standard have the
tire size molded into the sidewall
beginning with the section width. The
letter "P" is absent from this tire size
designation. Example: 215/65R15 96H.
LT (Light Truck) — Metric tire sizing is
based on U.S. design standards. The size
designation for LT-Metric tires is the
same as for P-Metric tires except for the
letters “LT” that are molded into the
sidewall preceding the size designation.
Example: LT235/85R16.
Temporary spare tires are designed
for temporary emergency use only.
Temporary high pressure compact spare
tires have the letter “T” or “S” molded
into the sidewall preceding the size
designation. Example: T145/
80D18 103M.
High flotation tire sizing is based on
U.S. design standards and it begins with
the tire diameter molded into the
sidewall. Example: 31x10.5 R15 LT.
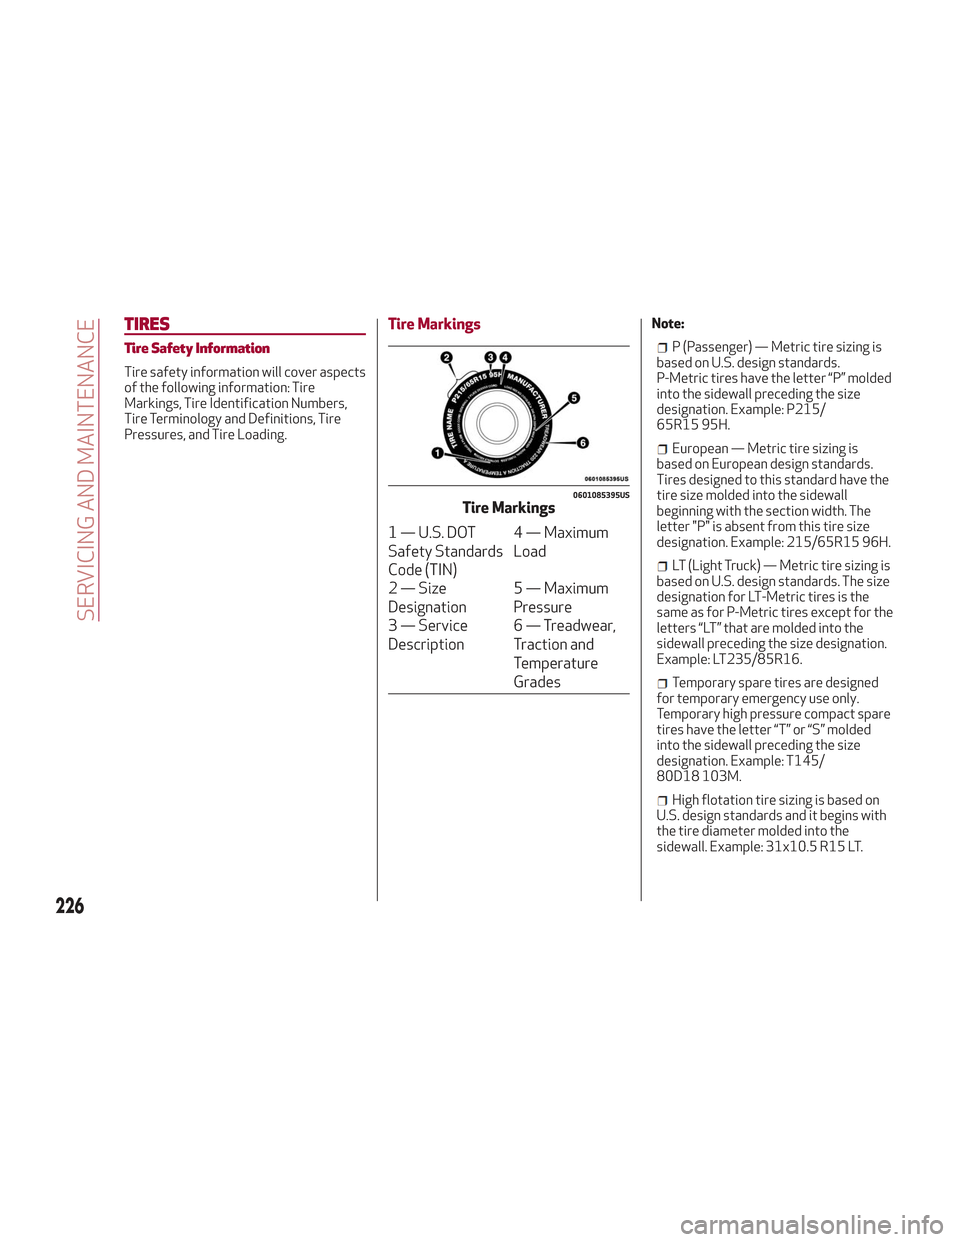
0601085395USTire Markings
1 — U.S. DOT
Safety Standards
Code (TIN) 4 — Maximum
Load
2 — Size
Designation 5 — Maximum
Pressure
3 — Service
Description 6 — Treadwear,
Traction and
Temperature
Grades
226
SERVICING AND MAINTENANCE
Page 230 of 276
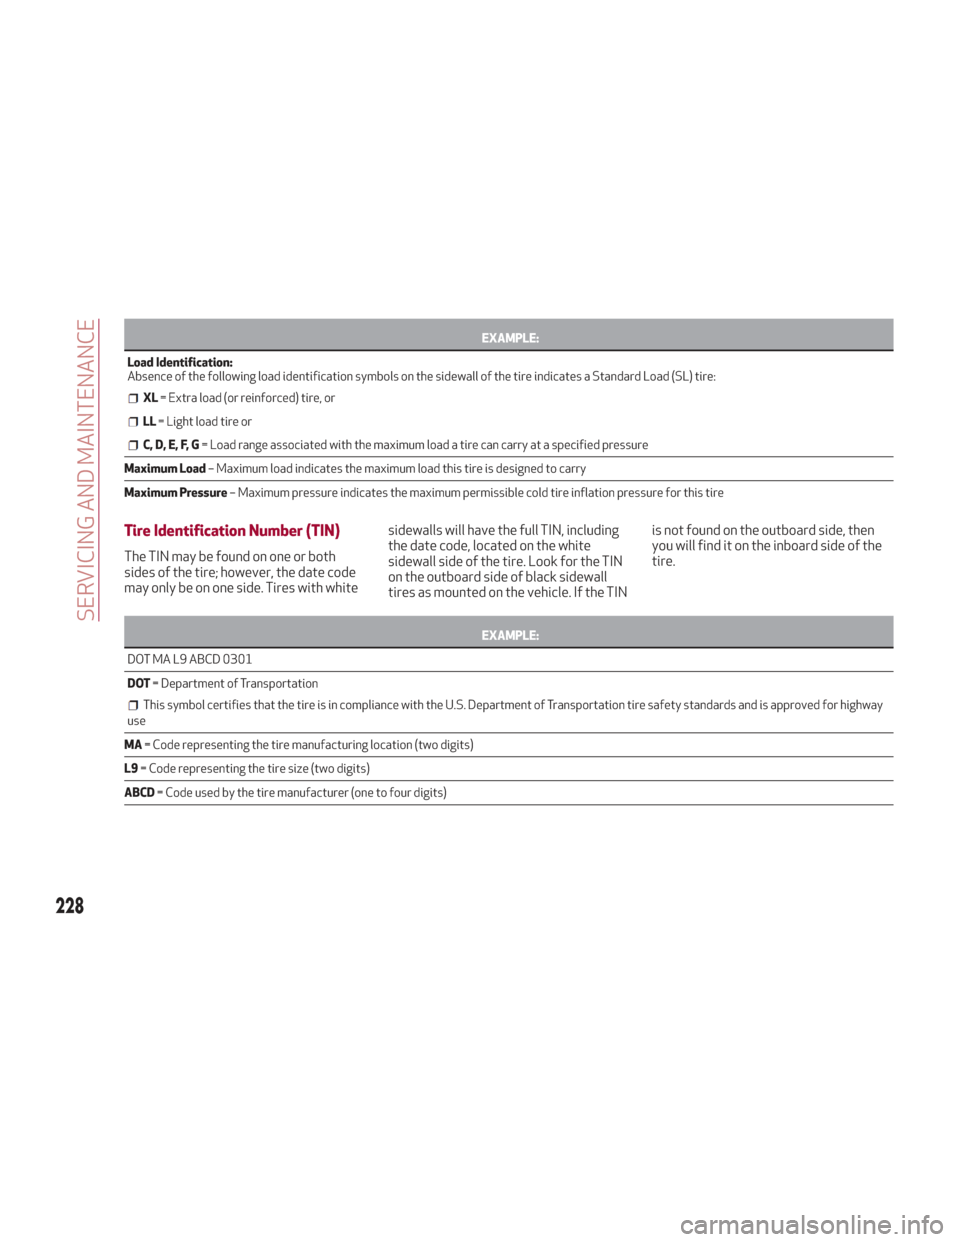
EXAMPLE:
Load Identification:
Absence
of the following load identification symbols on the sidewall of the tire indicates a Standard Load (SL) tire:
XL= Extra load (or reinforced) tire, or
LL= Light load tire or
C, D, E, F, G = Load range associated with the maximum load a tire can carry at a specified pressure
Maximum Load – Maximum load indicates the maximum load this tire is designed to carry
Maximum Pressure – Maximum pressure indicates the maximum permissible cold tire inflation pressure for this tire
Tire Identification Number (TIN)
The TIN may be found on one or both
sides of the tire; however, the date code
may only be on one side. Tires with white sidewalls will have the full TIN, including
the date code, located on the white
sidewall side of the tire. Look for the TIN
on the outboard side of black sidewall
tires as mounted on the vehicle. If the TINis not found on the outboard side, then
you will find it on the inboard side of the
tire.
EXAMPLE:
DOT MA L9 ABCD 0301
DO
T= Department of Transportation
This symbol certifies that the tire is in compliance with the U.S. Department of Transportation tire safety standards and is approved for highway
use
MA = Code representing the tire manufacturing location (two digits)
L9 = Code representing the tire size (two digits)
ABCD = Code used by the tire manufacturer (one to four digits)
228
SERVICING AND MAINTENANCE
Page 246 of 276
Engine Compartment
At the end of every winter, wash the
engine compartment thoroughly, taking
care not to aim the jet of water directly at
the electronic control units or at the
windshield wiper motors. Have this
operation performed at a specialized
workshop.
Note:The washing should take place
with the engine cold and the ignition
device in the STOP position. After the
washing operation, make sure that the
various protections (e.g. rubber caps and
guards) have not been removed or
damaged.INTERIORS
Periodically check the cleanliness of the
interior, beneath the mats, which could
cause oxidation of the sheet metal.
Seats And Fabric Parts
Remove dust with a soft brush or a
vacuum cleaner. It is advised to use a
moist brush on velvet upholstery. Rub the
seats with a sponge moistened with a
solution of water and neutral detergent.
Leather Seats
Remove the dry dirt with a chamois or
slightly damp cloth, without exerting too
much pressure.
Remove any liquid or grease stains using
an absorbent dry cloth, without rubbing.
Then clean with a soft cloth or buckskin
cloth dampened with water and mild
soap. If the stain persists, use specific
products and observe the instructions
carefully.
Note: Never use alcohol. Make sure that
the cleaning products used contain no
alcohol or alcohol derivatives, even in
small quantities.
Plastic And Coated Parts
Clean interior plastic parts with a damp
cloth (if possible made from microfiber),
and a solution of water and neutral,
non-abrasive detergent.
To clean oily or persistent stains, use
specific products free from solvents and
designed to maintain the original
appearance and color of the components.
Remove any dust using a microfiber
cloth, if necessary moistened with water.
The use of paper tissues is not
recommended as these may leave
residues.
Genuine Leather Parts
Use only water and mild soap to clean
these parts. Never use alcohol or
alcohol-based products.
Before using a specific product for
cleaning interiors, make sure that it does
not contain alcohol and/or alcohol based
substances.
Carbon Fiber Parts
To eliminate small scratches and marks
on the carbon, contact your authorized
dealer. An improperly performed
operation may irreparably damage the
carbon.
244
SERVICING AND MAINTENANCE
Page 248 of 276

IDENTIFICATION DATA
Vehicle Identification Number
The Vehicle Identification Number (VIN)
is stamped on a plate on the front left
corner of the dashboard trim, which can
be seen from outside the vehicle, through
the windshield.This number is also stamped on the
chassis near the front left shock
absorber and can be seen by opening the
engine compartment hood.
Vehicle Identification Number (VIN)
Plate
The plates are located on the left side A
pillar and contain the data about:
Chassis number (VIN).
Vehicle type (USA and Canada only).
Color code.
Place of manufacturing of the vehicle
(USA and Mexico only).
Vehicle manufacturing date.
Maximum permitted weights.
Permitted tire inflation pressure (USA
and Canada only).
10016V0001EMVehicle Identification Number
10016V0002EMVehicle Identification Number
246
TECHNICAL SPECIFICATIONS
Page 265 of 276
Customer Assistance For The Hearing
Or Speech Impaired (TDD/TTY)
To assist customers who have hearing
difficulties, the manufacturer has
installed special TDD
(Telecommunication Devices for the
Deaf) equipment at its customer center.
Any hearing or speech impaired
customer, who has access to a TDD or a
conventional teletypewriter (TTY) in the
United States, can communicate with the
manufacturer by dialing
1-800-380-2479.
Canadian residents with hearing
difficulties that require assistance can
use the special needs relay service
offered by Bell Canada. For TTY
teletypewriter users, dial 711 and for
Voice callers, dial 1-800-855-0511 to
connect with a Bell Relay Service
operator.
Service Contract
You may have purchased a service
contract for a vehicle to help protect you
from the high cost of unexpected repairs
after the manufacturer's New Vehicle
Limited Warranty expires. The
manufacturer stands behind only the
manufacturer's service contracts. If you
purchased a manufacturer's service
contract, you will receive Plan Provisions
and an Owner Identification Card in the
mail within three weeks of the vehicle
delivery date. If you have any questions
about the service contract, call themanufacturer's Service Contract
National Customer Hotline at
1-800-521-9922 (Canadian residents,
call (800) 465-2001 English / (800)
387-9983 French).
The manufacturer will not stand behind
any service contract that is not the
manufacturer's service contract. It is not
responsible for any service contract
other than the manufacturer's service
contract. If you purchased a service
contract that is not a manufacturer's
service contract, and you require service
after the manufacturer's New Vehicle
Limited Warranty expires, please refer to
the contract documents, and contact the
person listed in those documents.
We appreciate that you have made a
major investment when you purchased
the vehicle. An authorized dealer has also
made a major investment in facilities,
tools, and training to assure that you are
absolutely delighted with the ownership
experience. You will be pleased with their
sincere efforts to resolve any warranty
issues or related concerns.
Warning!
Engine exhaust (internal combustion engines
only), some of its constituents, and certain
vehicle components contain, or emit,
chemicals known to the State of California
to cause cancer and birth defects, or other
reproductive harm. In addition, certain fluids
contained in vehicles and certain products of
component wear contain, or emit, chemicals
known to the State of California to cause
cancer and birth defects, or other
reproductive harm.
263