2018 Alfa Romeo Stelvio control unit
[x] Cancel search: control unitPage 167 of 276

set, the speed control speed will be
lowered to that of the Speed Limiter.
Warning!
Leaving the Speed Control system on when
not in use is dangerous. You could
accidentally set the system or cause it to go
faster than you want. You could lose control
and have an accident. Always leave the
system OFF when you are not using it.
Setting The Desired Speed
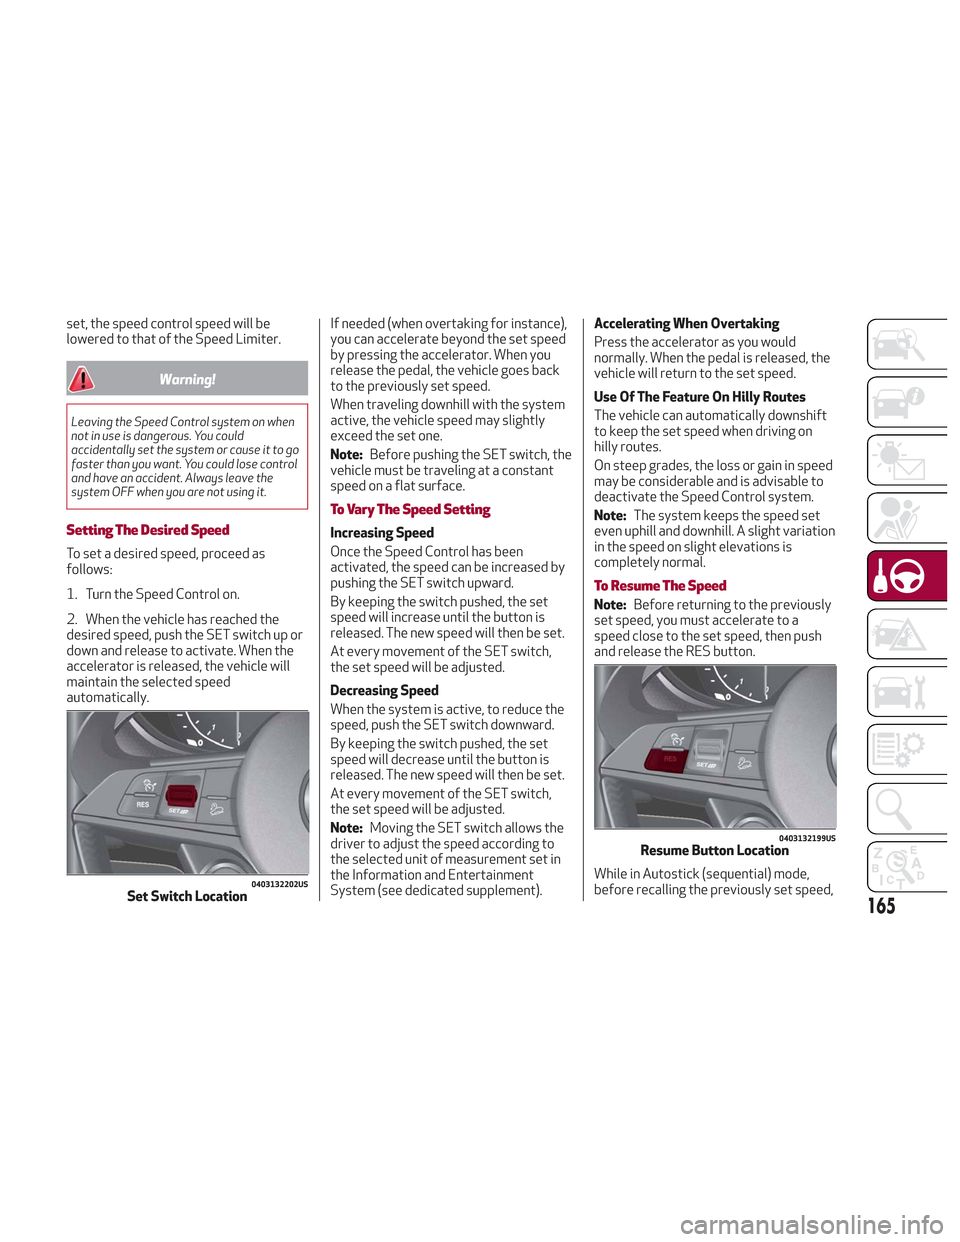
To set a desired speed, proceed as
follows:
1. Turn the Speed Control on.
2. When the vehicle has reached the
desired speed, push the SET switch up or
down and release to activate. When the
accelerator is released, the vehicle will
maintain the selected speed
automatically.If needed (when overtaking for instance),
you can accelerate beyond the set speed
by pressing the accelerator. When you
release the pedal, the vehicle goes back
to the previously set speed.
When traveling downhill with the system
active, the vehicle speed may slightly
exceed the set one.
Note:
Before pushing the SET switch, the
vehicle must be traveling at a constant
speed on a flat surface.
To Vary The Speed Setting
Increasing Speed
Once the Speed Control has been
activated, the speed can be increased by
pushing the SET switch upward.
By keeping the switch pushed, the set
speed will increase until the button is
released. The new speed will then be set.
At every movement of the SET switch,
the set speed will be adjusted.
Decreasing Speed
When the system is active, to reduce the
speed, push the SET switch downward.
By keeping the switch pushed, the set
speed will decrease until the button is
released. The new speed will then be set.
At every movement of the SET switch,
the set speed will be adjusted.
Note: Moving the SET switch allows the
driver to adjust the speed according to
the selected unit of measurement set in
the Information and Entertainment
System (see dedicated supplement). Accelerating When Overtaking
Press the accelerator as you would
normally. When the pedal is released, the
vehicle will return to the set speed.
Use Of The Feature On Hilly Routes
The vehicle can automatically downshift
to keep the set speed when driving on
hilly routes.
On steep grades, the loss or gain in speed
may be considerable and is advisable to
deactivate the Speed Control system.
Note:
The system keeps the speed set
even uphill and downhill. A slight variation
in the speed on slight elevations is
completely normal.
To Resume The Speed
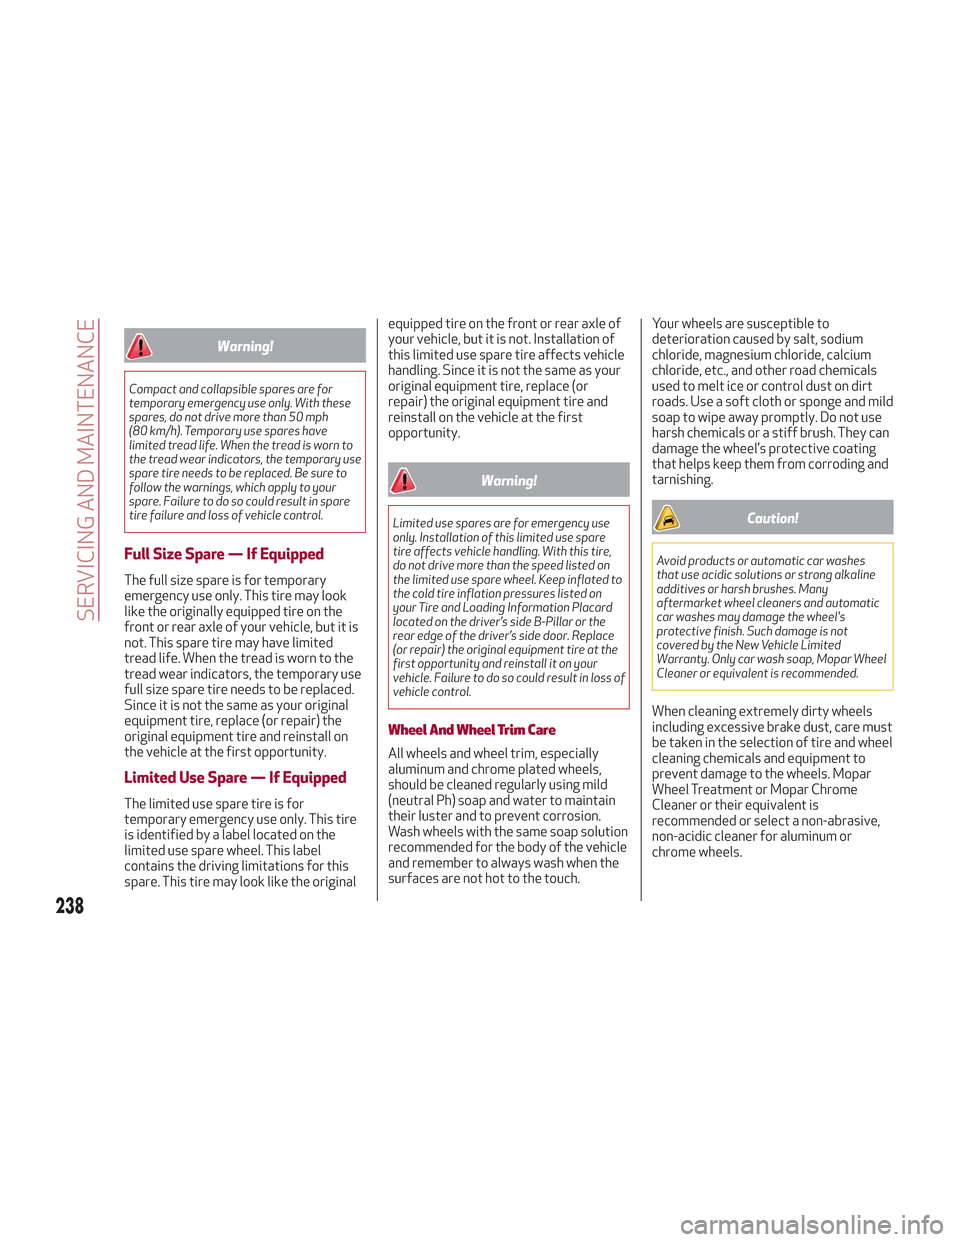
Note: Before returning to the previously
set speed, you must accelerate to a
speed close to the set speed, then push
and release the RES button.
While in Autostick (sequential) mode,
before recalling the previously set speed,
0403132202USSet Switch Location
0403132199USResume Button Location
165
Page 197 of 276

may result in serious personal injury, fire
and/or property damage.
Before replacing a fuse, make sure that
the ignition is off and that all the other
services are switched off and/or
disengaged.
If the replaced fuse blows again, contact
an authorized dealer.
If a general protection fuse for safety
systems (air bag system, braking system),
power unit systems (engine system,
transmission system) or steering system
blows, contact an authorized dealer.
Fuse Location
The fuses, which can be replaced by the
user, are grouped in two boxes below the
passenger side foot board and inside the
luggage compartment.
Control Unit Under Passenger Side
Footboard
To access the fuses, proceed as follows:
1. Lift the upper end of the footboard on
the passenger side, pulling to release the
two buttons. Release Buttons On Footboard
1 — Footboard
2. Unscrewing the two hooks, remove
the panel pulling downward.
Release Hooks On Footboard
2 — Panel
The fuses are freely accessible on the
control unit.
After replacing the fuse, make sure that
panel and footboard are correctly locked.
Luggage Compartment Fuse Box
To access the fuses, proceed as follows:
1. Lift the luggage compartment cover.
2. Remove the control unit cover.
The fuses are freely accessible on the
control unit.
The number identifying the electrical
component corresponding to each fuse is
shown on the cover.
After replacing a fuse, make sure that
you have closed the cover correctly.
08036V0010EM
08036V0011EM
08036V0014EMControl Unit
195
Page 198 of 276

Control Unit Under Passenger Side Footboard
FUNCTIONFUSEAMPERAGE
Front power window (driver’s side) F3325
Front
power window (passenger side) F3425
Supply for Information and Entertainment system, Climate Control
system, alarm, power door mirror folding, EOBD system, USB port F36
15
Safe Lock device (driver side door unlock – if equipped), doors
unlock, central lock F38
20
Windshield washer pump F4320
Rear left power window F4725
Rear right power window F4825
Heater rear window coil F9415
08036S0013EMPassenger Side Control Unit
196
IN CASE OF EMERGENCY
Page 199 of 276

Luggage Compartment Fuse Box
FUNCTIONFUSEAMPERE
Receiver module (TTM/TTEBM) F0140
Hi-Fi
system F0830
I-Drive / USB Socket / AUX / USB Charger F2110
KL15/a 12V Power socket in the luggage compartment F2220
Trailer light control unit power supply (+30) F120
Trailer light control unit power supply (+30) F215
Trailer socket (only EMEA) (+30) F310
Tow bar (+15) F410
08036V0015EMLuggage Compartment Control Unit
197
Page 239 of 276

equipment dealer with any questions you
may have on tire specifications or
capability. Failure to use equivalent
replacement tires may adversely affect
the safety, handling, and ride of your
vehicle.
Warning!
Do not use a tire, wheel size, load rating,
or speed rating other than that specified for
your vehicle. Some combinations of
unapproved tires and wheels may change
suspension dimensions and performance
characteristics, resulting in changes to
steering, handling, and braking of your
vehicle. This can cause unpredictable
handling and stress to steering and
suspension components. You could lose
control and have a collision resulting in
serious injury or death. Use only the tire and
wheel sizes with load ratings approved for
your vehicle.
Never use a tire with a smaller load index
or capacity, other than what was originally
equipped on your vehicle. Using a tire with a
smaller load index could result in tire
overloading and failure. You could lose
control and have a collision.
Failure to equip your vehicle with tires
having adequate speed capability can result
in sudden tire failure and loss of vehicle
control.
Caution!
Replacing original tires with tires of a
different size may result in false
speedometer and odometer readings.
Spare Tires — If Equipped
Note: For vehicles equipped with Tire
Service Kit instead of a spare tire, please
refer to “Tire Service Kit” in “In Case Of
Emergency” for further information.
Caution!
Because of the reduced ground clearance,
do not take your vehicle through an
automatic car wash with a compact or
limited use temporary spare installed.
Damage to the vehicle may result.
Spare Tire Matching Original
Equipped Tire And Wheel — If
Equipped
Your vehicle may be equipped with a
spare tire and wheel equivalent in look
and function to the original equipment
tire and wheel found on the front or rear
axle of your vehicle. This spare tire may
be used in the tire rotation for your
vehicle. If your vehicle has this option,
refer to an authorized tire dealer for the
recommended tire rotation pattern.
Compact Spare Tire — If Equipped
The compact spare is for temporary
emergency use only. You can identify if
your vehicle is equipped with a compact
spare by looking at the spare tire
description on the Tire and Loading
Information Placard located on the
driver’s side door opening or on the
sidewall of the tire. Compact spare tire
descriptions begin with the letter “T” or
“S” preceding the size designation.
Example: T145/80D18 103M.
T, S = Temporary Spare Tire
Since this tire has limited tread life, the
original equipment tire should be
repaired (or replaced) and reinstalled on
your vehicle at the first opportunity.
Do not install a wheel cover or attempt to
mount a conventional tire on the compact
spare wheel, since the wheel is designed
specifically for the compact spare tire.
Do not install more than one compact
spare tire and wheel on the vehicle at any
given time.
237
Page 240 of 276

Warning!
Compact and collapsible spares are for
temporary emergency use only. With these
spares, do not drive more than 50 mph
(80 km/h). Temporary use spares have
limited tread life. When the tread is worn to
the tread wear indicators, the temporary use
spare tire needs to be replaced. Be sure to
follow the warnings, which apply to your
spare. Failure to do so could result in spare
tire failure and loss of vehicle control.
Full Size Spare — If Equipped
The full size spare is for temporary
emergency use only. This tire may look
like the originally equipped tire on the
front or rear axle of your vehicle, but it is
not. This spare tire may have limited
tread life. When the tread is worn to the
tread wear indicators, the temporary use
full size spare tire needs to be replaced.
Since it is not the same as your original
equipment tire, replace (or repair) the
original equipment tire and reinstall on
the vehicle at the first opportunity.
Limited Use Spare — If Equipped
The limited use spare tire is for
temporary emergency use only. This tire
is identified by a label located on the
limited use spare wheel. This label
contains the driving limitations for this
spare. This tire may look like the originalequipped tire on the front or rear axle of
your vehicle, but it is not. Installation of
this limited use spare tire affects vehicle
handling. Since it is not the same as your
original equipment tire, replace (or
repair) the original equipment tire and
reinstall on the vehicle at the first
opportunity.
Warning!
Limited use spares are for emergency use
only. Installation of this limited use spare
tire affects vehicle handling. With this tire,
do not drive more than the speed listed on
the limited use spare wheel. Keep inflated to
the cold tire inflation pressures listed on
your Tire and Loading Information Placard
located on the driver’s side B-Pillar or the
rear edge of the driver’s side door. Replace
(or repair) the original equipment tire at the
first opportunity and reinstall it on your
vehicle. Failure to do so could result in loss of
vehicle control.
Wheel And Wheel Trim Care
All wheels and wheel trim, especially
aluminum and chrome plated wheels,
should be cleaned regularly using mild
(neutral Ph) soap and water to maintain
their luster and to prevent corrosion.
Wash wheels with the same soap solution
recommended for the body of the vehicle
and remember to always wash when the
surfaces are not hot to the touch.
Your wheels are susceptible to
deterioration caused by salt, sodium
chloride, magnesium chloride, calcium
chloride, etc., and other road chemicals
used to melt ice or control dust on dirt
roads. Use a soft cloth or sponge and mild
soap to wipe away promptly. Do not use
harsh chemicals or a stiff brush. They can
damage the wheel’s protective coating
that helps keep them from corroding and
tarnishing.
Caution!
Avoid products or automatic car washes
that use acidic solutions or strong alkaline
additives or harsh brushes. Many
aftermarket wheel cleaners and automatic
car washes may damage the wheel's
protective finish. Such damage is not
covered by the New Vehicle Limited
Warranty. Only car wash soap, Mopar Wheel
Cleaner or equivalent is recommended.
When cleaning extremely dirty wheels
including excessive brake dust, care must
be taken in the selection of tire and wheel
cleaning chemicals and equipment to
prevent damage to the wheels. Mopar
Wheel Treatment or Mopar Chrome
Cleaner or their equivalent is
recommended or select a non-abrasive,
non-acidic cleaner for aluminum or
chrome wheels.
238
SERVICING AND MAINTENANCE
Page 246 of 276

Engine Compartment
At the end of every winter, wash the
engine compartment thoroughly, taking
care not to aim the jet of water directly at
the electronic control units or at the
windshield wiper motors. Have this
operation performed at a specialized
workshop.
Note:The washing should take place
with the engine cold and the ignition
device in the STOP position. After the
washing operation, make sure that the
various protections (e.g. rubber caps and
guards) have not been removed or
damaged.INTERIORS
Periodically check the cleanliness of the
interior, beneath the mats, which could
cause oxidation of the sheet metal.
Seats And Fabric Parts
Remove dust with a soft brush or a
vacuum cleaner. It is advised to use a
moist brush on velvet upholstery. Rub the
seats with a sponge moistened with a
solution of water and neutral detergent.
Leather Seats
Remove the dry dirt with a chamois or
slightly damp cloth, without exerting too
much pressure.
Remove any liquid or grease stains using
an absorbent dry cloth, without rubbing.
Then clean with a soft cloth or buckskin
cloth dampened with water and mild
soap. If the stain persists, use specific
products and observe the instructions
carefully.
Note: Never use alcohol. Make sure that
the cleaning products used contain no
alcohol or alcohol derivatives, even in
small quantities.
Plastic And Coated Parts
Clean interior plastic parts with a damp
cloth (if possible made from microfiber),
and a solution of water and neutral,
non-abrasive detergent.
To clean oily or persistent stains, use
specific products free from solvents and
designed to maintain the original
appearance and color of the components.
Remove any dust using a microfiber
cloth, if necessary moistened with water.
The use of paper tissues is not
recommended as these may leave
residues.
Genuine Leather Parts
Use only water and mild soap to clean
these parts. Never use alcohol or
alcohol-based products.
Before using a specific product for
cleaning interiors, make sure that it does
not contain alcohol and/or alcohol based
substances.
Carbon Fiber Parts
To eliminate small scratches and marks
on the carbon, contact your authorized
dealer. An improperly performed
operation may irreparably damage the
carbon.
244
SERVICING AND MAINTENANCE