2018 Alfa Romeo Stelvio buttons
[x] Cancel search: buttonsPage 52 of 276

Climate Control Display Settings
The Climate Control settings are visible
on the Information and Entertainment
System radio screen.
The display on the Information and
Entertainment System is a pop up
window (1), which is activated by pushing
the buttons or turning the knobs on the
Climate Control system. The indicator
lights located on the buttons and knobs
indicate that the selected feature is
on/off. If no operation is performed for a
predetermined time, the pop-up will close
on the display.
Air Temperature Adjustment
Rotate the driver or passenger
Temperature Adjustment Knob clockwise
for warmer temperatures or
counterclockwise for cooler
temperatures. The set temperatures are
shown on the Information and
Entertainment System.
Push the SYNC button to sync the driver
and passenger air temperatures.
Rotate the passenger Temperature
Adjustment Knob to cancel the SYNC
function. This will set a new passenger
side temperature.
Rotate the Temperature Adjustment
Knob fully clockwise to engage the HI
(maximum heating) setting or fully
counterclockwise to engage the LO
(maximum cooling) setting. To deactivate
these functions, rotate the Temperature
Adjustment Knob to the desired
temperature.
Rear passengers’ temperature is linked
to driver side selection.
Air Distribution Selection
Push the Air Distribution Selection
button on the faceplate to change the
mode of air distribution. The follow
selectable option are explained below:
Air flow to the windshield and
demister window vents to
demist/defrost them.
Air flow at the central and side
dashboard vents to ventilate the
chest and the face.
Air flow to the front and rear floor
vents. This setting heats the
passenger compartment the
quickest.
Air flow distributed between the
floor vents (hotter air) and the
central and side dashboard vents
(cooler air). This air distribution
setting is useful on sunny days
during spring and autumn.
Air flow distributed between the
floor vents, windshield, and front
side window defrosting/demisting
vents. This distribution setting
warms the passenger compartment
while preventing the windows from
fogging up.0521128655USClimate Control Display Settings
1 — Climate Control Pop-up Display
50
GETTING TO KNOW YOUR VEHICLE
Page 56 of 276
POWER WINDOWS
Power Window Switches
The power window switches work with
the ignition in the ON position and for
three minutes after the ignition has been
placed in the STOP position. When one of
the front doors is opened, this operation
is disabled.
Driver Side Front Door Controls
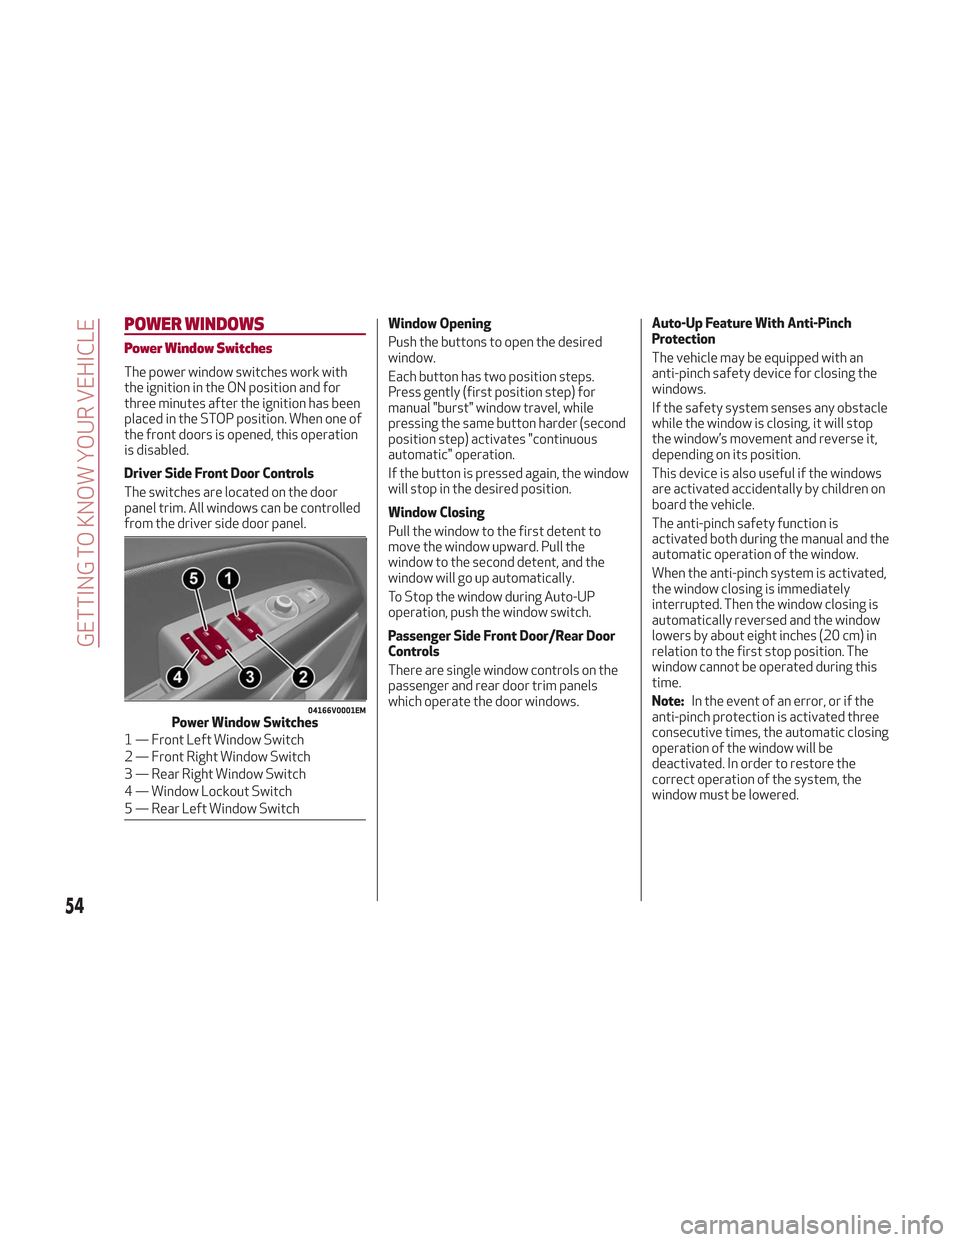
The switches are located on the door
panel trim. All windows can be controlled
from the driver side door panel.Window Opening
Push the buttons to open the desired
window.
Each button has two position steps.
Press gently (first position step) for
manual "burst" window travel, while
pressing the same button harder (second
position step) activates "continuous
automatic" operation.
If the button is pressed again, the window
will stop in the desired position.
Window Closing
Pull the window to the first detent to
move the window upward. Pull the
window to the second detent, and the
window will go up automatically.
To Stop the window during Auto-UP
operation, push the window switch.
Passenger Side Front Door/Rear Door
Controls
There are single window controls on the
passenger and rear door trim panels
which operate the door windows.Auto-Up Feature With Anti-Pinch
Protection
The vehicle may be equipped with an
anti-pinch safety device for closing the
windows.
If the safety system senses any obstacle
while the window is closing, it will stop
the window’s movement and reverse it,
depending on its position.
This device is also useful if the windows
are activated accidentally by children on
board the vehicle.
The anti-pinch safety function is
activated both during the manual and the
automatic operation of the window.
When the anti-pinch system is activated,
the window closing is immediately
interrupted. Then the window closing is
automatically reversed and the window
lowers by about eight inches (20 cm) in
relation to the first stop position. The
window cannot be operated during this
time.
Note:
In the event of an error, or if the
anti-pinch protection is activated three
consecutive times, the automatic closing
operation of the window will be
deactivated. In order to restore the
correct operation of the system, the
window must be lowered.
04166V0001EMPower Window Switches
1 — Front Left Window Switch
2 — Front Right Window Switch
3 — Rear Right Window Switch
4 — Window Lockout Switch
5 — Rear Left Window Switch
54
GETTING TO KNOW YOUR VEHICLE
Page 57 of 276
Power Window System Initialization
If power supply is interrupted, the
electric window automatic operation
must be re-initialized.
To perform the initialization procedure,
which must be done on each door with the
doors closed, manually fully close the
window to be initialized.
Warning!
Never leave children unattended in a vehicle,
and do not let children play with power
windows. Do not leave the key fob in or near
the vehicle, or in a location accessible to
children. Occupants, particularly unattended
children, can become entrapped by the
windows while operating the power window
switches. Such entrapment may result in
serious injury or death.
POWER SUNROOF — IF
EQUIPPED
Power Sunroof
The power sunroof consists of a single
glass panel and is fitted with a power
sunshade the full length of the panel.
Operation of the sunroof is only possible
with the ignition in ON mode. Refer to
“Ignition System” in this chapter for
further information.
The sunroof has three preset positions:
Fully closed.
Comfort (intermediate opening).
Fully open.
Note: You cannot have the sunshade
closed when the sunroof is open.
Warning!
Never leave children unattended in a
vehicle, or with access to an unlocked
vehicle. Never leave the key fob in or near
the vehicle, or in a location accessible to
children. Do not leave the ignition of a
vehicle equipped with keyless ignition in the
ON mode. Occupants, particularly
unattended children, can become entrapped
by the power sunroof while operating the
power sunroof switch. Such entrapment
may result in serious injury or death.
In a collision, there is a greater risk of
being thrown from a vehicle with an open
sunroof. You could also be seriously injured or killed. Always fasten your seat belt
properly and make sure all passengers are
also properly secured.
Do not allow small children to operate the
sunroof. Never allow your fingers, other
body parts, or any object, to project through
the sunroof opening. Injury may result.
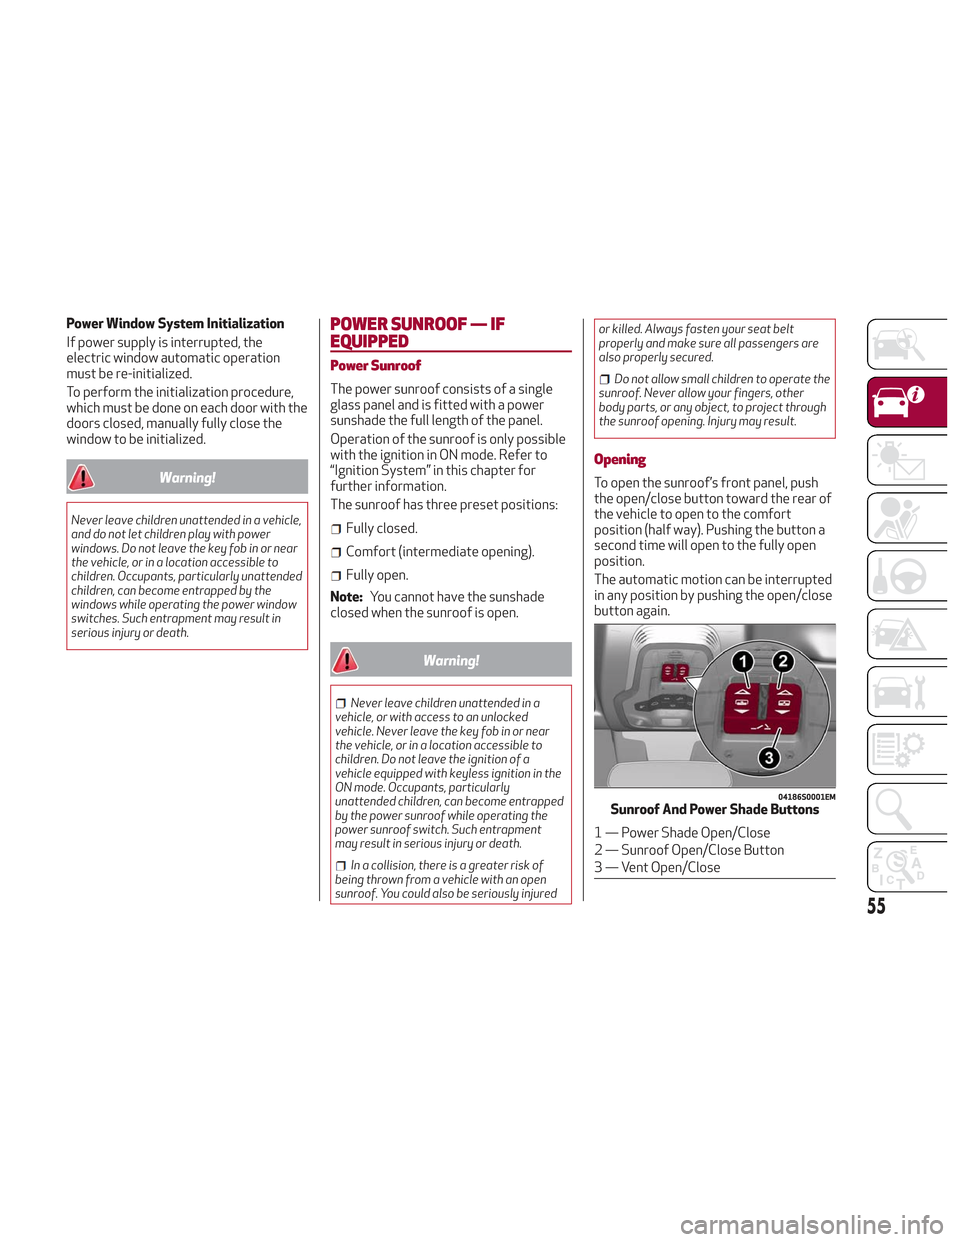
Opening
To open the sunroof’s front panel, push
the open/close button toward the rear of
the vehicle to open to the comfort
position (half way). Pushing the button a
second time will open to the fully open
position.
The automatic motion can be interrupted
in any position by pushing the open/close
button again.
04186S0001EMSunroof And Power Shade Buttons
1 — Power Shade Open/Close
2 — Sunroof Open/Close Button
3 — Vent Open/Close
55
Page 60 of 276
POWER LIFTGATE
Unlocking of the liftgate is electrically
operated and is deactivated when the
vehicle is in motion.
If anything obstructs the power liftgate
while it is closing or opening, the liftgate
will automatically reverse to the closed
or open position, provided it meets
sufficient resistance.
The liftgate height is adjustable to avoid
difficulties in tight spaces. To customize
the liftgate opening position, proceed as
follows:
1. Open the liftgate.
2. Manually move the liftgate to the
desired position.
3. Push one of the closing buttons for at
least five seconds (successful
programming is indicated by the turn
signals flashing three times).
The liftgate is now programmed to open
to the set position.
This function can be selected on the
Information and Entertainment System.
To set the liftgate opening height, refer
to the Information and Entertainment
System Owner’s Manual Supplement for
further information.
Opening
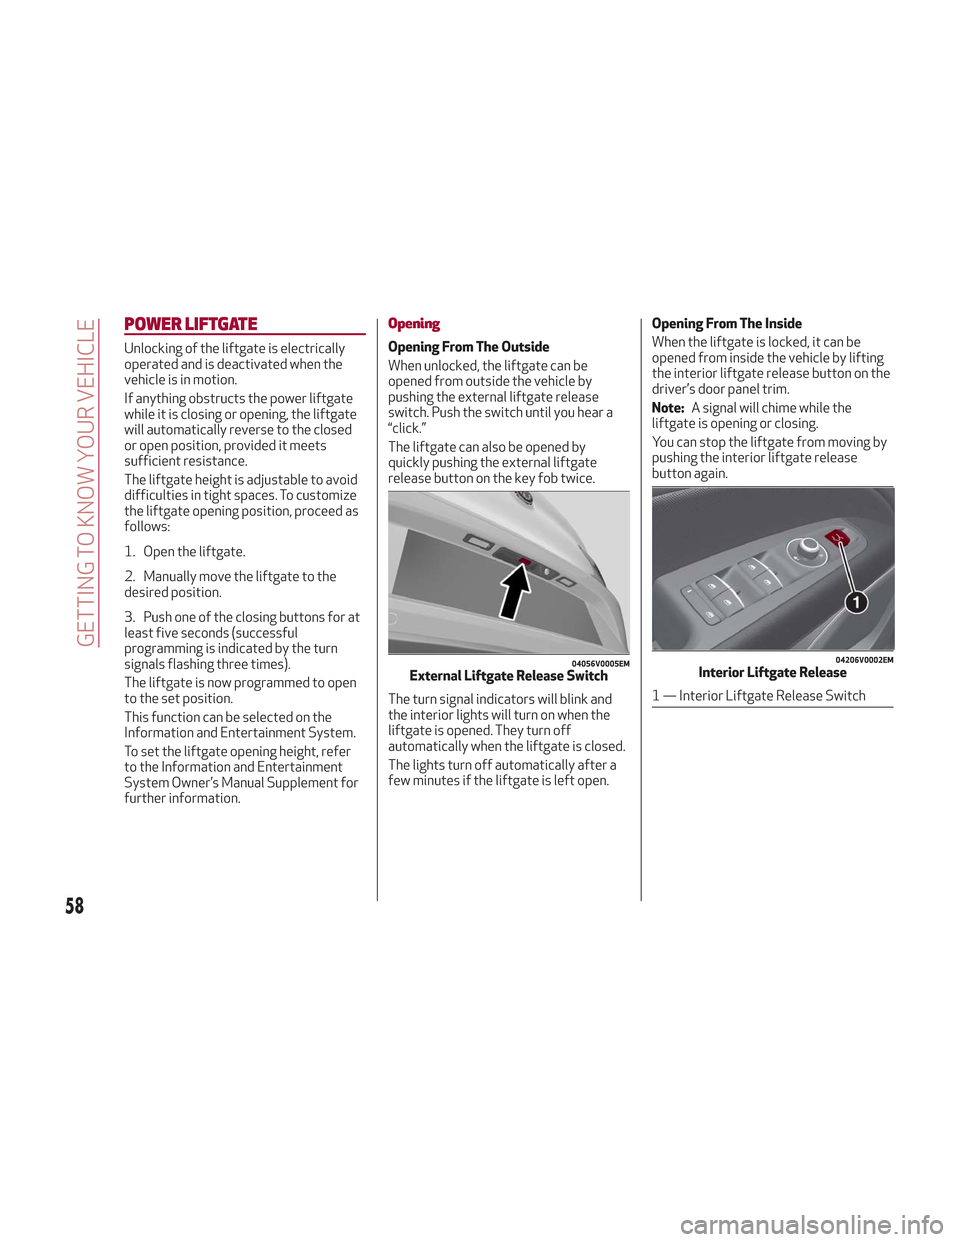
Opening From The Outside
When unlocked, the liftgate can be
opened from outside the vehicle by
pushing the external liftgate release
switch. Push the switch until you hear a
“click.”
The liftgate can also be opened by
quickly pushing the external liftgate
release button on the key fob twice.
The turn signal indicators will blink and
the interior lights will turn on when the
liftgate is opened. They turn off
automatically when the liftgate is closed.
The lights turn off automatically after a
few minutes if the liftgate is left open.Opening From The Inside
When the liftgate is locked, it can be
opened from inside the vehicle by lifting
the interior liftgate release button on the
driver’s door panel trim.
Note:
A signal will chime while the
liftgate is opening or closing.
You can stop the liftgate from moving by
pushing the interior liftgate release
button again.
04056V0005EMExternal Liftgate Release Switch
04206V0002EMInterior Liftgate Release
1 — Interior Liftgate Release Switch
58
GETTING TO KNOW YOUR VEHICLE
Page 61 of 276
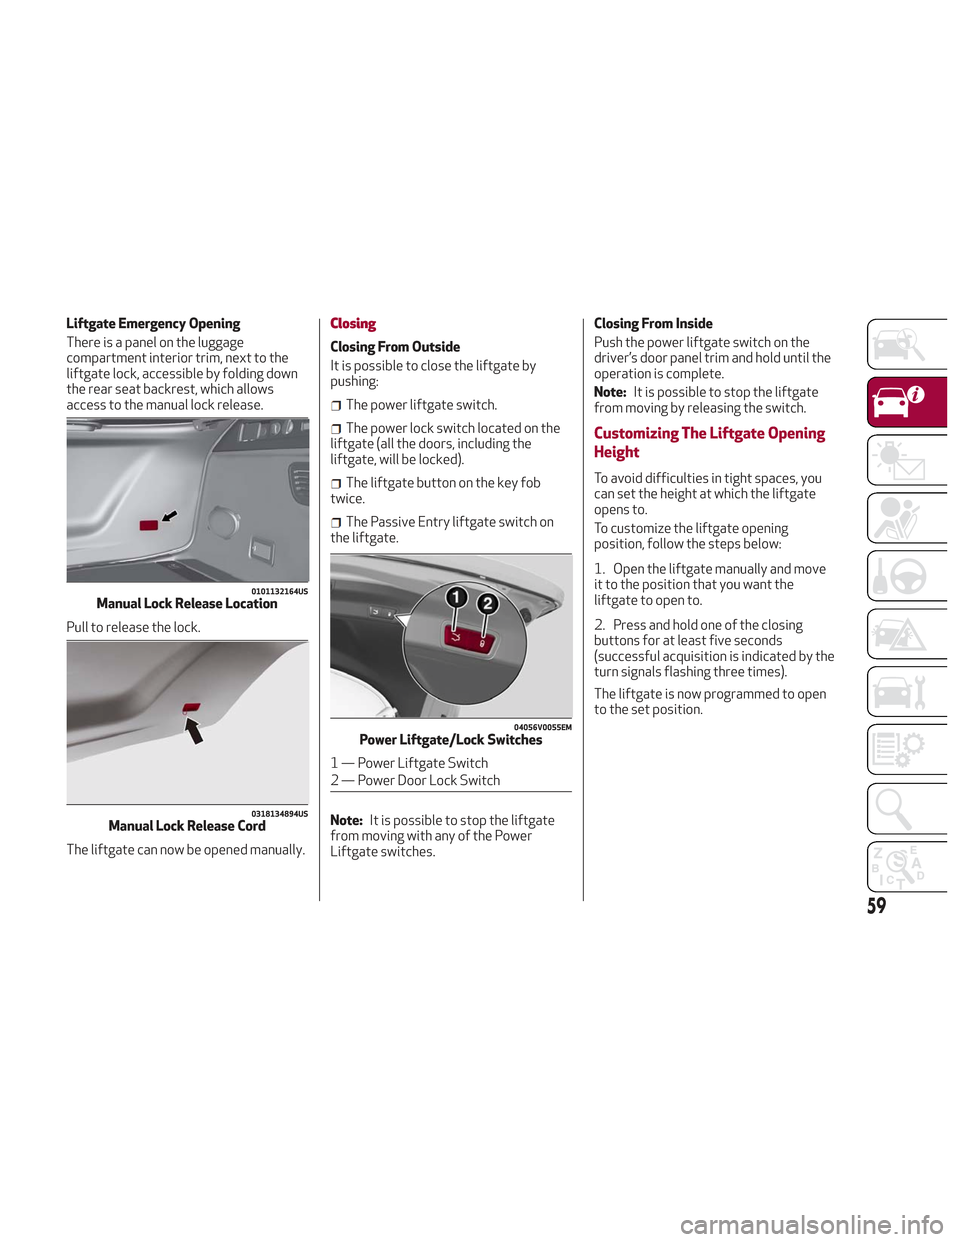
Liftgate Emergency Opening
There is a panel on the luggage
compartment interior trim, next to the
liftgate lock, accessible by folding down
the rear seat backrest, which allows
access to the manual lock release.
Pull to release the lock.
The liftgate can now be opened manually.Closing
Closing From Outside
It is possible to close the liftgate by
pushing:
The power liftgate switch.
The power lock switch located on the
liftgate (all the doors, including the
liftgate, will be locked).
The liftgate button on the key fob
twice.
The Passive Entry liftgate switch on
the liftgate.
Note: It is possible to stop the liftgate
from moving with any of the Power
Liftgate switches. Closing From Inside
Push the power liftgate switch on the
driver’s door panel trim and hold until the
operation is complete.
Note:
It is possible to stop the liftgate
from moving by releasing the switch.
Customizing The Liftgate Opening
Height
To avoid difficulties in tight spaces, you
can set the height at which the liftgate
opens to.
To customize the liftgate opening
position, follow the steps below:
1. Open the liftgate manually and move
it to the position that you want the
liftgate to open to.
2. Press and hold one of the closing
buttons for at least five seconds
(successful acquisition is indicated by the
turn signals flashing three times).
The liftgate is now programmed to open
to the set position.
0101132164USManual Lock Release Location
0318134894USManual Lock Release Cord
04056V0055EMPower Liftgate/Lock Switches
1 — Power Liftgate Switch
2 — Power Door Lock Switch
59
Page 66 of 276

The following operation will delete the
manufacture’s standard codes and does
not need to be repeated during the
subsequent button programming:
Push and hold the outer buttons (1 and
3). After about ten seconds, the lighted
indicators will start to flash. Release both
buttons. Note:
Follow the steps below to begin
programming your remote control to one
of the HomeLink buttons:
1. Push and hold the desired HomeLink
button (1, 2 or 3).
When the HomeLink indicator begins to
flash slowly, move the portable remote
control one to three inches from the
HomeLink system (keeping the
programmable button pushed down).
2. If the indicator does not begin to flash
quickly, change the distance between the
HomeLink and the portable remote
control and try the procedure again.
3. The HomeLink indicator flashes, first
slowly and then quickly. When the
indicator starts to flash quickly, release
both buttons.
Using The Homelink System
The HomeLink system activates the
garage door or gate motor, just like the
portable remote control. The vehicle
must be within the range of the garage
door and the ignition must be in the ON
position.
Push the programmed button (1, 2 or 3).
While the signal is being transmitted, the
indicator is lit and the system (garage
door, gate, etc.) will respond. If the HomeLink system does not
operate, the original portable remote
control may be equipped with an
alternative code (refer to “Alternative
Code Synchronization”).
If necessary, the original remote control
can still be used to operate the system.
Alternative Code Synchronization
To check whether the garage door or gate
motor has an alternative code, proceed
as follows:
1. Read the garage door or gate motor
manufacturer manual.
2. The portable remote control seems to
have programmed to the HomeLink
system, but the garage door or gate can
be neither opened or closed.
3. Push the programmed button and
keep it pushed (1, 2 or 3). With an
alternative code system, the indicator
flashes briefly, and then remains off for
two seconds. This sequence is repeated
for 20 seconds.
04246S0006NAGarage Door Opener (Homelink)
Buttons
1 — Homelink Button 1
2 — Homelink Button 2
3 — Homelink Button 3
4 — Homelink Indicator
64
GETTING TO KNOW YOUR VEHICLE
Page 68 of 276

2. When the HomeLink indicator begins
to flash slowly, move the portable remote
control 1 to 3 inches from the system
(keeping the programmable button
pressed down).
If the indicator does not begin to flash
quickly, change the distance between the
HomeLink and the portable remote
control and try the procedure again.
The HomeLink indicator flashes, first
slowly and then quickly. When the
indicator starts to flash quickly, release
both buttons on the remote control.
The system previously programmed to
HomeLink has now been deleted and the
new system is ready to use. This does not
affect the other two HomeLink buttons in
any way.
Deleting Programmed Keys
It is recommended to delete HomeLink
programming before selling the vehicle.
All three keys are deleted
simultaneously.
Proceed as follows:
1. Push and hold the outer buttons
(1 and 3). After about ten seconds, the
indicator will start to flash.
2. Release both keys. Technical Information For After Sales
Service
If you are unable to set up HomeLink
successfully after following the above
instructions, contact After Sales Service
(HomeLink free hotline number
1-800-355-3515 ) with the following
information:
Vehicle make and model, including
manufacturing year and country of
purchase;
Make, model, age and frequency of use
of the original portable remote control (if
known).
General Information
The following regulatory statement
applies to all Radio Frequency (RF)
devices equipped in this vehicle:
This device complies with Part 15 of the
FCC Rules and with Industry Canada
license-exempt RSS standard(s).
Operation is subject to the following two
conditions:
1. This device may not cause harmful
interference, and
2. This device must accept any
interference received, including
interference that may cause undesired
operation.
Note: Changes or modifications not
expressly approved by the party
responsible for compliance could void the
user’s authority to operate the
equipment.
Power Outlets
The Instrument Panel Power Outlet is
located under the air conditioning control
panel. It will only operate when the
ignition is ON.
Note: Do not connect devices, with a
power rating higher than 180 W, to the
outlet. Do not use power adaptors that
do not fit the outlet as this may damage
it.
0313132162USInstrument Panel Power Outlet
66
GETTING TO KNOW YOUR VEHICLE
Page 166 of 276
Programmed Speed Icon Flashing
The programmed speed will flash in the
following scenarios:
When the accelerator pedal has been
fully pressed and the vehicle has
exceeded the programmed speed.
Activating the system after setting a
limit below the effective speed of the
vehicle.
In the event of overtake acceleration.
Deactivation
The feature can be activated/
deactivated through the Information and
Entertainment System.
Deactivating The Device
To access this feature on the main menu,
select the following items in sequence:
"Settings", "Safety", “Speed Limiter” and
“OFF”.
Automatic Deactivation Of The Device
The device deactivates automatically in
the event of fault in the system. In this
case, contact an authorized dealer.
Temporary Signal Loss
When the devices loses the signal, the
white symbol without the speed
indication illuminates on the display.
System Failure
If there is a system failure, the amber
symbol
illuminates on the display.
SPEED CONTROL (CRUISE
CONTROL)
Speed Control Description
This is an electronically controlled driving
assistance feature that allows the
desired vehicle speed to be maintained,
without having to press the accelerator
pedal. This feature can be used at a speed
above 25 mph (40 km/h) on long
stretches of dry, straight roads with few
variations (highways).
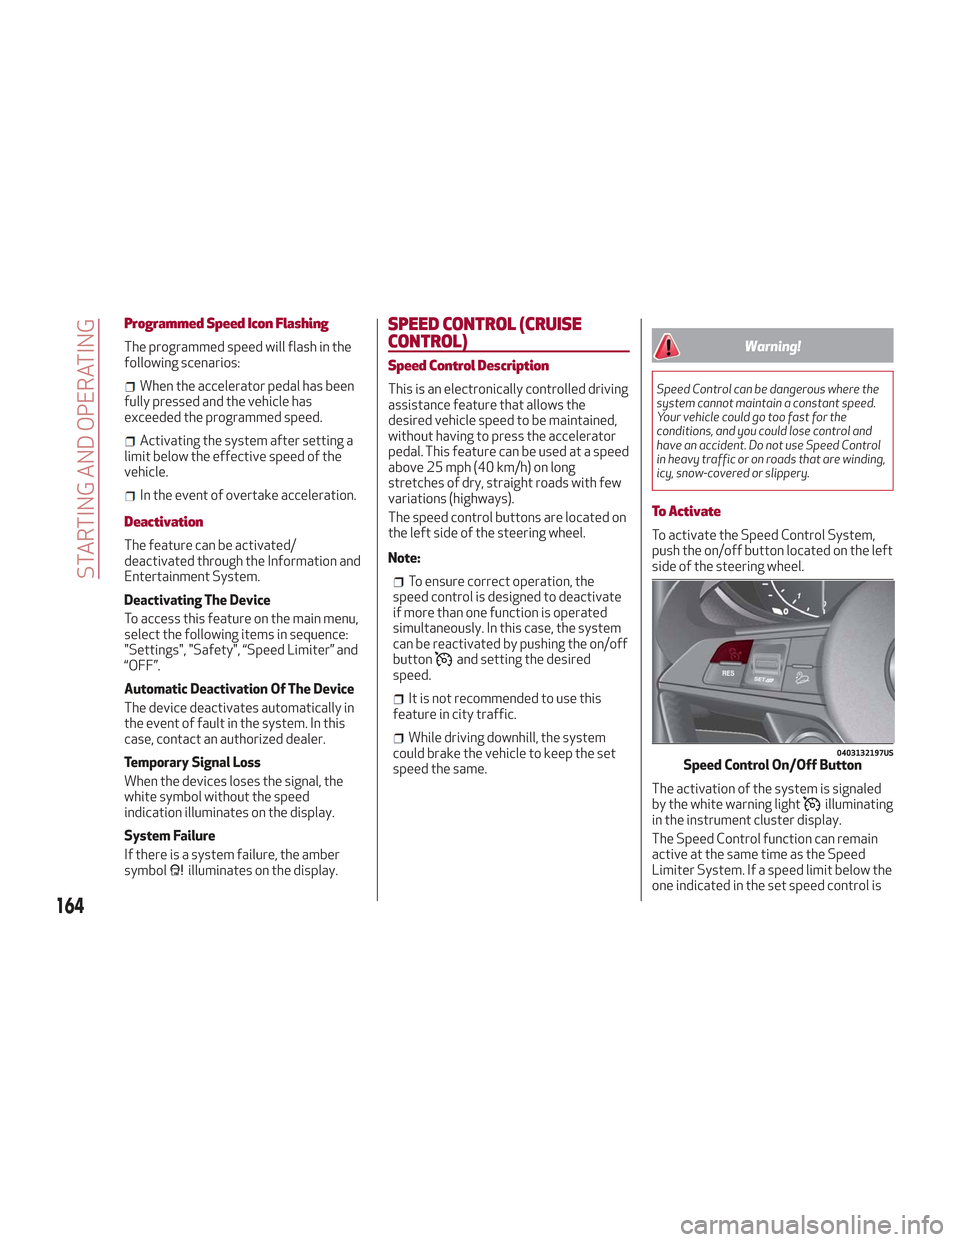
The speed control buttons are located on
the left side of the steering wheel.
Note:
To ensure correct operation, the
speed control is designed to deactivate
if more than one function is operated
simultaneously. In this case, the system
can be reactivated by pushing the on/off
button
and setting the desired
speed.
It is not recommended to use this
feature in city traffic.
While driving downhill, the system
could brake the vehicle to keep the set
speed the same.
Warning!
Speed Control can be dangerous where the
system cannot maintain a constant speed.
Your vehicle could go too fast for the
conditions, and you could lose control and
have an accident. Do not use Speed Control
in heavy traffic or on roads that are winding,
icy, snow-covered or slippery.
To Activate
To activate the Speed Control System,
push the on/off button located on the left
side of the steering wheel.
The activation of the system is signaled
by the white warning light
illuminating
in the instrument cluster display.
The Speed Control function can remain
active at the same time as the Speed
Limiter System. If a speed limit below the
one indicated in the set speed control is
0403132197USSpeed Control On/Off Button
164
STARTING AND OPERATING