2018 Alfa Romeo Stelvio brake
[x] Cancel search: brakePage 65 of 276

INTERNAL EQUIPMENT
Glove Compartment
To open the glove compartment proceed
as follows:
1. If equipped with a lock, unlock the
glove compartment by placing the
emergency key into the lock on the
handle.
2. Pull the handle to open the glove
compartment.
When the glove compartment is opened,
a light turns on to illuminate the inside of
the compartment.
Note:Do not insert large objects that
prevent the glove compartment from
closing completely. Always make sure
that the glove compartment is
completely closed when driving.
Sun Visors
The sun visors are located at the sides of
the interior rear view mirror. They can be
adjusted forward and sideways.
To direct the visor toward the passenger
side window, detach the visor from the
interior rear view mirror side hook and
turn it towards the side window.
From this position, the sun visor can also
be extended toward the rear of the
vehicle for additional blockage of
sunlight.
Courtesy mirrors with lights are fitted on
the back of the sun visors and can be
used even in poor light conditions.
Note: A rear facing child restraint
system should never be fitted in the front
passenger seat. Always comply with the
instructions on the sun visor. Refer to
"Child Restraints" in "Safety" for more
information.
Homelink
Description
Homelink is a fixed system installed on
the vehicle. It can sync up to three
different devices that activate garage
doors, gates, lighting systems, and home
or office alarm systems.
Programming
Warning!
Vehicle exhaust contains carbon
monoxide, a dangerous gas. Do not run your
vehicle in the garage while programming the
transceiver. Exhaust gas can cause serious
injury or death.
Your motorized door or gate will open and
close while you are programming the
universal transceiver. Do not program the
transceiver if people, pets or other objects
are in the path of the door or gate. Only use
this transceiver with a garage door opener
that has a “stop and reverse” feature as
required by Federal safety standards. This
includes most garage door opener models
manufactured after 1982. Do not use a
garage door opener without these safety
features. Call toll-free 1-800-355-3515 or,
on the Internet at HomeLink.com for safety
information or assistance.
Note: Without starting the engine,
activate the electric park brake and place
the ignition in the ON position.
0403132212USOpening The Glove Compartment
0403132210USRotate Sun Visor Toward Passenger Window
63
Page 67 of 276

Warning!
Vehicle exhaust contains carbon
monoxide, a dangerous gas. Do not run your
vehicle in the garage while programming the
transceiver. Exhaust gas can cause serious
injury or death.
Your motorized door or gate will open and
close while you are programming the
universal transceiver. Do not program the
transceiver if people, pets or other objects
are in the path of the door or gate. Only use
this transceiver with a garage door opener
that has a “stop and reverse” feature as
required by Federal safety standards. This
includes most garage door opener models
manufactured after 1982. Do not use a
garage door opener without these safety
features. Call toll-free 1-800-355-3515 or,
on the Internet at HomeLink.com for safety
information or assistance.
Note: To program Homelink using an
Alternative Code, the vehicle must be
within range of the garage door. Activate
the electric park brake and turn the
ignition to ON, without starting the
engine.
Proceed as follows: 1. Locate the “Learn” or “Train” button on
the garage door or gate motor. The color
and position may vary depending on the
manufacturer (consult the garage door or
gate manual). Push the “Learn” or “Train”
button (this normally activates the
setting warning light).
2. Push the desired HomeLink button (1,
2 or 3). When the HomeLink indicator
begins to flash slowly, move the portable
remote control one to three inches from
the HomeLink system (keeping the
programmable button pushed down).
3. Within 30 seconds, push the
programmed key (1, 2 or 3) and release it.
Push the programmed button a second
time and release it to conclude the
operation. For some motors, the
operation will probably have to be
repeated a third time to end the setting.
The motor should now be capable of
recognizing the signal transmitted by
HomeLink and then open/close the door
or gate.
Programming A Single Key
It is possible to program another original
remote control on an already
programmed HomeLink key by canceling
the previously stored frequency.
Warning!
Vehicle exhaust contains carbon
monoxide, a dangerous gas. Do not run your
vehicle in the garage while programming the
transceiver. Exhaust gas can cause serious
injury or death.
Your motorized door or gate will open and
close while you are programming the
universal transceiver. Do not program the
transceiver if people, pets or other objects
are in the path of the door or gate. Only use
this transceiver with a garage door opener
that has a “stop and reverse” feature as
required by Federal safety standards. This
includes most garage door opener models
manufactured after 1982. Do not use a
garage door opener without these safety
features. Call toll-free 1-800-355-3515 or,
on the Internet at HomeLink.com for safety
information or assistance.
Note: Activate the electric park brake
and place the ignition to ON without
starting the engine.
Proceed as follows:
1. Push the desired HomeLink button
and keep it pushed (1, 2 or 3). Do not
release the button until the last
operation has been performed.
65
Page 80 of 276

Red Warning Lights
Warning LightWhat It Means What To Do
INSUFFICIENT BRAKE FLUID/ELECTRIC PARK BRAKE
ON
This light monitors various brake functions, including
brake fluid level and parking brake application. If the
brake light turns on it may indicate that the parking brake
is applied, that the brake fluid level is low, or that there is
a problem with the anti-lock brake system reservoir.
If the light remains on when the parking brake has been
disengaged, and the fluid level is at the full mark on the
master cylinder reservoir, it indicates a possible brake
hydraulic system malfunction or that a problem with the
Brake Booster has been detected by the Anti-Lock Brake
System (ABS) / Electronic Stability Control (ESC) system.
In this case, the light will remain on until the condition has
been corrected. If the problem is related to the Brake
Booster, the ABS pump will run when applying the brake,
and a brake pedal pulsation may be felt during each stop.Operation of the Brake Warning Light can be checked by
turning the ignition switch from the OFF position to the
ON/RUN position. The light should illuminate for
approximately four seconds. The light should then turn
off unless the parking brake is applied or a brake fault is
detected. If the light does not illuminate, have the light
inspected by an authorized dealer.
The light also will turn on when the parking brake is
applied with the ignition switch in the ON/RUN position.
This light shows only that the parking brake is applied. It
does not show the degree of brake application.
For low brake fluid level, go to an authorized dealer to
have the system checked as soon as possible.
Release the electric park brake, then check that the
warning light has turned off.
If the warning light stays on, contact an authorized dealer.
ELECTRONIC BRAKING FORCE DISTRIBUTION (EBD)
FAILURE
The simultaneous turning on of the BRAKE (red) and
(amber) warning lights with the engine on indicates
either a failure of the EBD system or that the system is
not available. In this case, the rear wheels may suddenly
lock and the vehicle may swerve when braking abruptly. Drive very carefully to the nearest authorized dealer to
have the system inspected immediately.
78
GETTING TO KNOW YOUR INSTRUMENT PANEL
Page 82 of 276

Amber Warning Lights
WarningLight What It Means What To Do
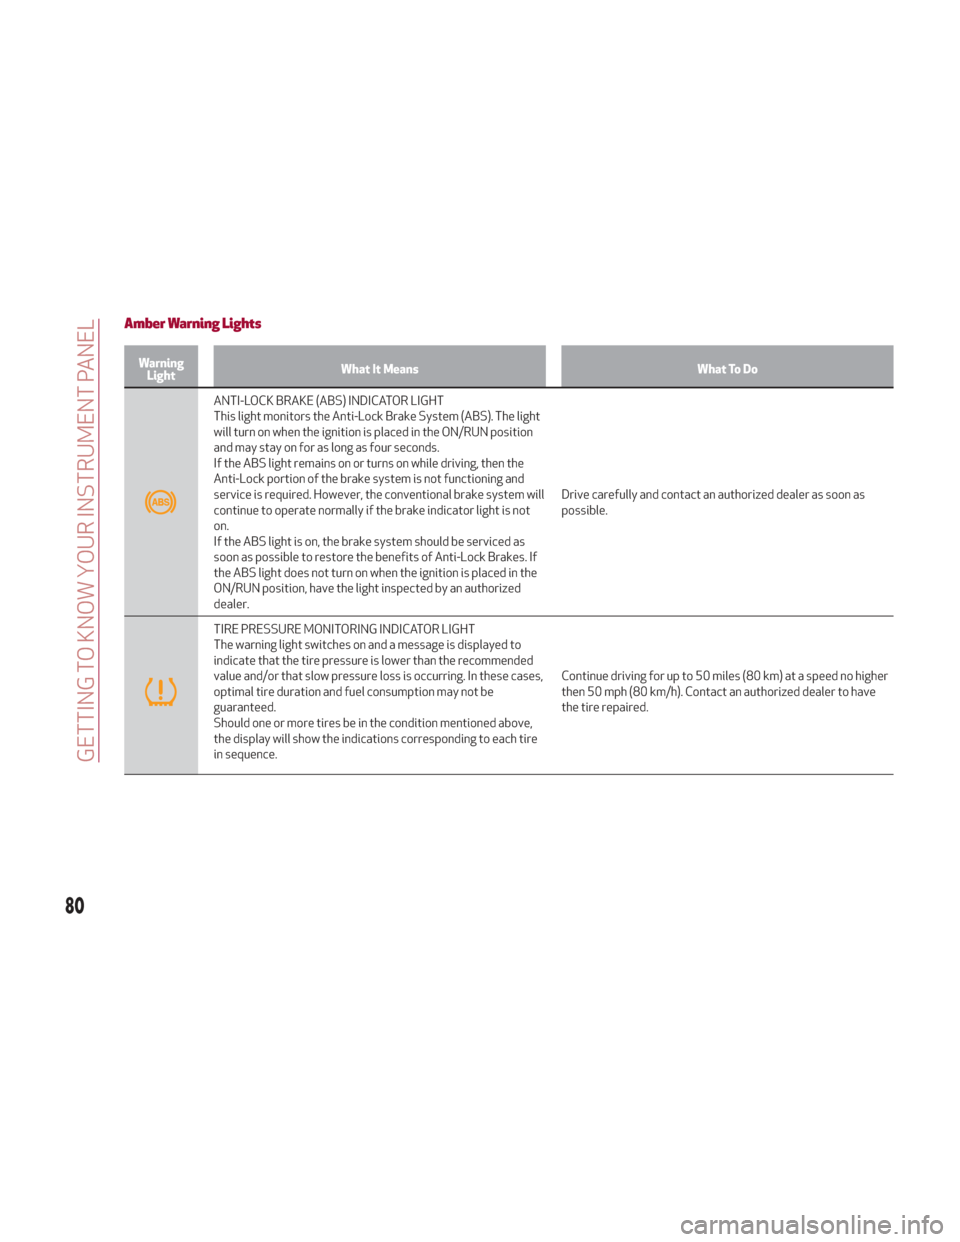
ANTI-LOCK BRAKE (ABS) INDICATOR LIGHT
This light monitors the Anti-Lock Brake System (ABS). The light
will turn on when the ignition is placed in the ON/RUN position
and may stay on for as long as four seconds.
If the ABS light remains on or turns on while driving, then the
Anti-Lock portion of the brake system is not functioning and
service is required. However, the conventional brake system will
continue to operate normally if the brake indicator light is not
on.
If the ABS light is on, the brake system should be serviced as
soon as possible to restore the benefits of Anti-Lock Brakes. If
the ABS light does not turn on when the ignition is placed in the
ON/RUN position, have the light inspected by an authorized
dealer. Drive carefully and contact an authorized dealer as soon as
possible.
TIRE PRESSURE MONITORING INDICATOR LIGHT
The warning light switches on and a message is displayed to
indicate that the tire pressure is lower than the recommended
value and/or that slow pressure loss is occurring. In these cases,
optimal tire duration and fuel consumption may not be
guaranteed.
Should one or more tires be in the condition mentioned above,
the display will show the indications corresponding to each tire
in sequence.
Continue driving for up to 50 miles (80 km) at a speed no higher
then 50 mph (80 km/h). Contact an authorized dealer to have
the tire repaired.
80
GETTING TO KNOW YOUR INSTRUMENT PANEL
Page 92 of 276

Warning LightWhat It Means What To Do
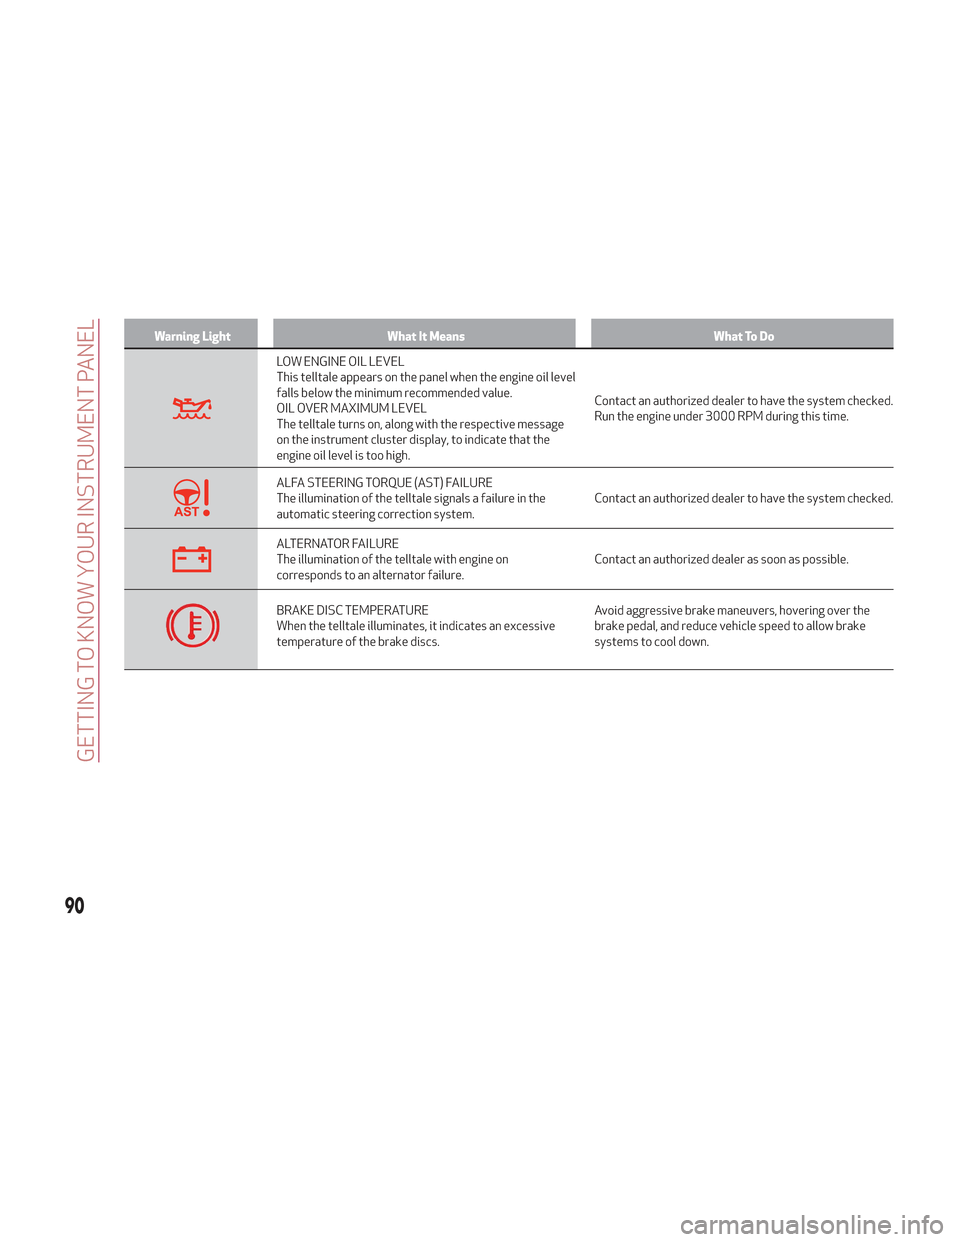
LOW ENGINE OIL LEVEL
This telltale appears on the panel when the engine oil level
falls below the minimum recommended value.
OIL OVER MAXIMUM LEVEL
The telltale turns on, along with the respective message
on the instrument cluster display, to indicate that the
engine oil level is too high.Contact an authorized dealer to have the system checked.
Run the engine under 3000 RPM during this time.
ALFA STEERING TORQUE (AST) FAILURE
The illumination of the telltale signals a failure in the
automatic steering correction system.
Contact an authorized dealer to have the system checked.
ALTERNATOR FAILURE
The illumination of the telltale with engine on
corresponds to an alternator failure.Contact an authorized dealer as soon as possible.
BRAKE DISC TEMPERATURE
When the telltale illuminates, it indicates an excessive
temperature of the brake discs.Avoid aggressive brake maneuvers, hovering over the
brake pedal, and reduce vehicle speed to allow brake
systems to cool down.
90
GETTING TO KNOW YOUR INSTRUMENT PANEL
Page 95 of 276

Warning LightWhat It Means What To Do
FORWARD COLLISION WARNING (FCW) SYSTEM
FAILURE
The telltale will illuminate in the case of failure of the
Forward Collision Warning system.Contact an authorized dealer as soon as possible.
START & STOP SYSTEM FAILURE
This telltale will illuminate to report a Stop & Start
system failure.Contact an authorized dealer as soon as possible to have
the failure eliminated.
RAIN SENSOR FAILURE
The telltale will illuminate in the case of failure of the
automatic windshield wiper.
Contact an authorized dealer as soon as possible.
DUSK SENSOR FAILURE
The telltale will illuminate in the case of failure of the
automatic low beam alignment.Contact an authorized dealer as soon as possible.
BLIND SPOT MONITORING SYSTEM FAILURE
The telltale will illuminate in the event of a Blind Spot
Monitoring system failure.Contact an authorized dealer as soon as possible.
FUEL LEVEL SENSOR FAILURE
The telltale will illuminate in the event of fuel level sensor
failure.Contact an authorized dealer as soon as possible.
EXTERIOR LIGHTS FAILURE
The telltale will illuminate to indicate a failure on the
following lights: daytime running lights (DRLs) / parking
lights / trailer turn signal indicators (if present) / trailer
lights (if present) / side lights / turn signal indicators /
rear fog light / reversing light / brake lights / license plate
lights.The failure may be caused by a blown bulb, a blown
protection fuse, or an interruption of the electrical
connection.
Replace the bulb or the relevant fuse. Contact an
authorized dealer.
93
Page 97 of 276

Warning LightWhat It Means What To Do
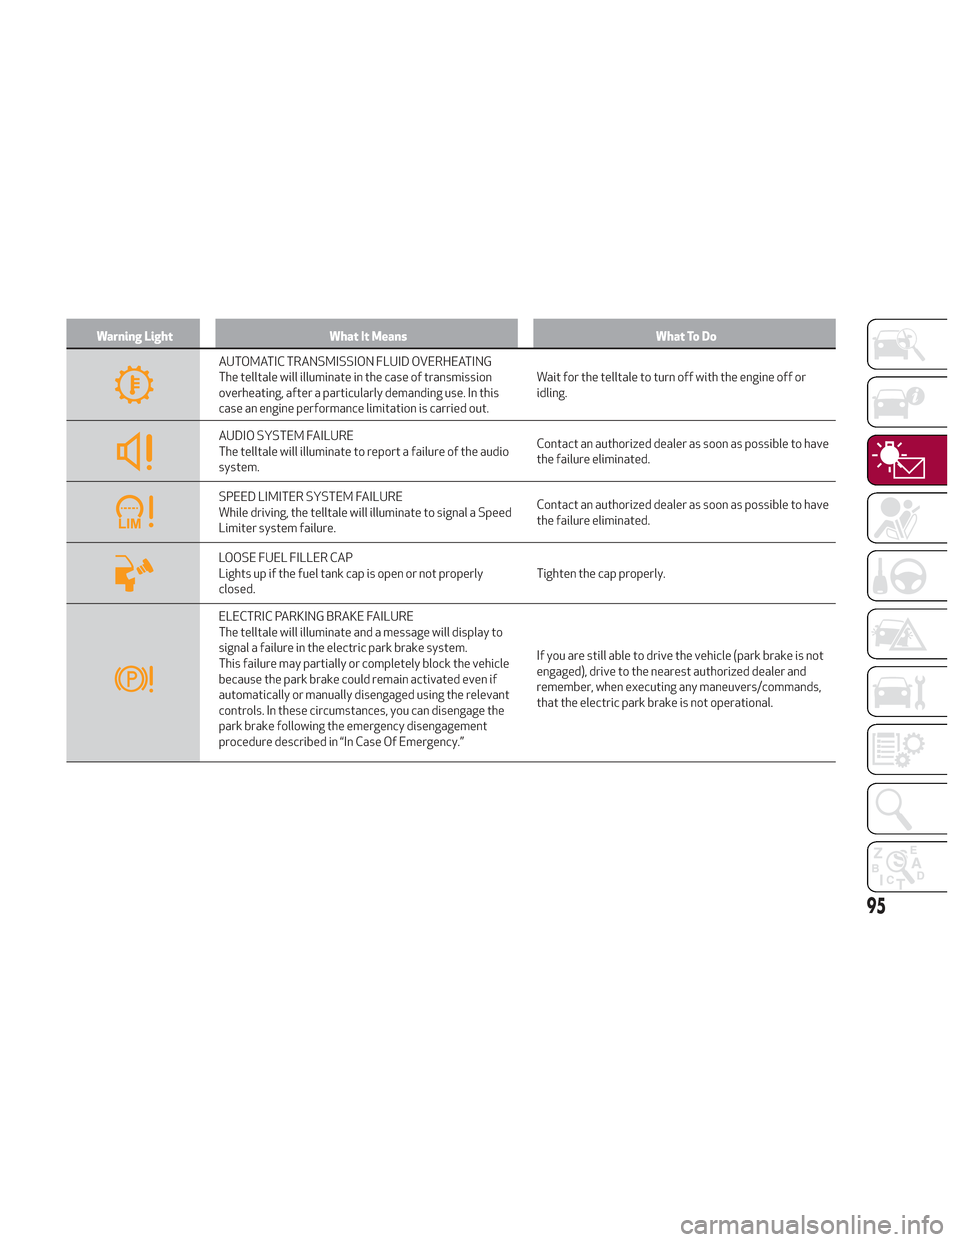
AUTOMATIC TRANSMISSION FLUID OVERHEATING
The telltale will illuminate in the case of transmission
overheating, after a particularly demanding use. In this
case an engine performance limitation is carried out.Wait for the telltale to turn off with the engine off or
idling.
AUDIO SYSTEM FAILURE
The telltale will illuminate to report a failure of the audio
system.
Contact an authorized dealer as soon as possible to have
the failure eliminated.
SPEED LIMITER SYSTEM FAILURE
While driving, the telltale will illuminate to signal a Speed
Limiter system failure.Contact an authorized dealer as soon as possible to have
the failure eliminated.
LOOSE FUEL FILLER CAP
Lights up if the fuel tank cap is open or not properly
closed.
Tighten the cap properly.
ELECTRIC PARKING BRAKE FAILURE
The telltale will illuminate and a message will display to
signal a failure in the electric park brake system.
This failure may partially or completely block the vehicle
because the park brake could remain activated even if
automatically or manually disengaged using the relevant
controls. In these circumstances, you can disengage the
park brake following the emergency disengagement
procedure described in “In Case Of Emergency.”If you are still able to drive the vehicle (park brake is not
engaged), drive to the nearest authorized dealer and
remember, when executing any maneuvers/commands,
that the electric park brake is not operational.
95
Page 98 of 276

Warning LightWhat It Means What To Do
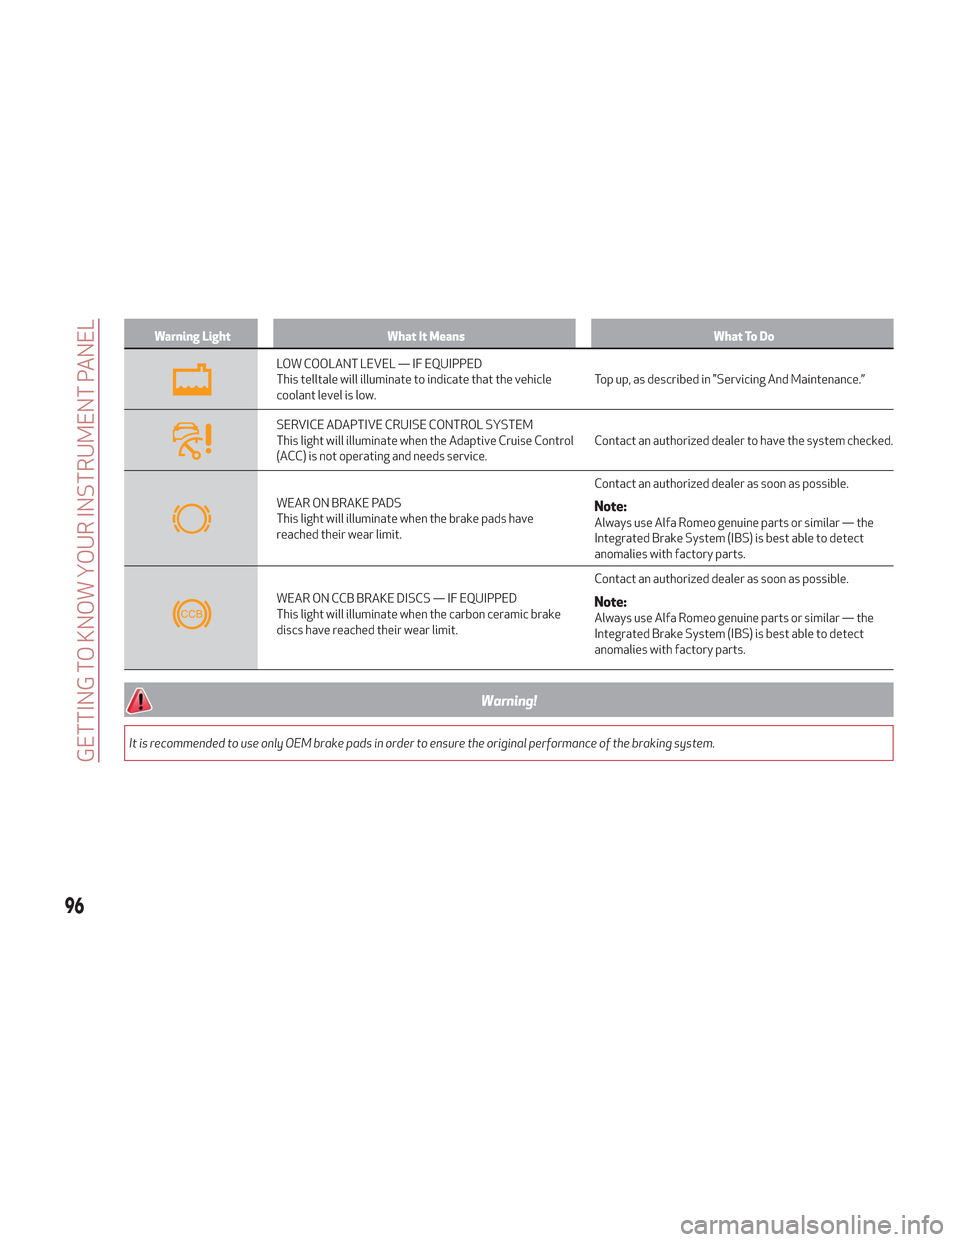
LOW COOLANT LEVEL — IF EQUIPPED
This telltale will illuminate to indicate that the vehicle
coolant level is low.Top up, as described in "Servicing And Maintenance.”
SERVICE ADAPTIVE CRUISE CONTROL SYSTEM
This light will illuminate when the Adaptive Cruise Control
(ACC) is not operating and needs service.Contact an authorized dealer to have the system checked.
WEAR ON BRAKE PADS
This light will illuminate when the brake pads have
reached their wear limit.Contact an authorized dealer as soon as possible.Note:Always use Alfa Romeo genuine parts or similar — the
Integrated Brake System (IBS) is best able to detect
anomalies with factory parts.
WEAR ON CCB BRAKE DISCS — IF EQUIPPED
This light will illuminate when the carbon ceramic brake
discs have reached their wear limit.Contact an authorized dealer as soon as possible.Note:Always use Alfa Romeo genuine parts or similar — the
Integrated Brake System (IBS) is best able to detect
anomalies with factory parts.
Warning!
It is recommended to use only OEM brake pads in order to ensure the original performance of the braking system.
96
GETTING TO KNOW YOUR INSTRUMENT PANEL