2018 Alfa Romeo Stelvio Turn
[x] Cancel search: TurnPage 28 of 276
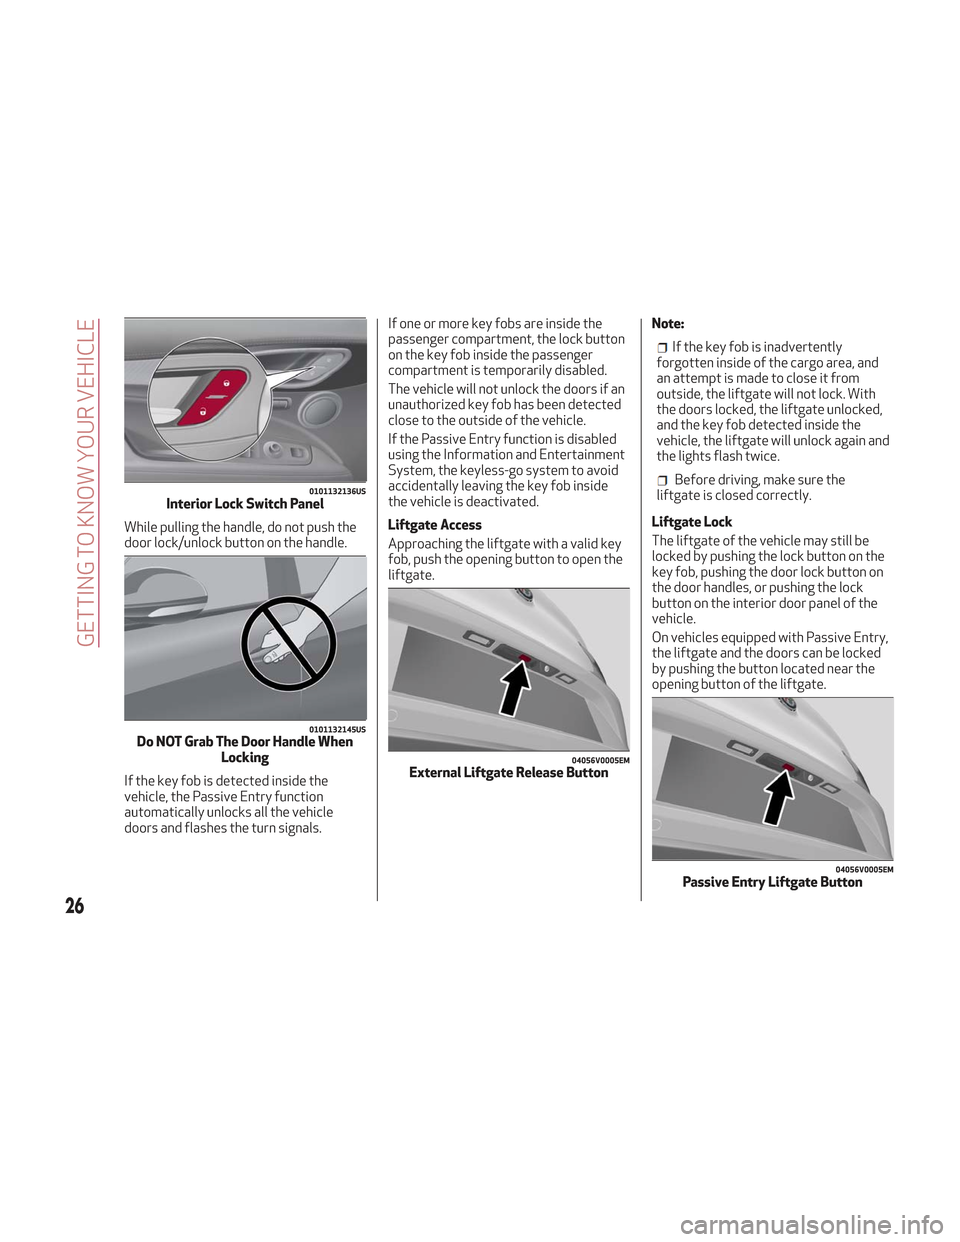
While pulling the handle, do not push the
door lock/unlock button on the handle.
If the key fob is detected inside the
vehicle, the Passive Entry function
automatically unlocks all the vehicle
doors and flashes the turn signals.If one or more key fobs are inside the
passenger compartment, the lock button
on the key fob inside the passenger
compartment is temporarily disabled.
The vehicle will not unlock the doors if an
unauthorized key fob has been detected
close to the outside of the vehicle.
If the Passive Entry function is disabled
using the Information and Entertainment
System, the keyless-go system to avoid
accidentally leaving the key fob inside
the vehicle is deactivated.
Liftgate Access
Approaching the liftgate with a valid key
fob, push the opening button to open the
liftgate.
Note:
If the key fob is inadvertently
forgotten inside of the cargo area, and
an attempt is made to close it from
outside, the liftgate will not lock. With
the doors locked, the liftgate unlocked,
and the key fob detected inside the
vehicle, the liftgate will unlock again and
the lights flash twice.
Before driving, make sure the
liftgate is closed correctly.
Liftgate Lock
The liftgate of the vehicle may still be
locked by pushing the lock button on the
key fob, pushing the door lock button on
the door handles, or pushing the lock
button on the interior door panel of the
vehicle.
On vehicles equipped with Passive Entry,
the liftgate and the doors can be locked
by pushing the button located near the
opening button of the liftgate.0101132136USInterior Lock Switch Panel
0101132145USDo NOT Grab The Door Handle When Locking
04056V0005EMExternal Liftgate Release Button
04056V0005EMPassive Entry Liftgate Button
26
GETTING TO KNOW YOUR VEHICLE
Page 29 of 276
System Activation/Deactivation
The Passive Entry system can be
activated or deactivated using the
Information and Entertainment System.
General Information
The following regulatory statement
applies to all radio frequency (RF)
devices equipped in this vehicle:
This device complies with Part 15 of the
FCC Rules and with Industry Canada
license-exempt RSS standard(s).
Operation is subject to the following two
conditions:
1. This device may not cause harmful
interference, and
2. This device must accept any
interference received, including
interference that may cause undesired
operation.
Note:Changes or modifications not
expressly approved by the party
responsible for compliance could void the
user’s authority to operate the
equipment.
Power Lock
The power lock is a safety device that
prevents the operation of the interior
door handles and the door lock and
unlock buttons. The power lock also
prevent opening of the doors from inside
the passenger compartment.
It is recommended to lock the vehicle
doors each time the vehicle is parked.
Activating The Power Lock
The power lock is enabled on all the doors
by quickly pushing the lock button on the
key fob twice.
The turn signals will flash to let you know
that the power lock is active.
If one or more of the doors are not closed
correctly, the power lock will not activate,
preventing a person from getting stuck
inside the passenger compartment by
entering the vehicle, and then closing, the
open door.
Deactivating The Power Lock
The power lock disengages
automatically:
When the doors are unlocked, pushing
the unlock button on the key fob.
When the keyless ignition is placed in
the ON position.
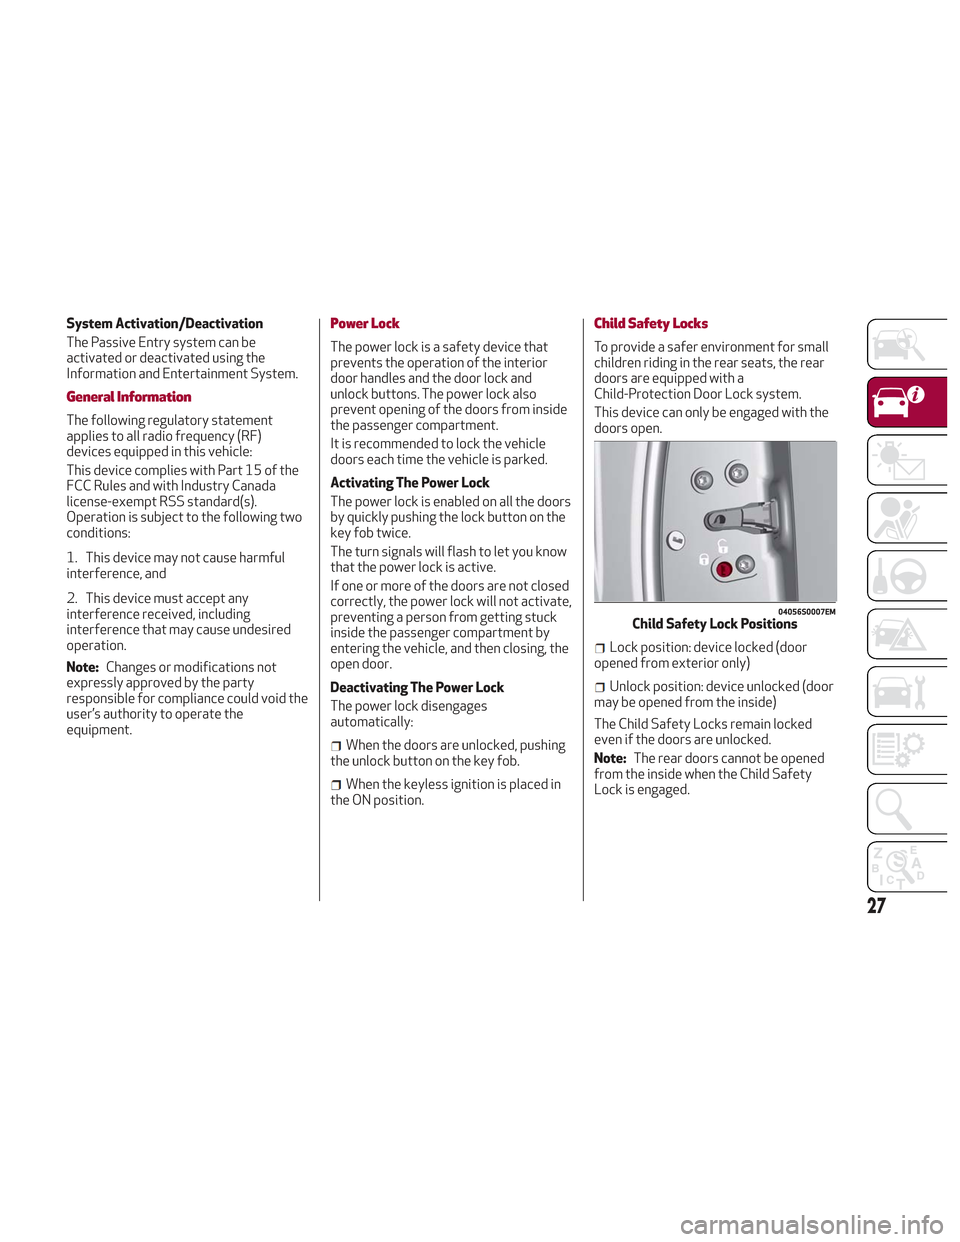
Child Safety Locks
To provide a safer environment for small
children riding in the rear seats, the rear
doors are equipped with a
Child-Protection Door Lock system.
This device can only be engaged with the
doors open.
Lock position: device locked (door
opened from exterior only)
Unlock position: device unlocked (door
may be opened from the inside)
The Child Safety Locks remain locked
even if the doors are unlocked.
Note: The rear doors cannot be opened
from the inside when the Child Safety
Lock is engaged.
04056S0007EMChild Safety Lock Positions
27
Page 30 of 276
Unlocking The Doors With A Discharged
Battery
Proceed as follows to unlock the doors if
the vehicle battery is discharged.
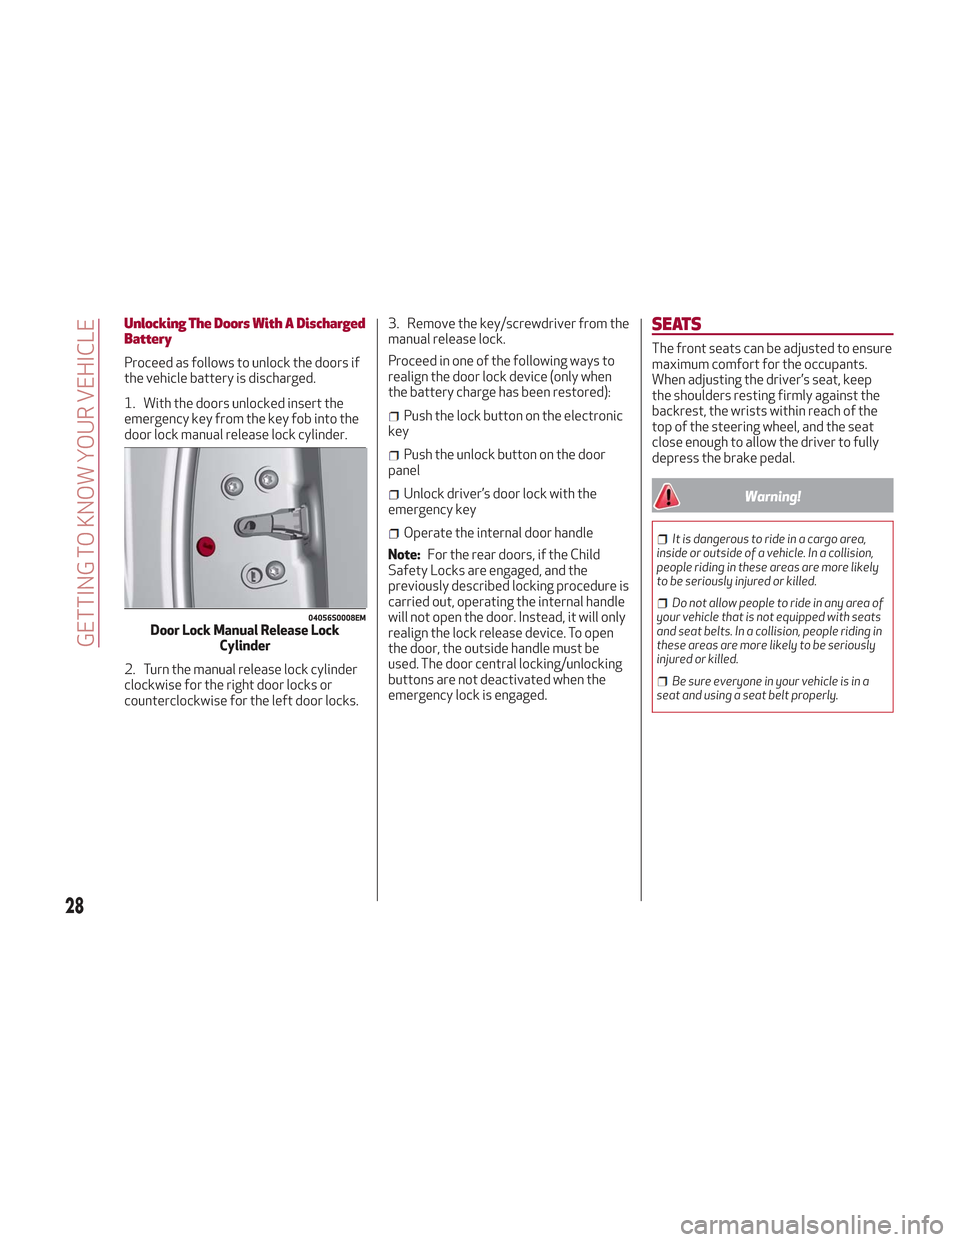
1. With the doors unlocked insert the
emergency key from the key fob into the
door lock manual release lock cylinder.
2. Turn the manual release lock cylinder
clockwise for the right door locks or
counterclockwise for the left door locks.3. Remove the key/screwdriver from the
manual release lock.
Proceed in one of the following ways to
realign the door lock device (only when
the battery charge has been restored):
Push the lock button on the electronic
key
Push the unlock button on the door
panel
Unlock driver’s door lock with the
emergency key
Operate the internal door handle
Note: For the rear doors, if the Child
Safety Locks are engaged, and the
previously described locking procedure is
carried out, operating the internal handle
will not open the door. Instead, it will only
realign the lock release device. To open
the door, the outside handle must be
used. The door central locking/unlocking
buttons are not deactivated when the
emergency lock is engaged.
SEATS
The front seats can be adjusted to ensure
maximum comfort for the occupants.
When adjusting the driver’s seat, keep
the shoulders resting firmly against the
backrest, the wrists within reach of the
top of the steering wheel, and the seat
close enough to allow the driver to fully
depress the brake pedal.
Warning!
It is dangerous to ride in a cargo area,
inside or outside of a vehicle. In a collision,
people riding in these areas are more likely
to be seriously injured or killed.
Do not allow people to ride in any area of
your vehicle that is not equipped with seats
and seat belts. In a collision, people riding in
these areas are more likely to be seriously
injured or killed.
Be sure everyone in your vehicle is in a
seat and using a seat belt properly.
04056S0008EMDoor Lock Manual Release Lock Cylinder
28
GETTING TO KNOW YOUR VEHICLE
Page 31 of 276
Sparco Racing Seats — If Equipped
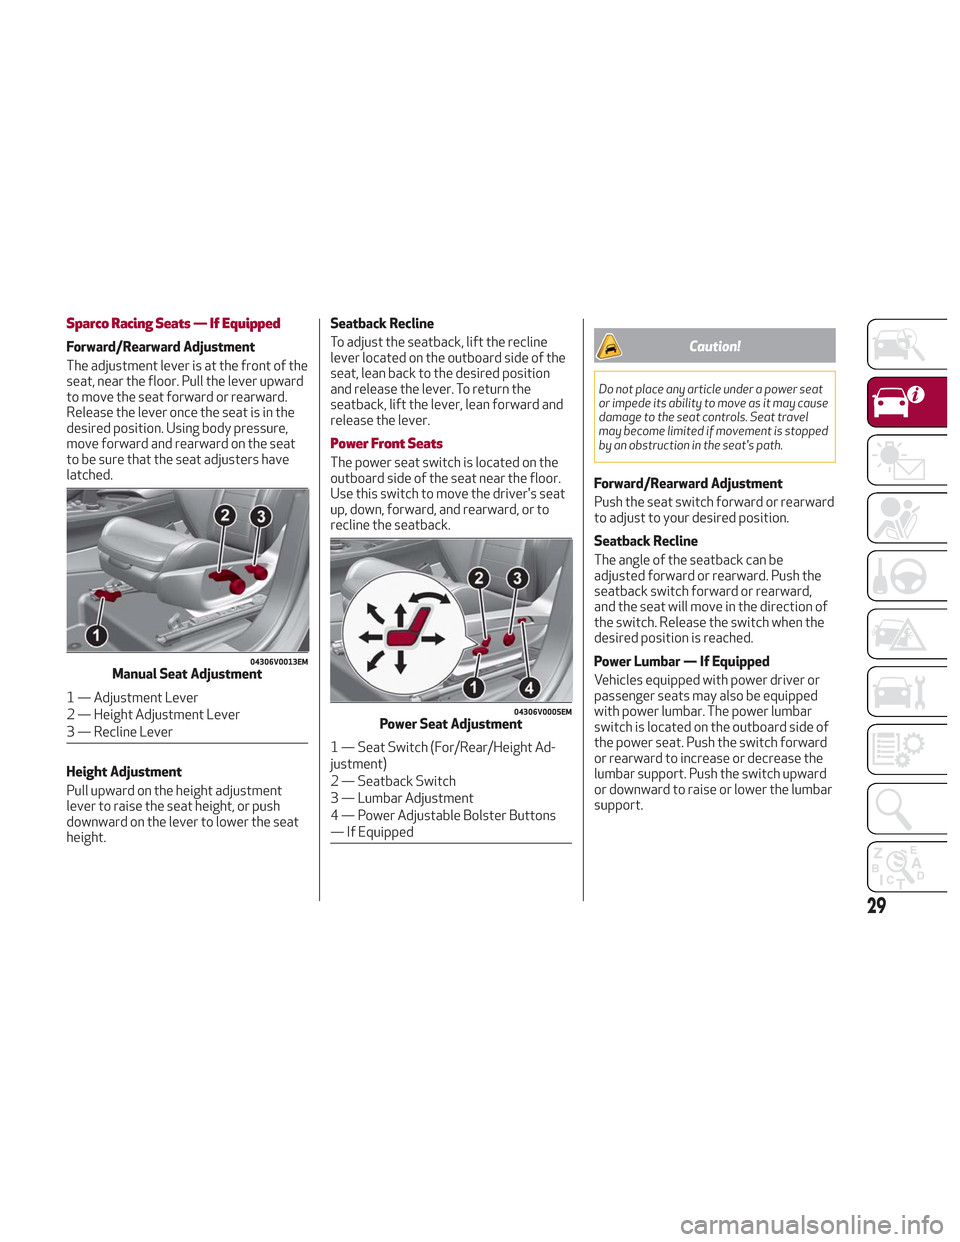
Forward/Rearward Adjustment
The adjustment lever is at the front of the
seat, near the floor. Pull the lever upward
to move the seat forward or rearward.
Release the lever once the seat is in the
desired position. Using body pressure,
move forward and rearward on the seat
to be sure that the seat adjusters have
latched.
Height Adjustment
Pull upward on the height adjustment
lever to raise the seat height, or push
downward on the lever to lower the seat
height.Seatback Recline
To adjust the seatback, lift the recline
lever located on the outboard side of the
seat, lean back to the desired position
and release the lever. To return the
seatback, lift the lever, lean forward and
release the lever.
Power Front Seats
The power seat switch is located on the
outboard side of the seat near the floor.
Use this switch to move the driver's seat
up, down, forward, and rearward, or to
recline the seatback.
Caution!
Do not place any article under a power seat
or impede its ability to move as it may cause
damage to the seat controls. Seat travel
may become limited if movement is stopped
by an obstruction in the seat's path.
Forward/Rearward Adjustment
Push the seat switch forward or rearward
to adjust to your desired position.
Seatback Recline
The angle of the seatback can be
adjusted forward or rearward. Push the
seatback switch forward or rearward,
and the seat will move in the direction of
the switch. Release the switch when the
desired position is reached.
Power Lumbar — If Equipped
Vehicles equipped with power driver or
passenger seats may also be equipped
with power lumbar. The power lumbar
switch is located on the outboard side of
the power seat. Push the switch forward
or rearward to increase or decrease the
lumbar support. Push the switch upward
or downward to raise or lower the lumbar
support.
04306V0013EMManual Seat Adjustment
1 — Adjustment Lever
2 — Height Adjustment Lever
3 — Recline Lever04306V0005EMPower Seat Adjustment
1 — Seat Switch (For/Rear/Height Ad-
justment)
2 — Seatback Switch
3 — Lumbar Adjustment
4 — Power Adjustable Bolster Buttons
— If Equipped
29
Page 33 of 276
Warning!
Adjusting a seat while driving may be
dangerous. Moving a seat while driving
could result in loss of control which could
cause a collision and serious injury or death.
Seats should be adjusted before
fastening the seat belts and while the
vehicle is parked. Serious injury or death
could result from a poorly adjusted seat
belt.
Do not ride with the seatback reclined so
that the shoulder belt is no longer resting
against your chest. In a collision you could
slide under the seat belt, which could result
in serious injury or death.
Heated Seats — If Equipped
Front Heated Seats
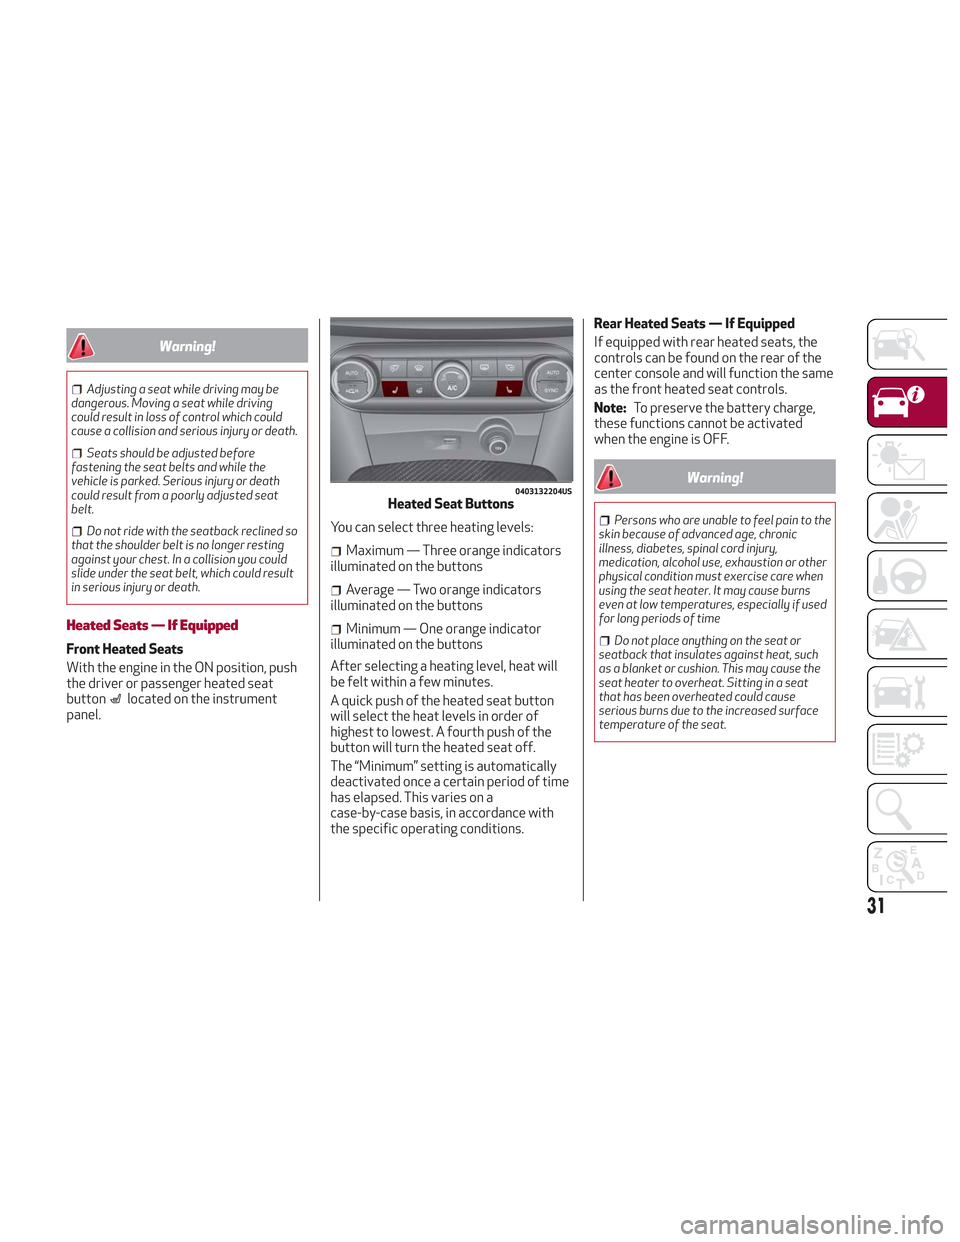
With the engine in the ON position, push
the driver or passenger heated seat
button
located on the instrument
panel. You can select three heating levels:
Maximum — Three orange indicators
illuminated on the buttons
Average — Two orange indicators
illuminated on the buttons
Minimum — One orange indicator
illuminated on the buttons
After selecting a heating level, heat will
be felt within a few minutes.
A quick push of the heated seat button
will select the heat levels in order of
highest to lowest. A fourth push of the
button will turn the heated seat off.
The “Minimum” setting is automatically
deactivated once a certain period of time
has elapsed. This varies on a
case-by-case basis, in accordance with
the specific operating conditions. Rear Heated Seats — If Equipped
If equipped with rear heated seats, the
controls can be found on the rear of the
center console and will function the same
as the front heated seat controls.
Note:
To preserve the battery charge,
these functions cannot be activated
when the engine is OFF.
Warning!
Persons who are unable to feel pain to the
skin because of advanced age, chronic
illness, diabetes, spinal cord injury,
medication, alcohol use, exhaustion or other
physical condition must exercise care when
using the seat heater. It may cause burns
even at low temperatures, especially if used
for long periods of time
Do not place anything on the seat or
seatback that insulates against heat, such
as a blanket or cushion. This may cause the
seat heater to overheat. Sitting in a seat
that has been overheated could cause
serious burns due to the increased surface
temperature of the seat.
0403132204USHeated Seat Buttons
31
Page 40 of 276

Power Folding
With the power mirror control knob in the
neutral position, rotate it to the power
folding position. Rotate the knob back to
the neutral position to return the mirrors
to the driving position.
If the power mirror control knob is moved
again during door mirror folding (from
closed to open position and vice versa),
the movement direction is reversed.
Automatic Activation
Activating the central door locking
system from outside the vehicle
automatically folds the mirrors. The
mirrors return to the driving position
when the vehicle is then unlocked.
If the door mirrors were folded using the
power mirror control knob, they can only
be returned to the driving position by
rotating the knob again.Note:
The power folding operation can
be enabled only when the vehicle speed is
lower than 31 mph (50 km/h).
Automatic Dimming Mirrors — If
Equipped
Like the electrochromic mirror, an
automatic dimming feature is also
available on the outside rear view mirrors
to prevent glare. The automatic dimming
button for these mirrors is the same as
the electrochromic mirror.
Warning!
Vehicles and other objects seen in an outside
convex mirror will look smaller and farther
away than they really are. Relying too much
on side convex mirrors could cause you to
collide with another vehicle or other object.
Use your inside mirror when judging the size
or distance of a vehicle seen in a side convex
mirror.
Heated Mirrors
Push the rear defrostbutton, located
within the climate controls, to activate
the heated mirrors.
EXTERIOR LIGHTS
Headlight Switch
The headlight switch is located to the left
of the steering wheel on the instrument
panel. This switch controls the operation
of the headlights, parking lights,
instrument panel lights, instrument panel
light dimming, interior lights and rear fog
lights.
In addition, there are buttons for parking
sensors deactivation and stop/start.
Refer to “Starting And Operating” for
further information.
04106S0005EMFolding Mirror
04126V0001NAHeadlight Switch
1 — Parking Sensors Deactivation But-
ton
2 — Parking Light, Daylight Running
Lights, Headlight Switch
3 — Instrument Panel Dimmer
4 — Rear Fog Light Button
5 — Stop/Start Button
38
GETTING TO KNOW YOUR VEHICLE
Page 41 of 276

The exterior lights can be activated only
when the ignition is in the ON mode,
except for the parking lights. Refer to
"Parking Lights" in this section for more
information.
The instrument panel and the various
controls on the dashboard will be
illuminated when the exterior lights are
turned on.
Automatic Headlights
This system automatically turns the
headlights on or off according to ambient
light levels.
Function Activation
From the O (off) position, rotate the light
switch to the
(auto) position.
Note: The function can only operate with
the ignition position cycled to ON.
Function Deactivation
To deactivate the function, rotate the
light switch to a position other than the
(auto) position.
Daytime Running Lights (DRL)
With the ignition cycled to ON, and the
light switch turned to theposition, if
the dusk sensor detects sufficient
external light, the Daytime Running
Lights will turn on automatically while the
other lights remain off.
If the turn signals are operated, the
brightness of the corresponding Daytime
Running Lights will be decreased for as
long as the turn signals are on.
If equipped, the DRL can be
activated/deactivated from the
Information and Entertainment System,
by selecting the following functions in
sequence on the main MENU:
1. “Settings.”
2. “Lights.”
3. “Daytime Lights.”
Note: The Daytime Running Lights
cannot be deactivated in Canadian
markets.
Rear Fog Lights
The rear fog light switch is located within
the headlight switch.
Push the
button, located in the center
of the headlight switch, to turn the rear
fog lights on/off. The rear fog lights turn on only when the
headlights or parking lights are also
turned on. The lights can be turned off by
pushing the
button again or by turning
the headlight switch to the O (off)
position.
When the engine is stopped with the rear
fog lights on, they will be off the next
time the engine is started.
Parking Lights
With the ignition in STOP mode, rotate
the headlight switch to theposition to
turn the parking lights on. All of the
parking lights will turn on for eight
minutes, and opening the door activates
an audible warning.
To leave only the lights on one side
(right/left) illuminated, you must move
the multifunction lever (located on the
left side of the steering wheel) to the side
that you want to remain on. With the
parking lights on, the
warning light on
the instrument panel will illuminate.
Note: Cycling the ignition to ON mode
turns off the parking lights, which were
only illuminated on one side.
39
Page 42 of 276

Headlight Off Delay
The “Headlight Off Delay” function delays
the turning off of the headlights after the
vehicle’s engine has been stopped.
The function can be activated from the
Information and Entertainment System
by selecting the following functions in
sequence on the main menu:
1. “Settings.”
2. “Lights.”
3. “Headlight Off Delay.”
The side lights and the headlights stay on
for a time that can be set between 30,
60, and 90 seconds.
Function Activation
With the headlights on, cycle the ignition
to STOP mode and the timer will start.
Note:To activate this function, the
headlights must be deactivated within
two minutes after the ignition has been
cycled to the STOP mode.
Function Deactivation
This function is deactivated by turning on
the headlights, the side lights, or by
cycling the ignition to ON mode.
Adaptive Headlight System (AFS)
This is a system combined with Xenon
headlights (Bi-Xenon 35 W headlamp if
equipped) which directs the headlights
horizontally, and continuously and
automatically adapts them to the driving
conditions around bends or when
cornering.
The system directs the headlights to light
up the road in the best way, taking into
account the speed of the vehicle and the
bend or corner angle, as well as the speed
of steering.
The adaptive lights are automatically
activated when the vehicle is started.
High Beam Headlights
To activate the fixed high beam
headlights, push the multifunction lever,
located on the left side of the steering
wheel, towards the instrument panel. The
headlight switch must first be turned to
the
(auto) or(on) position.
With high beam headlights on, the
High Beam Indicator on the
instrument panel will illuminate. The high beam headlights are turned off
by pulling the multifunction lever
rearward to its original position. The
warning light/icon
will turn off in the
instrument panel when the high beams
are turned off.
Flashing The Headlights
Pulling the multifunction lever toward the
steering wheel will activate the high
beam headlights manually. The lights will
remain on as long as the lever is held.
Once the lever is released, the lights will
resume the previous setting.
04126S0020EMMultifunction Lever
40
GETTING TO KNOW YOUR VEHICLE