2018 Alfa Romeo Stelvio Forward Collision
[x] Cancel search: Forward CollisionPage 112 of 276
Forward Collision Warning Plus (FCW+)
System
This is a driving assistance system
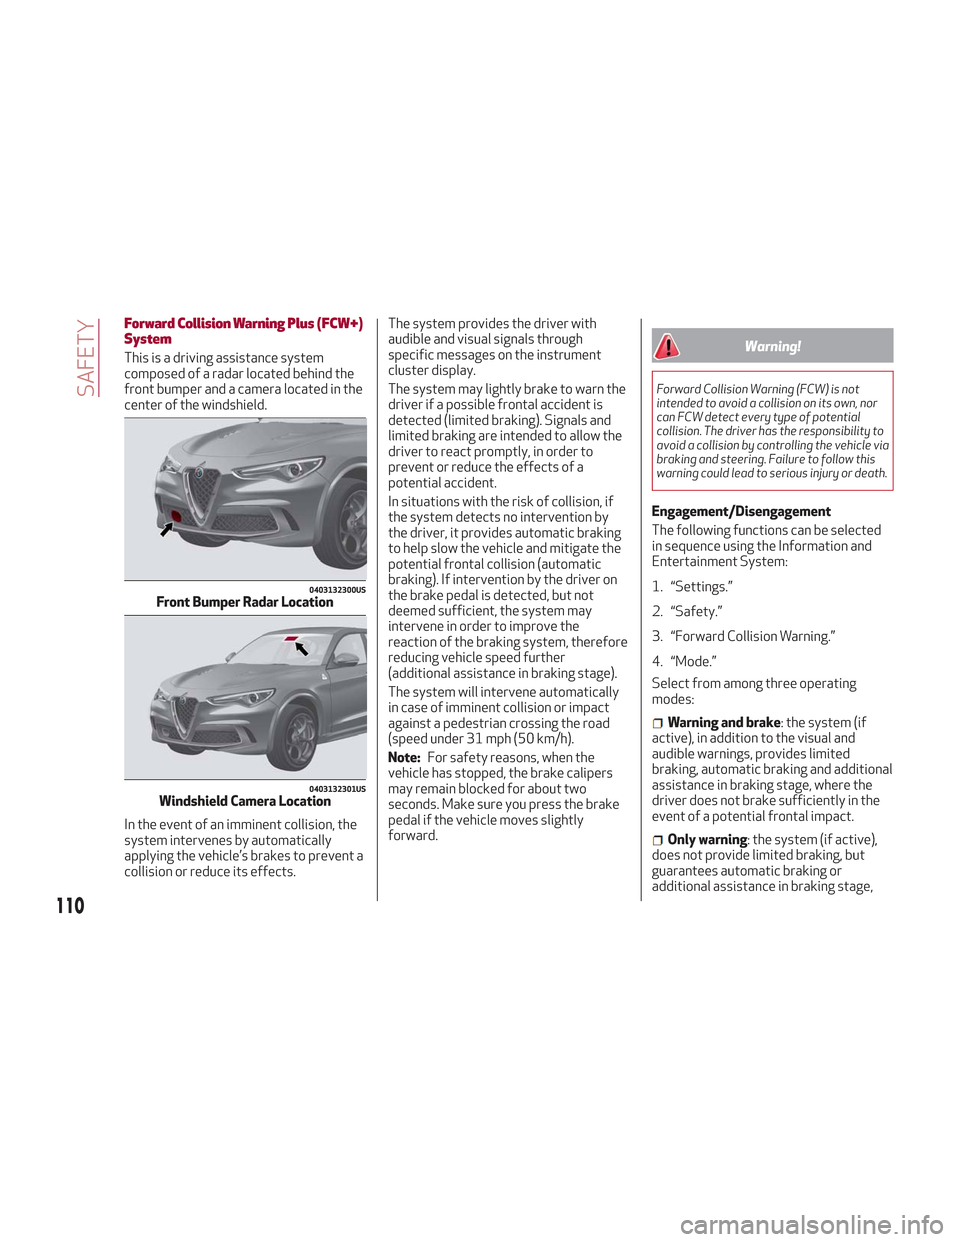
composed of a radar located behind the
front bumper and a camera located in the
center of the windshield.
In the event of an imminent collision, the
system intervenes by automatically
applying the vehicle’s brakes to prevent a
collision or reduce its effects.The system provides the driver with
audible and visual signals through
specific messages on the instrument
cluster display.
The system may lightly brake to warn the
driver if a possible frontal accident is
detected (limited braking). Signals and
limited braking are intended to allow the
driver to react promptly, in order to
prevent or reduce the effects of a
potential accident.
In situations with the risk of collision, if
the system detects no intervention by
the driver, it provides automatic braking
to help slow the vehicle and mitigate the
potential frontal collision (automatic
braking). If intervention by the driver on
the brake pedal is detected, but not
deemed sufficient, the system may
intervene in order to improve the
reaction of the braking system, therefore
reducing vehicle speed further
(additional assistance in braking stage).
The system will intervene automatically
in case of imminent collision or impact
against a pedestrian crossing the road
(speed under 31 mph (50 km/h).
Note:
For safety reasons, when the
vehicle has stopped, the brake calipers
may remain blocked for about two
seconds. Make sure you press the brake
pedal if the vehicle moves slightly
forward.Warning!
Forward Collision Warning (FCW) is not
intended to avoid a collision on its own, nor
can FCW detect every type of potential
collision. The driver has the responsibility to
avoid a collision by controlling the vehicle via
braking and steering. Failure to follow this
warning could lead to serious injury or death.
Engagement/Disengagement
The following functions can be selected
in sequence using the Information and
Entertainment System:
1. “Settings.”
2. “Safety.”
3. “Forward Collision Warning.”
4. “Mode.”
Select from among three operating
modes:
Warning and brake : the system (if
active), in addition to the visual and
audible warnings, provides limited
braking, automatic braking and additional
assistance in braking stage, where the
driver does not brake sufficiently in the
event of a potential frontal impact.
Only warning : the system (if active),
does not provide limited braking, but
guarantees automatic braking or
additional assistance in braking stage,
0403132300USFront Bumper Radar Location
0403132301USWindshield Camera Location
110
SAFETY
Page 113 of 276

where the driver does not brake at all or
not sufficiently in the event of a potential
frontal impact.
Disable: the system does not provide
visual and audible warnings, limited
braking, automatic braking or additional
assistance in braking stage. The system
will therefore provide no indication of a
possible collision.
Activation/Deactivation
The Forward Collision Warning system is
activated whenever the engine is started
regardless of what is shown in the
Information and Entertainment System.
Following a deactivation, the system will
not warn the driver about the possible
collision with a preceding vehicle,
regardless of the setting selected in the
Information and Entertainment System.
Note: Each time the engine is started,
the system is activated regardless of
what setting was selected when the
engine was turned OFF.
This function is not active at a speed
lower than 4 mph (7 km/h) or higher than
124 mph (200 km/h).
The system is active:
Each time the engine is started.
When feature is selected within the
Information and Entertainment System.
When the ignition is in the ON position.
When the vehicle speed is between
4 mph (7 km/h) and 124 mph (200 km/h).
When the front seat belts are
fastened.
The "Alfa DNA Pro" selector is not in
RACE position (if equipped).
Changing The System Sensitivity
The sensitivity of the system can be
changed through the Information and
Entertainment System menu, choosing
from one of the following three options:
"Near", "Med" or "Far". Refer to the
description in the Information and
Entertainment System Supplement for
how to change the settings.
The default setting is "Med". With this
setting, the system warns the driver of a
possible collision with the vehicle in front
when that vehicle is at a standard
distance, between that of the other two
settings.
With the system sensitivity set to "Far",
the system will warn the driver of a
possible collision with the vehicle in front
when that vehicle is at a greater distance,
thus providing the possibility of acting on
the brakes more lightly and gradually.
This setting provides the drivers with the
maximum possible reaction time to
prevent a potential accident.
With the option set to "Near", the system
will alert the driver of a possible collision
with the vehicle in front when that vehicle
is close. This setting offers the driver a
lower reaction time compared to the "Med" and "Far" settings, in the event of a
potential collision, but permits more
dynamic driving of the vehicle.
The system sensitivity setting is kept in
the memory when the engine is turned
OFF.
System Limited Operation Warning
If a dedicated message is displayed, a
condition limiting the system operation
may have occurred. The possible reasons
of this limitation are something is
blocking the camera view or a fault.
If an obstruction is signaled, clean the
area of the radar on the front bumper,
and the camera area on the windshield.
If a fault in the system is occurring, it will
still be possible to drive the vehicle
normally, but automatic braking will not
be available in the event of an impending
collision.
When the conditions limiting the system
functions end, this will go back to normal
and complete operation. Should the fault
persist, contact your authorized dealer.
System Failure Signaling
If the system turns off and a dedicated
message is shown on the display, it
means that there is a fault with the
system.
In this case, it is still possible to drive the
vehicle, but you are advised to contact
your authorized dealer as soon as
possible.
111
Page 121 of 276
Warning!
Relying on the air bags alone could lead to
more severe injuries in a collision. The air
bags work with your seat belt to restrain
you properly. In some collisions, the air bags
won’t deploy at all. Always wear your seat
belt even though you have air bags.
In a collision, you and your passengers can
suffer much greater injuries if you are not
properly buckled up. You can strike the
interior of your vehicle or other passengers,
or you can be thrown out of the vehicle.
Always be sure you and others in your
vehicle are buckled up properly.
It is dangerous to ride in a cargo area,
inside or outside of a vehicle. In a collision,
people riding in these areas are more likely
to be seriously injured or killed.
Do not allow people to ride in any area of
your vehicle that is not equipped with seats
and seat belts.
Be sure everyone in your vehicle is in a
seat and using a seat belt properly.
Occupants, including the driver, should
always wear their seat belts whether or not
an air bag is also provided at their seating
position to minimize the risk of severe injury
or death in the event of a crash.
Wearing your seat belt incorrectly could
make your injuries in a collision much worse.
You might suffer internal injuries, or you
could even slide out of the seat belt. Follow
these instructions to wear your seat belt
safely and to keep your passengers safe,
too.
Two people should never be belted into a
single seat belt. People belted together can
crash into one another in a collision, hurting
one another badly. Never use a lap/shoulder
belt or a lap belt for more than one person,
no matter what their size.
Warning!
A lap belt worn too high can increase the
risk of injury in a collision. The seat belt
forces won’t be at the strong hip and pelvic
bones, but across your abdomen. Always
wear the lap part of your seat belt as low as
possible and keep it snug.
A twisted seat belt may not protect you
properly. In a collision, it could even cut into you.
Be sure the seat belt is flat against your body,
without twists. If you can’t straighten a seat
belt in your vehicle, take it to your authorized
dealer immediately and have it fixed.
A seat belt that is buckled into the wrong
buckle will not protect you properly. The lap
portion could ride too high on your body,
possibly causing internal injuries. Always buckle
your seat belt into the buckle nearest you.
A seat belt that is too loose will not protect
you properly. In a sudden stop, you could move
too far forward, increasing the possibility of
injury. Wear your seat belt snugly.
A seat belt that is worn under your arm is
dangerous. Your body could strike the inside
surfaces of the vehicle in a collision,
increasing head and neck injury. A seat belt
worn under the arm can cause internal injuries. Ribs aren’t as strong as shoulder
bones. Wear the seat belt over your
shoulder so that your strongest bones will
take the force in a collision.
A shoulder belt placed behind you will not
protect you from injury during a collision.
You are more likely to hit your head in a
collision if you do not wear your shoulder
belt. The lap and shoulder belt are meant to
be used together.
A frayed or torn seat belt could rip apart
in a collision and leave you with no
protection. Inspect the seat belt system
periodically, checking for cuts, frays, or
loose parts. Damaged parts must be
replaced immediately. Do not disassemble
or modify the seat belt system. Seat belt
assemblies must be replaced after a
collision.
Lap/Shoulder Belt Operating
Instructions
1. Enter the vehicle and close the door.
Sit back and adjust the seat.
2. The seat belt latch plate is above the
back of the front seat, and next to your
arm in the rear seat (for vehicles
equipped with a rear seat). Grasp the
latch plate and pull out the seat belt.
Slide the latch plate up the webbing as
far as necessary to allow the seat belt to
go around your lap.
3. When the seat belt is long enough to
fit, insert the latch plate into the buckle
until you hear a “click.”
119
Page 124 of 276

webbing to retract completely in this
case and then carefully pull out only the
amount of webbing necessary to
comfortably wrap around the occupant’s
mid-section. Slide the latch plate into the
buckle until you hear a "click."
In Automatic Locking Mode, the shoulder
belt is automatically pre-locked. The seat
belt will still retract to remove any slack
in the shoulder belt. Use the Automatic
Locking Mode anytime a child restraint is
installed in a seating position that has a
seat belt with this feature. Children
12 years old and under should always be
properly restrained in the rear seat of a
vehicle with a rear seat.
Warning!
Never place a rear-facing child restraint in
front of an air bag. A deploying passenger
front air bag can cause death or serious
injury to a child 12 years or younger,
including a child in a rear-facing child
restraint.
Only use a rear-facing child restraint in
the rear seat of a vehicle with a rear seat.
How To Engage The Automatic Locking
Mode
1. Buckle the combination lap and
shoulder belt. 2. Grasp the shoulder portion and pull
downward until the entire seat belt is
extracted.
3. Allow the seat belt to retract. As the
seat belt retracts, you will hear a clicking
sound. This indicates the seat belt is now
in the Automatic Locking Mode.
How To Disengage The Automatic
Locking Mode
Unbuckle the combination lap/shoulder
belt and allow it to retract completely to
disengage the Automatic Locking Mode
and activate the vehicle sensitive
(emergency) locking mode.
Warning!
The seat belt assembly must be replaced
if the switchable Automatic Locking
Retractor (ALR) feature or any other seat
belt function is not working properly when
checked according to the procedures in the
Service Manual.
Failure to replace the seat belt assembly
could increase the risk of injury in collisions.
Do not use the Automatic Locking Mode
to restrain occupants who are wearing the
seat belt or children who are using booster
seats. The locked mode is only used to
install rear-facing or forward-facing child
restraints that have a harness for
restraining the child.
Supplemental Restraint Systems
(SRS)
Some of the safety features described in
this section may be standard equipment
on some models, or may be optional
equipment on others. If you are not sure,
ask your authorized dealer.
The air bag system must be ready to
protect you in a collision. The Occupant
Restraint Controller (ORC) monitors the
internal circuits and interconnecting
wiring associated with the electrical Air
Bag System Components. Your vehicle
may be equipped with the following Air
Bag System Components:
Air Bag System Components
Occupant Restraint Controller (ORC)
Air Bag Warning Light
Steering Wheel and Column
Instrument Panel
Knee Impact Bolsters
Driver and Front Passenger Air Bags
Seat Belt Buckle Switch
Supplemental Side Air Bags
Supplemental Knee Air Bags
Front and Side Impact Sensors
Seat Belt Pretensioners
Seat Track Position Sensors
122
SAFETY
Page 134 of 276
Warning!
In a collision, an unrestrained child can
become a projectile inside the vehicle. The
force required to hold even an infant on your
lap could become so great that you could not
hold the child, no matter how strong you are.
The child and others could be badly injured or
killed. Any child riding in your vehicle should
be in a proper restraint for the child’s size.
There are different sizes and types of
restraints for children from newborn size
to the child almost large enough for an
adult safety belt. Always check the child
seat Owner’s Manual to make sure you
have the correct seat for your child.
Carefully read and follow all the
instructions and warnings in the child
restraint Owner’s Manual and on all the
labels attached to the child restraint.
Before buying any restraint system,
make sure that it has a label certifying
that it meets all applicable Safety
Standards. You should also make sure
that you can install it in the vehicle where
you will use it.Note:
For additional information, refer to
www.safercar.gov/parents/index.htm or
call: 1–888–327–4236
Canadian residents should refer to
Transport Canada’s website for
additional information: http://
www.tc.gc.ca/eng/motorvehiclesafety/
safedrivers-childsafety-index-53.htm
Summary Of Recommendations For Restraining Children In Vehicles
Child Size, Height, Weight Or Age Recommended Type Of Child Restraint
Infants and Toddlers Children
who are two years old or younger and
who have not reached the height or weight
limits of their child restraint Either an Infant Carrier or a Convertible Child
Restraint, facing rearward in the rear seat of
the vehicle
Small Children Children who are at least two years old or who
have outgrown the height or weight limit of
their rear-facing child restraint Forward-Facing Child Restraint with a
five-point Harness, facing forward in the rear
seat of the vehicle
Larger Children Children who have outgrown their
forward-facing child restraint, but are too
small to properly fit the vehicle’s seat belt Belt Positioning Booster Seat and the vehicle
seat belt, seated in the rear seat of the vehicle
Children Too Large for Child Restraints Children 12 years old or younger, who have
outgrown the height or weight limit of their
booster seat Vehicle Seat Belt, seated in the rear seat of the
vehicle
132
SAFETY
Page 135 of 276
Infant And Child Restraints
Safety experts recommend that children
ride rear-facing in the vehicle until they
are two years old or until they reach
either the height or weight limit of their
rear-facing child restraint. Two types of
child restraints can be used rear-facing:
infant carriers and convertible child
seats.
The infant carrier is only used rear-facing
in the vehicle. It is recommended for
children from birth until they reach the
weight or height limit of the infant carrier.
Convertible child seats can be used either
rear-facing or forward-facing in the
vehicle. Convertible child seats often
have a higher weight limit in the
rear-facing direction than infant carriers
do, so they can be used rear-facing by
children who have outgrown their infant
carrier but are still less than at least two
years old. Children should remain
rear-facing until they reach the highest
weight or height allowed by their
convertible child seat.Warning!
Never place a rear-facing child restraint in
front of an air bag. A deploying passenger
front air bag can cause death or serious
injury to a child 12 years or younger,
including a child in a rear-facing child
restraint.
Only use a rear-facing child restraint in
the rear seat of a vehicle with a rear seat.
Older Children And Child Restraints
Children who are two years old or who
have outgrown their rear-facing
convertible child seat can ride
forward-facing in the vehicle.
Forward-facing child seats and
convertible child seats used in the
forward-facing direction are for children
who are over two years old or who have
outgrown the rear-facing weight or
height limit of their rear-facing
convertible child seat. Children should
remain in a forward-facing child seat with
a harness for as long as possible, up to
the highest weight or height allowed by
the child seat.
All children whose weight or height is
above the forward-facing limit for the
child seat should use a belt-positioning
booster seat until the vehicle’s seat belts
fit properly. If the child cannot sit with
knees bent over the vehicle’s seat
cushion while the child’s back is against the seatback, they should use a
belt-positioning booster seat. The child
and belt-positioning booster seat are
held in the vehicle by the seat belt.
Warning!
Improper installation can lead to failure
of an infant or child restraint. It could come
loose in a collision. The child could be badly
injured or killed. Follow the child restraint
manufacturer’s directions exactly when
installing an infant or child restraint.
After a child restraint is installed in the
vehicle, do not move the vehicle seat
forward or rearward because it can loosen
the child restraint attachments. Remove the
child restraint before adjusting the vehicle
seat position. When the vehicle seat has
been adjusted, reinstall the child restraint.
When your child restraint is not in use,
secure it in the vehicle with the seat belt or
LATCH anchorages, or remove it from the
vehicle. Do not leave it loose in the vehicle. In
a sudden stop or accident, it could strike the
occupants or seatbacks and cause serious
personal injury.
133
Page 157 of 276
Caution!
Before moving the transmission gear
selector out of PARK, you must push the
ignition button to cycle from STOP/OFF
mode to the ON mode, and also press the
brake pedal. Otherwise, damage to the gear
selector could result.
DO NOT race the engine when shifting
from PARK or NEUTRAL into another gear
range, as this can damage the drivetrain.
REVERSE (R)
Select this mode only with the vehicle at
a standstill.
NEUTRAL (N)
Use this range when the vehicle is
standing for prolonged periods with the
engine running. The engine may be
started in this range. Apply the electric
park brake and shift the transmission
into PARK (P) if you must leave the
vehicle.
Warning!
Do not coast in NEUTRAL and never turn off
the ignition to coast down a hill. These are
unsafe practices that limit your response to
changing traffic or road conditions. You
might lose control of the vehicle and have a
collision.
DRIVE (D)
Use this mode in normal driving
conditions.
Shifting from DRIVE (D) to PARK (P) or
REVERSE (R) modes must take place
only after releasing the accelerator
pedal, with vehicle at a standstill and
brake pedal pressed.
This mode ensures automatic
engagement of the most suitable gears
for driving needs and maximum fuel
economy in terms of consumption.
In this position, the transmission shifts
the gears automatically, selecting the
most suitable for forward driving among
those available as you go. In this way the
vehicle's optimal driving characteristics
are provided for all conditions.
AutoStick
In the case of frequent shifting (e.g. for
sport driving, when the vehicle is driven
with a heavy load, on slopes, when towing
heavy trailers), it is recommended to use
the AutoStick (sequential shifting) mode
to select and keep a lower fixed ratio.
In these conditions, the use of a lower
gear improves vehicle performance and
prevents overheating.
It is possible to shift from DRIVE (D)
mode to AutoStick mode regardless of
vehicle speed. Activation
Starting from DRIVE (D) mode, to
activate the sequential drive mode, move
the gear selector to the left (– and +
indication of the trim). The gear engaged
will be shown on the display.
Shifting is made by moving the gear
selector forward, toward symbol – or
backward, toward symbol +.
Steering Column Mounted Shift
Paddles
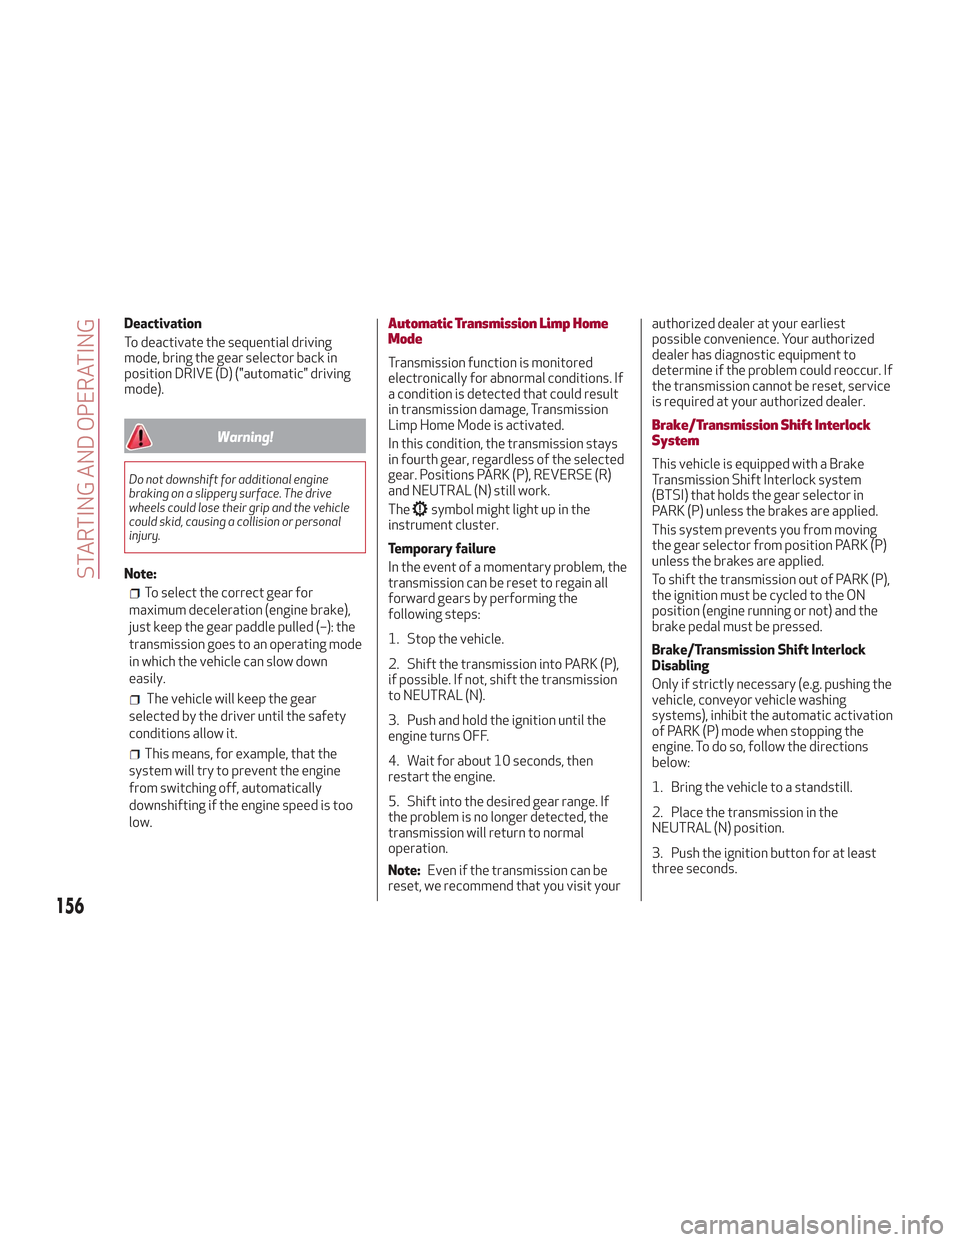
The gear can be manually shifted also by
using the paddles behind the steering
wheel, pull the right paddle (+) toward the
steering wheel and release it to engage a
higher gear, perform the same operation
with the left paddle (-) to engage a lower
gear.
Note:
If only one manual shift is
necessary, the letter (D) will remain on
the display with the engaged gear next to
it.
0604132230USSteering Column Mounted Shift Paddles
155
Page 158 of 276
Deactivation
To deactivate the sequential driving
mode, bring the gear selector back in
position DRIVE (D) ("automatic" driving
mode).
Warning!
Do not downshift for additional engine
braking on a slippery surface. The drive
wheels could lose their grip and the vehicle
could skid, causing a collision or personal
injury.
Note:
To select the correct gear for
maximum deceleration (engine brake),
just keep the gear paddle pulled (–): the
transmission goes to an operating mode
in which the vehicle can slow down
easily.
The vehicle will keep the gear
selected by the driver until the safety
conditions allow it.
This means, for example, that the
system will try to prevent the engine
from switching off, automatically
downshifting if the engine speed is too
low.
Automatic Transmission Limp Home
Mode
Transmission function is monitored
electronically for abnormal conditions. If
a condition is detected that could result
in transmission damage, Transmission
Limp Home Mode is activated.
In this condition, the transmission stays
in fourth gear, regardless of the selected
gear. Positions PARK (P), REVERSE (R)
and NEUTRAL (N) still work.
The
symbol might light up in the
instrument cluster.
Temporary failure
In the event of a momentary problem, the
transmission can be reset to regain all
forward gears by performing the
following steps:
1. Stop the vehicle.
2. Shift the transmission into PARK (P),
if possible. If not, shift the transmission
to NEUTRAL (N).
3. Push and hold the ignition until the
engine turns OFF.
4. Wait for about 10 seconds, then
restart the engine.
5. Shift into the desired gear range. If
the problem is no longer detected, the
transmission will return to normal
operation.
Note: Even if the transmission can be
reset, we recommend that you visit your authorized dealer at your earliest
possible convenience. Your authorized
dealer has diagnostic equipment to
determine if the problem could reoccur. If
the transmission cannot be reset, service
is required at your authorized dealer.
Brake/Transmission Shift Interlock
System
This vehicle is equipped with a Brake
Transmission Shift Interlock system
(BTSI) that holds the gear selector in
PARK (P) unless the brakes are applied.
This system prevents you from moving
the gear selector from position PARK (P)
unless the brakes are applied.
To shift the transmission out of PARK (P),
the ignition must be cycled to the ON
position (engine running or not) and the
brake pedal must be pressed.
Brake/Transmission Shift Interlock
Disabling
Only if strictly necessary (e.g. pushing the
vehicle, conveyor vehicle washing
systems), inhibit the automatic activation
of PARK (P) mode when stopping the
engine. To do so, follow the directions
below:
1. Bring the vehicle to a standstill.
2. Place the transmission in the
NEUTRAL (N) position.
3. Push the ignition button for at least
three seconds.
156
STARTING AND OPERATING