2018 Alfa Romeo Stelvio Battery
[x] Cancel search: BatteryPage 30 of 276
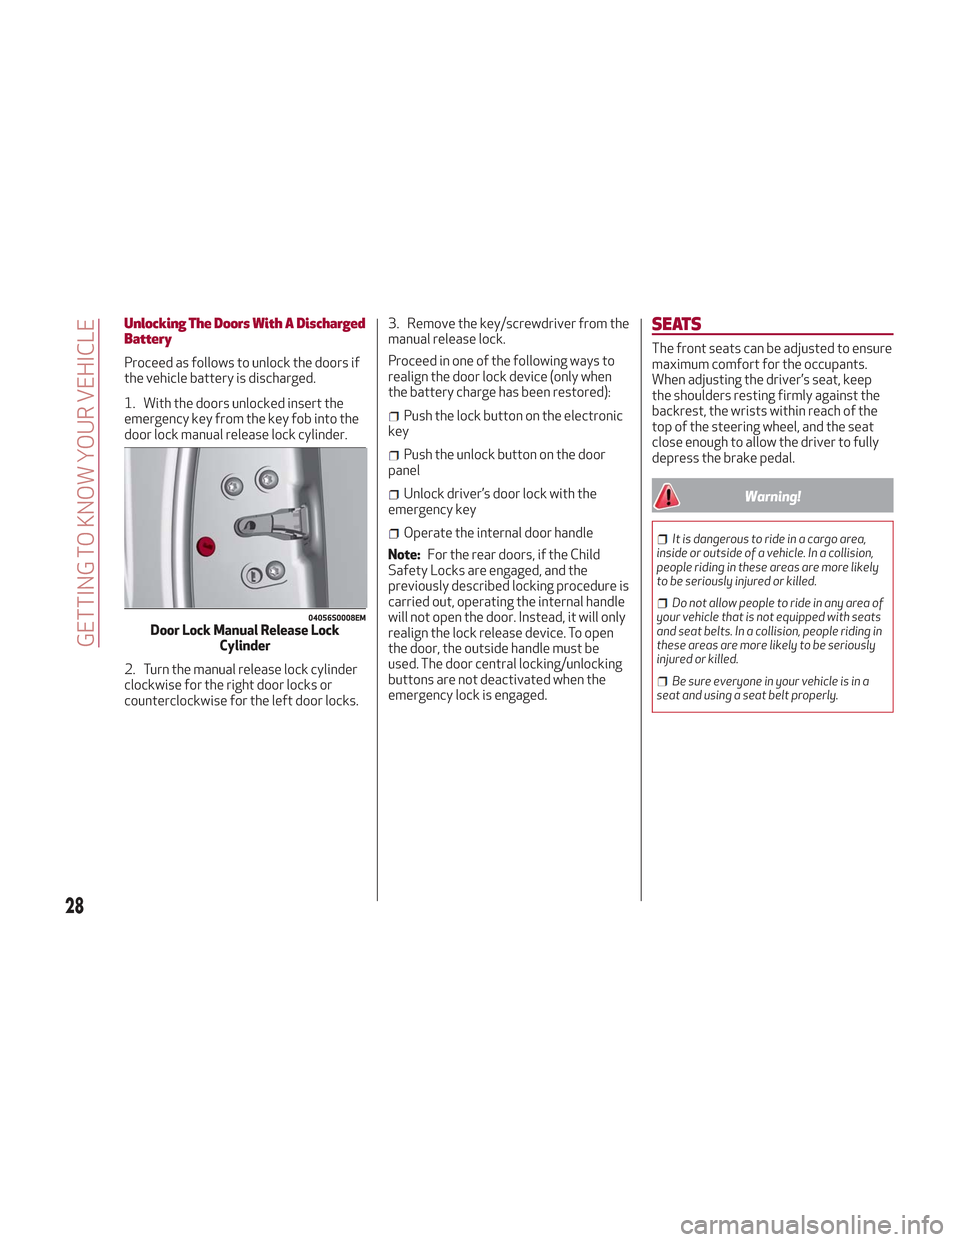
Unlocking The Doors With A Discharged
Battery
Proceed as follows to unlock the doors if
the vehicle battery is discharged.
1. With the doors unlocked insert the
emergency key from the key fob into the
door lock manual release lock cylinder.
2. Turn the manual release lock cylinder
clockwise for the right door locks or
counterclockwise for the left door locks.3. Remove the key/screwdriver from the
manual release lock.
Proceed in one of the following ways to
realign the door lock device (only when
the battery charge has been restored):
Push the lock button on the electronic
key
Push the unlock button on the door
panel
Unlock driver’s door lock with the
emergency key
Operate the internal door handle
Note: For the rear doors, if the Child
Safety Locks are engaged, and the
previously described locking procedure is
carried out, operating the internal handle
will not open the door. Instead, it will only
realign the lock release device. To open
the door, the outside handle must be
used. The door central locking/unlocking
buttons are not deactivated when the
emergency lock is engaged.
SEATS
The front seats can be adjusted to ensure
maximum comfort for the occupants.
When adjusting the driver’s seat, keep
the shoulders resting firmly against the
backrest, the wrists within reach of the
top of the steering wheel, and the seat
close enough to allow the driver to fully
depress the brake pedal.
Warning!
It is dangerous to ride in a cargo area,
inside or outside of a vehicle. In a collision,
people riding in these areas are more likely
to be seriously injured or killed.
Do not allow people to ride in any area of
your vehicle that is not equipped with seats
and seat belts. In a collision, people riding in
these areas are more likely to be seriously
injured or killed.
Be sure everyone in your vehicle is in a
seat and using a seat belt properly.
04056S0008EMDoor Lock Manual Release Lock Cylinder
28
GETTING TO KNOW YOUR VEHICLE
Page 33 of 276
Warning!
Adjusting a seat while driving may be
dangerous. Moving a seat while driving
could result in loss of control which could
cause a collision and serious injury or death.
Seats should be adjusted before
fastening the seat belts and while the
vehicle is parked. Serious injury or death
could result from a poorly adjusted seat
belt.
Do not ride with the seatback reclined so
that the shoulder belt is no longer resting
against your chest. In a collision you could
slide under the seat belt, which could result
in serious injury or death.
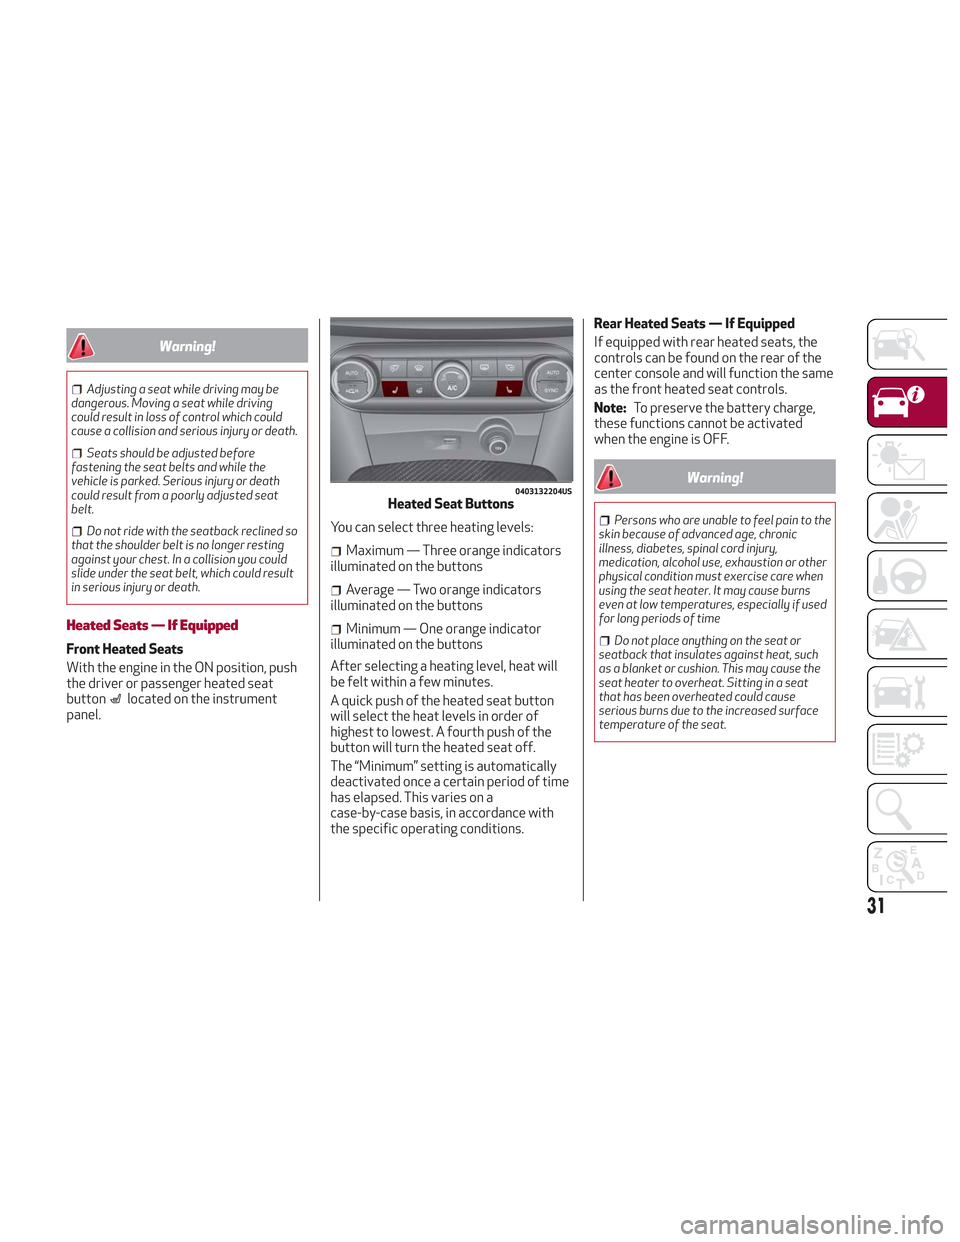
Heated Seats — If Equipped
Front Heated Seats
With the engine in the ON position, push
the driver or passenger heated seat
button
located on the instrument
panel. You can select three heating levels:
Maximum — Three orange indicators
illuminated on the buttons
Average — Two orange indicators
illuminated on the buttons
Minimum — One orange indicator
illuminated on the buttons
After selecting a heating level, heat will
be felt within a few minutes.
A quick push of the heated seat button
will select the heat levels in order of
highest to lowest. A fourth push of the
button will turn the heated seat off.
The “Minimum” setting is automatically
deactivated once a certain period of time
has elapsed. This varies on a
case-by-case basis, in accordance with
the specific operating conditions. Rear Heated Seats — If Equipped
If equipped with rear heated seats, the
controls can be found on the rear of the
center console and will function the same
as the front heated seat controls.
Note:
To preserve the battery charge,
these functions cannot be activated
when the engine is OFF.
Warning!
Persons who are unable to feel pain to the
skin because of advanced age, chronic
illness, diabetes, spinal cord injury,
medication, alcohol use, exhaustion or other
physical condition must exercise care when
using the seat heater. It may cause burns
even at low temperatures, especially if used
for long periods of time
Do not place anything on the seat or
seatback that insulates against heat, such
as a blanket or cushion. This may cause the
seat heater to overheat. Sitting in a seat
that has been overheated could cause
serious burns due to the increased surface
temperature of the seat.
0403132204USHeated Seat Buttons
31
Page 44 of 276
Note:Before exiting the vehicle, ensure
that the overhead lights are off. This will
prevent the battery from discharging
once the doors are closed. If a light is left
on accidently, the overhead lights will
turn off automatically approximately
15 minutes after the engine has been
cycled OFF.
Overhead Light Timing
On certain models, to assist getting in
and out of the vehicle at night or in
poorly-lit areas, two timed modes have
been provided.
Timing While Getting Into The Vehicle
— The overhead lights turn on according
to the following modes:
Will illuminate for a few seconds when
the doors are unlocked.
Will illuminate for approximately three
minutes when one of the doors is opened.
Will illuminate for a few seconds when
the doors are locked.
Timing is interrupted when the ignition is
cycled to ON mode.
Three Modes Are Available For Turning
Off Overhead Lighting:
When all doors are closed after
entering the vehicle, the three-minute
timer will stop and a seconds timer will
start for the interior lights. This timing
will stop when the ignition is cycled to ON
mode.
When doors are locked (either with key
fob or with key inserted on driver side
door), the overhead light turns off.
The interior lights will turn off after
15 minutes to preserve the battery.
Timing While Getting Out Of The
Vehicle — After cycling the ignition to
STOP mode, the overhead lights will turn
on as follows:
For a few seconds after the engine
stops.
For approximately three minutes when
one of the doors is opened.
For a few seconds when the last door
is closed.
The timing stops automatically when the
doors are locked.
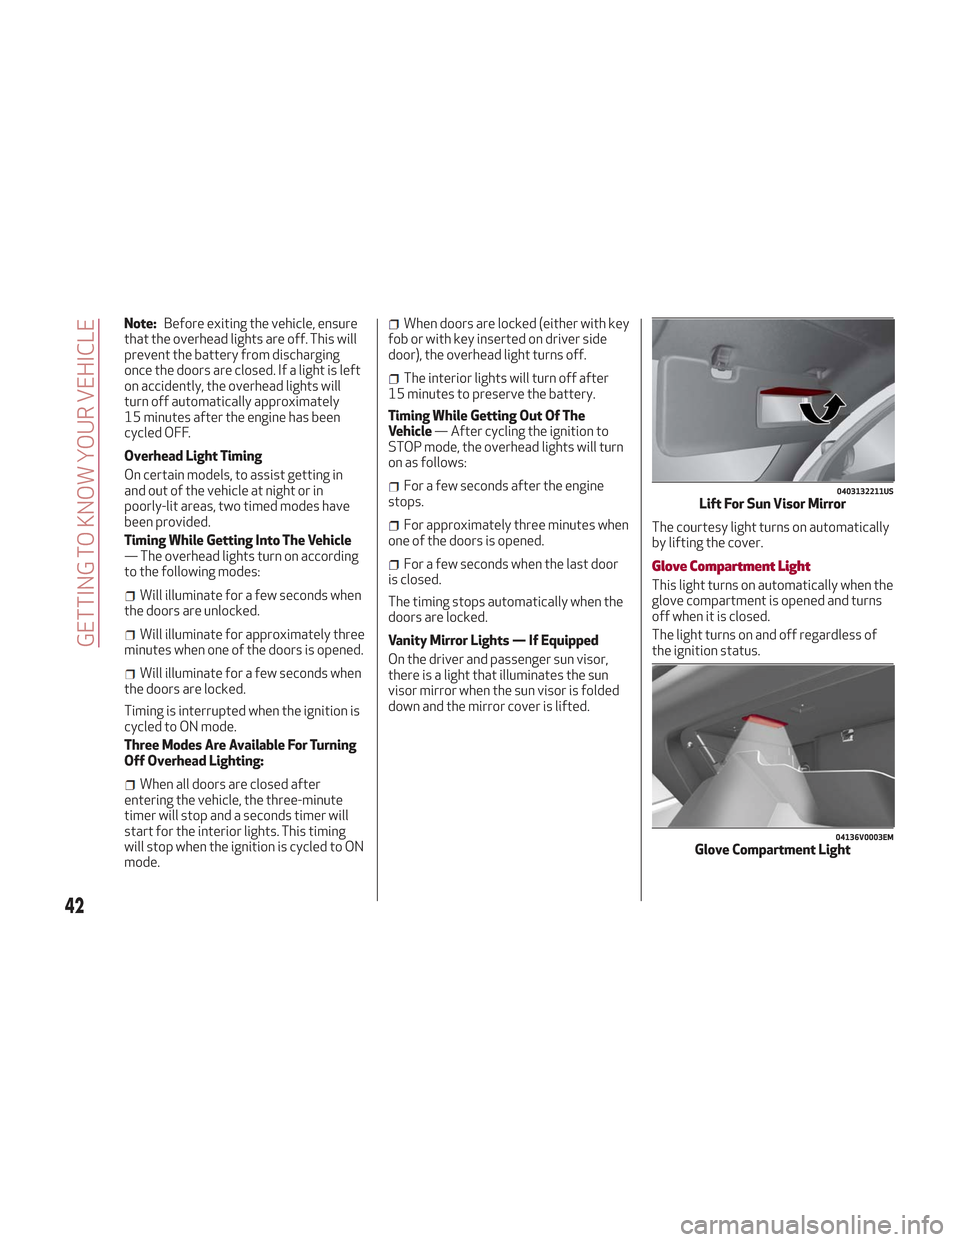
Vanity Mirror Lights — If Equipped
On the driver and passenger sun visor,
there is a light that illuminates the sun
visor mirror when the sun visor is folded
down and the mirror cover is lifted. The courtesy light turns on automatically
by lifting the cover.Glove Compartment Light
This light turns on automatically when the
glove compartment is opened and turns
off when it is closed.
The light turns on and off regardless of
the ignition status.
0403132211USLift For Sun Visor Mirror
04136V0003EMGlove Compartment Light
42
GETTING TO KNOW YOUR VEHICLE
Page 46 of 276

Luggage Compartment Courtesy Lights
The luggage compartment features two
courtesy lights.
These courtesy lights turn on
automatically when the liftgate is opened
and turn off when it is closed.
The courtesy lights will turn on and off
regardless of the ignition position.
Note:If the liftgate is left open, the
lights will automatically turn off after
15 minutes to prevent discharging of the
battery.
Instrument Panel Dimmer Control
With the daytime running lights or
headlights on, rotate the dimmer control
upward to increase the instrument panel
brightness and the control button icons.
Rotate the dimmer control downward to
decrease brightness.
WINDSHIELD WIPERS
Windshield Wiper Stalk
The windshield wiper stalk is located on
the right side of the steering wheel.
The windshield wipers will only operate
with the ignition cycled to ON.
Caution!
Turn the windshield wipers off when
driving through an automatic car wash.
Damage to the windshield wipers may result
if the wiper control is left in any position
other than off.
In cold weather, always turn off the wiper
switch and allow the wipers to return to the
“Park” position before turning off the
engine. If the wiper switch is left on and the
wipers freeze to the windshield, damage to
the wiper motor may occur when the vehicle
is restarted.
Always remove any buildup of snow that
prevents the windshield wiper blades from
returning to the off position. If the
windshield wiper control is turned off and
the blades cannot return to the off position,
damage to the wiper motor may occur.
04136V0006EMLuggage Compartment Courtesy Lights04126V0055EMDimmer Control
44
GETTING TO KNOW YOUR VEHICLE
Page 58 of 276
Caution!
Do not open the sun roof if a roof rack or
crossbars are fitted. Do not open the sun
roof if there is snow or ice on it: you may
damage it.
Closing
From the complete open position, push
the open/close button toward the front
of the vehicle. The roof will close
completely.
The automatic motion can be interrupted
in any position by pushing the open/close
button again.
Vent Opening
To bring the roof into vent position, push
and release the vent button.
This type of vent opening can be
activated regardless of the position of
the sunroof. When starting with the roof
in the closed position, pushing the vent
button automatically causes the sunroof
to open to the vent position. If the roof is
already open, the button must be held
until the roof reaches the vent-opening
position.
Pushing the vent button again during
automatic movement of the roof will stop
it.
Power Sun Shade
The sunshade is power operated.
Push the Power Shade open/close button
toward the rear of the vehicle to open the
sun shade.
Push the Power Shade open/close button
toward the front of the vehicle to close
the sun shade.
The automatic motion can be interrupted
in any position by pushing the Power
Shade on/off button again.
Pinch Protect Feature
The sunroof has an anti-pinch safety
system capable of detecting the
presence of an obstacle during the
closing movement. If an obstacle is
detected, the system intervenes and the
movement of the sunroof is immediately
reversed into opening.
Initialization Procedure
Automatic operation of the sunroof must
be initialized again in case of faulty
sunroof operation. It may also be
necessary to initialize the sunroof after
the vehicle’s battery as been
disconnected and then reconnected.Proceed as follows:
1. Push the open/close button to bring
the roof into the completely closed
position.
2. Cycle the ignition to STOP mode and
wait at least ten seconds.
3. Cycle the ignition to AVV mode. Refer
to “Ignition System” in this chapter for
further information.
4. Hold the open/close button down for
at least ten seconds. You should then
hear the mechanical stop of the roof
motor.
5. Within five seconds, hold the
open/close button down. The roof will
perform a complete opening and closing
cycle (to indicate that the initialization
procedure has been successful). If this
does not occur, the procedure must be
restarted from the beginning.
56
GETTING TO KNOW YOUR VEHICLE
Page 62 of 276

Hands Free Liftgate — If Equipped
To operate the Hands Free Liftgate
System:
1. If the doors are locked, the system
must detect the electronic key near the
liftgate.
2. If the doors are unlocked, the system
does not have to detect the electronic
key near the liftgate.
3. Go to the rear of the vehicle, in the
center and about 3 feet (1 m) from the
liftgate.
4. Move your foot under the bumper,
simulating a kick. When you have
completed this movement, withdraw your
leg. To activate the liftgate, both sensors
must detect your leg.If it is closed, the Hands Free Liftgate
unlocks and opens completely, and with
another movement of the foot, it stops. A
further movement of the foot reverses
the direction and closes the liftgate
completely, if you do not stop it again.
If it is open, with a movement of the foot,
the Hands Free Liftgate closes
completely, and with another movement
of the foot, it stops. If the liftgate is
stopped, another movement of the foot
will reverse the direction and open it
completely.
Note:
To conserve the battery charge,
avoid performing this operation
repeatedly with the engine off.
You can activate/deactivate the Hands
Free Liftgate on the Information and
Entertainment System by pushing the
MENU button to select the Main menu,
and selecting the following items:
1. Settings
2. Doors And Locks
3. Automatic Liftgate Opening Select
them by turning the Rotary Pad and
pushing it.Warning!
Driving with the liftgate open can allow
poisonous exhaust gases into your vehicle.
You and your passengers could be injured by
these fumes. Keep the liftgate closed when
you are operating the vehicle.
If you are required to drive with the
liftgate open, make sure that all windows
are closed, and the climate control blower
switch is set at high speed. Do not use the
recirculation mode.
Warning!
During power operation, personal injury or
cargo damage may occur. Ensure the
liftgate travel path is clear. Make sure the
liftgate is closed and latched before driving
away.
Liftgate Initialization
Note: Automatic operation of the
liftgate must be initialized again in case
of faulty liftgate operation. Proceed as
follows:
1. Close all the doors and the liftgate.
2. Push the lock button on the key fob.
3. Push the unlock button on the key fob.
0101132146USHands Free Liftgate Activation Zone
60
GETTING TO KNOW YOUR VEHICLE
Page 90 of 276
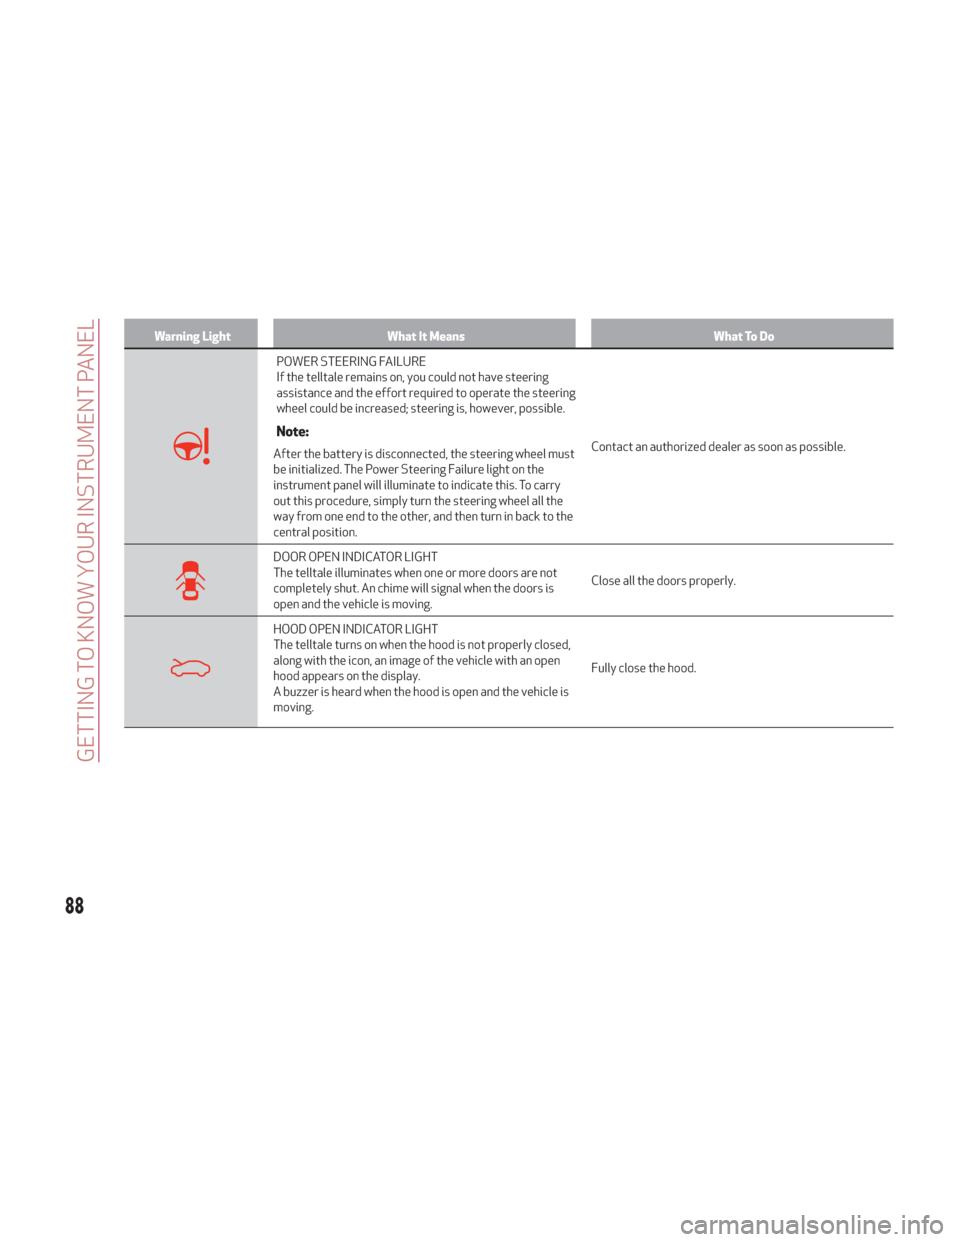
Warning LightWhat It Means What To Do
POWER STEERING FAILURE
If the telltale remains on, you could not have steering
assistance and the effort required to operate the steering
wheel could be increased; steering is, however, possible.
Note:
After the battery is disconnected, the steering wheel must
be initialized. The Power Steering Failure light on the
instrument panel will illuminate to indicate this. To carry
out this procedure, simply turn the steering wheel all the
way from one end to the other, and then turn in back to the
central position.Contact an authorized dealer as soon as possible.
DOOR OPEN INDICATOR LIGHT
The telltale illuminates when one or more doors are not
completely shut. An chime will signal when the doors is
open and the vehicle is moving.
Close all the doors properly.
HOOD OPEN INDICATOR LIGHT
The telltale turns on when the hood is not properly closed,
along with the icon, an image of the vehicle with an open
hood appears on the display.
A buzzer is heard when the hood is open and the vehicle is
moving.Fully close the hood.
88
GETTING TO KNOW YOUR INSTRUMENT PANEL
Page 103 of 276

ONBOARD DIAGNOSTIC
SYSTEM
Operation
The OBD (Onboard Diagnostic system)
carries out a continuous diagnosis of the
components of the vehicle related to
emissions.
It also alerts the driver of when these
components are no longer in peak
condition by switching on the
warning
light on the instrument panel (see
“Warning Lights And Messages”
paragraph in this chapter).
The aim of the OBD system (Onboard
Diagnostic) is to:
Monitor the efficiency of the system
Indicate an increase in emissions
Indicate the need to replace damaged
components
The vehicle also has a connector, which
can interface with appropriate tools, that
makes it possible to read the error codes
stored in the electronic control units
together with a series of specific
parameters for engine operation and
diagnosis. This check can be carried out
by your authorized dealer.
Note: After eliminating a fault, to check
the system completely, your authorized
dealer is obliged to run tests and, if
necessary certain road tests.
Onboard Diagnostic System (OBD II)
Cybersecurity
Your vehicle is required to have an
Onboard Diagnostic system (OBD II) and
a connection port to allow access to
information related to the performance
of your emissions controls. Authorized
service technicians may need to access
this information to assist with the
diagnosis and service of your vehicle and
emissions system.
Warning!
ONLY an authorized service technician
should connect equipment to the OBD II
connection port in order to diagnose or
service your vehicle.
If unauthorized equipment is connected to
the OBD II connection port, such as a
driver-behavior tracking device, it may:
Be possible that vehicle systems,
including safety related systems, could be
impaired or a loss of vehicle control could
occur that may result in an accident
involving serious injury or death.
Access, or allow others to access,
information stored in your vehicle systems,
including personal information.
EMISSIONS INSPECTION AND
MAINTENANCE PROGRAMS
In some localities, it may be a legal
requirement to pass an inspection of your
vehicle's emissions control system.
Failure to pass could prevent vehicle
registration.
For states that require
an Inspection and
Maintenance (I/M), this
check verifies the
“Malfunction Indicator
Light (MIL)” is functioning and is not on
when the engine is running, and that the
OBD II system is ready for testing.
Normally, the OBD II system will be ready.
The OBD II system may notbe ready if
your vehicle was recently serviced,
recently had a dead battery or a battery
replacement. If the OBD II system should
be determined not ready for the I/M test,
your vehicle may fail the test.
Your vehicle has a simple ignition
actuated test, which you can use prior to
going to the test station. To check if your
vehicle's OBD II system is ready, you
must do the following:
1. Cycle the ignition switch to the ON
position, but do not crank or start the
engine.
Note: If you crank or start the engine,
you will have to start this test over.
101