2018 Alfa Romeo Giulietta tow
[x] Cancel search: towPage 90 of 216
depress the brake pedal with your left
foot and, simultaneously, fully depress
the accelerator pedal with your right
foot;
shift gear using the gear lever or the
steering wheel paddle "−" (pulling the
paddle towards the driver as previously
described): rpm are thus increased from
2750 to 4500; (1.4 Petrol versions) and
from 1700 to 2700 (2.0 JTD
Mversions)
and from 3000 to 3750 (1750 Turbo
petrol version);
release the brake pedal: in this way a
more "lively" start is achieved.
When the brake pedal is released, the car
will start with maximum acceleration.
Despite the "Sequential mode", the car
will autonomously shift the gear to
guarantee max. acceleration, once the
correct shifting speed has been reached.
To abandon the strategy, simply interrupt
the above sequence of operations or
release the accelerator pedal.
IMPORTANT
25)If the car is on a gradient, always engage
the electric parking brake BEFORE placing
the gear lever in P.
26)Engage reverse only with the car
stationary, engine at idling speed and
accelerator pedal fully released.27)Using the paddles incorrectly (paddles
pushed towards the dashboard ) could break
them.
28)It is advisable to contact an Alfa Romeo
Dealership to have the refitting procedure
carried out. If you would like to proceed
autonomously, special attention must be
paid to the correct coupling of the retaining
clips. Otherwise, noise might be heard due to
an incorrect fastening of the lower cover
with the upper cover.
WARNING
95)Never leave children unattended in the
car. Always remove the ignition key when
leaving the car and take the key with you.
96)While the Launch Control function is
being used, the ESC and ASR systems are
deactivated. This means that vehicle
dynamic control is the sole responsibility of
the driver. Therefore pay the utmost
attention when using the Launch Control.
Take into account traffic and road surface
conditions and during manoeuvres make
sure there is enough room in the area
concerned.
MANUAL TRANSMISSION
97)
29)
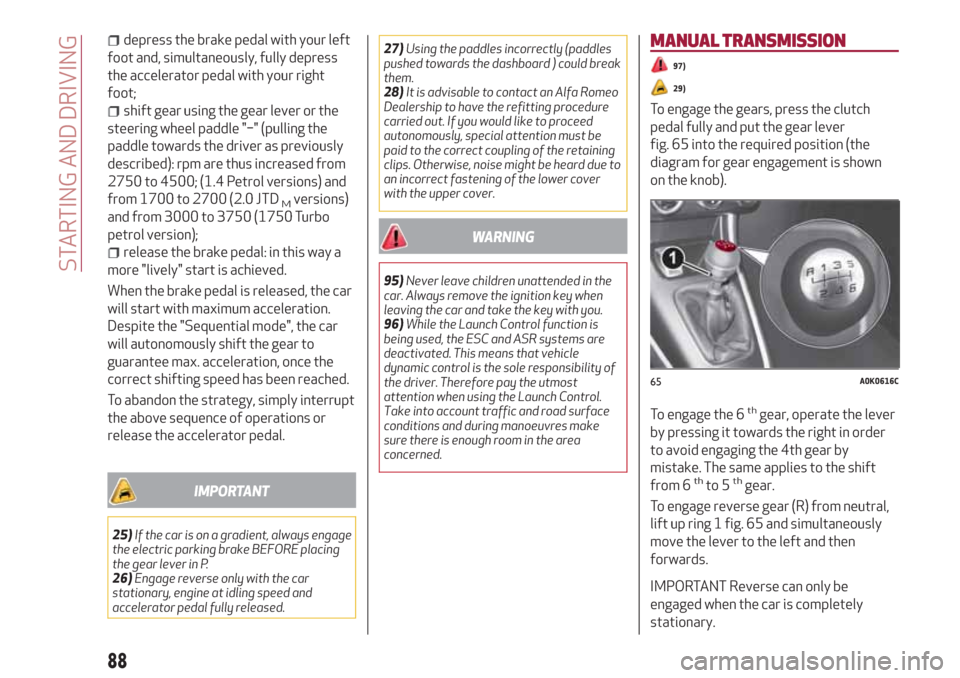
To engage the gears, press the clutch
pedal fully and put the gear lever
fig. 65 into the required position (the
diagram for gear engagement is shown
on the knob).
To engage the 6
thgear, operate the lever
by pressing it towards the right in order
to avoid engaging the 4th gear by
mistake. The same applies to the shift
from 6
thto 5thgear.
To engage reverse gear (R) from neutral,
lift up ring 1 fig. 65 and simultaneously
move the lever to the left and then
forwards.
IMPORTANT Reverse can only be
engaged when the car is completely
stationary.
65A0K0616C
88
STARTING AND DRIVING
Page 93 of 216

CRUISE CONTROL
(for versions/markets, where provided)
This is an electronically controlled driving
assistance device that allows the desired
vehicle speed to be maintained, without
having to press the accelerator pedal.
This device can be used at a speed above
30 km/h on long stretches of dry, straight
roads with few variations (e.g.
motorways). It is therefore not
recommended to use this device on
extra-urban roads with traffic. Do not use
it in town.
ACTIVATING THE DEVICE
Turn ring 1 fig. 67to ON.
The device cannot be engaged in 1
stor
reverse gear: it is advisable to engage it
in 5
thgear or higher.When travelling downhill with the device
engaged, the car may slightly exceed the
stored speed.
Activation is indicated by the warning
light
.
SETTING THE DESIRED SPEED
Proceed as follows:
turn ring 1 fig. 67 to ON and press the
accelerator to reach the required speed;
move the stalk upwards (+) for at least
1 second, then release it: the car speed is
now stored and you can therefore release
the accelerator.
If needed (when overtaking for instance),
you can accelerate simply by pressing the
accelerator; when you release the pedal,
the vehicle goes back to the speed stored
previously.
RESTORING THE MEMORISED SPEED
If the device has been disengaged by
pressing the brake or clutch pedal, the
stored speed can be reset as follows:
accelerate gradually until a speed
approaching the one stored is reached;
engage the gear selected at the time
of speed storing;
press the RES button (2 fig. 67).
INCREASING THE MEMORISED SPEED
Once the electronic Cruise Control has
been activated, the speed can be
increased by pressing button SET +.
REDUCING THE MEMORISED SPEED
Once the electronic Cruise Control has
been activated, the speed can be reduced
by pressing the button SET -.
DEACTIVATING THE DEVICE
The device can be switched off in the
following ways:
by turning the ring 1 fig. 67 to the OFF
position;
by switching off the engine;
by pressing the brake pedal, the clutch
or the accelerator; in this last case the
system is not effectively deactivated but
the system gives priority to the
acceleration request. The device still
remains active, without the need to press
the RES button to return to the previous
conditions once acceleration is
concluded.
Automatic deactivation
The device is automatically switched off
in the following cases:
if the ABS or ESC systems intervene;
with the vehicle speed below the set
limit;
in the event of system failure.
99)67A0K0559C
91
Page 95 of 216

When reverse gear is engaged an
acoustic signal is automatically activated
if there is an obstacle within the range of
operation.
The acoustic signal:
increasesas distance between the car
and the obstacle decreases;
becomes continuouswhen the
distance between the car and the
obstacle is less that 30 cm and stops
immediately if the distance increases;
is constantif the distance is unvaried;
if this situation occurs for the side
sensors, the signal will stop after about
3 seconds to avoid, for example,
indications in the event of manoeuvres
alongside walls.
OPERATION WITH A TRAILER
Parking sensor operation is automatically
turned off when the trailer electric cable
plug is fitted into the car tow hook
socket.
31)
The sensors are automatically
reactivated when the trailer's cable plug
is removed.
101) 102)
IMPORTANT NOTES
During parking manoeuvres, pay the
utmost attention to any obstacles that
could be located above or below the
sensors.
Objects set close to the car rear, under
certain circumstances are not detectedand could therefore cause damage to the
car or be damaged.
The following conditions may influence
the performance of the parking
assistance system:
reduced sensor sensitivity and a
reduction in the parking assistance
system performance could be due to the
presence on the surface of the sensor of:
ice, snow, mud, thick paint
The sensors may detect a
non-existent obstacle (echo interference)
due to mechanical interference, for
example when washing the car, in rain
(strong wind), hail.
The signals sent by the sensors can
also be altered by the presence of
ultrasonic systems (e.g. pneumatic brake
systems or pneumatic drills) near the
vehicle.
sensor performance can also be
influenced by the position of the sensors.
For example by a change in the ride
setting (caused by the wear of the shock
absorbers, suspension), overloading the
car and carrying out specific tuning
operations that require the car to be
lowered;
The detection of obstacles at the top
part of the car may not be guaranteed
because the system detects obstacles
that could cause an impact with the car in
the bottom part.
IMPORTANT
31)The sensor must be free of mud, dirt,
snow or ice in order for the system to work.
Be careful not to scratch or damage the
sensors while cleaning them. Avoid using dry,
rough or hard cloths. The sensors must be
washed using clean water, with the addition
of vehicle shampoo if necessary. When using
special washing equipment such as high
pressure jets or steam cleaning, clean the
sensors very quickly keeping the jet more
than 10 cm away.
WARNING
101)Only have the bumpers repainted or
any retouches to the paintwork in the area of
the sensors carried out by an Alfa Romeo
Dealership. Incorrect paint application could
affect the operation of the parking sensors.
102)Parking and other dangerous
manoeuvres are, however, always the
driver’s responsibility. While carrying out
these manoeuvres, always make sure that
no people (especially children) or animals are
in the area concerned. The parking sensors
are an aid for the driver, but the driver must
never allow their attention to lapse during
potentially dangerous manoeuvres, even
those executed at low speeds.
93
Page 96 of 216

TOWING TRAILERS
IMPORTANT NOTES
The car must be provided with a
type-approved tow hook and adequate
electric system to tow caravans or
trailers. Installation must be carried out
by a specialist.
Install any specific and/or additional door
mirrors as specified by the Highway
Code.
Remember that when towing a trailer,
steep hills are harder to climb, the
braking spaces increase and overtaking
takes longer depending on the overall
weight.
Engage a low gear when driving downhill,
rather than constantly using the brake.
The weight of the trailer reduces the load
capacity of the car by the same amount.
Consider the weight at full load, including
accessories and luggage, to make sure
you do not exceed the maximum towable
weight (shown in the registration
document).
Do not exceed the speed limits specific
to each country you are driving in, in the
case of vehicles towing trailers. In any
case do not exceed 100 km/h.
INSTALLING A TOW HOOK
Contact an Alfa Romeo Dealership to
install a tow hook.
103) 104)
WARNING
103)The ABS with which the car is equipped
will not control the braking system of the
trailer. Particular caution is therefore
required on slippery roads.
104)Do not, under any circumstances,
modify the vehicle's braking system to
control the trailer breaking system. The
towing braking system must be completely
independent of the vehicle's hydraulic
system.
REFUELLING THE CAR
Stop the engine before refuelling.
PETROL ENGINES
Only use unleaded petrol 95 R.O.N.
compliant with the European
specification EN228. The petrol octane
rating (RON) must not be lower than 95.
In order to prevent damage to the
catalytic converter never introduce even
the smallest amount of leaded petrol,
even in the event of an emergency.
DIESEL ENGINES
Only use diesel fuel compliant with
European specification EN590. The use
of other products or mixtures may
damage the engine beyond repair and
consequently invalidate the warranty,
due to the damage caused.
Operation at low temperatures
If the outside temperature is very low,
diesel thickens due to the formation of
paraffin clots with consequent defective
operation of the fuel supply system.
In order to avoid these problems,
different types of Diesel are distributed
according to the season: summer type,
winter type and arctic type (cold,
mountain areas).
94
STARTING AND DRIVING
Page 101 of 216

A punctured tyre or a burnt-out bulb?
At times, a problem may interfere with our journey.
The pages on emergencies can help you to deal with critical
situations independently and with calm. In an emergency we
recommend that you call the freephone number found in the
Warranty Booklet. You can also use the universal, national or
international freephone number to find your nearest Authorised
Alfa Romeo Dealership.
IN AN EMERGENCY
HAZARD WARNING LIGHTS.......................100
REPLACING A BULB............................100
REPLACING AN EXTERIOR BULB....................104
REPLACING FUSES............................106
CHANGING A WHEEL ...........................114
FIX&GO KIT.................................117
JUMP STARTING..............................120
FUEL CUT-OFF SYSTEM.........................121
TCT - KEY REMOVAL...........................121
TOWING THE CAR.............................123
Page 102 of 216
HAZARD WARNING LIGHTS
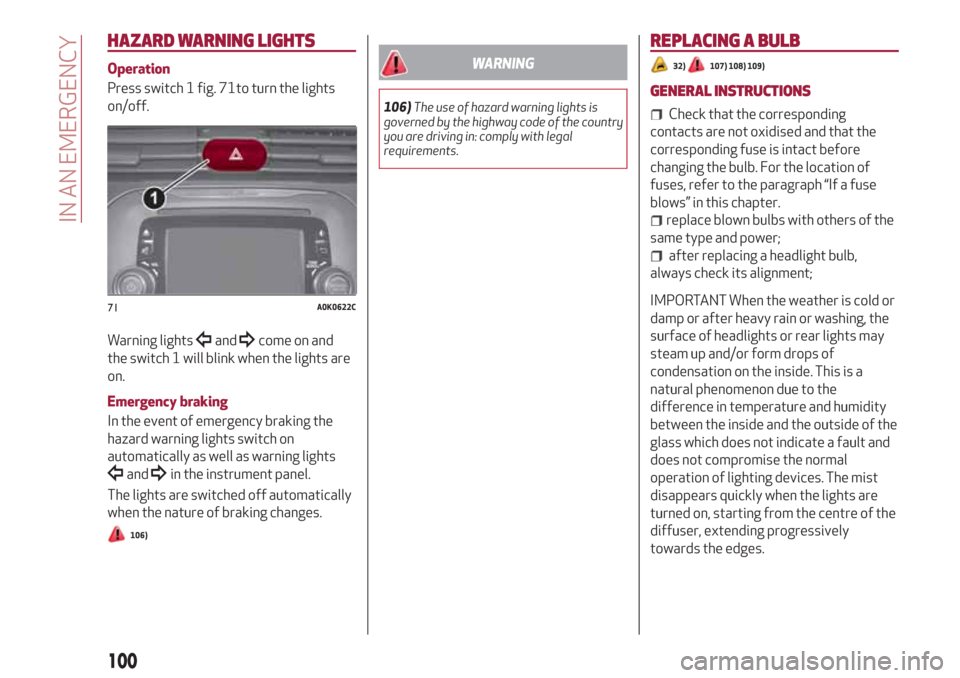
Operation
Press switch 1 fig. 71to turn the lights
on/off.
Warning lights
andcome on and
the switch 1 will blink when the lights are
on.
Emergency braking
In the event of emergency braking the
hazard warning lights switch on
automatically as well as warning lights
andin the instrument panel.
The lights are switched off automatically
when the nature of braking changes.
106)
WARNING
106)The use of hazard warning lights is
governed by the highway code of the country
you are driving in: comply with legal
requirements.
REPLACING A BULB
32)107) 108) 109)
GENERAL INSTRUCTIONS
Check that the corresponding
contacts are not oxidised and that the
corresponding fuse is intact before
changing the bulb. For the location of
fuses, refer to the paragraph “If a fuse
blows” in this chapter.
replace blown bulbs with others of the
same type and power;
after replacing a headlight bulb,
always check its alignment;
IMPORTANT When the weather is cold or
damp or after heavy rain or washing, the
surface of headlights or rear lights may
steam up and/or form drops of
condensation on the inside. This is a
natural phenomenon due to the
difference in temperature and humidity
between the inside and the outside of the
glass which does not indicate a fault and
does not compromise the normal
operation of lighting devices. The mist
disappears quickly when the lights are
turned on, starting from the centre of the
diffuser, extending progressively
towards the edges.71A0K0622C
100
IN AN EMERGENCY
Page 106 of 216
REPLACING AN EXTERIOR BULB
FRONT LIGHT CLUSTERS
These contain the bulbs for the side
lights/daytime running lights (DRL),
dipped beams, main beams and direction
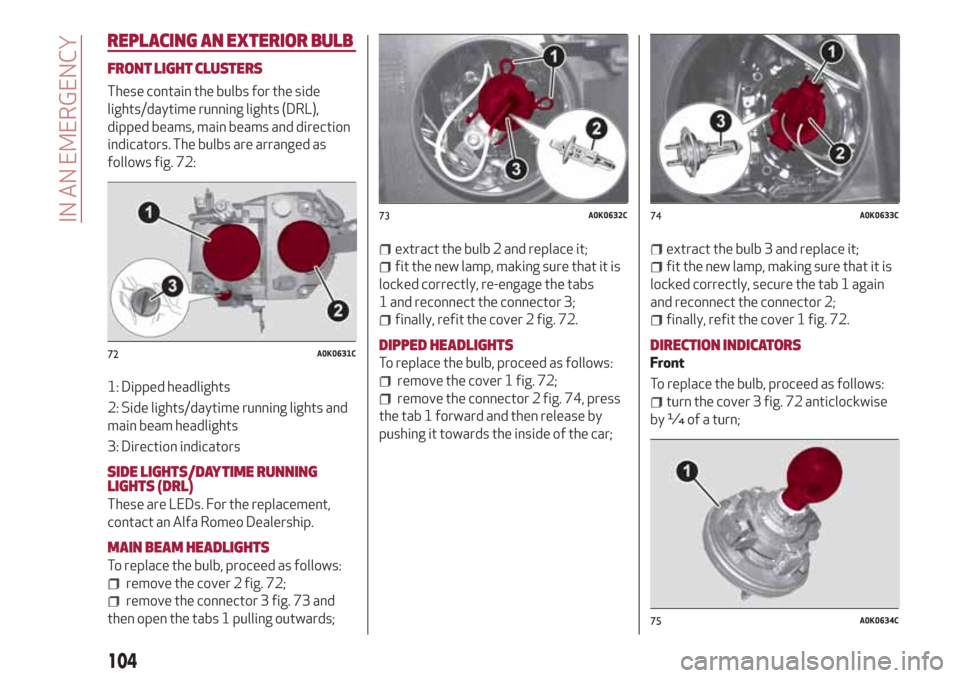
indicators. The bulbs are arranged as
follows fig. 72:
1: Dipped headlights
2: Side lights/daytime running lights and
main beam headlights
3: Direction indicators
SIDE LIGHTS/DAYTIME RUNNING
LIGHTS (DRL)
These are LEDs. For the replacement,
contact an Alfa Romeo Dealership.
MAIN BEAM HEADLIGHTS
To replace the bulb, proceed as follows:
remove the cover 2 fig. 72;
remove the connector 3 fig. 73 and
then open the tabs 1 pulling outwards;
extract the bulb 2 and replace it;
fit the new lamp, making sure that it is
locked correctly, re-engage the tabs
1 and reconnect the connector 3;
finally, refit the cover 2 fig. 72.
DIPPED HEADLIGHTS
To replace the bulb, proceed as follows:
remove the cover 1 fig. 72;
remove the connector 2 fig. 74, press
the tab 1 forward and then release by
pushing it towards the inside of the car;
extract the bulb 3 and replace it;
fit the new lamp, making sure that it is
locked correctly, secure the tab 1 again
and reconnect the connector 2;
finally, refit the cover 1 fig. 72.
DIRECTION INDICATORS
Front
To replace the bulb, proceed as follows:
turn the cover 3 fig. 72 anticlockwise
by ¼ of a turn;
72A0K0631C
73A0K0632C74A0K0633C
75A0K0634C
104
IN AN EMERGENCY
Page 122 of 216

JUMP STARTING
STARTING THE ENGINE
If the iconstays on constantly on the
instrument panel, contact the Alfa
Romeo Dealership immediately.
JUMP STARTING
If the battery is flat, start the engine
using an auxiliary battery with the same
capacity or a little higher than the flat
one.
38) 39)123)
Proceed as follows to start the vehicle:
connect the positive terminal (+)
fig. 104 of the auxiliary battery only to
the point indicated on the car battery
(writing "OK") and nowhere else;
with a second lead, connect the
negative terminal(−)oftheauxiliary
battery to an earthing point
on the
engine or the gearbox/transmission of
the car to be started;
start the engine; when the engine has
been started, remove the leads reversing
the order above.
If after a few attempts the engine does
not start, contact the Alfa Romeo
Dealership.
JUMP STARTING
(For versions with Start&Stop system)
When jump starting, never connect the
negative lead (–) of the auxiliary battery
to the negative pole 1 fig. 105 of the car
battery, but rather to an engine/gearbox
earth point.
124)
BUMP STARTING
Never, under any circumstances, jump
start the engine by pushing, towing or
coasting downhill.
IMPORTANT
38)Never connect the negative terminals of
the two batteries directly! If the auxiliary
battery is installed on another car, prevent
accidental contact between metallic parts of
the two cars.
39)Never use a fast battery-charger to
start the engine as this could damage the
electronic systems of your vehicle,
particularly the ignition and engine fuel
supply control units.
WARNING
123)This starting procedure must be
performed by expert personnel because
incorrect actions could cause electrical
discharge of considerable intensity.
Furthermore, battery fluid is poisonous and
corrosive: avoid contact with skin and eyes.
Keep naked flames and lighted cigarettes
away from the battery and do not cause
sparks.
124)Before opening the bonnet, make sure
that the engine is off and that the ignition
key is in the STOP position. Please follow the
instructions on the decal near the front
crossmember. We recommend that you
remove the key from the ignition if other
people remain in the vehicle. The vehicle
should always be left after the key has been
removed or turned to the STOP position.
During refuelling, make sure that the engine
is off (and that the ignition key is in the STOP
position).
104A0K0247C
105A0K0755C
120
IN AN EMERGENCY