Page 103 of 453

uuGauges and Multi-Information Display uMulti-Information Display
102
Instrument Panel
Use the multi-information display to customize certain features.
■How to customize
Select the VEHICLE SETTINGS screen by pressing the / button while the
power mode is in ON, and the vehicle is at a complete stop.
Press the SEL/RESET button.
■Customized Features
Models without fu ll color display1Customized Features
To customize other features, press the /
button.
2 List of customizable options P. 105
2 Example of customization settings P. 116
Customization is possible when you see the driver’s
ID ( DRIVER 1 or DRIVER 2) on the screen.
The driver’s ID indicates which remote transmitter
you have used to unlock the driver’s door. The
customized settings are recalled every time you
unlock the driver’s door with that remote.
When you customize settings: Shift to
( P
/ Button:
Changes the customize menus
and items.
Multi-Information Display:
Goes to customize settings.
SEL/RESET button:
Enters the selected item
Page 109 of 453

uuGauges and Multi-Information Display uMulti-Information Display
108
Instrument Panel
Use the multi-information display to customize certain features.
■How to customize
Select the Vehicle Settings screen by pressing the / button while the
power mode is in ON, and the vehicle is at a complete stop.
Press the SEL/RESET button.
■Customized Features
Models with full color display1Customized Features
To customize other features, press the /
button.
2 List of customizable options P. 111
2 Example of customization settings P. 116
Customization is possible when you see the driver’s
ID ( DRIVER 1 or DRIVER 2) on the screen.
The driver’s ID indicates which remote transmitter
you have used to unlock the driver’s door. The
customized settings are recalled every time you
unlock the driver’s door with that remote.
When you customize settings: Shift to
( P
/ Button:
Changes the customize menus
and items.
Multi-Information Display:
Goes to customize settings.
SEL/RESET button:
Enters the selected item
Page 118 of 453
117
uuGauges and Multi-Information Display uMulti-Information Display
Instrument Panel
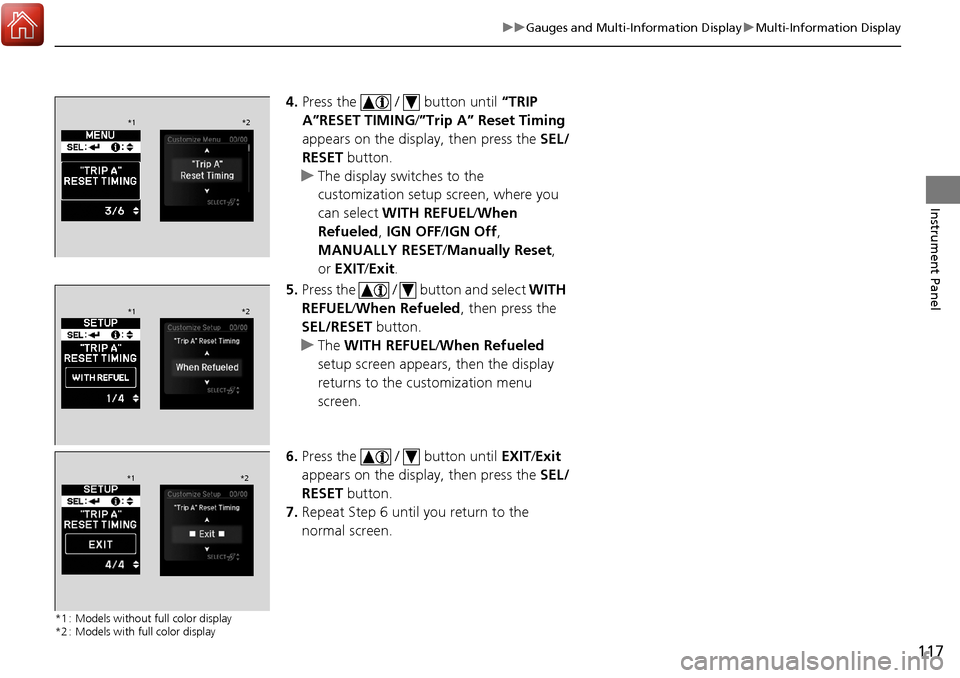
4. Press the / button until “TRIP
A”RESET TIMING /”Trip A” Reset Timing
appears on the display, then press the SEL/
RESET button.
u The display swit ches to the
customization setup screen, where you
can select WITH REFUEL /When
Refueled, IGN OFF/IGN Off ,
MANUALLY RESET/ Manually Reset,
or EXIT /Exit .
5. Press the / button and select WITH
REFUEL /When Refueled , then press the
SEL/RESET button.
u The WITH REFUEL /When Refueled
setup screen appears, then the display
returns to the customization menu
screen.
6. Press the / button until EXIT/Exit
appears on the display, then press the SEL/
RESET button.
7. Repeat Step 6 until you return to the
normal screen.
*1 : Models without full color display
*2 : Models with full color display
*1 *2
*1*2
*1*2
Page 188 of 453

187
Features
This chapter describes how to operate technology features.
Audio System*
About Your Audio System ................ 188
USB Port .......................................... 189
Auxiliary Input Jack .......................... 189
Audio System Theft Protection ......... 190
Audio Remote Controls .................... 191
Audio System Basic Operation
*....... 192
Audio/Information Screen ................ 193
Wallpaper Setup .............................. 196
Display Setup ................................... 198
Adjusting the Sound ........................ 199
Playing the AM/FM Radio ................. 200
Playing the SiriusXM ® Radio ............. 202 Playing a CD .................................... 204
Playing an iPod ................................ 207
Playing Pandora
®............................. 210
Playing a USB Flash Drive ................. 212
Playing Bluetooth ® Audio................. 215
Audio Error Messages
*..................... 217
General Information on the Audio System
*............................................ 220
HomeLink ® Universal Transceiver
Training HomeLink ........................... 224
Bluetooth® HandsFreeLink®
Using HFL ........................................ 226
HFL Menus....................................... 228 Compass
*.......................................... 255
* Not available on all models
Page 193 of 453

192
Features
Audio System Basic Operation*
To use the audio system function, the power mode must be in ACCESSORY or ON.
Use the selector knob or SETUP button to
access some audio functions.
Press to switch between the normal and
extended display fo r some functions.
Selector knob: Rotate left or right to scroll
through the available choices. Press to set
your selection.
SETUP button: Press to select any mode such
as the RDS Information, Sound Settings, Play
Mode, Resume/Pause, or Adjust Clock.
BACK button: Press to go back to the
previous display.
button: Press to change the audio/
information screen brightness. The brightness
can be set differently for the day time and
night time.
Press once for the day time mode.
Press twice for the night time mode.
Adjust the brightness using . 1 Audio System Basic Operation*
These indications are used to show how to operate
the selector knob.
Rotate to select.
Press to enter.
Press the MODE,
(+, (-, or button on the
steering wheel to cha nge any audio setting.
2 Audio Remote Controls P. 191
Setup Menu Items
2 Radio Data System (RDS) P. 201
2 Adjusting the Sound P. 199
2 How to Select a Play Mode P. 206
2 To pause or resume a file P. 216
2 Setting the Clock P. 12034
BACK
Button
Selector
Knob
SETUP
Button
Button
Menu Display
* Not available on all models
Page 198 of 453
197
uuAudio System Basic Operation*uWallpaper Setup
Features
1. Rotate to select Select on the wallpaper setup menu, then press .
u The screen will change to the wallpaper list.
2. Rotate to select desired wallpaper and press .
u The confirmation message will appear. Then the display will return to the
wallpaper setup menu.
1. Rotate to select Delete on the wallpaper setup menu, then press .
u The screen will change to the delete wallpaper list.
2. Rotate to select wallpaper that you want to delete and press .
u The confirmation me ssage will appear.
3. Rotate to select OK, then press to delete completely.
u The confirmation me ssage will appear.
■Select Wallpaper
■Delete Wallpaper
Page 201 of 453

200
uuAudio System Basic Operation*uPlaying the AM/FM Radio
Features
Playing the AM/FM Radio
BACK Button
Press to go back to the previous
display. SCAN Button
Press to sample each of the strongest
stations on the selected band for 10
seconds. To turn off scan, press the
button again. VOL/ (Power/volume) Knob
Press to turn the audio system on and off.
Turn to adjust the volume.
Preset Buttons (1-6)
To store a station:
1. Tune to the selected station.
2. Pick a preset button and hold it
until you hear a beep.
To listen to a stored station, select a
band, then press the preset button. SKIP Bar
Press to search up and down the
selected band for a station with a
strong signal.
SETUP Button
Press to display menu items.
Selector Knob
Press and turn to tune the radio
frequency. FM/AM Button
Press to select a band. CATEGORY Bar
Press either side to display and
select an RDS category.
A.SEL (Auto Select) Button
Press to scan both bands and store
the strongest station in each preset.
To turn off auto select, press the
button again. This restores the
presets you originally set.
Page 203 of 453
202
uuAudio System Basic Operation*uPlaying the SiriusXM ® Radio
Features
Playing the SiriusXM ® Radio
BACK Button
Press to go back to the previous
display. (SiriusXM
®) Button
Press to select SiriusXM ® Radio.
VOL/ (Power/volume) Knob
Press to turn the audio system on
and off.
Turn to adjust the volume.
SKIP Bar
Press or to the
previous or next channel.
SETUP Button
Press to display menu items.
Selector Knob
Press and turn to select channels. Preset Buttons (1-6)
To store a channel:
1. Tune to the selected channel.
2. Pick a preset button and hold it
until you hear a beep.
To listen to a stored channel, select
SiriusXM® , then press the preset
button.
SCAN Button
Press to sample all channels (in the
channel mode), or channels within a
category (in the category mode).
Each sampling continues for a few
seconds. Press SCAN again to cancel
scanning and continue listening to the
channel. CATEGORY Bar
Press either side to display and select
an SiriusXM ® Radio category.