Page 97 of 127

Basic operation97To scroll from one page to another:● Place your finger anywhere on the screen and move it left to
scroll to the next page or right to
scroll to the previous page.
Notice
Constant pressure must be applied
and the finger must be moved at a
constant speed.
● Touch q or p on the screen.
Tone settings
In the tone settings menu, the tone
characteristics can be set. The menu
may be accessed from each audio
main menu.
To open the tone settings menu,
select Menu in the respective audio
main menu. If necessary, scroll
through the list of menu items and
select Tone Settings . The respective
menu is displayed.
Equaliser mode
Use this setting to optimise the tone for the style of music, e.g. Rock or
Classical .
Select the desired sound style in the interaction selector bar at the bottomof the screen. If you choose Custom,
you can manually adjust the following
settings.
Bass
Use this setting to enhance or
attenuate the deep frequencies of the audio sources.
Touch + or - to adjust the setting.
Midrange
Use this setting to enhance or
attenuate the midrange frequencies
of the audio source.
Touch + or - to adjust the setting.
Treble
Use this setting to enhance or
attenuate the high frequencies of the
audio sources.
Touch + or - to adjust the setting.
Setting balance and fader
Use the illustration at the right side of
the menu to adjust balance and fader.
To define the point in the passenger
compartment where the sound is at its
highest level, touch the
corresponding point in the illustration.
Alternatively, you can move the red
marker to the desired point.
Notice
The balance and fader settings are
valid for all audio sources. They
cannot be adjusted individually for
each audio source.
Page 98 of 127

98Basic operationVolume settingsAdjusting the maximum startup
volume
Press ; and then select Settings.
Select Radio, scroll through the list
and then select Max Startup Volume .
Touch + or - to adjust the setting.
Adjusting the speed
compensated volume
Press ; and then select Settings.
Select Radio, scroll through the list
and then select Auto Volume.
To adjust the degree of volume
adaptation, select one of the options
in the list.
Off : no enhancement of volume with
increasing vehicle speed.
High : maximum enhancement of
volume with increasing vehicle
speed.Activating or deactivating the
audible touch feedback function
If the audible touch feedback function
is activated, each touch of a screen
button or menu item is indicated by a
beeping sound.
Press ; and then select Settings.
Select Radio and then scroll through
the list to Audible Touch Feedback .
Touch the screen button next to
Audible Touch Feedback to activate
or deactivate the function.
Volume of traffic announcements
To adjust the volume of traffic
announcements, set the desired volume while a traffic announcement
is given out by the system. The
respective setting is then stored by
the system.
System settings The following settings concern the
whole system. All other settings are
described in the respective chapters of this manual.
Time and date settings
Press ; and then select Settings.
Select Time and Date to display the
respective submenu.
Page 99 of 127

Basic operation99
Set Time Format
To select the desired time format,
touch the screen buttons 12 h or 24 h .
Set Date Format
To select the desired date format,
select Set Date Format and choose
between the available options in the
submenu.
Auto Set
To choose whether time and date are
to be set automatically or manually,
select Auto Set .
For time and date to be set
automatically, select On - RDS.
For time and date to be set manually,
select Off - Manual . If Auto Set is set
to Off - Manual , the submenu items
Set Time and Set Date become
available.
Set time and date
To adjust the time and date settings, select Set Time or Set Date .
Touch + or - to adjust the settings.
Language settings
Press ; and then select Settings.
Select Language to display the
respective menu.
To adjust the language for the menu
texts, touch the desired language.
Text scroll function If long text is displayed on the screen
e.g. song titles or station names, the
text may either be scrolled continually or it may be scrolled once and
displayed in truncated form.
Press ; and then select Settings.
Select Radio.
If you wish the text to be scrolled
continually, activate Text Scroll.
If you wish the text to be scrolled in
blocks, deactivate the setting.
Black display function If you do not want to see the
illuminated display, e.g. during night
time, you can turn the display off.
Press ; and then select Settings.
Scroll through the list and select Turn
Display Off . The display is turned off.
The audio functions remain active.
To turn the display on again, touch the
screen or press a button.
Page 100 of 127
100Basic operationFactory defaults
Press ; and then select Settings.
Scroll through the list and select
Return to Factory Settings .
To restore all vehicle personalisation settings, select Restore Vehicle
Settings .
To delete the paired Bluetooth
devices, the contacts list and the
voice mail numbers stored, select Clear All Private Data .
To reset tone and volume settings,
delete all favourites, and erase the
ringtone selection, select Restore
Radio Settings .
In each case, a warning message is
displayed. Select Continue to reset
the settings.
System version Press ; and then select Settings.
Scroll through the list and select
Software Information .
If a USB device is connected, you
may save the vehicle information to this USB device.Select System Update and then Save
Vehicle Info to USB .
For a system update, contact your
workshop.
Vehicle settingsVehicle settings are described in the
Owner's Manual.
Page 101 of 127
Radio101RadioUsage........................................ 101
Station search ............................ 101
Favourite lists ............................. 103
Radio data system .....................103
Digital audio broadcasting .........105Usage
Activating radio
Press ; and then select Audio. The
audio main menu last selected is
displayed.
Select Source in the radio main menu
to open the interaction selector bar.
Select the desired waveband.
The station last played in the selected waveband will be received.
Station search
Automatic station search
Briefly press or touch t or v on the
control panel or on the screen to play the previous or next station in the
station memory.
Manual station search
Press and hold t or v on the
control panel. Release when the
required frequency has almost been
reached.
A search is made for the next station that can be received and it is played
automatically.
Page 102 of 127
 is activated, only traffic service
stations 3 103 a")
102RadioNotice
FM waveband: when the RDS
function is activated, only RDS
stations 3 103 are searched for, and
when the radio traffic service (TP) is activated, only traffic service
stations 3 103 are searched for.
Station tuning
Touch B on the screen. The Direct
tune screen is shown.
Enter the desired frequency. Use r
to delete digits entered. If necessary, touch d or c to subsequently adjust
the input.
Confirm the input to play the station.
Station lists
Select Menu in the radio main menu
to open the corresponding
waveband-specific submenu.
Select Station List . All receivable
stations of the relevant waveband
and in the current reception area are
displayed.
Select the desired station.
Notice
The currently received radio station
is indicated by the l symbol next to
the station name.
Category lists
Numerous radio stations broadcast a
PTY code, which specifies the type of programme transmitted (e.g. news).
Some stations also change the PTY
code depending on the content which
is currently transmitted.
The Infotainment system stores these
stations, sorted by programme type in the corresponding category list.Notice
The Categories list item is only
available for the FM and the DAB
wavebands.
To search for a programme type
determined by the stations, select
Categories .
A list of programme types currently available is displayed.
Select the desired programme type. A
list of stations of the selected
programme type is displayed.
Select the desired station.
Notice
The currently received radio station
is indicated by the l symbol next to
the station name.
Update station lists
If the stations stored in the waveband-
specific station list can no longer be
received, the AM and the DAB station lists must be updated.
Notice
The FM station list is updated
automatically.
Page 103 of 127

Radio103Select Menu in the radio main menu
and then select Update Station List .
Notice
If a waveband-specific station list is
updated, the corresponding
category list is also updated.
A station search is started and a
corresponding message is displayed.
Once the search is finished, the
respective station list is displayed.
Notice
The currently received radio station
is indicated by the l symbol next to
the station name.
Favourite lists
Stations of all wavebands can be
stored manually in the favourite lists.
Five favourite lists with five favourites each are available.
Notice
The currently received station is
highlighted.
Storing a station
If required, touch < or > to scroll to
the desired favourite list.
To store the currently active radio
station as a favourite, touch and hold
the desired favourite button for a few
seconds. The favourite button will be titled as the corresponding frequency
or station name.
Retrieving a station
If required, touch < or > to scroll to
the desired favourite list.
Select the desired favourite.
Defining the number of available
favourite lists
To define the number of favourite lists
displayed for selection, press ; and
then select Settings on the screen.
Select Radio and then Manage
Favourites to display the respective
submenu.
Activate or deactivate the favourite
lists to be displayed.
Radio data system
Radio data system (RDS) is a service of FM stations that considerably
facilitates the finding of the desired
station and its fault-free reception.
Page 104 of 127

104RadioAdvantages of RDS● On the display, the programme name of the station appears
instead of its frequency.
● During a station search, the Infotainment system tunes in to
RDS stations only.
● The Infotainment system always tunes into the best receivable
broadcasting frequency of the set station by means of AF
(alternative frequency).
● Depending on the station that is received, the Infotainment
system displays radio text that
can contain e.g. information on
the current programme.
RDS configuration
Touch Menu in the FM radio main
menu to open the corresponding
waveband-specific submenu.
Scroll to RDS.
Activate or deactivate RDS.Traffic Programme
Radio traffic service stations are RDS
stations that broadcast traffic news. If the traffic service is switched on, the
currently playing audio source is
interrupted for the duration of the
traffic announcement.
Activating the traffic programme
function
Select Menu in the FM radio main
menu to open the corresponding
waveband-specific submenu.
Touch the screen button next to
Traffic Programme to activate or
deactivate the function.
Notice
In the station list, TP is displayed
next to the stations providing a traffic programme.
If the radio traffic service is activated,
[TP] is shown in the top line of all main
menus. If the current station is not a
radio traffic service station, TP is
greyed-out and a search is started
automatically for the next radio traffic
service station. As soon as a radio
traffic service station is found, TP ishighlighted. If no radio traffic service
station is found, TP remains greyed-
out.
If a traffic announcement is broadcast on the respective station, a message
is displayed.
To interrupt the announcement and return to the function previously
activated, touch the screen or press
m .
Regionalisation
Sometimes RDS stations broadcast
regionally different programmes on
different frequencies.
Select Menu in the FM radio main
menu to open the corresponding
waveband-specific submenu and
scroll to Region
Activate or deactivate Region.
If regionalisation is activated,
alternative frequencies with the same regional programmes are selected
where necessary. If regionalisation is
switched off, alternative frequencies
of the stations are selected without
regard to regional programmes.
 1
1 2
2 3
3 4
4 5
5 6
6 7
7 8
8 9
9 10
10 11
11 12
12 13
13 14
14 15
15 16
16 17
17 18
18 19
19 20
20 21
21 22
22 23
23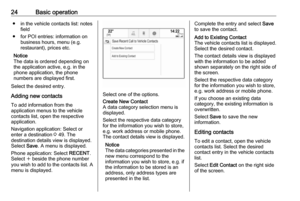 24
24 25
25 26
26 27
27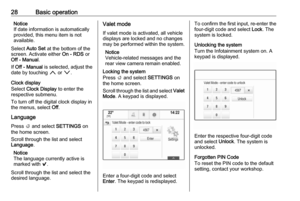 28
28 29
29 30
30 31
31 32
32 33
33 34
34 35
35 36
36 37
37 38
38 39
39 40
40 41
41 42
42 43
43 44
44 45
45 46
46 47
47 48
48 49
49 50
50 51
51 52
52 53
53 54
54 55
55 56
56 57
57 58
58 59
59 60
60 61
61 62
62 63
63 64
64 65
65 66
66 67
67 68
68 69
69 70
70 71
71 72
72 73
73 74
74 75
75 76
76 77
77 78
78 79
79 80
80 81
81 82
82 83
83 84
84 85
85 86
86 87
87 88
88 89
89 90
90 91
91 92
92 93
93 94
94 95
95 96
96 97
97 98
98 99
99 100
100 101
101 102
102 103
103 104
104 105
105 106
106 107
107 108
108 109
109 110
110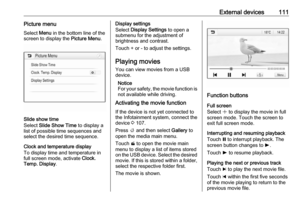 111
111 112
112 113
113 114
114 115
115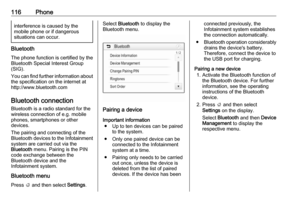 116
116 117
117 118
118 119
119 120
120 121
121 122
122 123
123 124
124 125
125 126
126
