Page 73 of 96

Periodic maintenance and adjustment
6-31
6
EAU23315
Battery
A poorly maintained battery will cor-
rode and discharge quickly. The elec-
trolyte level, battery lead connections
and breather hose routing should be
checked before each ride and at the in-
tervals specified in the periodic mainte-
nance and lubrication chart.
WARNING
EWA10771
Electrolyte is poisonous and
dangerous since it contains sul-
furic acid, which causes severe
burns. Avoid any contact with
skin, eyes or clothing and al-
ways shield your eyes when
working near batteries. In case
of contact, administer the fol-
lowing FIRST AID.
EXTERNAL: Flush with plenty
of water.
INTERNAL: Drink large quan-
tities of water or milk and im-
mediately call a physician.
EYES: Flush with water for 15
minutes and seek prompt
medical attention.
Batteries produce explosive hy-
drogen gas. Therefore, keep
sparks, flames, cigarettes, etc.,
away from the battery and pro-
vide sufficient ventilation when
charging it in an enclosed
space.
Take care not to spill electrolyte
on the drive chain, as this may
weaken it, shorten chain life and
possibly result in an accident.
KEEP THIS AND ALL BATTER-
IES OUT OF THE REACH OF
CHILDREN.
To check the electrolyte level
1. Place the vehicle on a level sur-
face and hold it in an upright posi-
tion.
TIP
Make sure that the vehicle is posi-
tioned straight up when checking the
electrolyte level.
2. Check the electrolyte level in the
battery.
TIP
The electrolyte should be between the
minimum and maximum level marks.
3. If the electrolyte is at or below the
minimum level mark, add distilled
water to raise it to the maximum
level mark. NOTICE: Use only
distilled water, as tap water
contains minerals that are
harmful to the battery.
[ECA10612]
4. Check and, if necessary, tighten
the battery lead connections and
correct the breather hose routing.
To store the battery
1. If the motorcycle will not be used
for more than one month, remove
the battery, fully charge it, and
1. Maximum level mark
2. Minimum level mark
1
2+UPPER
LOWER
ZAUM0106
UBR3E1E0.book Page 31 Wednesday, August 10, 2016 9:45 AM
Page 74 of 96

Periodic maintenance and adjustment
6-32
6then place it in a cool, dry place.
NOTICE: When removing the
battery, be sure the key is
turned to “OFF”, then discon-
nect the negative lead before
disconnecting the positive lead.
[ECA16303]
2. If the battery will be stored for
more than two months, check the
specific gravity of the electrolyte
at least once a month and fully
charge the battery whenever nec-
essary.
3. Fully charge the battery before in-
stallation. NOTICE: When install-
ing the battery, be sure the key
is turned to “OFF”, then connect
the positive lead before con-
necting the negative lead.
[ECA16841]
4. After installation, make sure that
the battery leads are properly con-
nected to the battery terminals
and that the breather hose is prop-
erly routed, in good condition, and
not obstructed. NOTICE: If the
breather hose is positioned in
such a way that the frame is ex-
posed to electrolyte or gas ex-
pelled from the battery, the
frame could suffer structural
and external damages.
[ECA10602]EAUM3461
Replacing the fuses
The fuse boxes, which contains the
fuses for the individual circuits, are lo-
cated under the rider seat. (See page
3-19.)
If a fuse for the individual circuits is
blown, replace it as follows.
1. Turn the key to “OFF” and turn off
the electrical circuit in question.
2. Remove the blown fuse, and then
install a new fuse of the specified
amperage. WARNING! Do not
use a fuse of a higher amperage
rating than recommended to
avoid causing extensive dam-
age to the electrical system and
possibly a fire.
[EWA15132]
TIP
tool kit. Use the tongs to remove and
install a fuse.
1. Fuse box
ZAUM1455
UBR3E1E0.book Page 32 Wednesday, August 10, 2016 9:45 AM
Page 75 of 96

Periodic maintenance and adjustment
6-33
6
3. Turn the key to “ON” and turn on
the electrical circuit in question to
check if the device operates.
4. If the fuse immediately blows
again, have a Yamaha dealer
check the electrical system.
EAUM3501
Replacing the headlight bulb
This model is equipped with a halogen
bulb headlight. If the headlight bulb
burns out, replace it as follows.
NOTICE
ECA10651
Take care not to damage the follow-
ing parts:
Headlight bulb
Do not touch the glass part of
the headlight bulb to keep it free
from oil, otherwise the transpar-
ency of the glass, the luminosity
of the bulb, and the bulb life will
be adversely affected. Thor-
oughly clean off any dirt and fin-
gerprints on the headlight bulb
using a cloth moistened with al-
cohol or thinner.
Headlight lens
Do not affix any type of tinted
film or stickers to the headlight
lens.
Do not use a headlight bulb of a
wattage higher than specified.
1. Remove the headlight unit by re-
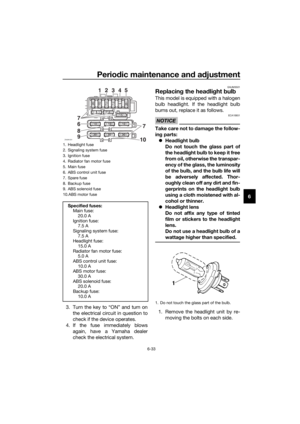
moving the bolts on each side.
1. Headlight fuse
2. Signaling system fuse
3. Ignition fuse
4. Radiator fan motor fuse
5. Main fuse
6. ABS control unit fuse
7. Spare fuse
8. Backup fuse
9. ABS solenoid fuse
10.ABS motor fuse
Specified fuses:
Main fuse:
20.0 A
Ignition fuse:
7.5 A
Signaling system fuse:
7.5 A
Headlight fuse:
15.0 A
Radiator fan motor fuse:
5.0 A
ABS control unit fuse:
10.0 A
ABS motor fuse:
30.0 A
ABS solenoid fuse:
20.0 A
Backup fuse:
10.0 A
ZAUM1231
10
303020
7
8
91010
157.5
207.5 7.515
5 20
5
7
12
3
45
6
1. Do not touch the glass part of the bulb.
UBR3E1E0.book Page 33 Wednesday, August 10, 2016 9:45 AM
Page 76 of 96
Periodic maintenance and adjustment
6-34
62. Disconnect the headlight coupler,
and then remove the headlight
bulb cover.
3. Remove the headlight bulb holder
by turning it counterclockwise,
and then remove the burnt-out
bulb.4. Place a new headlight bulb into
position, and then secure it with
the bulb holder.
5. Install the headlight bulb cover,
and then connect the coupler.
6. Install the headlight unit as shown,
and then install the bolt on each
side.
TIP
Check the wire routing when headlight
unit is installed in order to avoid wire
pinching and coupler disconnection.
7. Have a Yamaha dealer adjust the
headlight beam if necessary.
1. Bolt
1. Headlight bulb cover
2. Headlight coupler
1. Headlight bulb
2. Headlight bulb holder
ZAUM1220
1
ZAUM1221
21
ZAUM1222
2
1
ZAUM1224
UBR3E1E0.book Page 34 Wednesday, August 10, 2016 9:45 AM
Page 77 of 96
Periodic maintenance and adjustment
6-35
6
EAU54502
Auxiliary lights
This model is equipped with LED-type
auxiliary lights.
If an auxiliary light does not come on,
have a Yamaha dealer check it.
EAU24182
Tail/brake light
This model is equipped with an LED-
type tail/brake light.
If the tail/brake light does not come on,
have a Yamaha dealer check it.
UBR3E1E0.book Page 35 Wednesday, August 10, 2016 9:45 AM
Page 78 of 96

Periodic maintenance and adjustment
6-36
6
EAU24205
Replacing a turn signal light
bulb
1. Remove the turn signal light lens
by removing the screw.
2. Remove the burnt-out bulb by
pushing it in and turning it coun-
terclockwise.
3. Insert a new bulb into the socket,
push it in, and then turn it clock-
wise until it stops.
4. Install the lens by installing the
screw. NOTICE: Do not over-
tighten the screw, otherwise the
lens may break.
[ECA11192]EAUM3510
Replacing the license plate
light bulb
1. Remove the license plate light unit
by removing the screw.
2. Remove the license plate light
bulb socket (together with the
bulb) by pulling it out.
3. Remove the burnt-out bulb by
pulling it out.
4. Insert a new bulb into the socket.
5. Install the socket (together with
the bulb) by pushing it in.
6. Install the license plate light unit by
installing the screw.
1. Screw
1. Turn signal light bulb
ZAUM1223
1. License plate light bulb socket
2. License plate light unit
3. Screw
ZAUM1190
2
3
UBR3E1E0.book Page 36 Wednesday, August 10, 2016 9:45 AM
Page 79 of 96

Periodic maintenance and adjustment
6-37
6
EAU67131
Supporting the motorcycle
Since this model is not equipped with a
centerstand, use maintenance stands
when removing the front or rear wheel
or when performing other maintenance
that requires the motorcycle to stand
up right.
Check that the motorcycle is in a stable
and level position before starting any
maintenance.
EAU25872
Troubleshooting
Although Yamaha motorcycles receive
a thorough inspection before shipment
from the factory, trouble may occur
during operation. Any problem in the
fuel, compression, or ignition systems,
for example, can cause poor starting
and loss of power.
The following troubleshooting charts
represent quick and easy procedures
for checking these vital systems your-
self. However, should your motorcycle
require any repair, take it to a Yamaha
dealer, whose skilled technicians have
the necessary tools, experience, and
know-how to service the motorcycle
properly.
Use only genuine Yamaha replace-
ment parts. Imitation parts may look
like Yamaha parts, but they are often
inferior, have a shorter service life and
can lead to expensive repair bills.
WARNING
EWA15142
When checking the fuel system, do
not smoke, and make sure there are
no open flames or sparks in the ar-
ea, including pilot lights from water
heaters or furnaces. Gasoline or
gasoline vapors can ignite or ex-
plode, causing severe injury or prop-
erty damage.
1. Maintenance stand (example)
1
UBR3E1E0.book Page 37 Wednesday, August 10, 2016 9:45 AM
Page 80 of 96

Periodic maintenance and adjustment
6-38
6
EAU68070
Troubleshooting charts
Starting problems or poor engine performance
1. FuelThere is enough fuel.
There is no fuel.Supply fuel.
The engine turns over
quickly.
Operate the electric
starter.
Check the
compression.
The engine turns over
slowly.
Wipe off with a dry
cloth and correct the
spark plug gap, or
replace the spark
plug.
Check the electrolyte
and battery lead
connections, and
charge the battery if
necessary.
The engine does not
start.
Have a Yamaha
dealer check the
vehicle.
4. BatteryThe battery is good.
3. IgnitionWet
Dry
The engine does not
start.
Check the
compression.
Have a Yamaha
dealer check the
vehicle.The engine does not
start.
Check the battery.
Remove the spark
plug and check
the electrodes.
Check the fuel level
in the fuel tank.
Operate the electric
starter.
Operate the electric
starter.
There is compression.
There is no
compression.Have a Yamaha dealer check the vehicle.
Check the ignition.2. Compression
UBR3E1E0.book Page 38 Wednesday, August 10, 2016 9:45 AM