2017 VOLVO XC90 TWIN ENGINE HYBRID maintenance
[x] Cancel search: maintenancePage 369 of 584

DRIVER SUPPORT
* Option/accessory, for more information, see Introduction.367
Park Assist Camera* (PAC)limitations
The Park Assist Camera system has certain limi-tations that the driver should be aware of.
NOTE
Bicycle carriers or other accessories mountedon the tailgate may obstruct the camera'sfield of vision.
Blind sectors
Even if a fairly small section of the screen imageappears to be obstructed, this may mean that arelatively large area is hidden and objects theremay not be detected until they are very near thevehicle.
The "blind" sectors between the cameras' fields of vision
With 360° view selected, objects/obstacles maynot be detected at the edges of the individualcameras' fields of vision.
Defective camera
If a camera sector is dark andcontains this symbol, this indi-cates that the camera is notfunctioning properly (see thefollowing illustration).
In this example, the driver's side camera is not function-ing
Dark camera sectors
A dark camera sector may also be displayed inthe following situations but without the defectivecamera symbol. A sector may be dark because:
•the door mirror is folded in
•the door is open
•the tailgate is open
Ambient lighting
The camera images are adjusted automatically tothe ambient light, which means the image mayvary slightly in terms of light and quality. Poorambient lighting may reduce the quality of theimage.
Maintenance
•Keep the camera's lens free of dirt, ice andsnow. This is particularly important in poorambient lighting conditions.
•Remove dirt, ice and snow carefully to avoidscratching the lenses.
•Clean the lens regularly with warm water anda suitable car washing detergent.
Related information
•Park Assist Camera (PAC)* (p. 362)
Page 375 of 584

DRIVER SUPPORT
* Option/accessory, for more information, see Introduction.373
•Heavy rain or snow may inhibit PAP'scapacity to correctly measure a parkingspace.
•Do not use PAP when using snow chainsand/or a temporary spare tire.
•Do not use PAP if there are any objects pro-truding from the vehicle.
WARNING
•The front end of your vehicle may turn outtoward oncoming traffic during the park-ing procedure.
•Objects located above the parking sen-sors' field of vision are not included whenPAP measures a parking space. For thisreason, PAP may turn into the parkingspace too soon. Avoid parking spaces ofthis type.
•The driver is always responsible for deter-mining if PAP has selected a suitableparking space.
Maintenance
Location of the PAP sensors
In order for PAP to function correctly, these sen-sors must be cleaned regularly with water and asuitable car washing detergent.
Related information
•Park Assist Pilot (PAP)* (p. 368)
•Park Assist Pilot (PAP)* limitations (p. 372)
•Park Assist Pilot (PAP)* symbols and mes-sages (p. 374)
Page 399 of 584

STARTING AND DRIVING
}}
397
Driving with a trailer
When towing a trailer, always observe the legalrequirements of the state/province.
•All Volvo models are equipped with energy-absorbing shock-mounted bumpers. Trailerhitch installation should not interfere with theproper operation of this bumper system.
Trailer towing does not normally present any par-ticular problems, but take into consideration:
•Increase tire pressure to recommended fullpressure.
•When your vehicle is new, avoid towing heavytrailers during the first 620 miles (1,000 km).
•Maximum speed when towing a trailer:50 mph (80 km/h).
•Engine and transmission are subject toincreased loads. Therefore, engine coolanttemperature should be closely watched whendriving in hot climates or hilly terrain. Use alower gear and turn off the air conditioner ifthe temperature gauge needle enters the redrange.
•If the automatic transmission begins to over-heat, a message will be displayed in the textwindow.
•Avoid overload and other abusive operation.
•Hauling a trailer affects handling, durability,and economy.
•It is necessary to balance trailer brakes withthe towing vehicle brakes to provide a safestop (check and observe state/local regula-tions).
•Do not connect the trailer's brake systemdirectly to the vehicle's brake system.
•More frequent vehicle maintenance isrequired.
•Remove the ball holder when the hitch is notbeing used.
NOTE
•When parking the vehicle with a trailer ona hill, apply the parking brake before put-ting the gear selector in P. Always followthe trailer manufacturer's recommenda-tions for wheel chocking.
•When starting on a hill, put the gearselector in D before releasing the parkingbrake.
•If you use the manual (Geartronic) shiftpositions while towing a trailer, make surethe gear you select does not put toomuch strain on the engine (using toohigh a gear).
•The drawbar assembly/trailer hitch maybe rated for trailers heavier than the vehi-cle is designed to tow. Please adhere toVolvo's recommended trailer weights.
•Avoid driving with a trailer on inclines ofmore than 15%.
Page 409 of 584
STARTING AND DRIVING
407
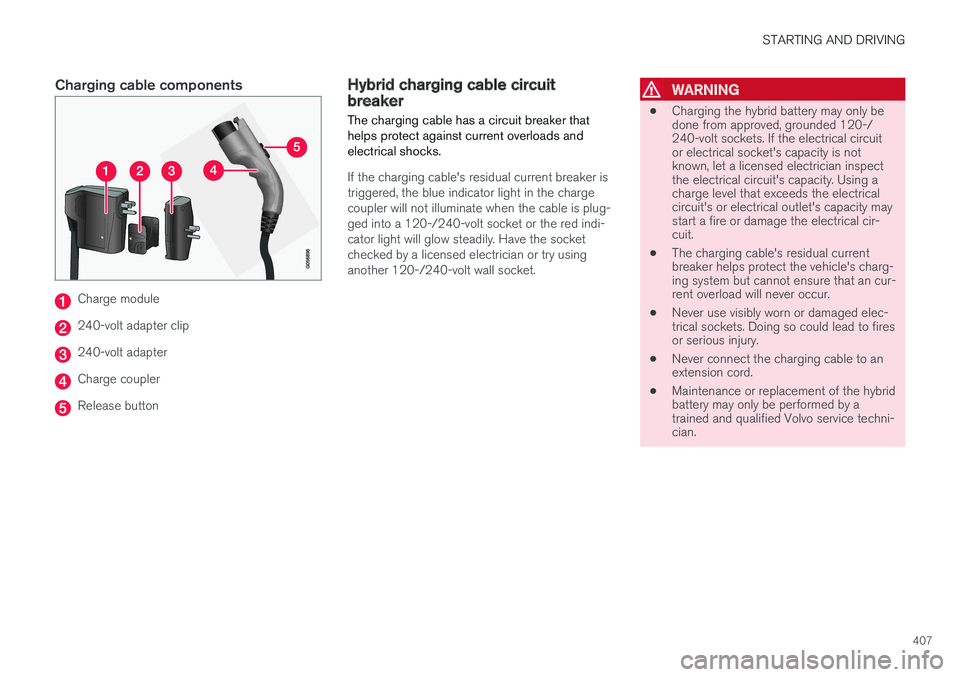
Charging cable components
Charge module
240-volt adapter clip
240-volt adapter
Charge coupler
Release button
Hybrid charging cable circuitbreaker
The charging cable has a circuit breaker thathelps protect against current overloads andelectrical shocks.
If the charging cable's residual current breaker istriggered, the blue indicator light in the chargecoupler will not illuminate when the cable is plug-ged into a 120-/240-volt socket or the red indi-cator light will glow steadily. Have the socketchecked by a licensed electrician or try usinganother 120-/240-volt wall socket.
WARNING
•Charging the hybrid battery may only bedone from approved, grounded 120-/240-volt sockets. If the electrical circuitor electrical socket's capacity is notknown, let a licensed electrician inspectthe electrical circuit's capacity. Using acharge level that exceeds the electricalcircuit's or electrical outlet's capacity maystart a fire or damage the electrical cir-cuit.
•The charging cable's residual currentbreaker helps protect the vehicle's charg-ing system but cannot ensure that an cur-rent overload will never occur.
•Never use visibly worn or damaged elec-trical sockets. Doing so could lead to firesor serious injury.
•Never connect the charging cable to anextension cord.
•Maintenance or replacement of the hybridbattery may only be performed by atrained and qualified Volvo service techni-cian.
Page 487 of 584

WHEELS AND TIRES
}}
485
Uniform Tire Quality Grading
ALL PASSENGER VEHICLE TIRES MUSTCONFORM TO FEDERAL SAFETY REQUIRE-MENTS IN ADDITION TO THESE GRADES.
Quality grades can be found, where applica-ble, on the tire sidewall between the treadshoulder and maximum section width. Forexample:
Treadwear 200 Traction AA Temperature A
TREADWEAR
The treadwear grade is a comparative ratingbased on the wear rate of the tire when testedunder controlled conditions on a specified gov-ernment test course. For example, a tire graded150 would wear one and one half (1 ½) times aswell on the government course as a tire graded100. The relative performance of tires dependsupon the actual conditions of their use, however,and many depart significantly from the norm dueto variation in driving habits, maintenance practi-ces and differences in road characteristics andclimate.
TRACTION
The traction grades, from highest to lowest, areAA, A, B, and C, as measured under controlledconditions on specified government test surfacesof asphalt and concrete. A tire marked C mayhave poor traction performance. The tractiongrade assigned to this tire is based on braking
(straight-ahead) traction tests and is not a meas-ure of cornering (turning) traction.
WARNING
The traction grade assigned to this tire isbased on braking (straight-ahead) tractiontests and is not a measure of cornering (turn-ing) traction.
TEMPERATURE
The temperature grades are A (the highest), B,and C, representing the tire's resistance to thegeneration of heat and its ability to dissipate heatwhen tested under controlled conditions on aspecified indoor laboratory test wheel. Sustainedhigh temperature can cause the material of thetire to degenerate and reduce tire life, and exces-sive temperature can lead to sudden tire failure.The grade C corresponds to a minimum level ofperformance that all passenger vehicle tires mustmeet under the Federal Motor Safety StandardNo. 109. Grades B and A represent higher levelsof performance on the laboratory test wheel thanthe minimum required by law.
WARNING
The temperature grade for this tire is estab-lished for a tire that is properly inflated andnot overloaded. Excessive speed, under-infla-tion, or excessive loading, either separately orin combination, can cause heat buildup andtire failure.
Snow tires and chains
The use of snow chains and/or winter tires canhelp improve traction in winter driving conditions.
Snow chains can be used on your Volvo with thefollowing restrictions:
•Snow chains should be installed on frontwheels only. Use only Volvo approved snowchains.
•If accessory, aftermarket or "custom" tiresand wheels are installed and are of a size dif-ferent than the original tires and wheels,chains in some cases CANNOT be used.Sufficient clearances between chains andbrakes, suspension and body componentsmust be maintained.
•Some strap-on type chains will interfere withbrake components and therefore CANNOTbe used.
•All Wheel Drive models: Snow chainsshould only be installed on the front wheels.
•Certain size tires may not allow the assemblyof snow chains/traction devices.
Consult your Volvo retailer for additional snowchain information.
Page 494 of 584

||
WHEELS AND TIRES
492
the inflation pressure recommended by the vehi-cle manufacturer on the vehicle placard or tireinflation pressure label. (If your vehicle has tiresof a different size than the size indicated on thevehicle placard or tire inflation pressure label, youshould determine the proper tire inflation pres-sure for those tires.)
As an added safety feature, your vehicle hasbeen equipped with a tire pressure monitoringsystem (TPMS) that illuminates a low tire pres-sure telltale when one or more of your tires issignificantly under-inflated. Accordingly, when thelow tire pressure telltale illuminates, you shouldstop and check your tires as soon as possible,and inflate them to the proper pressure.
Driving on a significantly under-inflated tire cau-ses the tire to overheat and can lead to tire fail-ure. Under-inflation also reduces fuel efficiencyand tire tread life, and may affect the vehicle'shandling and stopping ability. Please note thatthe TPMS is not a substitute for proper tire main-tenance, and it is the driver's responsibility tomaintain correct tire pressure, even if under-infla-tion has not reached the level to trigger illumina-tion of the TPMS low tire pressure telltale.
Your vehicle has also been equipped with aTPMS malfunction indicator to indicate when thesystem is not operating properly. The TPMS mal-function indicator is combined with the low tirepressure telltale.
When the system detects a malfunction, the tell-tale will flash for approximately one minute andthen remain continuously illuminated. Thissequence will continue upon subsequent vehiclestart-ups as long as the malfunction exists. Whenthe malfunction indicator is illuminated, the sys-tem may not be able to detect or signal low tirepressure as intended.
TPMS malfunctions may occur for a variety ofreasons, including the installation of replacementor alternate tires or wheels on the vehicle thatprevent the TPMS from functioning properly.Always check the TPMS malfunction telltale afterreplacing one or more tires or wheels on yourvehicle to ensure that the replacement or alter-nate tires and wheels allow the TPMS to con-tinue to function properly.
Messages in the instrument panel
When the TPMS symbol illuminates, the followingtext messages may also be displayed:
•Tire pressure low
•Tire pressure system Temporarilyunavailable
•Tire pressure system Service required
If TPMS cannot determine which tire(s) have lowinflation pressure:
•All four tires will be shown as affected in thecenter display
After changing wheels, always calibrate the sys-tem to avoid false warnings.
TPMS does not replace the need for regular tireinspection and maintenance.
NOTE
If you change to tires with a different dimen-sion than the factory-installed ones, theTPMS system must be calibrated for thesetires.
TPMS cannot be turned off.
WARNING
Incorrect inflation pressure could lead to tirefailure, resulting in a loss of control of thevehicle.
Related information
•Checking tire inflation pressure (p. 493)
•Reinflating tires equipped with the TirePressure Monitoring System (TPMS)(p. 494)
•Ignition modes (p. 400)
Page 506 of 584

MAINTENANCE AND SERVICING
504
Volvo's service program
Periodic maintenance and service performed atthe intervals specified in your Warranty andService Records Information booklet will helpkeep your vehicle running well.
Introduction
The maintenance services contain several checksthat require special instruments and tools andtherefore must be performed by a qualified tech-nician. To keep your Volvo in top condition, spec-ify time-tested and proven Genuine Volvo Partsand Accessories.
The Federal Clean Air Act – U.S.
The Federal Clean Air Act requires vehicle manu-facturers to furnish written instructions to the ulti-mate purchaser to assure the proper servicingand function of the components that controlemissions. These services, which are listed in the"Warranty and Service Records Information"booklet, are not covered by the warranty. You willbe required to pay for labor and material used.
Maintenance
Your Volvo passed several major inspectionsbefore it was delivered to you, in accordance withVolvo specifications. The maintenance proce-dures outlined in the Warranty and ServiceRecords Information booklet, many of which willpositively affect your vehicle's emissions, shouldbe performed as indicated. It is recommendedthat receipts for vehicle emission maintenance beretained in case questions arise concerning
maintenance. Inspection and maintenance shouldalso be performed anytime a malfunction isobserved or suspected.
Applicable warranties – U.S./Canada
In accordance with applicable U.S. and Canadianregulations, the following list of warranties is pro-vided.
•New Vehicle Limited Warranty
•Parts and Accessories Limited Warranty
•Corrosion Protection Limited Warranty
•Seat Belt and Supplemental Restraint Sys-tems Limited Warranty
•Emission Design and Defect Warranty
•Emission Performance Warranty
These are the federal warranties; other warran-ties are provided as required by state/provinciallaw. Refer to your separate Warranty and ServiceRecords Information booklet for detailed informa-tion concerning each of the warranties.
Periodic maintenance helps minimize
emissions
NOTE
•Refer to your Warranty and ServiceRecords Information booklet for a com-prehensive service and maintenanceschedule up to 150,000 miles (240,000km). This program contains inspectionsand services necessary for the properfunction of your vehicle and includescomponents that affect vehicle emis-sions.
•The Warranty and Service Records Infor-mation booklet also contains detailedinformation concerning the warrantiesthat apply to your vehicle.
On-board Diagnostic System
OBD II is part of your vehicle's computerizedengine management system. It stores diagnosticinformation about your vehicle's emission con-trols. It can light the Check Engine light (MIL) if itdetects an emission control "fault." A "fault" is acomponent or system that is not performingwithin an expected range. A fault may be perma-nent or temporary. OBD II will store a messageabout any fault.
Page 507 of 584

MAINTENANCE AND SERVICING
}}
505
Emission inspection readiness
How do states use OBD II for emission
inspections?
Many states connect a computer directly to avehicle's OBD II system. The inspector can thenread "faults." In some states, this type of inspec-tion has replaced the tailpipe emission test.
How can my vehicle fail OBD II emission
inspection?
Your vehicle can fail OBD II emission inspectionfor any of the following reasons.
•If your Check Engine (MIL) light is lit, yourvehicle may fail inspection.
•If your vehicle's Check Engine light was lit,but went out without any action on your part,OBD II will still have a recorded fault. Yourvehicle may pass or fail, depending on theinspection practices in your area.
•If you had recent service that required dis-connecting the battery, OBD II diagnosticinformation may be incomplete and "notready" for inspection. A vehicle that is notready may fail inspection.
How can I prepare for my next OBD II
emission inspection?
•If your Check Engine (MIL) light is lit – or waslit but went out without service, have your
vehicle diagnosed and, if necessary, servicedby a qualified Volvo technician.
•If you recently had service for a lit CheckEngine light, or if you had service thatrequired disconnecting the battery, a periodof driving is necessary to bring the OBD IIsystem to "ready" for inspection. Two half-hour trips of mixed stop-and-go/highwaydriving are typically needed to allow OBD II toreach readiness. Your Volvo retailer can pro-vide you with more information on planning atrip.
•Maintain your vehicle in accordance with yourvehicle's maintenance schedule.
Owner maintenance
Periodic maintenance requirements and intervalsare described in your vehicle's Warranty andService Records Information booklet.
The following points can be carried out betweenthe normally scheduled maintenance services.
Each time the car is refueled:
•Check the engine oil level.
•Clean the windshield, windshield wipers,headlights, and taillights.
Monthly:
•Check cold tire pressure in all tires. Inspectthe tires for wear.
•Check that engine coolant and other fluidlevels are between the indicated "min" and"max" markings.
•Clean interior glass surfaces with a glasscleaner and soft paper towels.
•Wipe driver information displays with a softcloth.
•Visually inspect battery terminals for corro-sion. Corrosion may indicate a loose terminalconnector, or a battery near the end of itsuseful service life. Consult your Volvo retailerfor additional information.
As needed:
Wash the car, including the undercarriage, toreduce wear that can be caused by a buildup ofdirt, and corrosion that can be caused by salt res-idues.
Clean leaves and twigs from air intake vents atthe base of the windshield, and from other placeswhere they may collect.
NOTE
Complete service information for qualifiedtechnicians is available online for purchase orsubscription at www.volvotechinfo.com.