2017 VOLVO V90 door lock
[x] Cancel search: door lockPage 314 of 594

||
DRIVER SUPPORT
* Option/accessory.
312
Automatic standby mode
Pilot Assist is dependent on other systems, e.g. stability control/anti-skid ESC. If any of theseother systems stops working, Pilot Assist isswitched off automatically. In the event of automatic deactivation a signal will sound and a message is shown in the driver dis-play. The driver must then intervene and adaptthe speed and distance to the vehicle ahead. Automatic deactivation may occur if:
• the speed is below 5 km/h (3 mph) and Pilot Assist is uncertain whether the vehicle aheadis a stationary vehicle or an object, such as aspeed bump.
• the speed is below 5 km/h (3 mph) and thevehicle ahead turns off so that Pilot Assist nolonger has a vehicle to follow.
• speed is reduced to below 30 km/h(20 mph) - only applies to cars with manualgearbox.
• the driver's hands are not on the steeringwheel
• the driver opens the door
• the driver takes off the seatbelt
• engine speed is too low/high
• wheels lose traction
• brake temperature is high
• the parking brake is applied •
the camera and radar unit is covered by e.g.snow or heavy rainfall (camera lens/radiowaves are blocked).
Reactivating Pilot Assist from the
standby mode
NOTE: The illustration is schematic - details may vary depending on car model.
–Press the steering wheel button (1).
> The speed is then set to the most recently stored speed.
NOTE
A marked speed increase may occur once the speed has been resumed by pressing steer- ing wheel button
.
Related information
• Pilot Assist
* (p. 304)
• Activating and starting the Pilot Assist
*
(p. 307)
• Managing the speed for Pilot Assist
* (p. 309)
• Setting the time interval for Pilot Assist
*
(p. 310)
• Change of target and automatic braking with Pilot Assist
* (p. 313)
• Overtaking assistance with the adaptivecruise control
* or Pilot Assist * (p. 298)
• Limitations of Pilot Assist
* (p. 314)
• Symbols and messages for Pilot Assist
*
(p. 316)
• Distance Warning
* (p. 288)
Page 516 of 594

MAINTENANCE AND SERVICE
514
Opening and closing the bonnet
The bonnet can be opened using the handle in the passenger compartment and a handle underthe bonnet.
Open the bonnet
Pull the handle near the foot pedals to release the bonnet from its fully closed posi-tion.
Turn the handle under the bonnet anticlock- wise to release the bonnet from the lockcatches and lift the bonnet.
Warning - bonnet not closed
When the bonnet is released, the warn- ing symbol and the graphics in thedriver display will light up and anacoustic reminder will sound. If the car
starts rolling, an acoustic warning signal willrepeat. For more information on graphics, see section "Door and seatbelt reminder".
NOTE
If the warning symbol is lit or the warning sig- nal is heard despite the bonnet being closedproperly, contact an authorised Volvo work-shop.
Close the bonnet1. Push the bonnet down until it starts to fall from its own weight.
2. When the bonnet stops against the lock catch, push the bonnet to close it completely.
WARNING
Risk of crushing! Ensure that the closing path under the bonnet is not obstructed, otherwisethere is a risk of personal injury.
WARNING
Check that the bonnet locks properly when closed. The bonnet must engage at bothsides audibly.
Page 546 of 594

||
MAINTENANCE AND SERVICE
* Option/accessory.
544
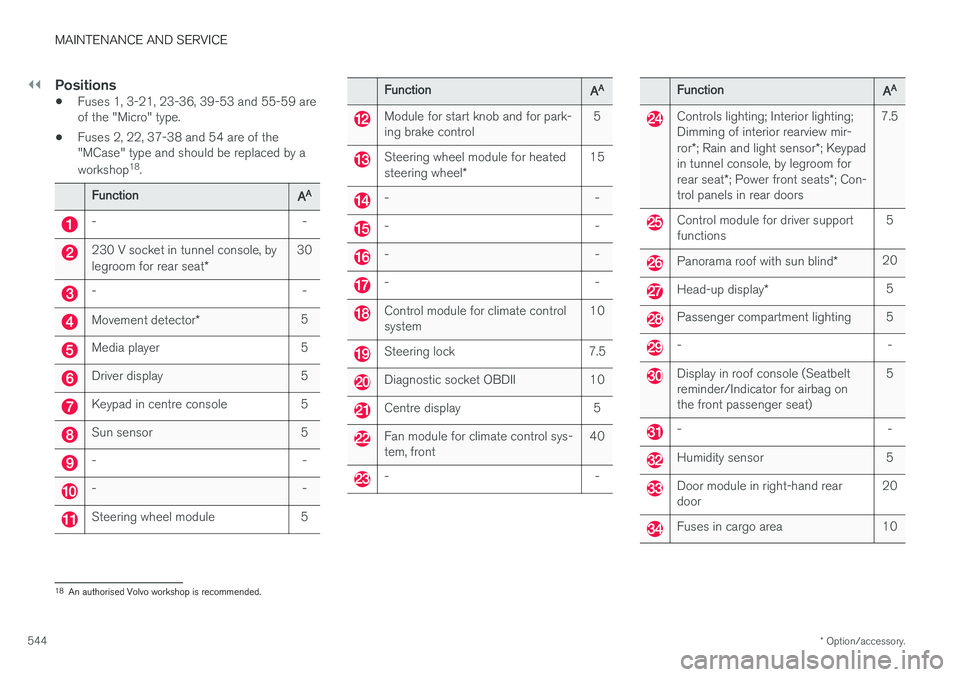
Positions
• Fuses 1, 3-21, 23-36, 39-53 and 55-59 are of the "Micro" type.
• Fuses 2, 22, 37-38 and 54 are of the"MCase" type and should be replaced by a workshop 18
.
Function AA
- -
230 V socket in tunnel console, by legroom for rear seat
*30
- -
Movement detector
* 5
Media player 5
Driver display 5
Keypad in centre console 5
Sun sensor 5
- -
- -
Steering wheel module 5
Function
AA
Module for start knob and for park- ing brake control 5
Steering wheel module for heated steering wheel
* 15
- -
- -
- -
- -
Control module for climate control system
10
Steering lock 7.5
Diagnostic socket OBDII 10
Centre display 5
Fan module for climate control sys- tem, front40
- -
Function
AA
Controls lighting; Interior lighting; Dimming of interior rearview mir- ror
*; Rain and light sensor *; Keypad
in tunnel console, by legroom forrear seat *; Power front seats *; Con-
trol panels in rear doors 7.5
Control module for driver support functions
5
Panorama roof with sun blind
*20
Head-up display
* 5
Passenger compartment lighting 5
- -
Display in roof console (Seatbelt reminder/Indicator for airbag onthe front passenger seat) 5
- -
Humidity sensor 5
Door module in right-hand rear door
20
Fuses in cargo area 10
18
An authorised Volvo workshop is recommended.
Page 552 of 594

||
MAINTENANCE AND SERVICE
* Option/accessory.
550 5. Switch off the engine by turning the start
knob in the tunnel console to STOP. Hold
the knob in STOP position for at least
4 seconds.
> The car is ready for the automatic car wash.
IMPORTANT
The system will automatically switch to P
mode unless the above step is followed. The wheels are locked in P mode, which they
should not be when putting the car through an automatic car wash.
High-pressure washingWhen using high-pressure washing, use sweep- ing movements and make sure that the nozzledoes not come closer than 30 cm to the surfaceof the car. Do not spray directly onto the locks.
Testing the brakesLightly depress the brake pedal now and thenwhen driving long distances in rain or slush. Theheat from the friction causes the brake linings towarm up and dry. Do the same thing after startingin very damp or cold weather.
WARNING
Always test the brakes after washing the car, including the parking brake, to ensure thatmoisture and corrosion do not attack thebrake linings and reduce braking perform-ance.
Wiper bladesAsphalt, dust and salt residue on wiper blades, as well as insects, ice etc. on the windscreen, impairthe service life of wiper blades. When cleaning, set the wiper blades in service position.
NOTE
Wash the wiper blades and windscreen regu- larly with lukewarm soap solution or carshampoo. Do not use any strong solvents.
Exterior plastic, rubber and trim components
A special cleaning agent available from Volvo dealers is recommended for the cleaning andcare of coloured plastic parts, rubber and trimcomponents, e.g. glossy trim mouldings. Whenusing such a cleaning agent the instructionsmust be followed carefully. The frames around the side windows, the car's roof rails and the door frames at the windows *
are produced in anodised aluminium. This means that they should only be washed using a cleaning agent with a pH value between 3.5 and 11.5.This is in order to avoid discolouration.
Parts that should be washed using a cleaning agent with a pH value between 3.5 and 11.5.
IMPORTANT
Avoid waxing and polishing on plastic and rubber. When using degreasant on plastic and rubber, only rub with light pressure if it is necessary.Use a soft washing sponge. Polishing glossy trim mouldings could wear away or damage the glossy surface layer. Polishing agent that contains abrasive must not be used.
Page 582 of 594

ALPHABETICAL INDEX
580Deadlock 246
deactivation 246
Defrosting 194
Diesel 420 run out of fuel 420
Diesel particle filter 421
Digital radio (DAB) 440
Dimensions 561 Towing bracket 425
dipped beam 137
Dipstick, electronic 517
Direction indicator 144
Direction indicators 144
direction of rotation 483
Disengaging the gear selector inhibitor 394
Display lighting 135
Distance Warning 288, 289 Limitations 290
Door mirrors 153 automatic dimming 154
resetting 154
Drive-E Environmental philosophy 25
Driver Alert Control 352 operation 353
Driver display
application menu 105
messages 106
Driver performance 168
Driver profile 174, 175, 176, 177 edit 175
import/export from/to USB 177
select 174
Drivetrain Gearbox 389
Driving cooling system 414
with a tailer 426
Driving economy 422
Driving in water 413
Driving mode 400Driving with a trailer towball load 564
towing capacity 564
E
ECO mode 402
Economical driving 402, 422
ECO pressure 484, 574
Electrical socket 220
Electrical system 530
Electric parking brake 409low battery voltage 411
Emergency equipment first aid kit 501
warning triangle 500
Emergency puncture repair 490, 494 action 491
inflating the tyres 494
rechecking 491
Emergency puncture repair kit 491 location 490
overview 491
sealing fluid 490
Emissions of carbon dioxide 572 Engine deactivate 387
overheating 414
start 386
Start/Stop 396
Engine compartment coolant 518
Engine oil 516
overview 515
Engine drag control 273
Engine oil 516, 569 adverse driving conditions 569
Page 589 of 594

ALPHABETICAL INDEX
587
Steering wheel 131, 132
heating 205
keypad 131
paddle 131
steering wheel adjustment 132
Steering wheel paddles 395
Stone chips and scratches 554, 555
Stop/start function 396
Storage spaces 218 glovebox 225
tunnel console 219
Sun blind panorama roof 158
Rear door 153
Sun visor 226
Support 19
Support battery 533
Switching off the engine 387
Switch off engine 387Symbols indicator symbols 95
Symbols and messages Adaptive Cruise Control 302
centre display status field 45
Collision Warning with Auto Brake 339
parking climate 212
Systemupdates 510
T
TailgateLocking/unlocking 247, 249
power 253, 256
Temperature Control 190
experienced 183
Temporary spare spare wheel 498
Through-load hatch 229
Tools 430, 500
Top speed 575Towbar foldable 423
Towing 431, 432
Towing bracket 422, 423 specifications 425
Towing capacity and towball load 564
Towing eye 430
Traction control 273
Traffic information 441
Trailer 428 cable 426
driving with a trailer 426, 428
snaking 428
Trailer stability assist 273, 428
Transmission 389Transmission oil grade 570
Tread 484
Tread depth 484, 499
Tread wear indicators 484
Trip computer 165, 166, 168
Trip meter 165
Trip meter, resetting 166Troubleshooting Adaptive Cruise Control 300
TSA - trailer stability assist 273, 428
Tunnel console 219
Tunnel detection 137TV 449
Type approval radar system 323
remote control key system 265
Type designations 558
Tyre dimension 495, 502
Tyre load index 502