2017 TOYOTA TACOMA ABS
[x] Cancel search: ABSPage 69 of 640

691-2. Theft deterrent system
1
For safety and security
Engine immobilizer system∗
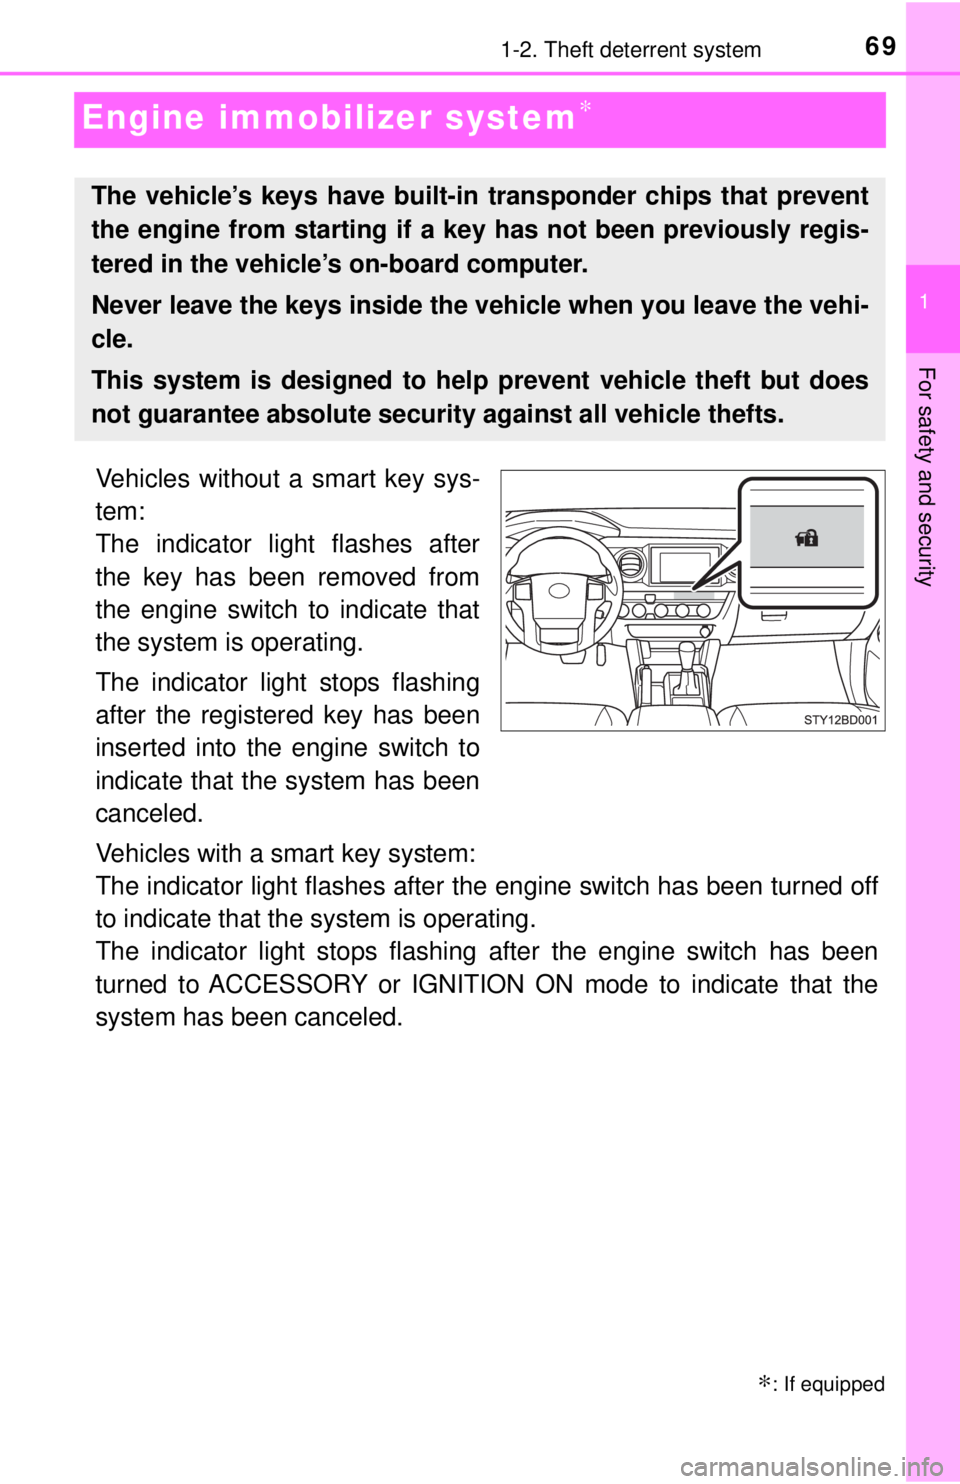
Vehicles without a smart key sys-
tem:
The indicator light flashes after
the key has been removed from
the engine switch to indicate that
the system is operating.
The indicator light stops flashing
after the registered key has been
inserted into the engine switch to
indicate that the system has been
canceled.
Vehicles with a smart key system:
The indicator light flashes after the engine switch has been turned off
to indicate that the system is operating.
The indicator light stops flashing after the engine switch has been
turned to ACCESSORY or IGNITION ON mode to indicate that the
system has been canceled.
∗: If equipped
The vehicle’s keys have built-in transponder chips that prevent
the engine from starting if a key has not been previously regis-
tered in the vehicle’s on-board computer.
Never leave the keys inside the vehicle when you leave the vehi-
cle.
This system is designed to help prevent vehicle theft but does
not guarantee absolute security against all vehicle thefts.
Page 83 of 640

832. Instrument cluster
2
Instrument cluster
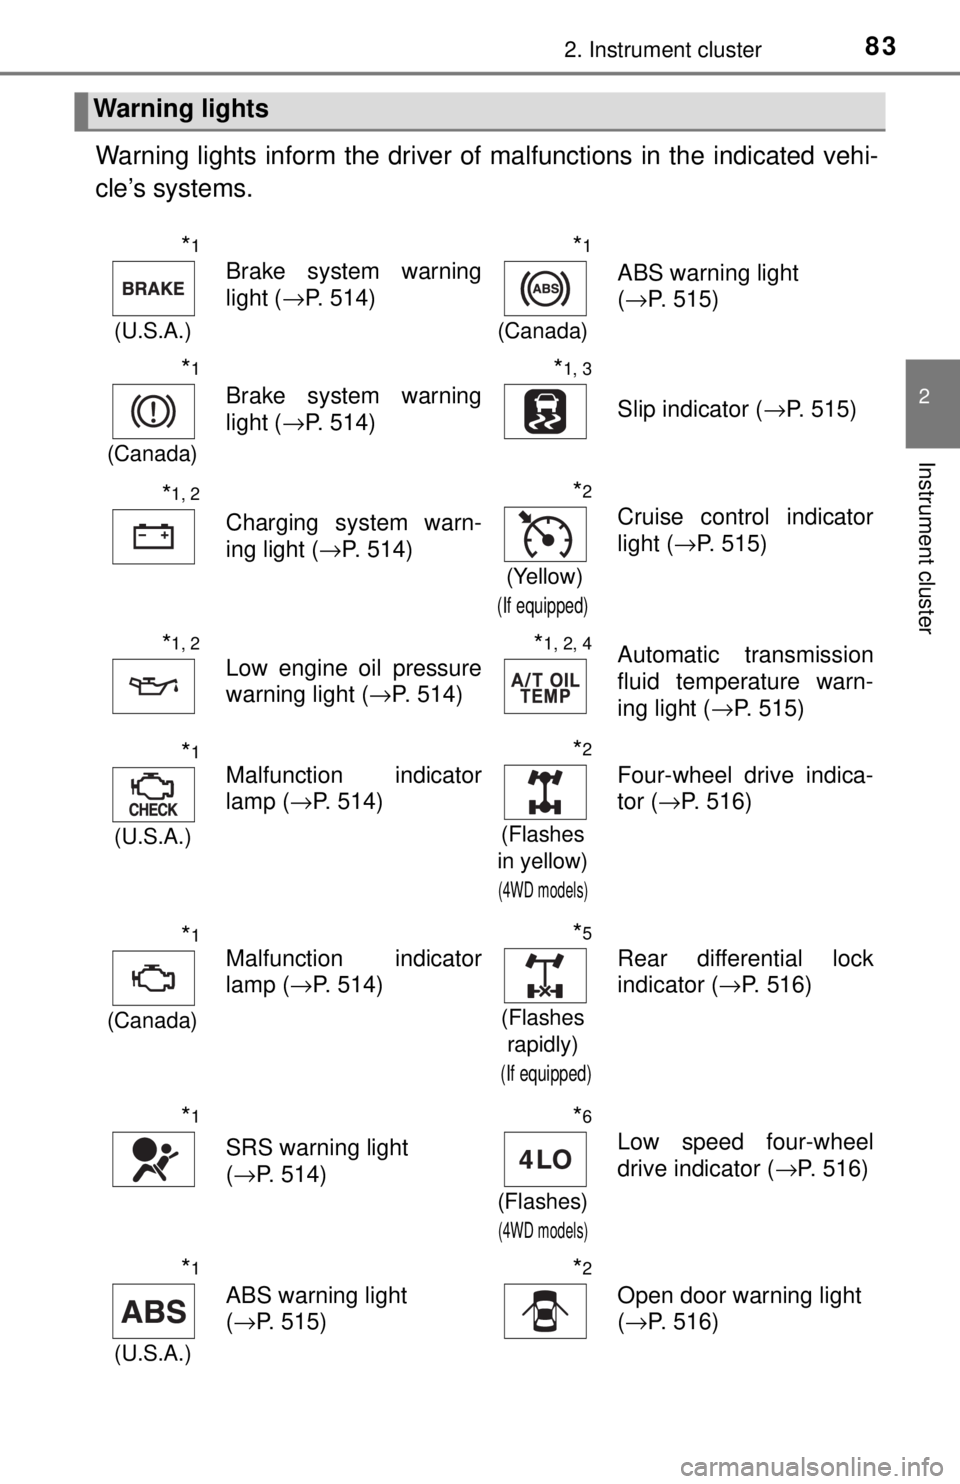
Warning lights inform the driver of malfunctions in the indicated vehi-
cle’s systems.
Warning lights
*1
(U.S.A.)
Brake system warning
light ( →P. 514)
*1
(Canada)
ABS warning light
(→P. 515)
*1
(Canada)
Brake system warning
light ( →P. 514)
*1, 3
Slip indicator ( →P. 515)
*1, 2
Charging system warn-
ing light (→P. 514)
*2
(Yellow)
(If equipped)
Cruise control indicator
light (→P. 515)
*1, 2
Low engine oil pressure
warning light ( →P. 514)*1, 2, 4Automatic transmission
fluid temperature warn-
ing light ( →P. 515)
*1
(U.S.A.)
Malfunction indicator
lamp (→P. 514)
*2
(Flashes
in yellow)
(4WD models)
Four-wheel drive indica-
tor ( →P. 516)
*1
(Canada)
Malfunction indicator
lamp ( →P. 514)
*5
(Flashes
rapidly)
(If equipped)
Rear differential lock
indicator ( →P. 516)
*1
SRS warning light
(→P. 514)
*6
(Flashes)
(4WD models)
Low speed four-wheel
drive indicator ( →P. 516)
*1
(U.S.A.)
ABS warning light
(→P. 515)
*2
Open door warning light
(→P. 516)
Page 87 of 640

872. Instrument cluster
2
Instrument cluster
*7: In order to confirm operation, the BSM outside rear view mirror indicators
illuminate in the following situations:
• When the engine switch is turned to the “ON” position (vehicles wi\
thout a smart key system) or IGNITION ON mode (vehicles with a smart key
system) while the BSM main switch is set to ON.
• When the BSM main switch is set to ON while the engine switch is in the “ON” position (vehicles without a smart key system) or IGNITION ON
mode (vehicles with a smart key system).
If the system is functioning correctly, the BSM outside rear view mirror indi-
cators will turn off after a few seconds.
If the BSM outside rear view mirror indicators do not illuminate or do not
turn off, there may be a malfunction in the system.
*8: This light illuminates on the outside rear view mirrors.
*9: This light illuminates on the center panel.
WARNING
■ If a safety system warning light does not come on
Should a safety system light such as the ABS and SRS warning light not
come on when you start the engine, this could mean that these systems are
not available to help protect you in an accident, which could result in death
or serious injury. Have the vehicle inspected by your Toyota dealer immedi-
ately if this occurs.
Page 118 of 640

1183-2. Opening, closing and locking the doors
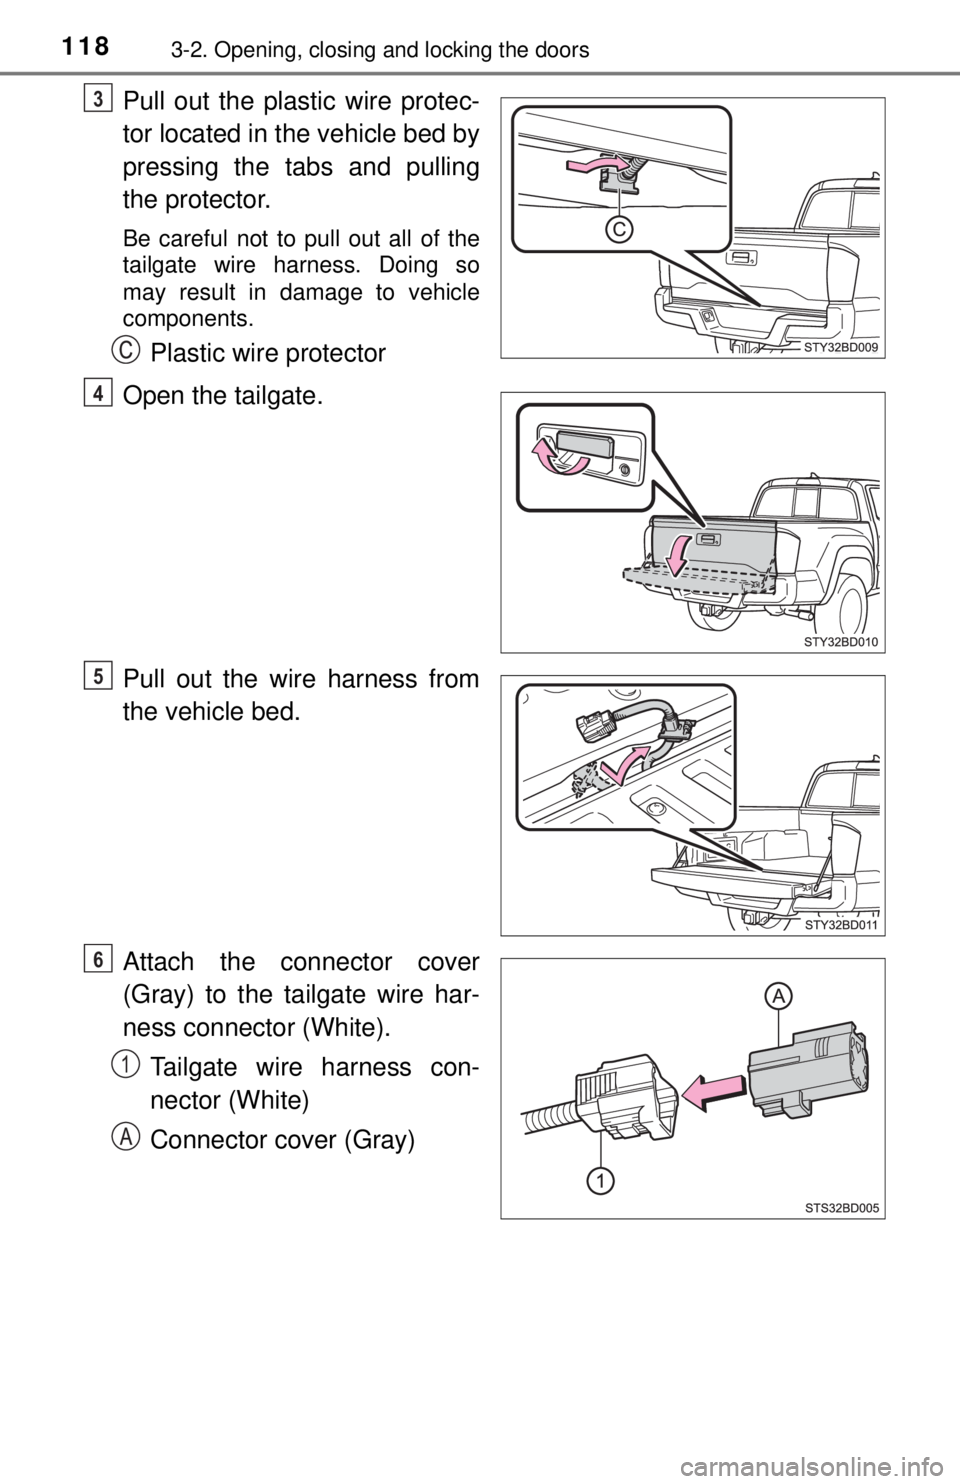
Pull out the plastic wire protec-
tor located in the vehicle bed by
pressing the tabs and pulling
the protector.
Be careful not to pull out all of the
tailgate wire harness. Doing so
may result in damage to vehicle
components.
Plastic wire protector
Open the tailgate.
Pull out the wire harness from
the vehicle bed.
Attach the connector cover
(Gray) to the tailgate wire har-
ness connector (White). Tailgate wire harness con-
nector (White)
Connector cover (Gray)
3
4
5
6
1
Page 183 of 640

1834-1. Before driving
4
Driving
●Always place wheel blocks under both the vehicle’s and the trailer’s
wheels when parking. Apply the parking brake firmly, and put the
transmission in P (automatic transmission) or in 1 or R (manual
transmission). Avoid parking on a slope, but if unavoidable, do so
only after performing the following:
Apply the brakes and keep them applied.
Have someone place wheel blocks under both the vehicle’s and
trailer’s wheels.
When the wheel blocks are in pl ace, release the brakes slowly
until the blocks absorb the load.
Apply the parking brake firmly.
Shift into P (automatic transmission) or 1 or R (manual transmis-
sion) and turn off the engine.
● When restarting after parking on a slope:
With the transmission in P (autom atic transmission) or the clutch
pedal (manual transmission) depr essed, start the engine. On
vehicles with an automatic transmission, be sure to keep the
brake pedal pressed.
Shift into a forward gear. If reversing, shift into R.
Release the parking brake (and also the brake pedal on vehicles
with an automatic transmission), and slowly pull or back away
from the wheel blocks. Stop and apply the brakes.
Have someone retrieve the blocks.
1
2
3
4
5
1
2
3
4
Page 227 of 640

2274-5. Using the driving support systems
4
Driving
●The shape of the obstacle may prevent the sensor from detecting it. Pay
particular attention to the following obstacles:
• Wires, fences, ropes, etc.
• Cotton, snow and other materials that absorb sound waves
• Sharply-angled objects
• Low obstacles
• Tall obstacles with upper sections projecting outwards in the direction of
your vehicle
● The following situations may occur during use.
• Depending on the shape of the obstacle and other factors, the detection
distance may shorten, or detection may be impossible.
• Obstacles may not be detected if they are too close to the sensor.
• There will be a short delay between obstacle detection and display. Even at slow speeds, there is a possibility that the obstacle will come within the
sensor’s detection areas before the display is shown and the warning
beep sounds.
• Thin posts or objects lower than the sensor may not be detected for colli- sion when approached, even if they have been detected once.
• It might be difficult to hear beeps due to the volume of audio system or air flow noise of air conditioning system.
■ If a message is displayed on the multi-information display
→P. 529
■ Customization
Settings (e.g. buzzer volume) can be changed.
(Customizable features →P. 595)
■ Certification (Canada only)
This ISM device complies with Canadian ICES-001.
Page 254 of 640

2544-5. Using the driving support systems
Manual transmission
4WD models: Before using the rear differential lock system.
Stop the vehicle or reduce your speed to less than 2 mph (3 km/h).
Depress the clutch pedal and turn the front-wheel drive control
switch in the “4L” position to see if this is sufficient. If this has no
effect, additionally use the rear differential lock system.
Be sure to stop the wheels.
Depress the clutch pedal.
Press the rear differential lock switch.
After the rear differential is locked, the indicator will come on.
Slowly release the clutch pedal.
Unlock the rear differential as soon as the vehicle moves.
To unlock the rear differential, press the switch again.
■ Locking the rear differential
●When the rear differential is locked, VSC is automatically turned off.
(The rear differential lock and VSC off indicators come on.)
● The following systems do not operate when the rear differential is locked. It
is normal operation for the ABS warning light and VSC off indicator to be on
at this time.
•ABS
• Multi Terrain ABS (if equipped)
• Brake assist system
•VSC
•TRAC
• Hill-start assist control (if equipped on 4WD models)
■ The rear differential lock is disengaged when
●Vehicles without a smart key system: When the engine switch is turned to
the “LOCK” position
● Vehicles with a smart key system: When the engine switch is turned off
● 4WD models only: Turn the front-wheel drive control switch to “2WD” or “4H”
position.
Never forget to turn off the switch after using this feature.
■ After unlocking the rear differential
Vehicles without a smart key system
To check that the indicator goes off, turn the engine switch to the “ON” posi-
tion, but do not start the engine.
Vehicles with a smart key system
To check that the indicator goes off, turn the engine switch to IGNITION ON
mode, but do not start the engine.
1
2
3
4
5
Page 267 of 640

2674-5. Using the driving support systems
4
Driving
Driving assist systems
◆ABS (Anti-lock Brake System)
Helps to prevent wheel lock when the brakes are applied suddenly,
or if the brakes are applied while driving on a slippery road surface
◆Multi Terrain ABS (Anti-lock Brake System) (if equipped)
Helps to prevent wheel lock when the brakes are applied suddenly,
or if the brakes are applied while driving on a slippery road surface,
or in off-road conditions (such as rough roads, sand and mud)
◆Brake assist
Generates an increased level of braking force after the brake pedal
is depressed when the system detects a panic stop situation
◆VSC (Vehicle Stability)
Helps the driver to control skidding when swerving suddenly or
turning on slippery road surfaces
◆Trailer Sway Control (if equipped)
Helps the driver to control trailer sway by selectively applying brake
pressure for individual wheels and reducing engine torque when
trailer sway is detected.
Trailer Sway Control is part of the VSC system and will not operate if
VSC system is turned off or experiences a malfunction.
◆TRAC (Traction Control)
Helps to maintain drive power and prevent the drive wheels from
spinning when starting the vehicle or accelerating on slippery roads
To help enhance driving safety and performance, the following
systems operate automatically in response to various driving
situations. Be aware, however, that these systems are supple-
mentary and should not be relied upon too heavily when operat-
ing the vehicle.