2017 TOYOTA TACOMA tire pressure
[x] Cancel search: tire pressurePage 5 of 640

5
1
9 8
7 5 4
3
2
10
6
6-1. Using the air conditioning system
Manual air conditioning system............................. 374
Automatic air conditioning system............................. 380
Seat heaters ...................... 387
6-2. Using the interior lights Interior lights list ................ 389• Interior light ................... 390
• Front personal lights ..... 390
• Cargo lamp main switch ............................ 391
6-3. Using the storage features List of storage features...... 392• Glove box...................... 393
• Front console box ......... 394
• Overhead console ......... 394
• Cup holders .................. 395
• Bottle holders ................ 396
• Storage box .................. 397
Luggage compartment features ........................... 400
6-4. Other interior features Other interior features ....... 410• Sun visors ..................... 410
• Vanity mirrors................ 410
• Clock ............................. 411
• Power outlets (12 V DC) ...................... 412
• Power outlet
(120 V AC) .................... 413
• Wireless charger ........... 418
• Assist grips ................... 423
• Camera mounting bracket .......................... 424
Garage door opener .......... 425
Compass ........................... 432 7-1. Maintenance and care
Cleaning and protecting the vehicle exterior .......... 438
Cleaning and protecting the vehicle interior ........... 441
7-2. Maintenance Maintenance requirements ................... 444
General maintenance ........ 446
Emission inspection and maintenance (I/M)
programs ......................... 449
7-3. Do-it-yourself maintenance Do-it-yourself service precautions ...................... 450
Hood .................................. 452
Engine compartment ......... 454
Tires................................... 466
Tire inflation pressure ........ 476
Wheels............................... 479
Air conditioning filter .......... 482
Wireless remote control/ electronic key battery ...... 485
Checking and replacing fuses ................................ 488
Light bulbs ......................... 491
8-1. Essential information Emergency flashers ........... 504
If your vehicle has to be stopped in
an emergency.................. 505
6Interior features7Maintenance and care
8When trouble arises
Page 15 of 640

15Pictorial index
Fuel filler door . . . . . . . . . . . . . . . . . . . . . . . . . . . . . . . . . . . . P. 214
Refueling method . . . . . . . . . . . . . . . . . . . . . . . . . . . . . . . . . . . P. 214
Fuel type/fuel tank capacity . . . . . . . . . . . . . . . . . . . . . . . . . . . P. 572
Tires . . . . . . . . . . . . . . . . . . . . . . . . . . . . . . . . . . . . . . . . . . . . P. 466
Tire size/inflation pressure . . . . . . . . . . . . . . . . . . . . . . . . . . . . P. 579
Winter tires/tire chain . . . . . . . . . . . . . . . . . . . . . . . . . . . . . . . . P. 273
Checking/rotation/tire pressure warning system
*3 . . . . . . . . . P. 466
Coping with flat tires . . . . . . . . . . . . . . . . . . . . . . . . . . . . . . . . P. 540
Hood . . . . . . . . . . . . . . . . . . . . . . . . . . . . . . . . . . . . . . . . . . . . P. 452
Opening . . . . . . . . . . . . . . . . . . . . . . . . . . . . . . . . . . . . . . . . . . P. 452
Engine oil . . . . . . . . . . . . . . . . . . . . . . . . . . . . . . . . . . . . . . . . . P. 573
Coping with overheat . . . . . . . . . . . . . . . . . . . . . . . . . . . . . . . . P. 563
Camera . . . . . . . . . . . . . . . . . . . . . . . . . . . . . . . . . . . . . . . . . . P. 229
Headlights . . . . . . . . . . . . . . . . . . . . . . . . . . . . . . . . . . . . . . . P. 206
Fog lights
*3 . . . . . . . . . . . . . . . . . . . . . . . . . . . . . . . . . . . . . . P. 210
Front turn signal lights . . . . . . . . . . . . . . . . . . . . . . . . . . . . . P. 204
Parking lights (bulb type)
*3/
daytime running lights (bulb type)
*3. . . . . . . . . . . . . . . . . . P. 206
Parking lights (LED type)
*3/
daytime running lights (LED type)
*3 . . . . . . . . . . . . . . . . . . P. 206
Rear turn signal/tail lights . . . . . . . . . . . . . . . . . . . . . . . . . . . P. 204
Stop/tail lights . . . . . . . . . . . . . . . . . . . . . . . . . . . . . . . . . . . . P. 206
Hill-start assist control . . . . . . . . . . . . . . . . . . . . . . . . . . . . . . . P. 268
License plate lights . . . . . . . . . . . . . . . . . . . . . . . . . . . . . . . . P. 206
Back-up lights
Shifting the shift lever to R . . . . . . . . . . . . . . . . . . . . . . . . P. 197, 202
Side marker lights . . . . . . . . . . . . . . . . . . . . . . . . . . . . . . . . . P. 206
6
7
8
9
Light bulbs of the exterior lights for driving
(Replacing method: P. 491, Watts: P. 580)
*1: Vehicles with a smart key system
*2: Vehicles with a multi-information display
*3: If equipped
10
11
12
13
14
15
16
17
18
Page 18 of 640

18Pictorial index
■Switches
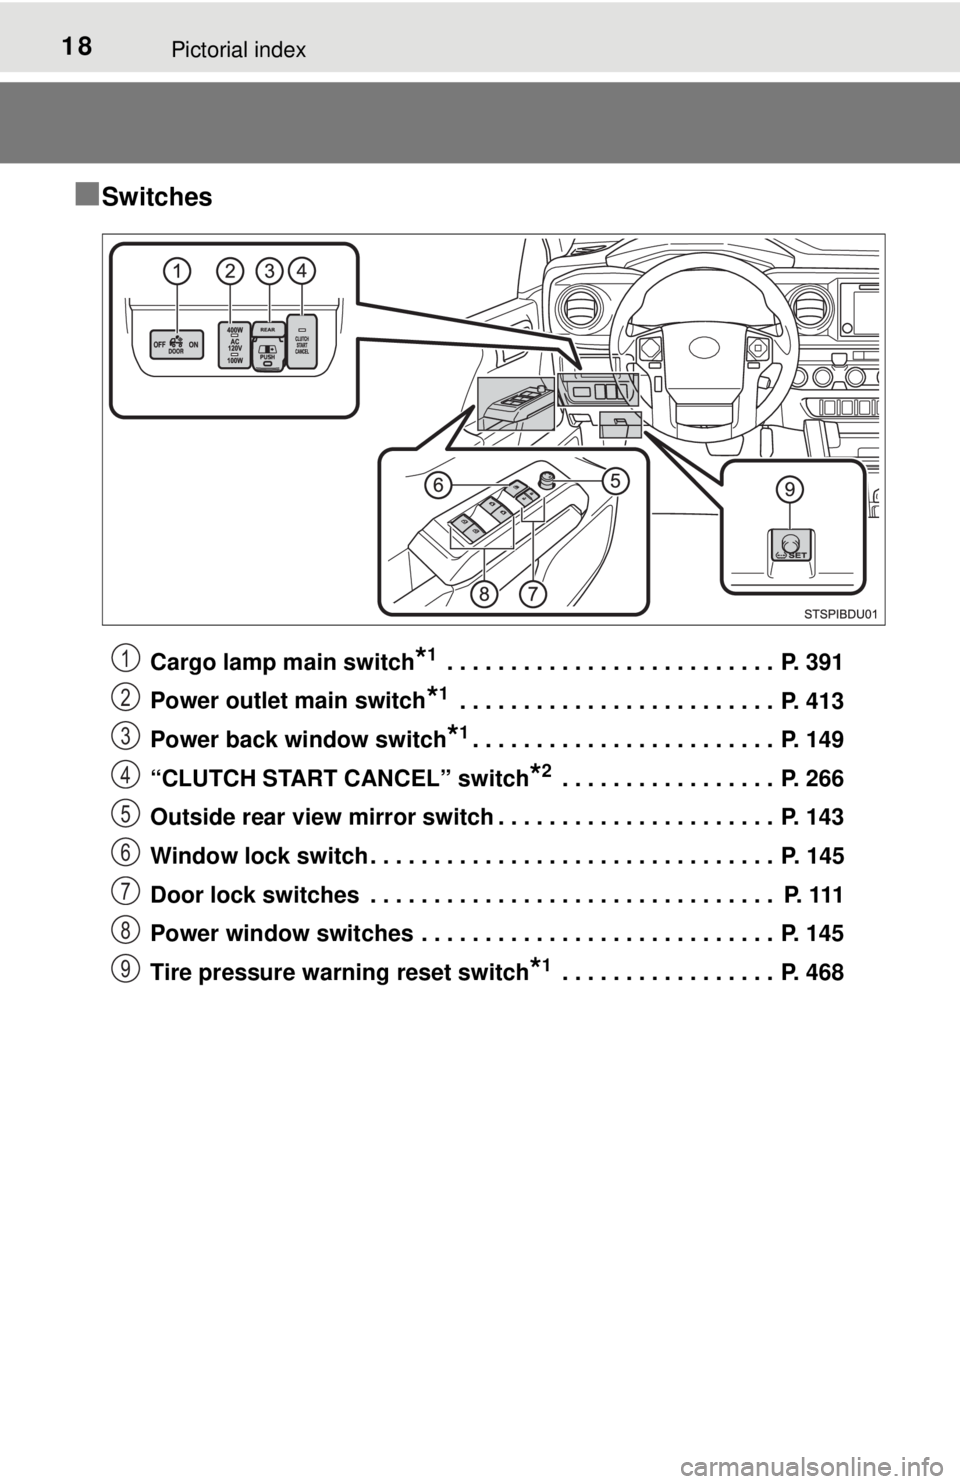
Cargo lamp main switch*1 . . . . . . . . . . . . . . . . . . . . . . . . . . P. 391
Power outlet main switch
*1 . . . . . . . . . . . . . . . . . . . . . . . . . P. 413
Power back window switch
*1. . . . . . . . . . . . . . . . . . . . . . . . P. 149
“CLUTCH START CANCEL” switch
*2 . . . . . . . . . . . . . . . . . P. 266
Outside rear view mirror switch . . . . . . . . . . . . . . . . . . . . . . P. 143
Window lock switch . . . . . . . . . . . . . . . . . . . . . . . . . . . . . . . . P. 145
Door lock switches . . . . . . . . . . . . . . . . . . . . . . . . . . . . . . . . P. 111
Power window switches . . . . . . . . . . . . . . . . . . . . . . . . . . . . P. 145
Tire pressure warning reset switch
*1 . . . . . . . . . . . . . . . . . P. 468
1
2
3
4
5
6
7
8
9
Page 84 of 640

842. Instrument cluster
*1: These lights turn on when the engine switch is turned to the “ON” position(vehicles without a smart key system) or IGNITION ON mode (vehicles
with a smart key system) to indicate that a system check is being per-
formed. They will turn off after the engine is started, or after a few seconds.
There may be a malfunction in a system if the lights do not come on, or if
the lights do not turn off. Have the vehicle inspected by your Toyota dealer
for details.
*2: Vehicles without a multi-information display.
*3: The light comes on to indicate a malfunction.
*4: Vehicles with an automatic transmission.
*5: Vehicles with a multi-information display.
*6: Vehicles without a multi-information display:
The light flashes rapidly in yellow to indicate a malfunction.
Vehicles with a multi-information display:
The light flashes to indicate a malfunction.
*7: 2GR-FKS engine only
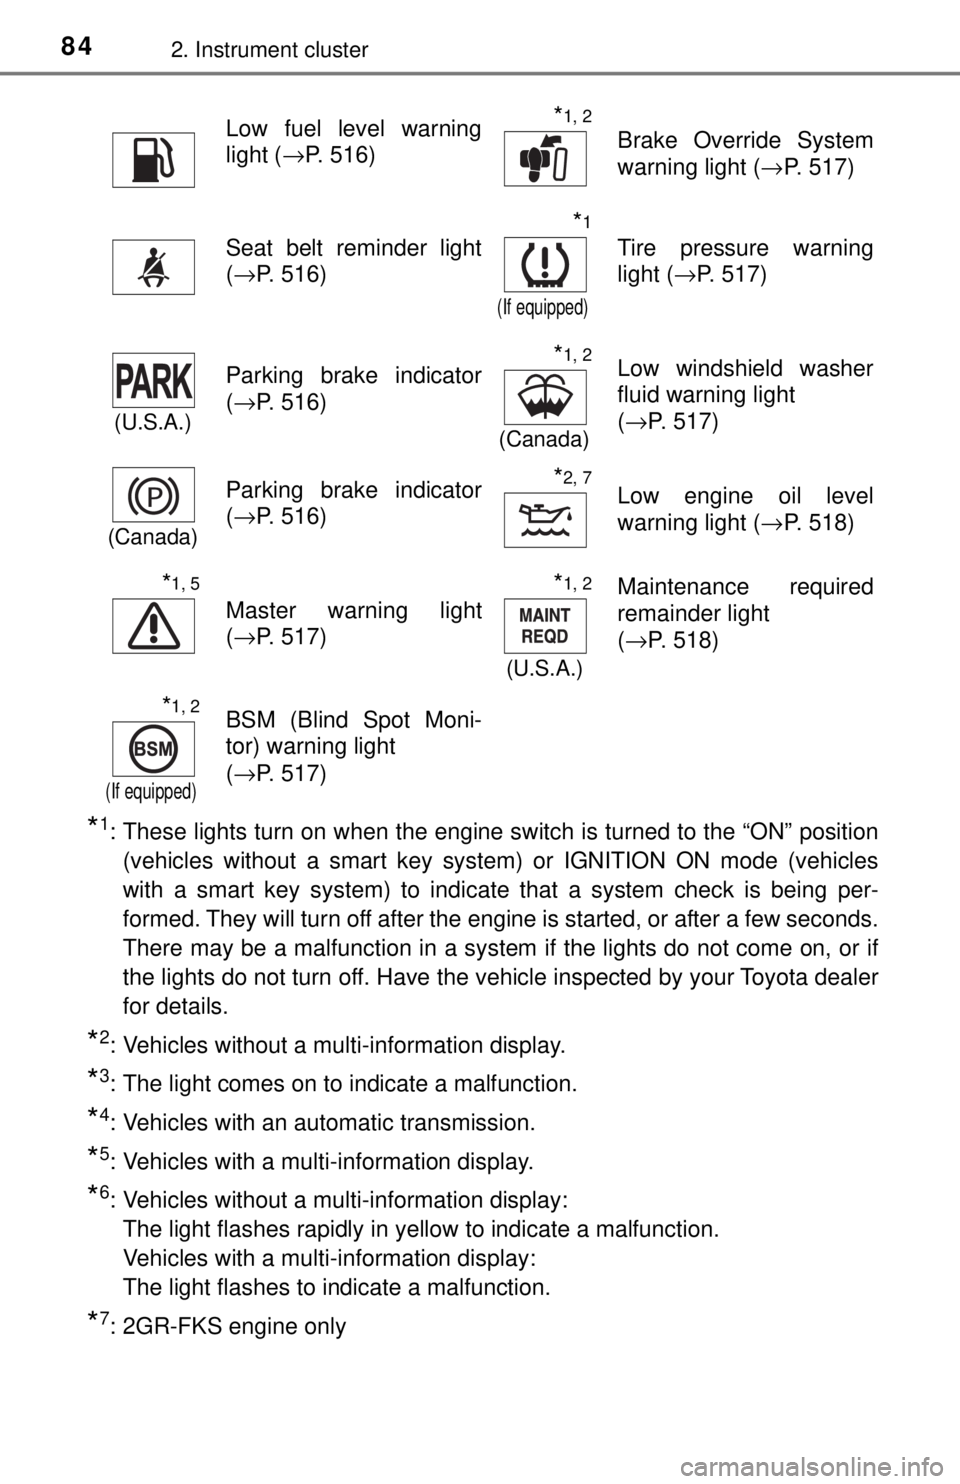
Low fuel level warning
light ( →P. 516)*1, 2
Brake Override System
warning light ( →P. 517)
Seat belt reminder light
(→P. 516)
*1
(If equipped)
Tire pressure warning
light ( →P. 517)
(U.S.A.)
Parking brake indicator
(→P. 516)*1, 2
(Canada)
Low windshield washer
fluid warning light
(→P. 517)
(Canada)
Parking brake indicator
(→P. 516)*2, 7Low engine oil level
warning light ( →P. 518)
*1, 5
Master warning light
(→P. 517)
*1, 2
(U.S.A.)
Maintenance required
remainder light
(→P. 518)
*1, 2
(If equipped)
BSM (Blind Spot Moni-
tor) warning light
(→P. 517)
Page 95 of 640

952. Instrument cluster
2
Instrument cluster
●Trip distance*1/Distance*1, 2
Displays the engine was started an d the distance since the function
was reset, respectively
● Digital speedometer
*1
●Display off*1
A blank screen is displayed
*1: Can be registered to Drive information 1 through 3.
*2: Resetting procedures:
• Select a function to be reset using the meter control switch and then press and hold the center button to reset.
• If there is more than one function that can be reset, check boxes will be
displayed next to the functions.
● Clinometer (if equipped)
Displays the longitudinal and late ral inclination of the vehicle.
● Intuitive parking assist (if equipped)
→P. 2 2 3
● Multi-terrain select (if equipped)
→P. 2 5 8
● Crawl control (if equipped)
→P. 2 6 2
● Tire inflation pressure (if equipped)
→P. 4 6 7
■Changing the settings
Select using the meter control switch.
Select an item and then set it with the center button.
Vehicle information
Settings display
1
2
Page 97 of 640

972. Instrument cluster
2
Instrument cluster
■Setting display automatic cancelation
In the following situations, a setting display in which the settings can\
be
changed through the meter control switches will automatically be turned off.
●When a warning message appears while the setting display is displayed
● When the vehicle begins to move while the setting display is displayed
■ Tire inflation pressure (vehicles with tire pressure warning system)
●It may take a few minutes to display the tire inflation pressure after the
engine switch is turned to the “ON” position (vehicles without a smart key
system) or IGNITION ON mode (vehicles with a smart key system). It may
also take a few minutes to display the tire inflation pressure after inflation
pressure has been adjusted.
● “---” may be displayed if the tire position information cannot be determined
due to unfavorable radio wave conditions.
● Tire inflation pressure changes with temperature. The displayed values may
also be different from the values measured using a tire pressure gauge.
■ Liquid crystal display
→P. 9 1
WARNING
■The information display at low temperatures
→ P. 9 2
■ Cautions during setting up the display
As the engine needs to be running during setting up the display, ensure that
the vehicle is parked in a place with adequate ventilation. In a closed area
such as a garage, exhaust gases including harmful carbon monoxide (CO)
may collect and enter the vehicle. This may lead to death or a serious
health hazard.
NOTICE
■During setting up the display
To prevent battery discharge, ensure that the engine is running while setting
up the display features.
Page 236 of 640

2364-5. Using the driving support systems
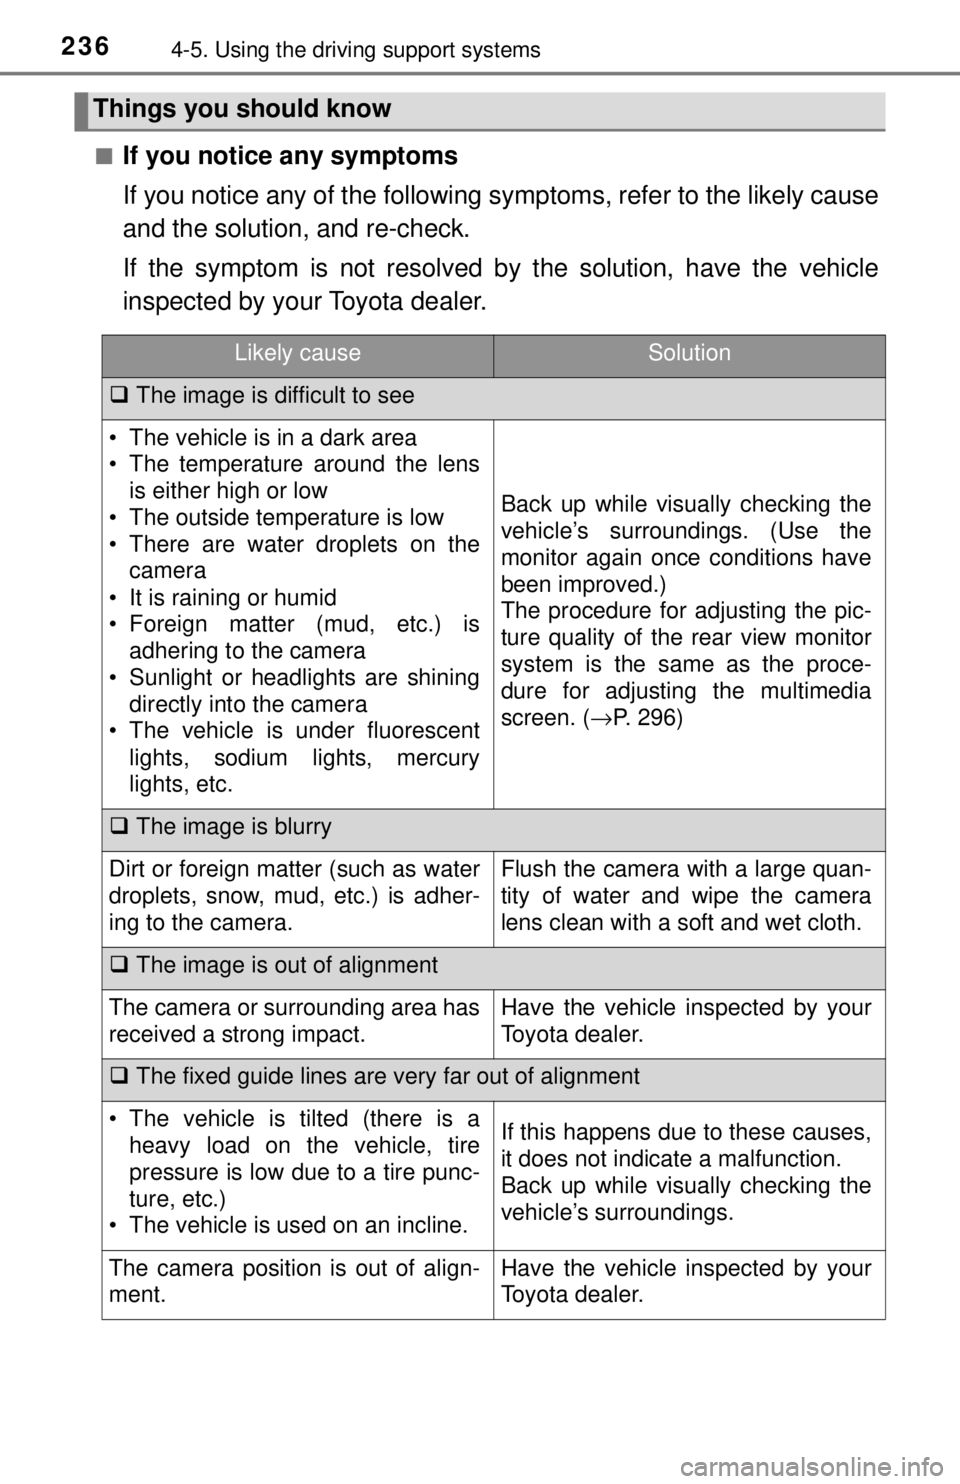
■If you notice any symptoms
If you notice any of the following symptoms, refer to the likely cause
and the solution, and re-check.
If the symptom is not resolved by the solution, have the vehicle
inspected by your Toyota dealer.
Things you should know
Likely causeSolution
The image is difficult to see
• The vehicle is in a dark area
• The temperature around the lens
is either high or low
• The outside temperature is low
• There are water droplets on the camera
• It is raining or humid
• Foreign matter (mud, etc.) is adhering to the camera
• Sunlight or headlights are shining directly into the camera
• The vehicle is under fluorescent
lights, sodium lights, mercury
lights, etc.
Back up while visually checking the
vehicle’s surroundings. (Use the
monitor again once conditions have
been improved.)
The procedure for adjusting the pic-
ture quality of the rear view monitor
system is the same as the proce-
dure for adjusting the multimedia
screen. ( →P. 296)
The image is blurry
Dirt or foreign matter (such as water
droplets, snow, mud, etc.) is adher-
ing to the camera.Flush the camera with a large quan-
tity of water and wipe the camera
lens clean with a soft and wet cloth.
The image is out of alignment
The camera or surrounding area has
received a strong impact.Have the vehicle inspected by your
Toyota dealer.
The fixed guide lines are very far out of alignment
• The vehicle is tilted (there is a
heavy load on the vehicle, tire
pressure is low due to a tire punc-
ture, etc.)
• The vehicle is used on an incline.If this happens due to these causes,
it does not indicate a malfunction.
Back up while visually checking the
vehicle’s surroundings.
The camera position is out of align-
ment.Have the vehicle inspected by your
Toyota dealer.
Page 272 of 640

2724-5. Using the driving support systems
WARNING
■Replacing tires
Make sure that all tires are of the specified size, brand, tread pattern and
total load capacity. In addition, make sure that the tires are inflated to the
recommended tire inflation pressure level.
The ABS, Multi Terrain ABS, TRAC, VSC and Trailer Sway Control systems
will not function correctly if different tires are installed on the vehicle.
Contact your Toyota dealer for further information when replacing tires or
wheels.
■ Handling of tires and the suspension
Using tires with any kind of problem or modifying the suspension will affect
the driving assist systems, and may cause a system to malfunction.
■ Trailer Sway Control precaution
The Trailer Sway Control system is not able to reduce trailer sway in all situ-
ations. Depending on many factors such as the conditions of the vehicle,
trailer, road surface, and driving environment, the Trailer Sway Control sys-
tem may not be effective. Refer to your trailer owner’s manual for informa-
tion on how to tow your trailer properly.
■ If trailer sway occurs
Observe the following precautions.
Failure to do so may cause death or serious injury.
● Firmly grip the steering wheel. Steer straight ahead.
Do not try to control trailer swaying by turning the steering wheel.
● Begin releasing the accelerator pedal immediately but very gradually to
reduce speed.
Do not increase speed. Do not apply vehicle brakes.
If you make no extreme correction with the steering or brakes, your vehicle
and trailer should stabilize. ( →P. 186)