Page 310 of 640
3105-6. Using an external device
■About iPod
●“Made for iPod” and “Made for iPhone” mean that an electronic accessory
has been designed to connect specifically to iPod or iPhone respectively,
and has been certified by the developer to meet Apple performance stan-
dards.
● Apple is not responsible for the operation of this device or its compliance
with safety and regulatory standards. Please note that the use of this acces-
sory with iPod and iPhone may affect wireless performance.
● iPhone, iPod, iPod classic, iPod nano, and iPod touch are trademarks of
Apple Inc., registered in the U.S. and other countries. Lightning is a trade-
mark of Apple Inc.
■ iPod cover art
●Depending on the iPod and songs in the iPod, iPod cover art may be dis-
played.
● This function can be changed to on/off. ( →P. 295)
● It may take time to display iPod cover art, and the iPod may not be operated
while the cover art display is in process.
● Only iPod cover art that is saved in JPEG format can be displayed.
■ iPod functions
●When an iPod is connected and the audio source is changed to iPod mode,
the iPod will resume play from the same point in which it was last used.
● Depending on the iPod that is connected to the system, certain functions
may not be available. If a function is unavailable due to a malfunction (as
opposed to a system specification), disconnecting the device and recon-
necting it may resolve the problem.
● While connected to the system, the iPod cannot be operated with its own
controls. It is necessary to use the controls of the vehicle’s multimedia sys-
tem instead.
● When the battery level of an iPod is very low, the iPod may not operate. If
so, charge the iPod before use.
● Compatible models ( →P. 312)
Page 318 of 640
3185-7. Connecting Bluetooth®
Preparations to use wireless communica-
tion
■About Bluetooth®
■Certifications fo r the Bluetooth®
For vehicles sold in U.S.A.
FCC ID: ACJ932YEAP01A727
NOTE:
This device complies with part 15 of the FCC Rules. Operation is subject to
the following two conditions: (1) This device may not cause harmful interfer-
ence, and (2) this device must accept any interference received, including
interference that may cause undesired operation.
FCC WARNING:
Changes or modifications not expressly approved by the party responsible for
compliance could void the user’ authority to operate the equipment.
CAUTION:
Radio frequency radiation exposure information:
This equipment complies with FCC radiation exposure limits set forth for an
uncontrolled environment.
This equipment should be installed and operated with minimum distance of
7.9 in. (20 cm) between the radiator and your body. This transmitter must not
be co-located or operating in conjunction with any other antenna or transmit-
ter.
The following can be performed using Bluetooth® wireless com-
munication:
■A portable audio player can be operated and listened to via
multimedia system
■Hands-free phone calls can be made via a cellular phone
In order to use wireless communication, register and connect a
Bluetooth
® device by performing the following procedures.
The Bluetooth® word mark and logos are
registered trademarks owned Bluetooth
SIG, Inc. and any use of such marks by
Panasonic Corporation is under license.
Other trademarks and trade names are
those of their respective owners.
Page 327 of 640
3275-7. Connecting Bluetooth®
5
Multimedia
Select “OK” when the connection status changes from “Connect-
ing...” to “Connected”.
If an error message is displayed, follow the guidance on the screen to try
again.
Registration can be performed from screens other than the
“Bluetooth
* Setup” screen.
■When registering from the “Bluetooth* Audio” screen
Display the “Bluetooth
* Audio” screen. ( →P. 298)
Select “Select Device”.
Follow the steps in “How to register a Bluetooth
® device” from
step ( →P. 326)
*: Bluetooth is a registered trademark of Bluetooth SIG, Inc.
Display the “Bluetooth* Setup” screen. ( →P. 323)
Select “Remove”.
Select the desired device.
A confirmation message will be displa yed, select “Yes” to delete the
device.
Check that a confirmation screen is displayed when the operation is
complete.
*: Bluetooth is a registered trademark of Bluetooth SIG, Inc.
Deleting a Bluetooth® device
6
1
2
3
2
1
2
3
4
5
Page 330 of 640
3305-7. Connecting Bluetooth®
Displaying a Bluetooth® device details
Display the “Bluetooth* Setup” screen. (→P. 323)
Select the device.
Select “Device Info”.
The following screen is dis-
played: Device Name
Change connection method
Bluetooth
® Address
Display your telephone num-
ber
The number may not be dis-
played depending on the model
of phone.
Compatibility profile of the device
Restore default settings
*: Bluetooth is a registered trademark of Bluetooth SIG, Inc.
Select “Connect Audio Player from”.
Select “Vehicle ” or “Device”.
“Vehicle”: Connect the multimedia system to the portable audio player.
“Device”: Connect the portable audio player to the multimedia system.
You can confirm and change the registered device details.
Bluetooth® device registration status
1
2
3
4
1
2
3
4
5
6
Changing connection method
1
2
Page 331 of 640
3315-7. Connecting Bluetooth®
5
Multimedia
Detailed Bluetooth® system settings
Display the “Bluetooth* Setup” screen. (→P. 323)
Select “System Settings”.
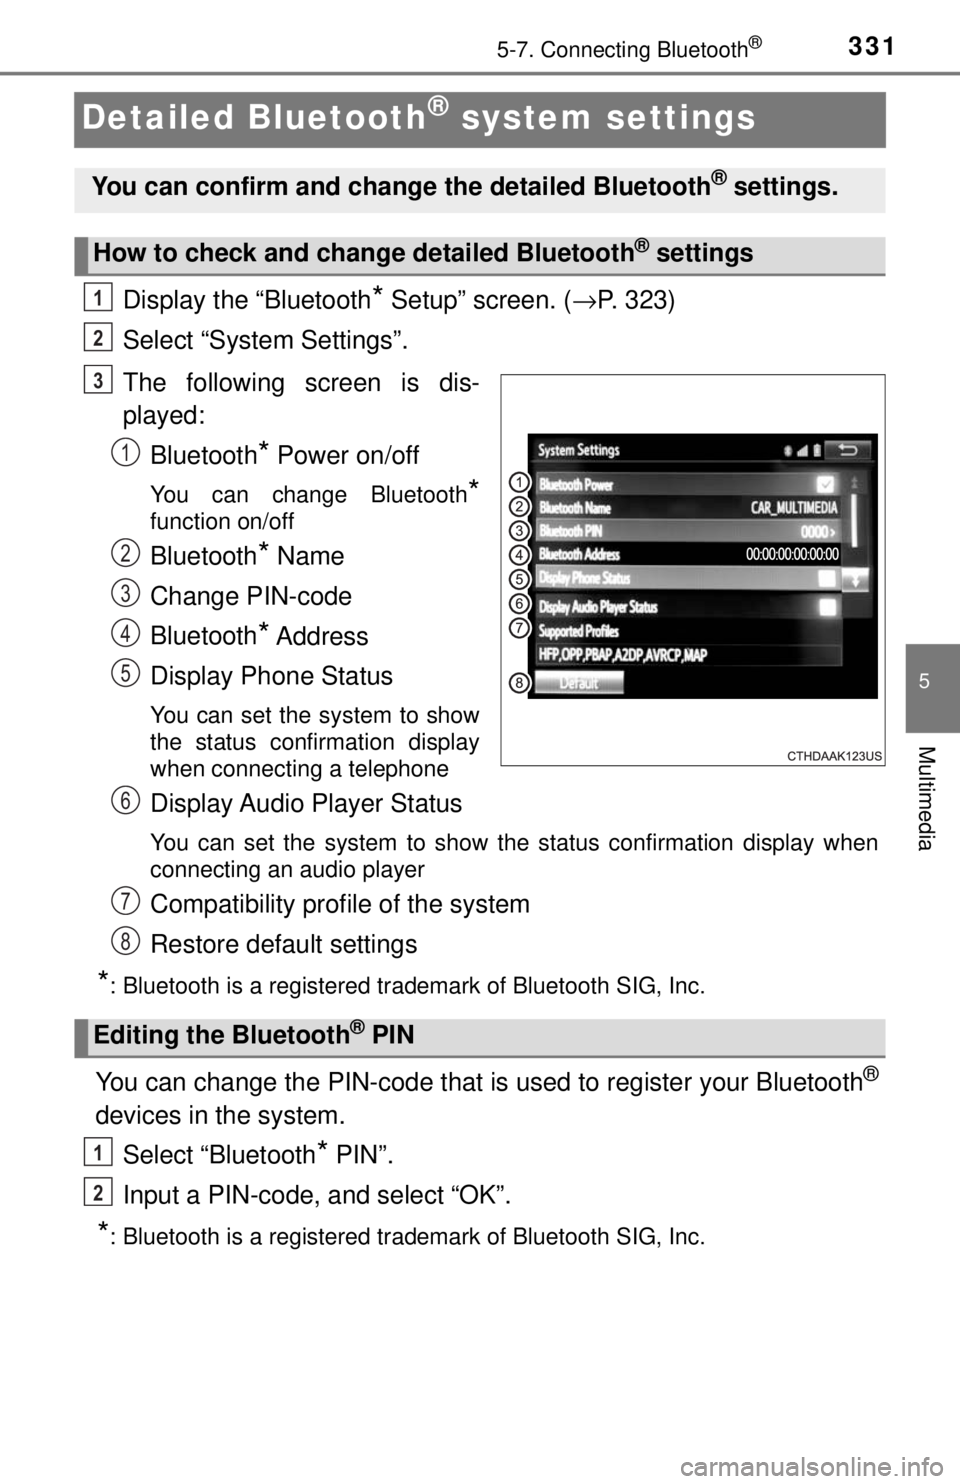
The following screen is dis-
played: Bluetooth
* Power on/off
You can change Bluetooth*
function on/off
Bluetooth* Name
Change PIN-code
Bluetooth
* Address
Display Phone Status
You can set the system to show
the status confirmation display
when connecting a telephone
Display Audio Player Status
You can set the system to show the status confirmation display when
connecting an audio player
Compatibility profile of the system
Restore default settings
*: Bluetooth is a registered trademark of Bluetooth SIG, Inc.
You can change the PIN-code that is used to register your Bluetooth®
devices in the system.
Select “Bluetooth
* PIN”.
Input a PIN-code, and select “OK”.
*: Bluetooth is a registered trademark of Bluetooth SIG, Inc.
You can confirm and change the detailed Bluetooth® settings.
How to check and change detailed Bluetooth® settings
1
2
3
1
2
3
4
5
Editing the Bluetooth® PIN
6
7
8
1
2
Page 349 of 640
3495-9. Bluetooth® phone
5
Multimedia
Contact/Call History Settings
The contacts can be transferred from a Bluetooth® phone to the sys-
tem. Contacts can also be added, edited and deleted.
The call history can be deleted and contacts and favorites can be
changed.
Display the “Phone/Message Settings” screen. ( →P. 347)
Select “Contact/Call History Settings”.
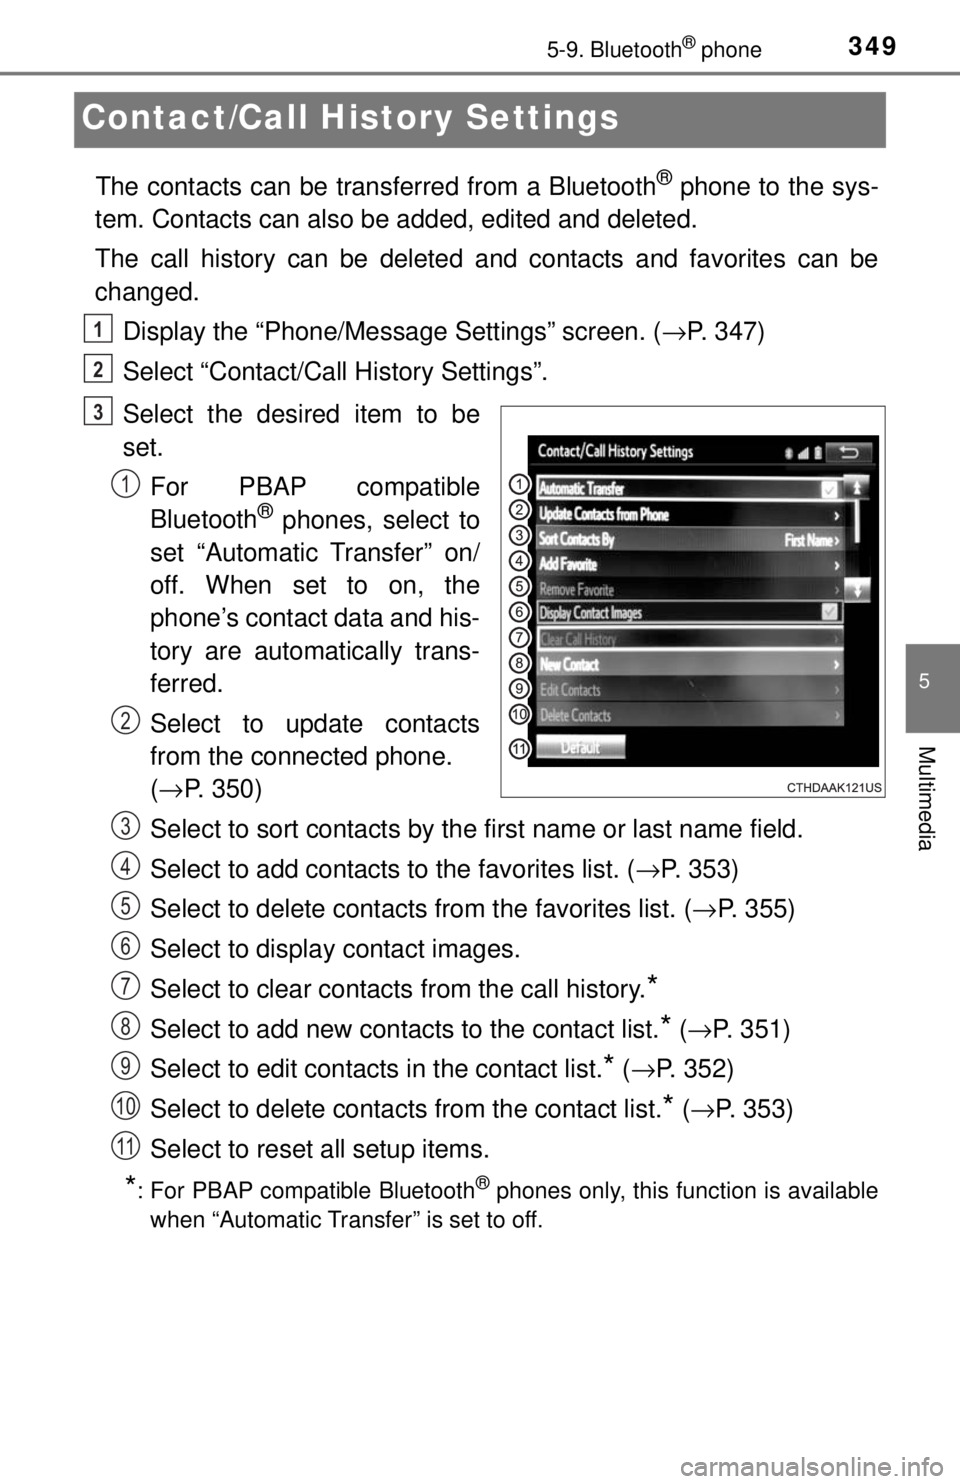
Select the desired item to be
set. For PBAP compatible
Bluetooth
® phones, select to
set “Automatic Transfer” on/
off. When set to on, the
phone’s contact data and his-
tory are automatically trans-
ferred.
Select to update contacts
from the connected phone.
( → P. 350)
Select to sort contacts by the first name or last name field.
Select to add contacts to the favorites list. ( →P. 353)
Select to delete contacts from the favorites list. ( →P. 355)
Select to display contact images.
Select to clear contacts from the call history.
*
Select to add new contacts to the contact list.* ( → P. 351)
Select to edit contacts in the contact list.
* (→ P. 352)
Select to delete contacts from the contact list.
* ( → P. 353)
Select to reset all setup items.
*: For PBAP compatible Bluetooth® phones only, this function is available
when “Automatic Transfer” is set to off.
1
2
3
1
2
3
4
5
6
7
8
9
10
11
Page 355 of 640
3555-9. Bluetooth® phone
5
Multimedia
■Deleting the contacts in the favorites listSelect “Remove Favorite”.
Select the desired contac ts and select “Remove”.
Select “Yes” when the confirmation screen appears.
Check that a confirmation scr een is displayed when the opera-
tion is complete.
Deleting contacts in the favorites list in a different way (from the
“Contacts” screen)
Display the phone screen. (→ P. 333)
Select the “Contacts” tab.
Select at the beginning of the contact list name to be deleted
from the favorites list.
When selected, is changed to , and the data is deleted from the
list.
Deleting contacts in the favorites list in a different way (from the
“Contact Details” screen)
Display the phone screen. (→ P. 333)
Select the “Contacts”, “Call Histor y” tab or the “Favorites” tab and
select the desired contact to delete.
Select “Remove Favorite”.
Select “Yes” when the confirmation screen appears.
Check that a confirmation scr een is displayed when the opera-
tion is complete.
1
2
3
4
1
2
3
1
2
3
4
5
Page 357 of 640
3575-9. Bluetooth® phone
5
Multimedia
■Displaying the “Messaging Settings” screen in a different wayDisplay the phone screen. (→ P. 333)
Select .
Select “Settings”.
Display the “Phone/Message Settings” screen. ( →P. 347)
Select “Phone Display Settings”.
Select the desired item to be
set. Change the incoming call
display.
“Full Screen”: When a call is
received, the hands-free screen
is displayed and can be oper-
ated on the screen.
“Drop-Down”: A message is displayed on the upper side of the screen.
Set display of the contact/history transfer completion message
on/off.
Phone Display Settings
1
2
3
1
2
3
1
2