Page 25 of 672

251-1. For safe use
SIENNA_OM_OM08007U_(U)
1
For safety and security
WARNING
Observe the following precautions.
Failure to do so may cause the driver’s floor mat to slip, possibly interfering
with the pedals while driving. An unexpectedly high speed may result or it may
become difficult to stop the vehicle. This could lead to an accident, resulting in
death or serious injury.
■When installing the driver’s floor mat
●Do not use floor mats designed for other models or different model year
vehicles, even if they are Toyota Genuine floor mats.
● Only use floor mats designed for the driver’s seat.
● Always install the floor mat securely using the retaining hooks (clips) pro-
vided.
● Do not use two or more floor mats on top of each other.
● Do not place the floor mat bottom-side up or upside-down.
■ Before driving
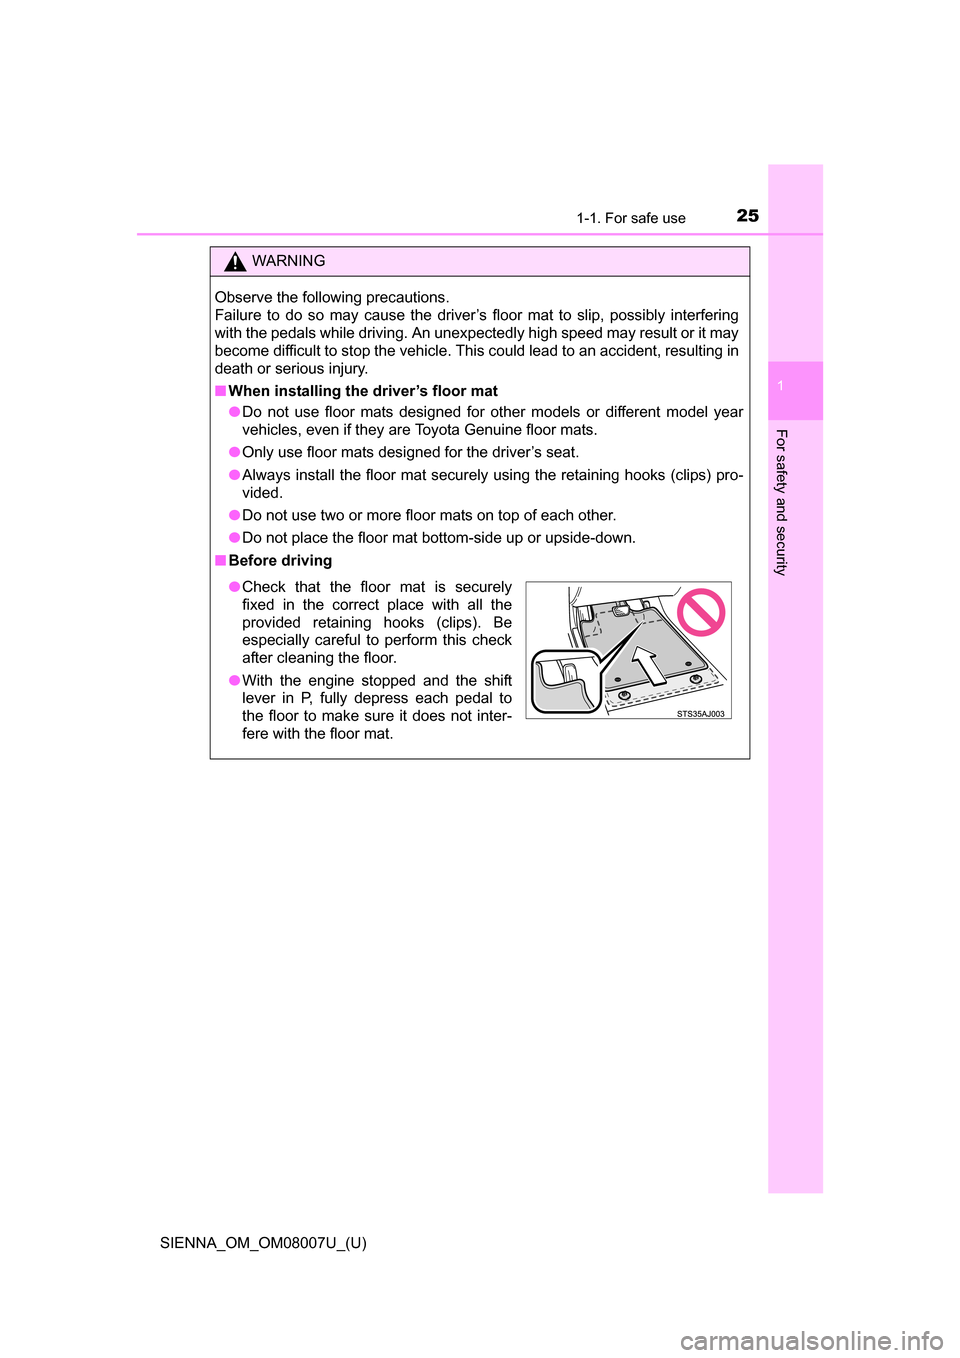
●Check that the floor mat is securely
fixed in the correct place with all the
provided retaining hooks (clips). Be
especially careful to perform this check
after cleaning the floor.
● With the engine stopped and the shift
lever in P, fully depress each pedal to
the floor to make sure it does not inter-
fere with the floor mat.
Page 60 of 672
601-1. For safe use
SIENNA_OM_OM08007U_(U)
Installing child restraints
Child restraint LATCH anchors
Second seats (8-passenger models)
LATCH anchors are provided for
second outside seats. (Buttons dis-
playing the location of the anchors
are attached to the seats.)
Second seats (7-passenger models)
LATCH anchors are provided for
both second seats. (Buttons dis-
playing the location of the anchors
are attached to the seats.)
Follow the child restraint system manufacturer’s instructions.
Firmly secure child restraints to the rear seats using the LATCH
anchors or a seat belt. Attach the top tether strap when installing
a child restraint.
The lap/shoulder belt can be used if your child restraint system
is not compatible with the LATCH (Lower Anchors and Tethers
for Children) system.
Page 61 of 672
611-1. For safe use
SIENNA_OM_OM08007U_(U)
1
For safety and security
Third seats
LATCH anchors are provided for
the right outboard seat and center
seat. (Buttons displaying the loca-
tion of the anchors are attached to
the seats.)
Seat belts equipped with a child
restraint locking mechanism
(ALR/ELR belts except driver’s
seat belt) ( P. 32)
Anchor brackets (for top tether strap)
Second seats (8-passenger models)
Anchor brackets are provided for
second outside seats.
Page 62 of 672
621-1. For safe use
SIENNA_OM_OM08007U_(U)
Second seats (7-passenger models)
Anchor brackets are provided for
both second seats.
Third seats
An anchor brackets are provided
for the right outboard seat and cen-
ter seat.
Fold the seatback while pulling
the lever and move to the rear-
most recline position.
Widen the gap between the seat cu shion and seatback slightly.
Installation with LATCH system (second seat)
1
2
Page 72 of 672

721-1. For safe use
SIENNA_OM_OM08007U_(U)
WARNING
■When installing a child restraint system
●When installing a child restraint system on the third center seat, adjust
both seatbacks at the same angle. Otherwise, the child restraint system
cannot be securely restrained and this may cause death or serious injuries
in the event of sudden braking, sudden swerving or an accident.
● When using the LATCH anchors for a child restraint system, move the seat
as far back as possible (second seat only), with the seatback close to the
child restraint system.
● When a booster seat is installed, always ensure that the shoulder belt is
positioned across the center of the child’s shoulder. The belt should be
kept away from the child’s neck, but not so that it could fall off the child’s
shoulder. Failing to do so may result in death or serious injury in the event
of sudden braking, sudden swerving or an accident.
● Ensure that the belt and plate are securely locked and the seat belt is not
twisted.
● Shake the child restraint system left and right, and forward and backward
to ensure that it has been securely installed.
● After securing a child restraint system, never adjust the seat.
● Follow all installation instructions provided by the child restraint system
manufacturer.
● When securing some types of child restraint systems in second (8-passen-
ger models) or third row seats, it may not be possible to properly use the
seat belts in positions next to the child restraint without interfering with it or
affecting seat belt effectiveness. Be sure your seat belt fits snugly across
your shoulder and low on your hips. if it dose not, or if it interferes with the
child restraint, move to a different position. Failure to do so may result in
death or serious injury.
Page 77 of 672

771-2. Theft deterrent system
SIENNA_OM_OM08007U_(U)
1
For safety and security
Alar m
The alarm uses light and sound to give an alert when an intrusion is
detected.
The alarm is triggered in the following situations when the alarm is
set:
●A locked door is unlocked or opened in any way other than using
the entry function (vehicles with a smart key system) or wireless
remote control. (The doors will lock again automatically.)
● The hood is opened.
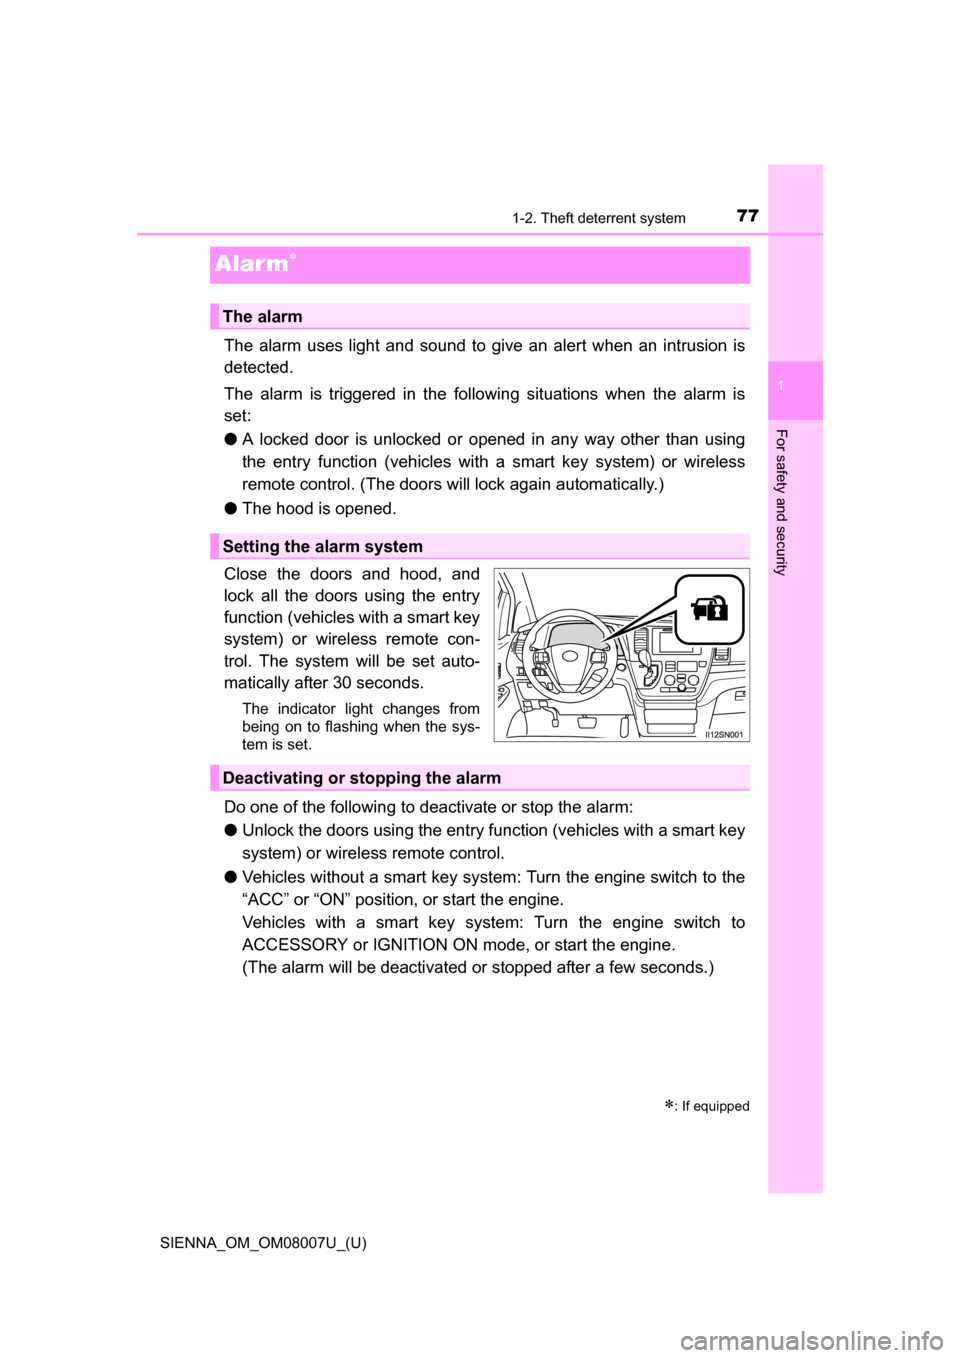
Close the doors and hood, and
lock all the doors using the entry
function (vehicles with a smart key
system) or wireless remote con-
trol. The system will be set auto-
matically after 30 seconds.
The indicator light changes from
being on to flashing when the sys-
tem is set.
Do one of the following to deactivate or stop the alarm:
● Unlock the doors using the entry function (vehicles with a smart key
system) or wireless remote control.
● Vehicles without a smart key system : Turn the engine switch to the
“ACC” or “ON” position, or start the engine.
Vehicles with a smart key system: Turn the engine switch to
ACCESSORY or IGNITION ON mode, or start the engine.
(The alarm will be deactivated or stopped after a few seconds.)
: If equipped
The alarm
Setting the alarm system
Deactivating or stopping the alarm
Page 84 of 672

84
SIENNA_OM_OM08007U_(U)
2. Instrument cluster
*1: These lights turn on when the engine switch is turned to the “ON” position(vehicles without a smart key system) or the engine switch is turned to the
IGNITION ON mode (vehicles with a smart key system) to indicate that a
system check is being performed. They will turn off after the engine is
started, or after a few seconds. There may be a malfunction in a system if
a light does not come on, or if the lights do not turn off. Have the vehicle
inspected by your Toyota dealer.
*2: If equipped
*3: The light flashes to indicate a malfunction.
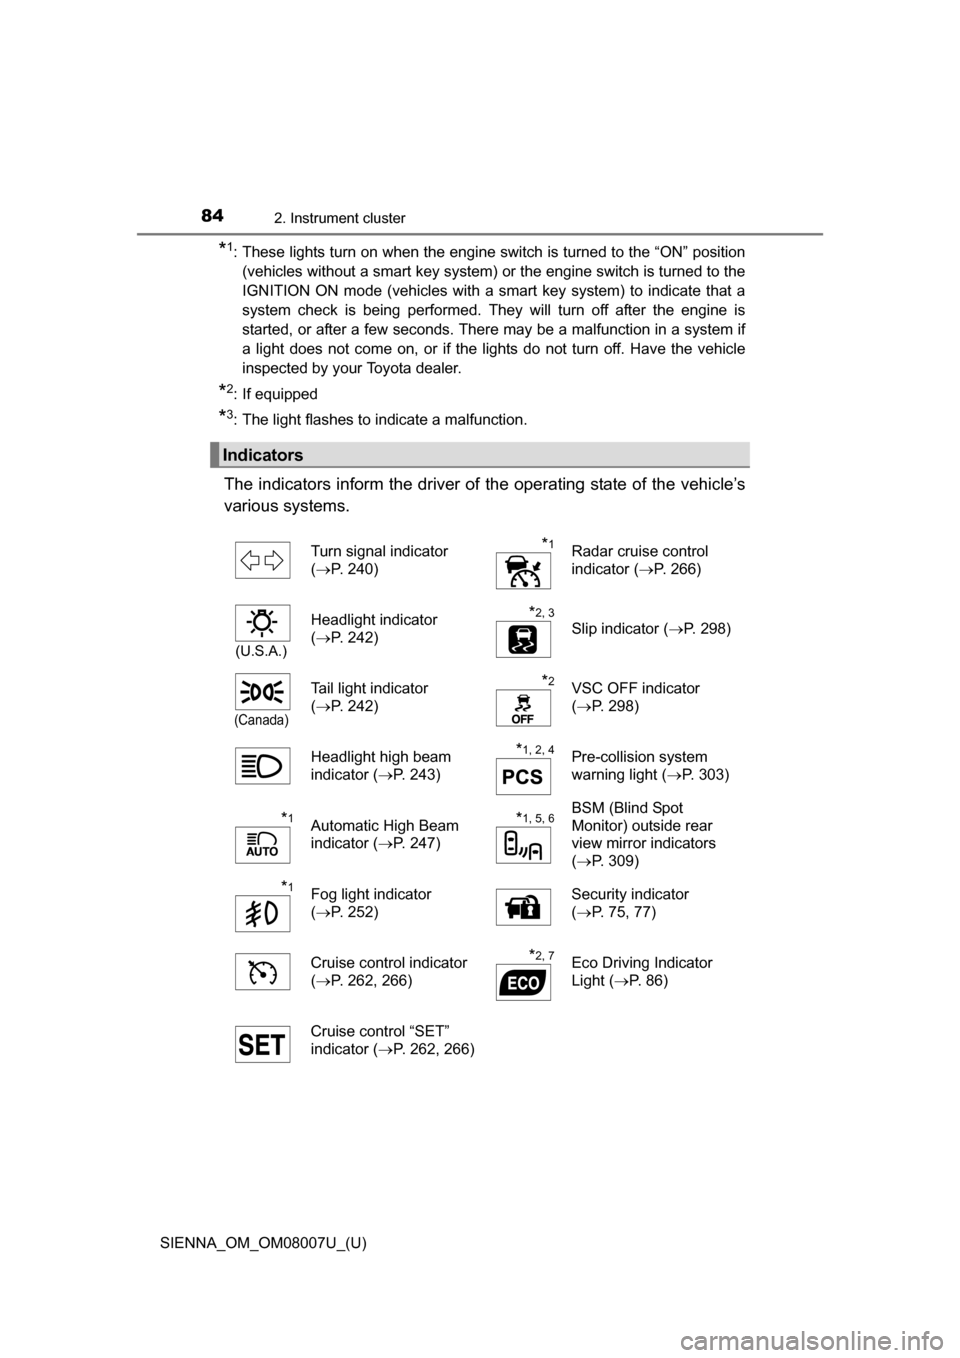
The indicators inform the driver of the operating state of the vehicle’s
various systems.
Indicators
Turn signal indicator
( P. 240)*1Radar cruise control
indicator ( P. 266)
(U.S.A.)
Headlight indicator
(P. 242)*2, 3
Slip indicator ( P. 298)
(Canada)
Tail light indicator
(P. 242)*2VSC OFF indicator
(P. 298)
Headlight high beam
indicator ( P. 243)
*1, 2, 4Pre-collision system
warning light ( P. 303)
*1Automatic High Beam
indicator (P. 247)*1, 5, 6BSM (Blind Spot
Monitor) outside rear
view mirror indicators
(P. 309)
*1Fog light indicator
(P. 252) Security indicator
(
P. 75, 77)
Cruise control indicator
( P. 262, 266)
*2, 7Eco Driving Indicator
Light ( P. 86)
Cruise control “SET”
indicator ( P. 262, 266)
Page 85 of 672

SIENNA_OM_OM08007U_(U)
852. Instrument cluster
2
Instrument cluster
*1: If equipped
*2: These lights turn on when the engine switch is turned to the “ON” position(vehicles without a smart key system) or IGNITION ON mode (vehicles
with a smart key system) to indicate that a system check is being per-
formed. They will turn off after the engine is started, or after a few seconds.
There may be a malfunction in a system if a light does not come on, or if
the lights do not turn off. Have the vehicle inspected by your Toyota dealer.
*3: The light flashes to indicate that the system is operating.
*4: The light comes on when the system is turned off. The light flashes fasterthan usual to indicate that the system is operating.
*5: In order to confirm operation, the BS M outside rear view mirror indicators
illuminate in the following situations:
• When the engine switch is turned to the “ON” position (vehicles without a smart key system) or IGNITION ON mode (vehicles with a smart key sys-
tem) while the BSM main switch is set to on.
• When the BSM main switch is set to on while the engine switch is in the “ON” position (vehicles without a smart key system) or IGNITION ON
mode (vehicles with a smart key system).
If the system is functioning correctly, the BSM outside rear view mirror indi-
cators will turn off after a few seconds.
If the BSM outside rear view mirror indicators do not illuminate or do not
turn off, there may be a malfunction in the system.
If this occurs, have the vehicle inspected by your Toyota dealer.
*6: This light illuminates on the outside rear view mirrors
*7: The light does not turn on when the system is disabled.
*8: This light illuminates on the center panel.
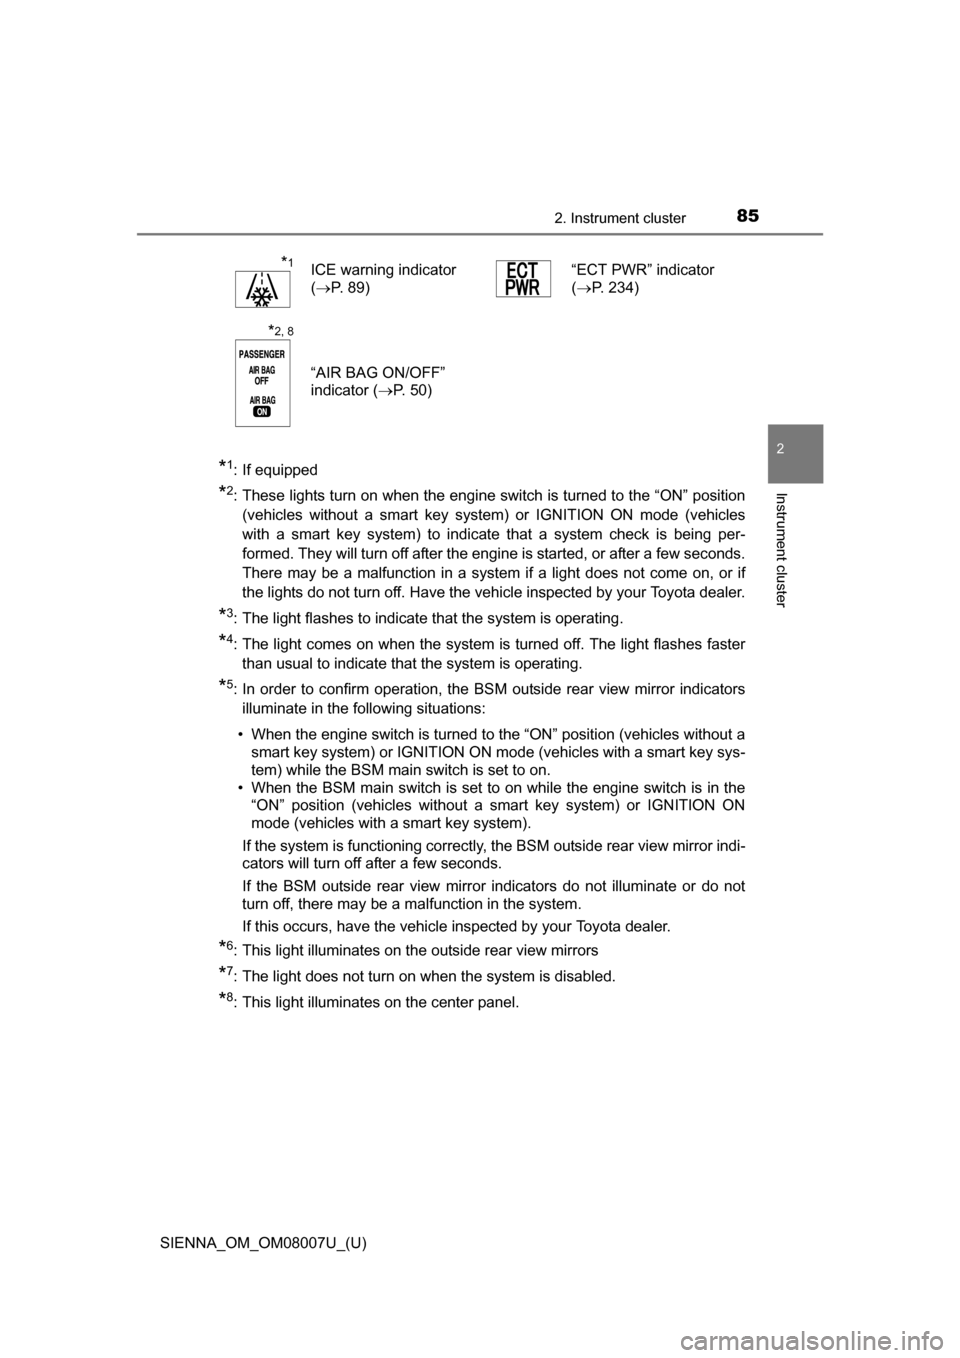
*1ICE warning indicator
( P. 89) “ECT PWR” indicator
(
P. 234)
*2, 8
“AIR BAG ON/OFF”
indicator ( P. 5 0 )