Page 454 of 672

454
SIENNA_OM_OM08007U_(U)
6-4. Using the other interior features
■Programming a Rolling Code system (for U.S.A. owners)
If your device is Rolling Code equipped, follow the steps under the
heading “Programming the HomeLink
®” before proceeding with the
steps listed below.
Locate the training button on the ceiling mounted garage door
opener motor. The exact location and color of the button may
vary by brand of garage door opener.
Refer to the operation manual supplied with the garage door opener for
the location of the training button.
Press the training button.
Following this step, you have 30 seconds in which to initiate step 3
below.
Press and hold the vehicle’s programmed HomeLink® button for
2 seconds and release it. Repeat this step once again. The
garage door may open.
If the garage door opens, the programming process is complete. If the
door does not open, press and release the button a third time. This third
press and release will complete the programming process by opening
the garage door.
The ceiling mounted garage door opener motor should now recognize
the HomeLink
® transceiver and operate the garage door.
Repeat the steps above to program another rolling code system
for any of the remaining HomeLink® buttons.
■Programming an entry gate (for U.S.A. owners)/Programming
all devices in the Canadian market
Place your transmitter 1 to 3 in. (25 to 75 mm) away from the sur-
face of the HomeLink
®.
Keep the indicator light on the HomeLink® in view while programming.
Press and hold the selected HomeLink® button.
Repeatedly press and release (cyc le) the device’s remote control
button for two seconds each until step 4 is complete.
When the indicator light on the HomeLink
® compatible trans-
ceiver starts to flashing rapidly, release the buttons.
Test the operation of the HomeLink
® by pressing the newly pro-
grammed button. Check to see if the gate/device operates cor-
rectly.
Repeat the steps above to program another device for each of
the remaining HomeLink
® buttons.
1
2
3
4
1
2
3
4
5
6
Page 493 of 672

SIENNA_OM_OM08007U_(U)
4937-3. Do-it-yourself maintenance
7
Maintenance and care
■Before recharging
When recharging, the battery produces hydrogen gas which is flammable and
explosive. Therefore, observe the following before recharging:
●If recharging with the battery installed on the vehicle, be sure to disconnect
the ground cable.
● Make sure the power switch on the charger is off when connecting and dis-
connecting the charger cables to the battery.
■ After recharging/reconnecting the ba ttery (vehicles with a smart key sys-
tem)
● Unlocking the doors using the smart key system may not be possible imme-
diately after reconnecting the battery. If this happens, use the wireless
remote control or the mechanical key to lock/unlock the doors.
● Start the engine with the engine switch in ACCESSORY mode. The engine
may not start with the engine switch turned off. However, the engine will
operate normally from the second attempt.
● The engine switch mode is recorded by the vehicle. If the battery is recon-
nected, the vehicle will return the engine switch mode to the status it was in
before the battery was disconnected. Make sure to turn off the engine
before disconnecting the battery. Take extra care when connecting the bat-
tery if the engine switch mode prior to discharge is unknown.
If the system will not start even after multiple attempts, contact your Toyota
dealer.
■ Disconnecting the batt ery (vehicles with an AUTO ACCESS SEAT)
Do not disconnect the battery while operating the AUTO ACCESS SEAT. The
AUTO ACCESS SEAT will become inoperable.
For details, refer to “AUTO ACCESS SEAT OWNER’S MANUAL”.
Page 588 of 672

588
SIENNA_OM_OM08007U_(U)
8-2. Steps to take in an emergency
If the electronic key does not operate
properly (vehicles with a smar t key system)
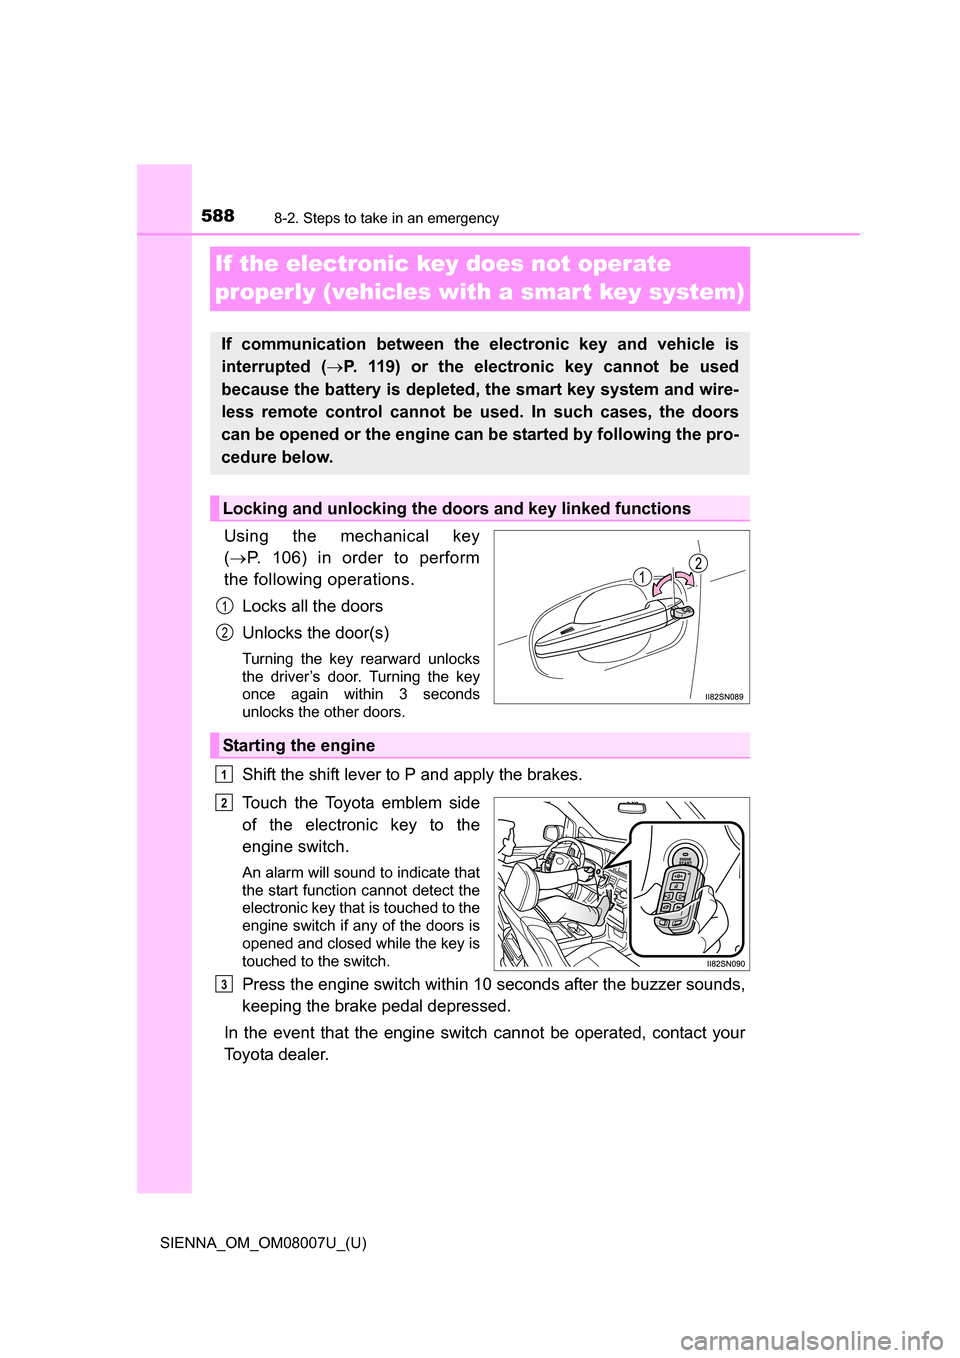
Using the mechanical key
( P. 106) in order to perform
the following operations.
Locks all the doors
Unlocks the door(s)
Turning the key rearward unlocks
the driver’s door. Turning the key
once again within 3 seconds
unlocks the other doors.
Shift the shift lever to P and apply the brakes.
Touch the Toyota emblem side
of the electronic key to the
engine switch.
An alarm will sound to indicate that
the start function cannot detect the
electronic key that is touched to the
engine switch if any of the doors is
opened and closed while the key is
touched to the switch.
Press the engine switch within 10 seconds after the buzzer sounds,
keeping the brake pedal depressed.
In the event that the engine switch cannot be operated, contact your
Toyota dealer.
If communication between the electronic key and vehicle is
interrupted ( P. 119) or the electronic key cannot be used
because the battery is depleted, the smart key system and wire-
less remote control cannot be used. In such cases, the doors
can be opened or the engine can be started by following the pro-
cedure below.
Locking and unlocking the doors and key linked functions
1
2
Starting the engine
1
2
3
Page 666 of 672

666Alphabetical index
SIENNA_OM_OM08007U_(U)
Smart key systemAntenna location ................... 143
Entry function ........ 110, 121, 133
Starting the engine................ 228
Warning message ................. 566
Snow tires ................................ 317
Spare tire Inflation pressure .................. 607
Storage location .................... 573
Spark plug ................................ 604
Specifications .......................... 600
Speedometer .............................. 88
Steering wheel Adjustment ............................ 177
Audio switches
*.................... 325
Column lock release ..... 226, 231
“DISP” switch .......................... 90
Heated steering wheel .......... 424
Meter control switches ............ 94
Talk switch
*.......................... 405
Telephone switches
*............ 384
Stop lights Replacing light bulbs..... 528, 531
Wattage ................................ 608
Storage feature ........................ 430
Storage precautions ........ 207, 430
Stuck If your vehicle becomes stuck ................................... 597
Sunshades
Rear door .............................. 450
Roof ...................................... 191
Sun visors ................................ 443
Switch
Audio remote control switches
*........................... 325
BSM (Blind Spot Monitor) switch ................................. 309
Cruise control switch............. 262 “DISP” switch .......................... 90
Door lock switch ................... 114
Driving position memory
switches ............................. 169
Emergency flashers
switch ................................. 536
Engine switch ............... 225, 228
Fog light switch ..................... 252
Garage door opener switches ............................. 452
Heated steering wheel .......... 424
Ignition switch ............... 225, 228
Intuitive parking assist switch ................................. 279
Light switches ....................... 242
Moon roof switches............... 189
Outside rear view mirror switches ............................. 181
Pre-collision braking off switch ................................. 303
Power back door................... 134
Power door lock switch ......... 114
Power window switch ... 184, 187
Rear window wiper and washer switch..................... 257
Rear window and outside rear view mirror
defoggers switch ................ 416
Seat heater switches ............ 424
“SOS” button......................... 461
Talk switch
*.......................... 405
Telephone switches
*............ 384
Tire pressure warning
reset switch ........................ 497
TRAC OFF switch................. 298
Vehicle-to-vehicle distance button ................................. 266
Window lock switch .............. 184
Wiper and washer switch ......................... 253, 257