2017 TOYOTA PRIUS PRIME Parts
[x] Cancel search: PartsPage 641 of 784

PRIUS PRIME_OM_OM47A88U_(U)
6417-3. Do-it-yourself maintenance
7
Maintenance and care
WARNING
■Replacing light bulbs
● Be sure to stop the hybrid system and turn off the lights. Do not attempt to
replace the bulb immediately after turning off the lights.
The bulbs become very hot and may cause burns.
● Do not touch the glass portion of the light bulb with bare hands. When it is
unavoidable to hold the glass portion, use and hold with a clean dry cloth
to avoid getting moisture and oils on the bulb.
Also, if the bulb is scratched or dropped, it may blow out or crack.
● Fully install light bulbs and any parts used to secure them. Failure to do so
may result in heat damage, fire, or water entering the headlight unit. This
may damage the headlights or cause condensation to build up on the lens.
● Do not attempt to repair or disassemble light bulbs, connectors, electric
circuits or component parts.
Doing so may result in death or serious injury due to electric shock.
● Do not replace the right-hand back-up light immediately after the vehicle
has been driven.
After the vehicle has been driven the exhaust pipe will be extremely hot,
and touching the exhaust pipe may result in burns.
● Use gloves and other protection to prevent injuries on vehicle parts.
There is the danger of being injured on the edges of parts.
■ To prevent damage or fire
● Make sure bulbs are fully seated and locked.
● Check the wattage of the bulb before installing to prevent heat damage.
Page 650 of 784
6508-2. Steps to take in an emergency
PRIUS PRIME_OM_OM47A88U_(U)
■While towing
If the hybrid system is off, the power assist for the brakes and steering will not
function, making steering and braking more difficult.
■ Wheel nut wrench
Wheel nut wrench is installed in luggage compartment. ( →P. 610)
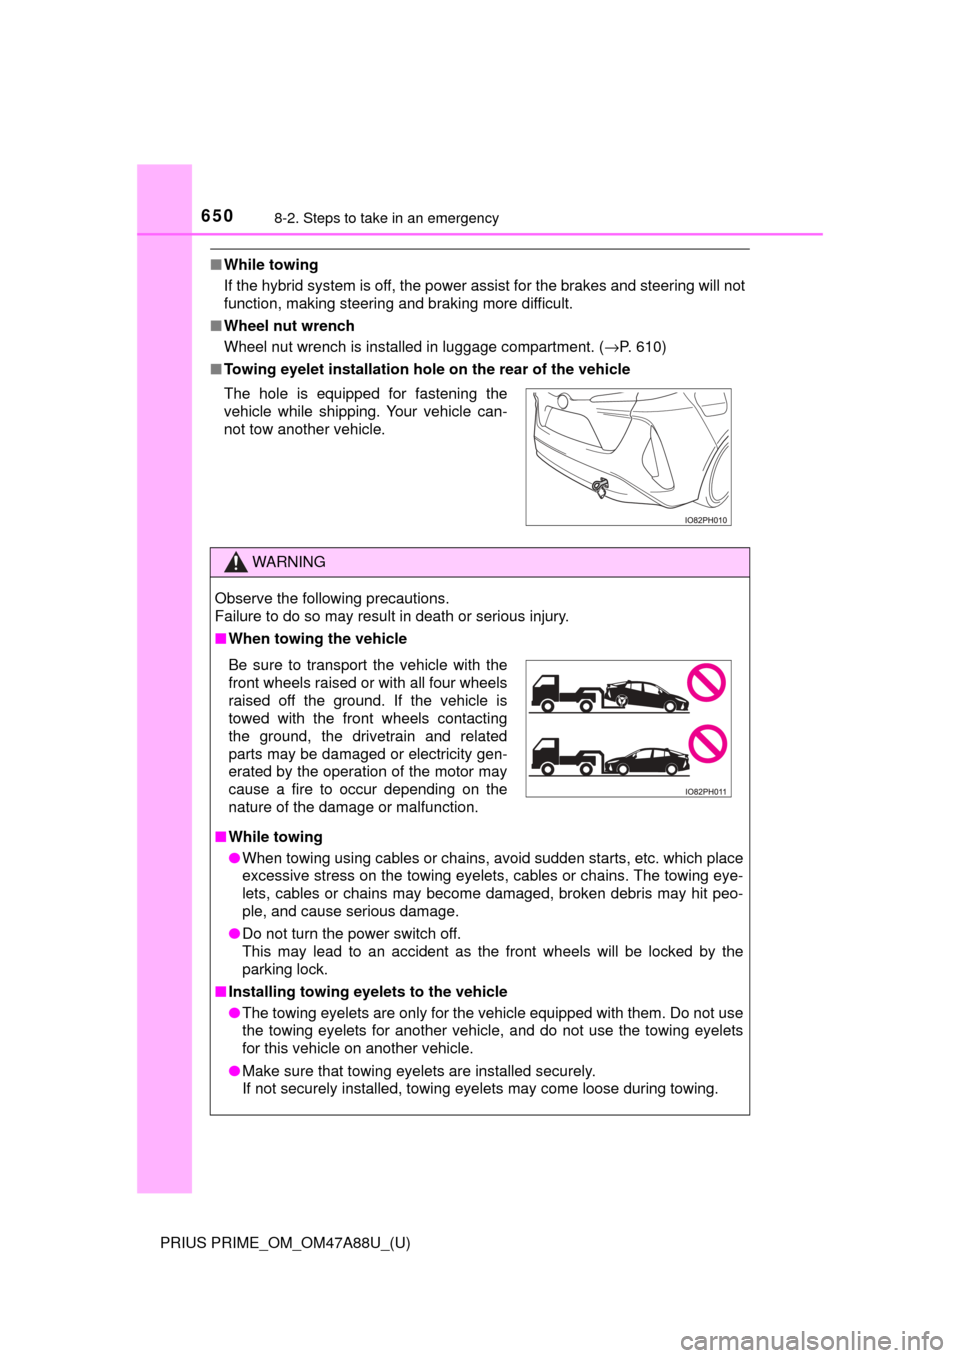
■ Towing eyelet installation hole on the rear of the vehicle
The hole is equipped for fastening the
vehicle while shipping. Your vehicle can-
not tow another vehicle.
WARNING
Observe the following precautions.
Failure to do so may result in death or serious injury.
■When towing the vehicle
■ While towing
● When towing using cables or chains, avoid sudden starts, etc. which place
excessive stress on the towing eyelets, cables or chains. The towing eye-
lets, cables or chains may become damaged, broken debris may hit peo-
ple, and cause serious damage.
● Do not turn the power switch off.
This may lead to an accident as the front wheels will be locked by the
parking lock.
■ Installing towing eyelets to the vehicle
● The towing eyelets are only for the vehicle equipped with them. Do not use
the towing eyelets for another vehicle, and do not use the towing eyelets
for this vehicle on another vehicle.
● Make sure that towing eyelets are installed securely.
If not securely installed, towing eyelets may come loose during towing.
Be sure to transport the vehicle with the
front wheels raised or with all four wheels
raised off the ground. If the vehicle is
towed with the front wheels contacting
the ground, the drivetrain and related
parts may be damaged or electricity gen-
erated by the operation of the motor may
cause a fire to occur depending on the
nature of the damage or malfunction.
Page 667 of 784
6678-2. Steps to take in an emergency
PRIUS PRIME_OM_OM47A88U_(U)
8
When trouble arises
■If “Shift System Malfunction See Owner’s Manual” is shown
Indicates a malfunction in the shift control system. Immediately have the sys-
tem inspected by your Toyota dealer.
The system may not operate properly.
■ If “Low 12-Volt Battery Apply Parking Brake Securely While Parking See
Owner’s Manual” is shown
Indicates that the 12-volt battery charge is insufficient. Charge or replace the
12-volt battery.
● When the message is shown, the hybrid system may not start or the shift
position may not be changed normally. (Coping method: →P. 669)
● After charging the 12-volt battery, the message may not go off until the shift
position is changed from P.
■ If “Shifting Unavailable Low 12-Volt Battery See Owner’s Manual” is
shown
Indicates that the shift position cannot be changed because the voltage of the
12-volt battery drops. Charge or replace the 12-volt battery.
(Coping method in the case the 12-volt battery is discharged: →P. 694)
■ If “Hybrid System Overheated. Re duced Output Power.” is shown
The message may be shown when driving under severe operating conditions.
(For example, when driving up a long steep hill or driving up a steep hill in
reverse.)
Coping method: →P. 700
■ If “Maintenance required for Traction battery cooling parts See owner’s
manual” is shown
There is a possibility that the filter may be clogged, the air intake vent may be
blocked or there may be a gap in the duct.
● When the air intake vents or filters are dirty, clean them by the procedures
on P. 562.
● When the air intake vents or filters are not dirty and the warning message is
shown, have the vehicle inspected at your Toyota dealer.
■ If “Hybrid Battery Low. Shift Ou t of to Recharge.” is shown
Message is displayed when the remaining charge for the hybrid battery (trac-
tion battery) is low.
As the hybrid battery (traction battery) can not be charged when the shift
position is in N, when stopped for long periods of time shift the shift position to
P.
■ If “Hybrid Battery Low Hybrid Syst em Stopped Shift to and Restart”
is shown
Message is displayed when the remaining charge for the hybrid battery (trac-
tion battery) is low, because vehicle has been shifted to N for a long period of
time.
When operating the vehicle, shift to P and restart the hybrid system.
Page 683 of 784
6838-2. Steps to take in an emergency
PRIUS PRIME_OM_OM47A88U_(U)
8
When trouble arises
■The valve of a tire that has been repaired
After a tire is repaired with the emergency tire puncture repair kit, the
valve should be replaced.
■After a tire is repaired with the emergency tire puncture repair kit
●The tire pressure warning valve and transmitter should be replaced.
●Even if the tire inflation pressure is at the recommended level, the tire
pressure warning light may come on/flash.
■Note for checking the emergency tire puncture repair kit
Check the sealant expiry date occasionally.
The expiry date is shown on the bottle. Do not use sealant whose expiry
date has already passed. Otherwise, repairs conducted using the emer-
gency tire puncture repair kit may not be performed properly.
■Emergency tire puncture repair kit
●The emergency tire punctu re repair kit is for filling the car tire with air.
●The sealant has a limited life span. The expiry date is marked on the
bottle. The sealant should be replaced before the expiry date. Contact
your Toyota dealer for replacement.
●The sealant stored in the emergency ti re puncture repair kit can be used
only once to temporarily repair a single tire. If the sealant in the bottle
and other parts of the kit have been used and need to be replaced, con-
tact your Toyota dealer.
●The compressor can be used repeatedly.
●The sealant can be used when the outside temperature is from -40°F
(-40°C) to 140°F (60°C).
●The kit is exclusively designed for size and type of tires originally
installed on your vehicle. Do not use it for tires that a different size than
the original ones, or for any other purposes.
●If the sealant gets on your clothes, it may stain.
●If the sealant adheres to a wheel or the surface of the vehicle body, the
stain may not be removable if it is not cleaned at once. Immediately wipe
away the sealant with a wet cloth.
●During operation of the repair kit, a loud operation noise is produced.
This does not indicate a malfunction.
●Do not use to check or to adjust the tire pressure.
Page 685 of 784
6858-2. Steps to take in an emergency
PRIUS PRIME_OM_OM47A88U_(U)
8
When trouble arises
WARNING
■When fixing the flat tire
●Stop your vehicle in a safe and flat area.
●Do not touch the wheels or the area around the brakes immediately
after the vehicle has been driven.
After the vehicle has been driven, the wheels and the area around the
brakes may be extremely hot. Touching these areas with hands, feet or
other body parts may result in burns.
●Connect the valve and hose securely with the tire installed on the vehi-
cle. If the hose is not properly co nnected to the valve, air leakage may
occur as sealant may be sprayed out.
●If the hose comes off the valve while inflating the tire, there is a risk
that the hose will move abru ptly due to air pressure.
●After inflation of the tire has comp leted, the sealant may splatter when
the hose is disconnected or some air is let out of the tire.
●Follow the operation procedure to repair the tire. If the procedures not
followed, the sealant may spray out.
●Keep back from the tire while it is being repaired, as there is a chance
of it bursting while the repair op eration is being performed. If you
notice any cracks or deformation of the tire, turn off the compressor
switch and stop the repair operation immediately.
●The repair kit may overheat if operated for a long period of time. Do not
operate the repair kit continuously for more than 40 minutes.
●Parts of the repair kit become hot during operation. Be careful handling
the repair kit during and after operation. Do not touch the metal part
connecting the bottle and the compressor. It will be extremely hot.
●Do not attach the vehicle speed warning sticker to an area other than
the one indicated. If the sticker is attached to an area where an SRS
airbag is located, such as the pad of the steering wheel, it may prevent
the SRS airbag from operating properly.
Page 686 of 784

6868-2. Steps to take in an emergency
PRIUS PRIME_OM_OM47A88U_(U)
WARNING
■Driving to spread the liquid sealant evenly
Observe the following precautions to reduce the risk of accidents.
Failing to do so may result in a loss of vehicle control and cause death
or serious injury.
●Drive the vehicle carefully at a low speed. Be especially careful when
turning and cornering.
●If the vehicle does not drive strai ght or you feel a pull through the
steering wheel, stop the vehicle and check the following.
• Tire condition. The tire may have separated from the wheel.
• Tire inflation pressure. If the tire inflation pressure is 19 psi (130 kPa, 1.3 kgf/cm
2 or bar) or less, the tire may be severely dam-
aged.
NOTICE
■When performing an emergency repair
●A tire should only be repaired with the emergency tire puncture repair
kit if the damage is caused by a sharp object such as nail or screw
passing through the tire tread.
Do not remove the sharp object from the tire. Removing the object may
widen the opening and disenable emergency repair with the repair kit.
●The repair kit is not waterproof. Ma ke sure that the repair kit is not
exposed to water, such as when it is being used in the rain.
●Do not put the repair kit directly onto dusty ground such as sand at the
side of the road. If the repair kit vacuums up dust etc., a malfunction
may occur.
■Precautions for the emergency tire puncture repair kit
●The repair kit power source should be 12 V DC suitable for vehicle
use. Do not connect the repair kit to any other source.
●If fuel splatters on the repair kit, the repa ir kit may deteriorate. Take
care not to allow fuel to contact it.
●Place the repair kit in a storage to prevent it from being exposed to dirt
or water.
●Store the repair kit in the luggage compartment out of reach of chil-
dren.
●Do not disassemble or modify the repair kit. Do not subject parts such
as the air pressure indicator to im pacts. This may cause a malfunction.
Page 693 of 784
6938-2. Steps to take in an emergency
PRIUS PRIME_OM_OM47A88U_(U)
8
When trouble arises
■Stopping the hybrid system
Set the parking brake, shift the shift position to P and press the power switch
as you normally do when stopping the hybrid system.
■ Replacing the key battery
As the above procedure is a temporary measure, it is recommended that the
electronic key battery be replaced immediately when the battery is depleted.
(→P. 627)
■ Changing power switch modes
Release the brake pedal and press the power switch in step above. The
hybrid system does not start and modes will be changed each time the switch
is pressed. ( →P. 326)
■ When the electronic key does not work properly
●Make sure that the smart key system has not been deactivated in the cus-
tomization setting. If it is off, turn the function on.
(Customizable features: →P. 732)
● Check if battery-saving mode is set. If it is set, cancel the function.
(→P. 280)
WARNING
■ When using the mechanical key and operating the power windows
Operate the power window after checking to make sure that there is no pos-\
sibility of any passenger having any of their body parts caught in the win-
dow.
Also, do not allow children to operate the mechanical key. It is possible for
children and other passengers to get caught in the power window.
3
Page 695 of 784

6958-2. Steps to take in an emergency
PRIUS PRIME_OM_OM47A88U_(U)
8
When trouble arises
Connect the jumper cables according to the following procedure:Connect a positive jumper cable clamp to the positive (+) battery
terminal on your vehicle.
Connect the clamp on the other e nd of the positive cable to the
positive (+) battery terminal on the second vehicle.
Connect a negative cable clamp to the negative (-) battery termi-
nal on the second vehicle.
Connect the clamp at the other end of the negative cable to a
solid, stationary, unpainted metallic point away from the 12-volt
battery and an y moving parts, as s hown in the illustration.
Start the engine of the second v ehicle. Increase the engine speed
slightly and maintain at that level for approximately 5 minutes to
recharge the 12-volt battery of your vehicle.
Maintain the engine speed of t he second vehicle and start the
hybrid system of your vehicle by turning the power switch to ON
mode.
Make sure the “READY” indicator comes on. If the indicator light
does not come on, contact your Toyota dealer.3
1
2
3
4
4
5
6