Page 143 of 784
PRIUS PRIME_OM_OM47A88U_(U)
1432-2. Charging
2
Plug-in hybrid system
WARNING
■When charging
Observe the following precautions.
Failure to do so may cause an unexpected accident, resulting in death or\
serious injury.
● Connect to a power source suitable for charging. ( →P. 122)
● Check that the charging inlet, charging cable, plug and outlet are free of
foreign matter.
● Only use outlets where the plug can be securely inserted.
● Do not charge if the charging cable is coiled or bundled.
● Wrapping 120 V charging cable while in-use is not recommended because
cable may overheat. Failure to rewrap charging cable when not in-use
could result in strangulation or tripping hazard.
● Do not wash the vehicle while the charging cable is connected to the vehi-
cle and when the charging lid is open.
● Do not touch the terminals of the charging connector and charging inlet
with a sharp metal objects (needles etc.) or hands, or short them with for-
eign objects.
● When charging outdoors, make sure to connect to a weatherproof outlet
for outdoor use.
● Do not insert the plug if the outlet is submerged in water or snow.
● Follow these points when charging while it is raining or snowing.
• Check that no snow, water or ice has accumulated around the charging
connector terminals and the vehicle charging inlet. Tap snow, water or
ice gently from connector prior to inserting charging connector into the
vehicle’s charging inlet.
• Do not connect the plug if your hands are wet. Also, do not get the plug or outlet wet.
● Do not charge the vehicle during a lightning storm.
● Do not let the wheels on the charging cable, plug, charging connector and
CCID (Charging Circuit Interrupting Device).
● Firmly insert the plug into the outlet.
● Do not use an extension cord and converting adaptor.
Page 147 of 784
147
PRIUS PRIME_OM_OM47A88U_(U)
2-2. Charging
2
Plug-in hybrid system
Using the charging timer function
When registering the charge schedul e, the following settings can be
changed.
■Select the charging mode
One of the two following charging modes can be selected.
*: There might be a slight error in the timing when charging starts due to the state of the hybrid battery (traction battery).
■
Repeated setting
The periodic timer charging can be set by selecting your desired
day of the week.
■Air conditioning-linked setting (“Climate Prep”)
When the charging mode is set to “D eparture”, the vehicle air condi-
tioning system ( →P. 488, 498) can be set to automatically operate*
according to the set time.
By adjusting the cabin temperature in advance, passengers can enjoy a
pleasant interior immediately after entering the vehicle.
*: Operation starts approximately 10 minutes before the set departure time.
Charging can be carried out at the desired time by registering
the charge schedule. Also, it is possible to set the timer to one’s
preferences, such as having charging complete by a certain
departure time or be carried out at the same time on certain
days.
Settings of the charging timer function
Charging modeOperation description
“Start”Starts charging at the set time and finishes charging
when fully charged.
*
“Departure”
Starts charging to finish at the set time.
When this setting is selected, the air conditioning-
linked function can be used.
Page 153 of 784

PRIUS PRIME_OM_OM47A88U_(U)
1532-2. Charging
2
Plug-in hybrid system
Press or of the
meter control switches to
select the desired day to acti-
vate for the repeated setting,
and then press .
Each time is pressed, the
repeated setting switches
between on and off.
When set to on, the selected day is highlighted and the charging timer i\
s
repeated on that day. It is possible to set more than one day to on.
If no days are set to on, charging is only carried out once according to
the timer for the next 24 hours.
After changing the settings to the desired settings, press to return to
the previous screen.
When the charging mode is
set to “Departure”, set the
“Climate Prep” (→P. 147) to
on or off.
To turn the function on and oper-
ate the air conditioning, press
or of the meter control
switches to select “Climate
Prep”, and then press .
Each time is pressed, the function switches between on and off.
After setting operations are
complete, press .
A screen where the settings can
be saved will display.
Press or of the meter
control switches to select “Yes”,
and then press to save the
settings.
If you wish to change the settings, select “No” and perform the se\
tting
procedure from step again.
After setting operations are complete, when the charging cable is con-
nected to the vehicle, charging will be carried out according to the
charging timer settings.
7
8
9
3
Page 162 of 784
162
PRIUS PRIME_OM_OM47A88U_(U)
2-2. Charging
“ON”/“OFF” button
The charge schedule switches between “ON” and “OFF” each time this
button is pressed. (→P. 164)
Scroll bar
When the number of registered charge schedules exceeds 3, the dis-
played contents can be changed by operating the button.
Main content displayed on the calendar:
*1: A row with a red line indicates the current time.
*2: While a registered setting is being changed, the icon of the related setting
is highlighted (except when the icon overlaps with another icon).
*3: When “Charge Now” ( →P. 165) is set to on, the orange icon moves to the
position of the red line and changes to display “Charge Now”.
*4: The content of the charge schedule that corresponds to the “Next Charging
Event” is not displayed in the list.
■
Registering the charge schedule Display the “Charge Schedule” screen. ( →P. 160)
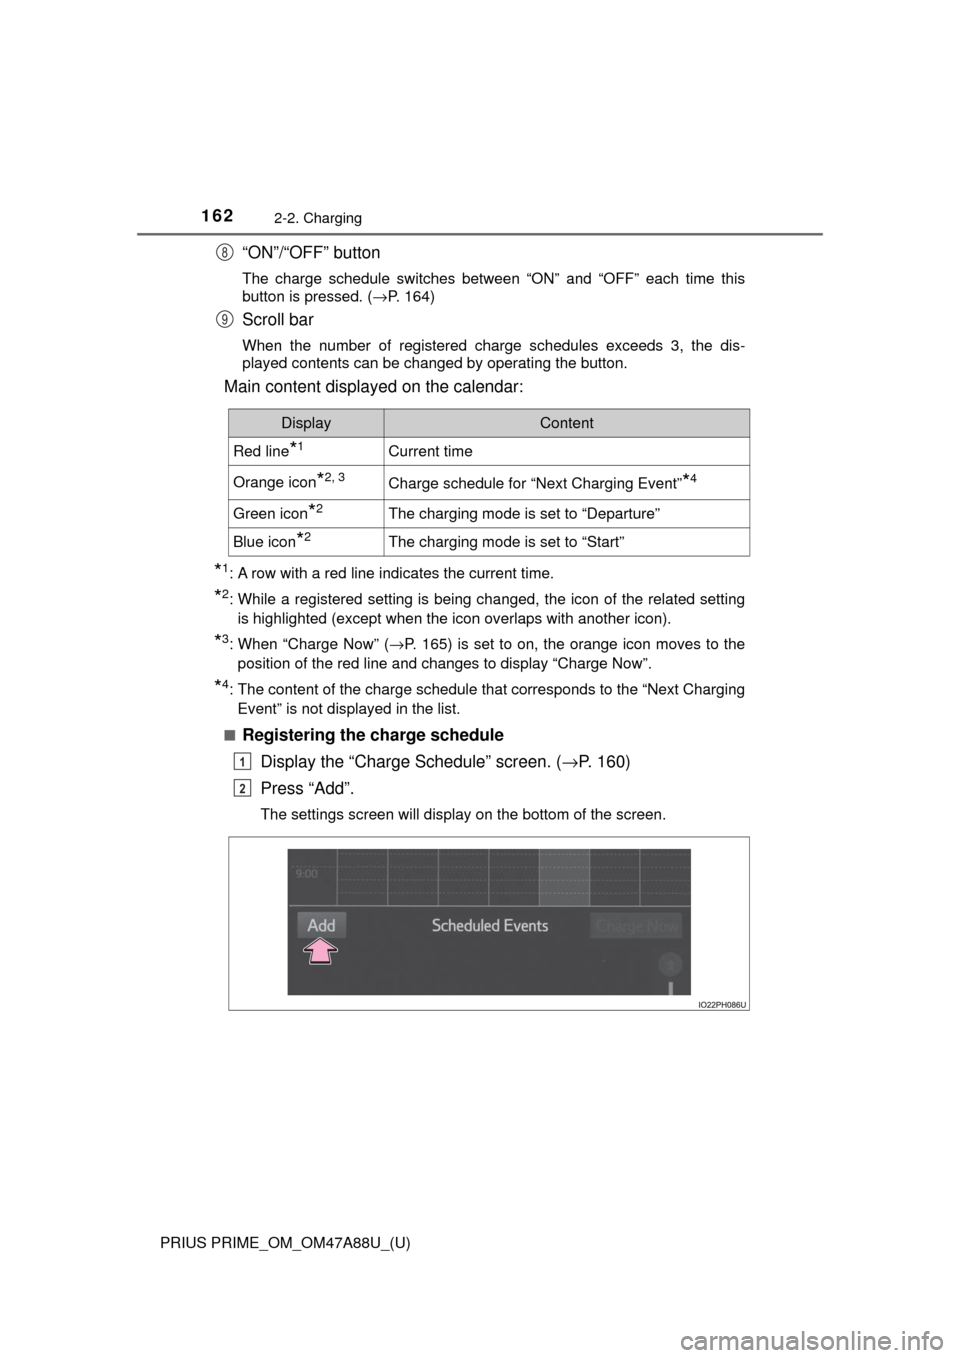
Press “Add”.
The settings screen will display on the bottom of the screen.
8
9
DisplayContent
Red line*1Current time
Orange icon*2, 3Charge schedule for “Next Charging Event”*4
Green icon*2The charging mode is set to “Departure”
Blue icon*2The charging mode is set to “Start”
1
2
Page 163 of 784

PRIUS PRIME_OM_OM47A88U_(U)
1632-2. Charging
2
Plug-in hybrid system
Select the charging mode.
Press “Start” or “Departure” to turn the button (charging mode) on and
highlight the button.
Operate the time setting wheel to set the start (or departure)
time.
When the charging mode is “Start”, set the charging start time (start
time). When it is “Departure”, set the charging end time (departure
time).
Operate the each wheel up and down to display the desired time in the
center.
When activating the repeated settings, press the desired day but-
ton.
Each time the button is pressed, the repeated setting for the selected
day switches between on and off.
When turned on, the button is highlighted and the charging timer is
repeated on that day. It is possible to turn more than one day on.
If no buttons are turned on, charging is only carried out once according
to the timer for the next 24 hours.
When the charging mode is set to “Departure”, set the “Climate
Prep” (→ P. 147) to on or off.
To operate the air conditioning, press the “Climate Prep” button to set
the function to “ON”.
Each time the button is pressed, the function switches between “ON”
and “OFF”.
After setting operations are complete, press “Save”.
The charge schedule is added to the list and an icon is added to the cal-
endar.
To cancel registration of the timer settings, press .
After setting operations are complete, when the power switch is turned
off and the charging cable is connected to the vehicle, charging is car-
ried out according to the charging timer settings.
3
4
5
6
7
Page 167 of 784
PRIUS PRIME_OM_OM47A88U_(U)
1672-2. Charging
2
Plug-in hybrid system
■Changing “Next Charging Event”*
*
: When “Charge Now” is turned on etc., the registered “Next Charging Event” cannot be changed.
Display the “Charge Schedule” screen. ( →P. 160)
“Next Charging Event” is displayed on the “Charge Schedule” screen
with an orange icon.
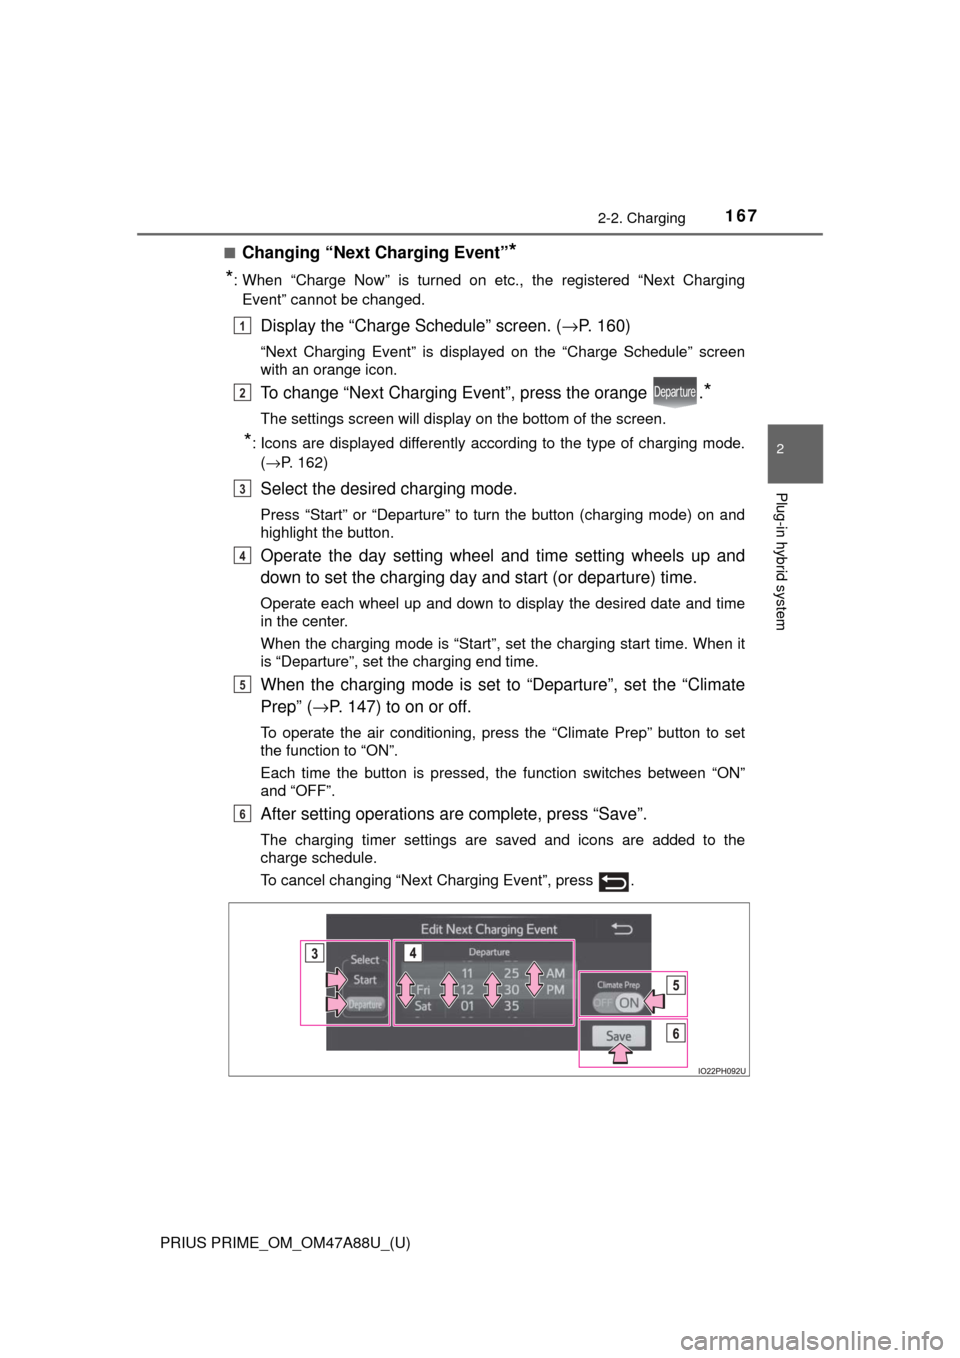
To change “Next Charging Event”, press the orange .*
The settings screen will display on the bottom of the screen.
*: Icons are displayed differently according to the type of charging mode.
(→P. 162)
Select the desired charging mode.
Press “Start” or “Departure” to turn the button (charging mode) on and
highlight the button.
Operate the day setting wheel and time setting wheels up and
down to set the charging day and start (or departure) time.
Operate each wheel up and down to display the desired date and time
in the center.
When the charging mode is “Start”, set the charging start time. When it
is “Departure”, set the charging end time.
When the charging mode is set to “Departure”, set the “Climate
Prep” (→ P. 147) to on or off.
To operate the air conditioning, press the “Climate Prep” button to set
the function to “ON”.
Each time the button is pressed, the function switches between “ON”
and “OFF”.
After setting operations are complete, press “Save”.
The charging timer settings are saved and icons are added to the
charge schedule.
To cancel changing “Next Charging Event”, press .
1
2
3
4
5
6
Page 178 of 784
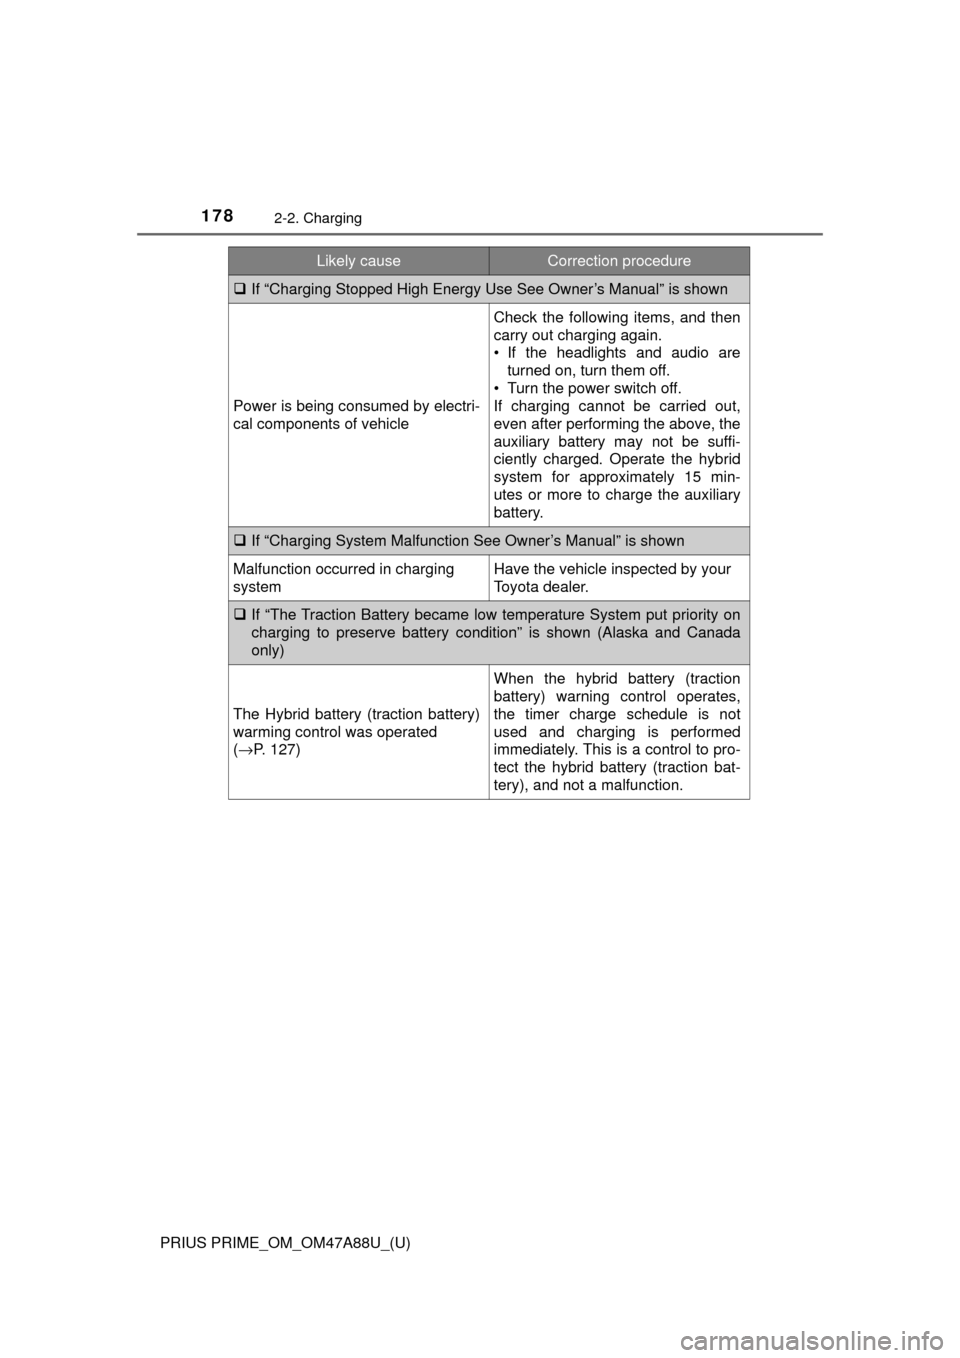
178
PRIUS PRIME_OM_OM47A88U_(U)
2-2. Charging
If “Charging Stopped High Energy Use See Owner’s Manual” is shown
Power is being consumed by electri-
cal components of vehicle
Check the following items, and then
carry out charging again.
• If the headlights and audio are
turned on, turn them off.
• Turn the power switch off.
If charging cannot be carried out,
even after performing the above, the
auxiliary battery may not be suffi-
ciently charged. Operate the hybrid
system for approximately 15 min-
utes or more to charge the auxiliary
battery.
If “Charging System Malfunction See Owner’s Manual” is shown
Malfunction occurred in charging
systemHave the vehicle inspected by your
Toyota dealer.
If “The Traction Battery became low temperature System put priority on
charging to preserve battery c ondition” is shown (Alaska and Canada
only)
The Hybrid battery (traction battery)
warming control was operated
( → P. 127)
When the hybrid battery (traction
battery) warning control operates,
the timer charge schedule is not
used and charging is performed
immediately. This is a control to pro-
tect the hybrid battery (traction bat-
tery), and not a malfunction.
Likely causeCorrection procedure
Page 179 of 784
179
PRIUS PRIME_OM_OM47A88U_(U)
Instrument cluster3
3. Instrument clusterCombination meter............ 180
Warning lights and indicators ........................ 188
Main display ...................... 196
Multi-information display ... 205
Head-up display ................ 238
Energy monitor/ consumption screen/
detail screen (vehicles
with 7-inch display) ......... 246
Energy monitor/ consumption screen/
detail screen (vehicles
with 11.6-inch display) .... 252