Page 375 of 608
LC200_OM_OM60P24U_(U)
3755-1. Using the air conditioning system and defogger
5
Interior features
■Changing the air flow mode
Press .
The air flow mode switches
each time the button is pressed.
Air flows to the upper body
Air flows to the upper body
and feet
Air flows to the feet
Air flows to the feet and the
windshield defogger oper-
ates
Select the air flow mode
* (left-
hand side)
Air flows to the feet and the
windshield defogger operates
Select the air flow mode
* (right-
hand side)
Display the option control
screen ( →P. 376)
Adjust the fan speed setting
Display the rear air conditioning control screen ( →P. 378)
To adjust or select settings , touch the screen button.
*: ⎯Air flows to the upper body
⎯ Air flows to the upper body and feet
⎯ Air flows to the feet
1
2
3
4
Control screen
1
2
3
4
5
6
Page 376 of 608
3765-1. Using the air conditioning system and defogger
LC200_OM_OM60P24U_(U)
Select to set cooling and dehu-
midification function on/off
Adjust the temperature for
driver, front passenger and rear
seats separately (Individual
mode) (→P. 377)
Prevent ice from building up on
the windshield and wiper
blades (if equipped) ( →P. 380)
Remove pollen from the air (M icro dust and pollen filter) (→P. 380)
■Using the automatic mode
Press .
Adjust the temperature setting.
To stop the operation, press .
■
Automatic mode indicator
If the fan speed setting or air fl ow modes are operated, the auto-
matic mode indicator goes off. However, automatic mode for func-
tions other than that operated is maintained.
Option control screen
1
2
3
Air conditioning controls
4
1
2
Page 377 of 608
LC200_OM_OM60P24U_(U)
3775-1. Using the air conditioning system and defogger
5
Interior features
To turn on the individual mode, perform any of the following proce-
dures:
●Press “4-ZONE” on the op tion control screen.
● Adjust the passenger’s side temperature setting.
● Change the rear air conditioning setting
The indicator comes on when the individual mode is on.
To return to the simultaneous mode, press “4-ZONE”.
In the simultaneous mode, only or on the driver’s side can
be used to adjust the temperature for all seats.
Adjusting the temperature for driver and passenger seats sepa-
rately (Individual mode)
Page 378 of 608

3785-1. Using the air conditioning system and defogger
LC200_OM_OM60P24U_(U)
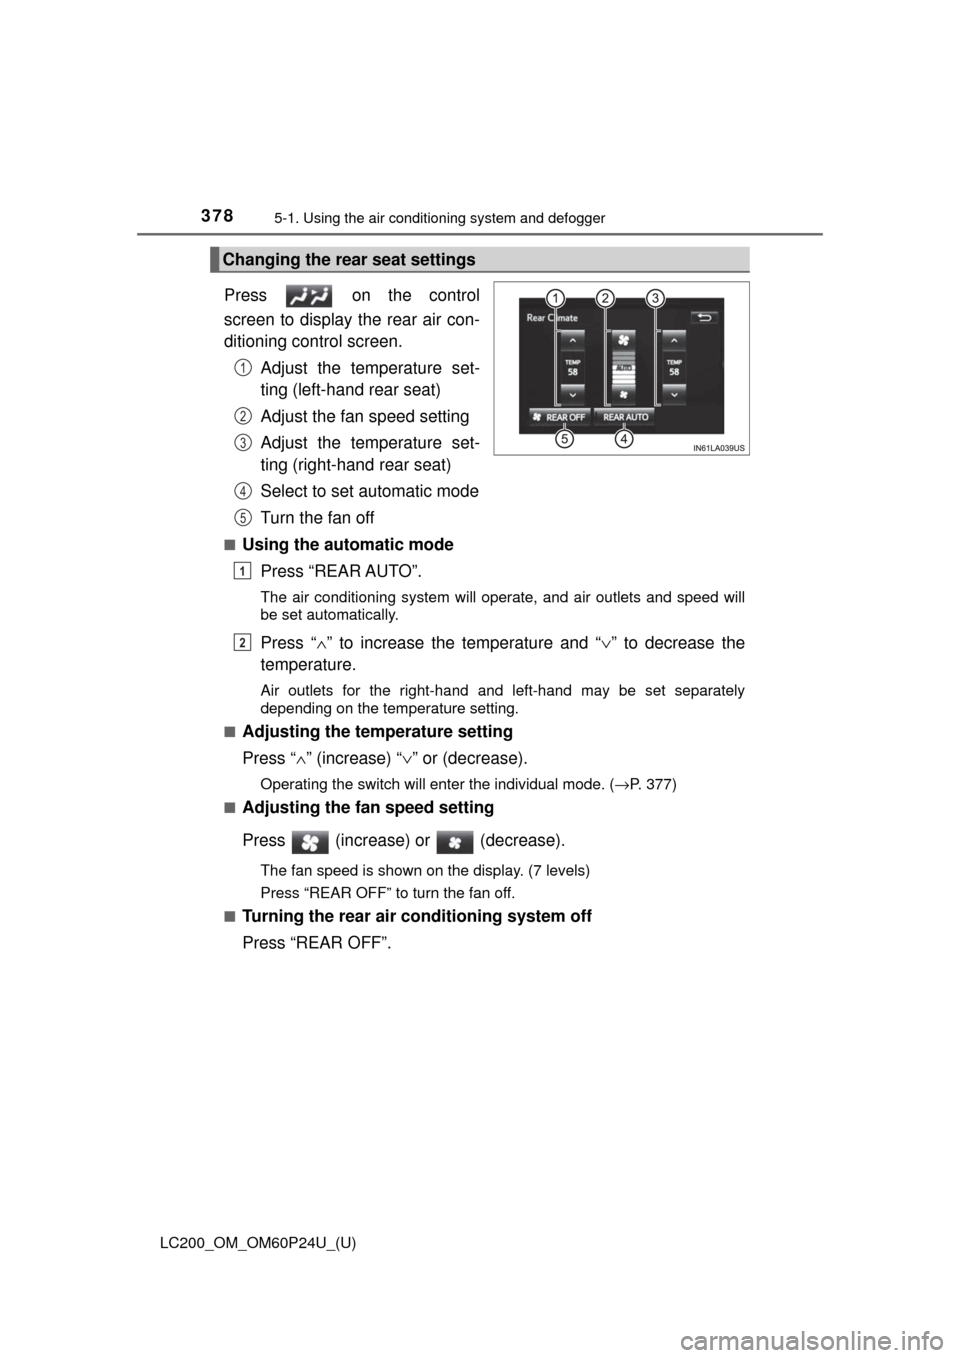
Press on the control
screen to display the rear air con-
ditioning control screen.
Adjust the temperature set-
ting (left-hand rear seat)
Adjust the fan speed setting
Adjust the temperature set-
ting (right-hand rear seat)
Select to set automatic mode
Turn the fan off
■Using the automatic modePress “REAR AUTO”.
The air conditioning system will operate, and air outlets and speed will\
be set automatically.
Press “ ∧” to increase the temperature and “ ∨” to decrease the
temperature.
Air outlets for the right-hand and left-hand may be set separately
depending on the temperature setting.
■
Adjusting the temperature setting
Press “ ∧” (increase) “ ∨” or (decrease).
Operating the switch will enter the individual mode. ( →P. 377)
■
Adjusting the fan speed setting
Press (increase) or (decrease).
The fan speed is shown on the display. (7 levels)
Press “REAR OFF” to turn the fan off.
■
Turning the rear air conditioning system off
Press “REAR OFF”.
Changing the rear seat settings
1
2
3
4
5
1
2
Page 380 of 608
3805-1. Using the air conditioning system and defogger
LC200_OM_OM60P24U_(U)■
Defogging the rear window and
outside rear view mirrors
Defoggers are used to defog the rear window, and to remove rain-
drops, dew and frost from the outside rear view mirrors.
Press .
Press the switch again to turn the defogger off.
■
Micro dust and pollen filter
Press on the control screen.
Press .
Outside air mode switches to recirculated air mode. Pollen is removed
from the air and the air flows to the upper part of the body.
Usually the system will turn off automatically approximately 1 to 3 min-
utes.
To stop the operation, press again.
■
Windshield wiper de-icer (if equipped)
This feature is used to prevent ice from building up on the wind-
shield and wiper blades.
Press on the control screen.
Press .
Press again to turn the de-icer off.
1
2
1
2
Page 464 of 608

464
LC200_OM_OM60P24U_(U)
6-3. Do-it-yourself maintenance
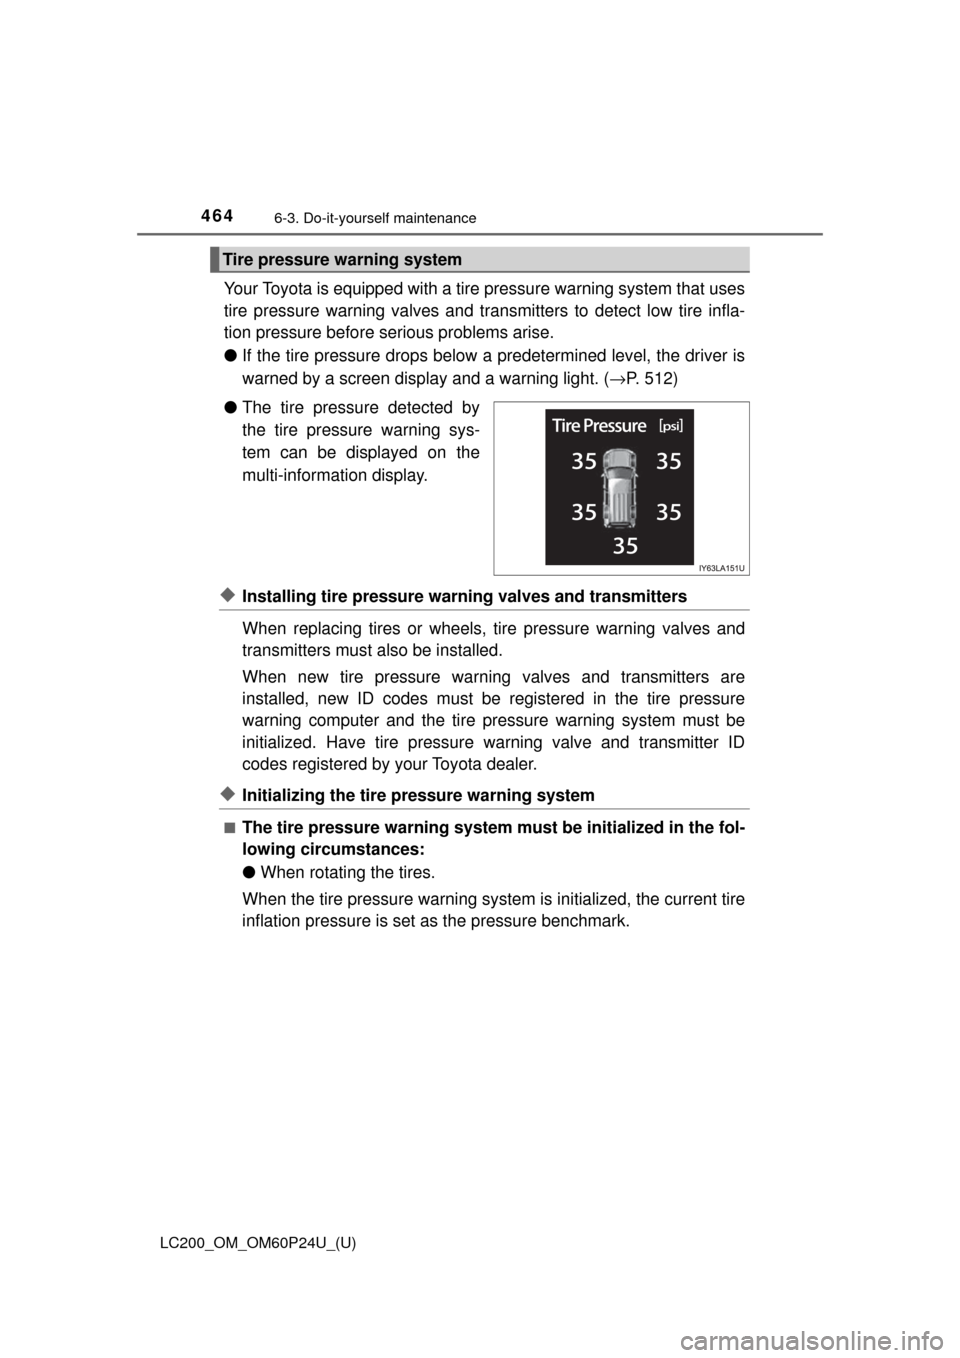
Your Toyota is equipped with a tire pressure warning system that uses
tire pressure warning valves and transmitters to detect low tire infla-
tion pressure before serious problems arise.
● If the tire pressure drops below a predetermined level, the driver is
warned by a screen display and a warning light. ( →P. 512)
● The tire pressure detected by
the tire pressure warning sys-
tem can be displayed on the
multi-information display.
◆Installing tire pressure warning valves and transmitters
When replacing tires or wheels, tire pressure warning valves and
transmitters must also be installed.
When new tire pressure warning valves and transmitters are
installed, new ID codes must be registered in the tire pressure
warning computer and the tire pr essure warning system must be
initialized. Have tire pressure warning valve and transmitter ID
codes registered by your Toyota dealer.
◆Initializing the tire pressure warning system
■The tire pressure warning system must be initialized in the fol-
lowing circumstances:
● When rotating the tires.
When the tire pressure warning system is initialized, the current tire
inflation pressure is set as the pressure benchmark.
Tire pressure warning system
Page 574 of 608

574
LC200_OM_OM60P24U_(U)
8-2. Customization
Customizable features
When customizing vehicle features, ensure that the vehicle is parked
in a safe place with the shift lever in P and the parking brake set.
■Changing by using the navigation system
Press the “SETUP” button on the navigation system.
Select “Vehicle” on the “Setup” screen.
Various setting can be changed. Refer to the list of settings that can
be changed for details.
■Changing by using the mu lti-information display
Use the meter control switches to select on the multi-infor-
mation display.
Choose the desired item using , and then press .
Select the desired setting by operating , and then press
.
To stop the selection, press to return to the previous screen.
Your vehicle includes a variety of electronic features that can be
personalized to suit your prefer ences. The settings of these fea-
tures can be changed by using the navigation system, the multi-
information display, or at your Toyota dealer.
Customizing vehicle features
1
2
1
2
3
Page 581 of 608

LC200_OM_OM60P24U_(U)
5818-2. Customization
8
Vehicle specifications
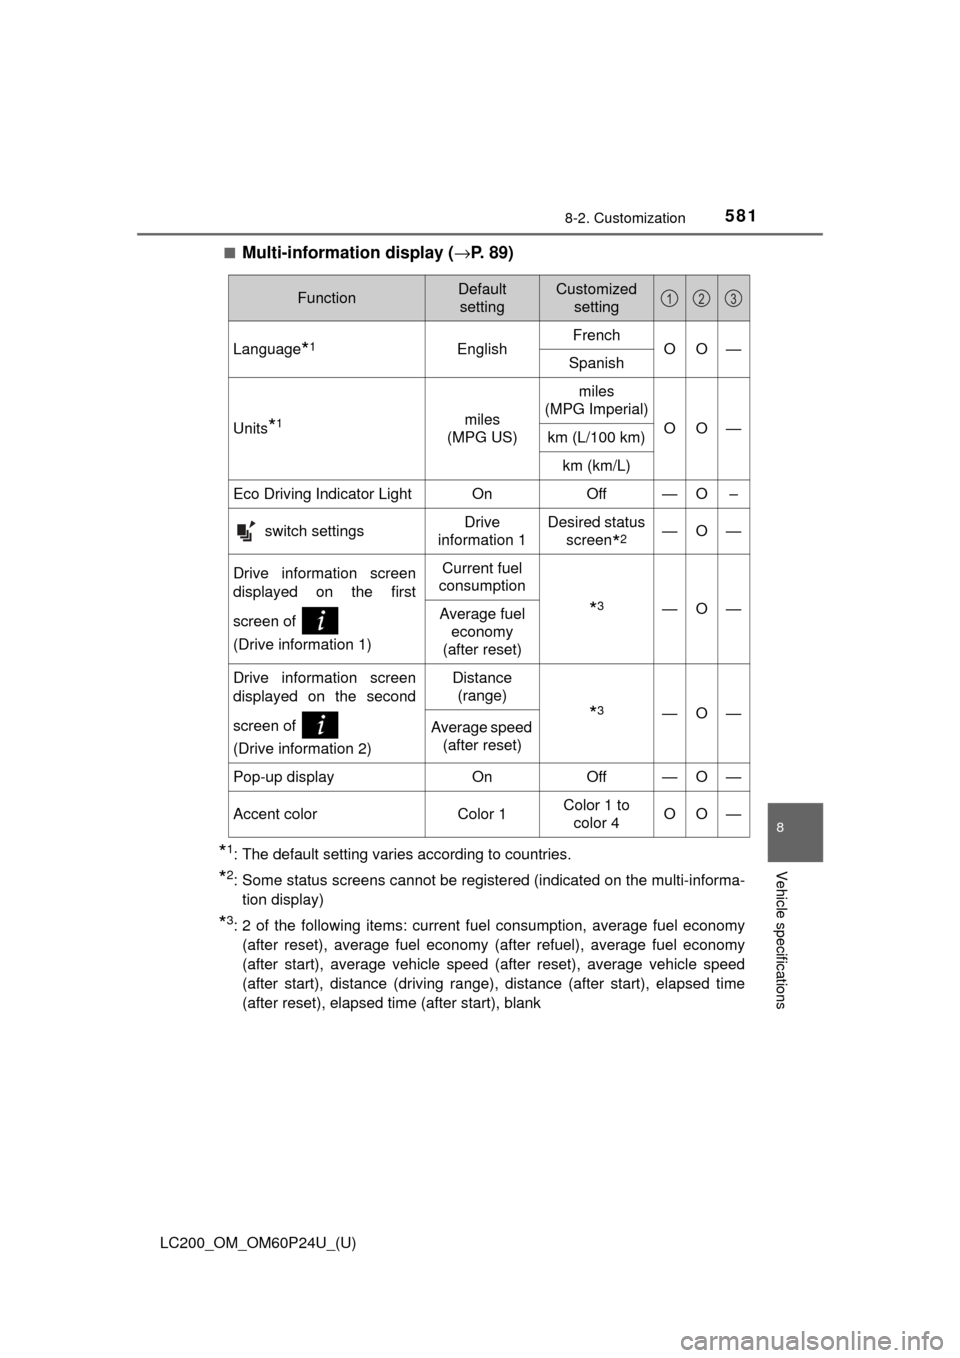
■Multi-information display (→P. 89)
*1: The default setting varies according to countries.
*2: Some status screens cannot be registered (indicated on the multi-informa-
tion display)
*3: 2 of the following items: current fuel consumption, average fuel economy(after reset), average fuel economy (after refuel), average fuel economy
(after start), average vehicle speed (after reset), average vehicle speed
(after start), distance (driving range) , distance (after start), elapsed time
(after reset), elapsed time (after start), blank
FunctionDefault settingCustomized setting
Language*1EnglishFrenchOO—Spanish
Units*1miles
(MPG US)
miles
(MPG Imperial)
OO—km (L/100 km)
km (km/L)
Eco Driving Indicator Light On Off — O –
switch settingsDrive
information 1Desired status screen
*2—O—
Drive information screen
displayed on the first
screen of
(Drive information 1)Current fuel
consumption
*3—O—Average fuel economy
(after reset)
Drive information screen
displayed on the second
screen of
(Drive information 2)Distance (range)
*3—O—Average speed (after reset)
Pop-up displayOnOff—O—
Accent colorColor 1Color 1 to
color 4OO—
123