2017 TOYOTA LAND CRUISER warning light
[x] Cancel search: warning lightPage 206 of 608
206
LC200_OM_OM60P24U_(U)
4-2. Driving procedures
Parking brake
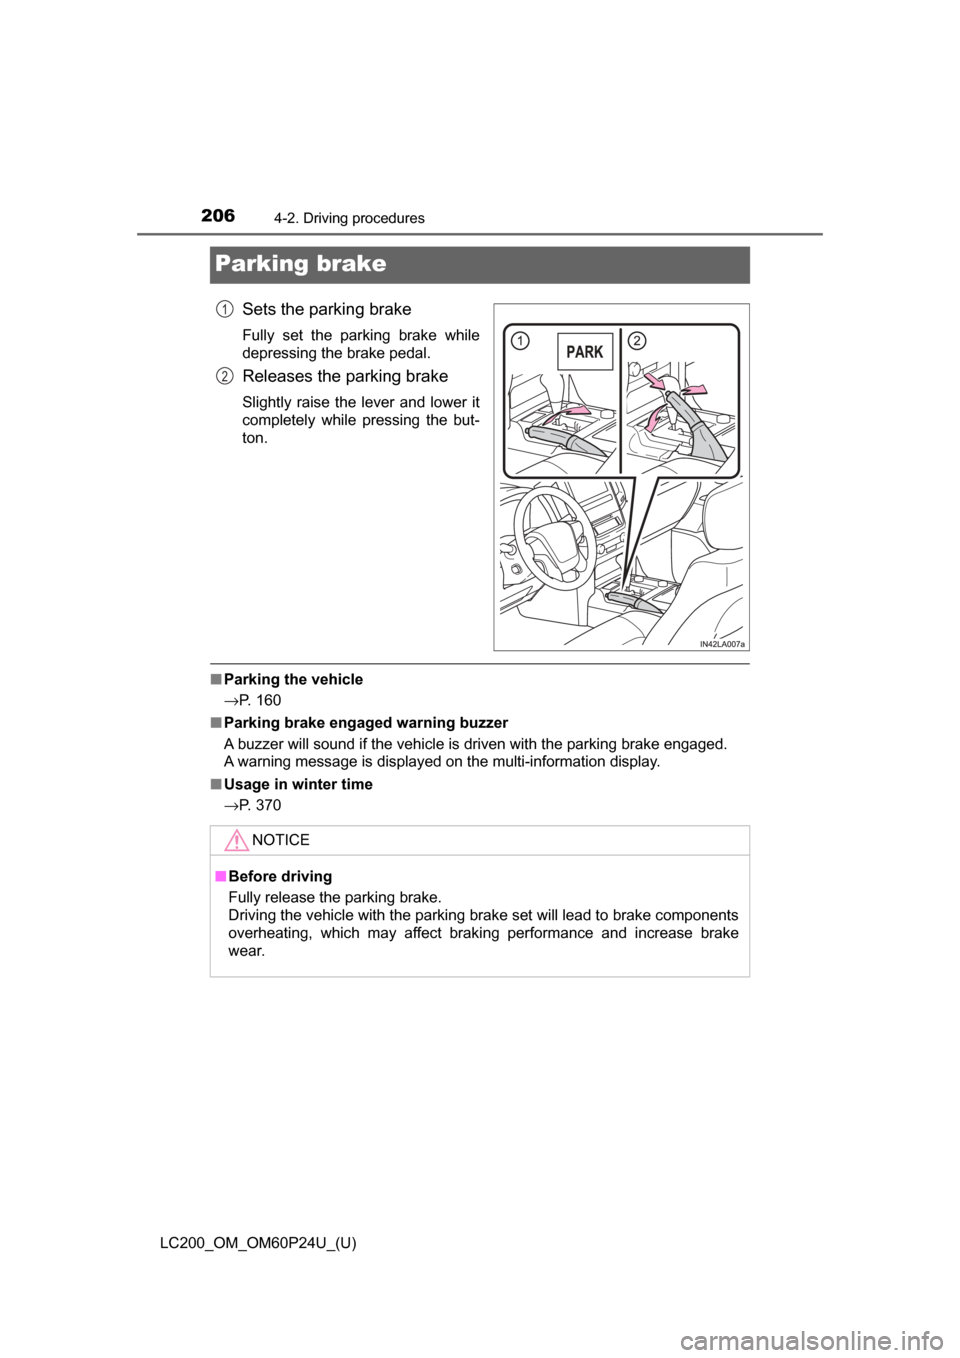
Sets the parking brake
Fully set the parking brake while
depressing the brake pedal.
Releases the parking brake
Slightly raise the lever and lower it
completely while pressing the but-
ton.
■Parking the vehicle
→P. 160
■ Parking brake engaged warning buzzer
A buzzer will sound if the vehicle is driven with the parking brake engaged.
A warning message is displayed on the multi-information display.
■ Usage in winter time
→P. 370
1
2
NOTICE
■Before driving
Fully release the parking brake.
Driving the vehicle with the parking brake set will lead to brake components
overheating, which may affect braking performance and increase brake
wear.
Page 209 of 608
LC200_OM_OM60P24U_(U)
2094-3. Operating the lights and wipers
4
Driving
■Daytime running light system
●To make your vehicle more visible to other drivers during daytime driving,
the daytime running lights turn on automatically whenever the engine is
started and the parking brake is released. (Illuminate dimmer than the head-
lights.) Daytime running lights are not designed for use at night.
For the U.S.A.: Daytime running lights can be turned off by operating the
switch.
● Compared to turning on the headlights, the daytime running light system
offers greater durability and consumes less electricity, so it can help improve
fuel economy.
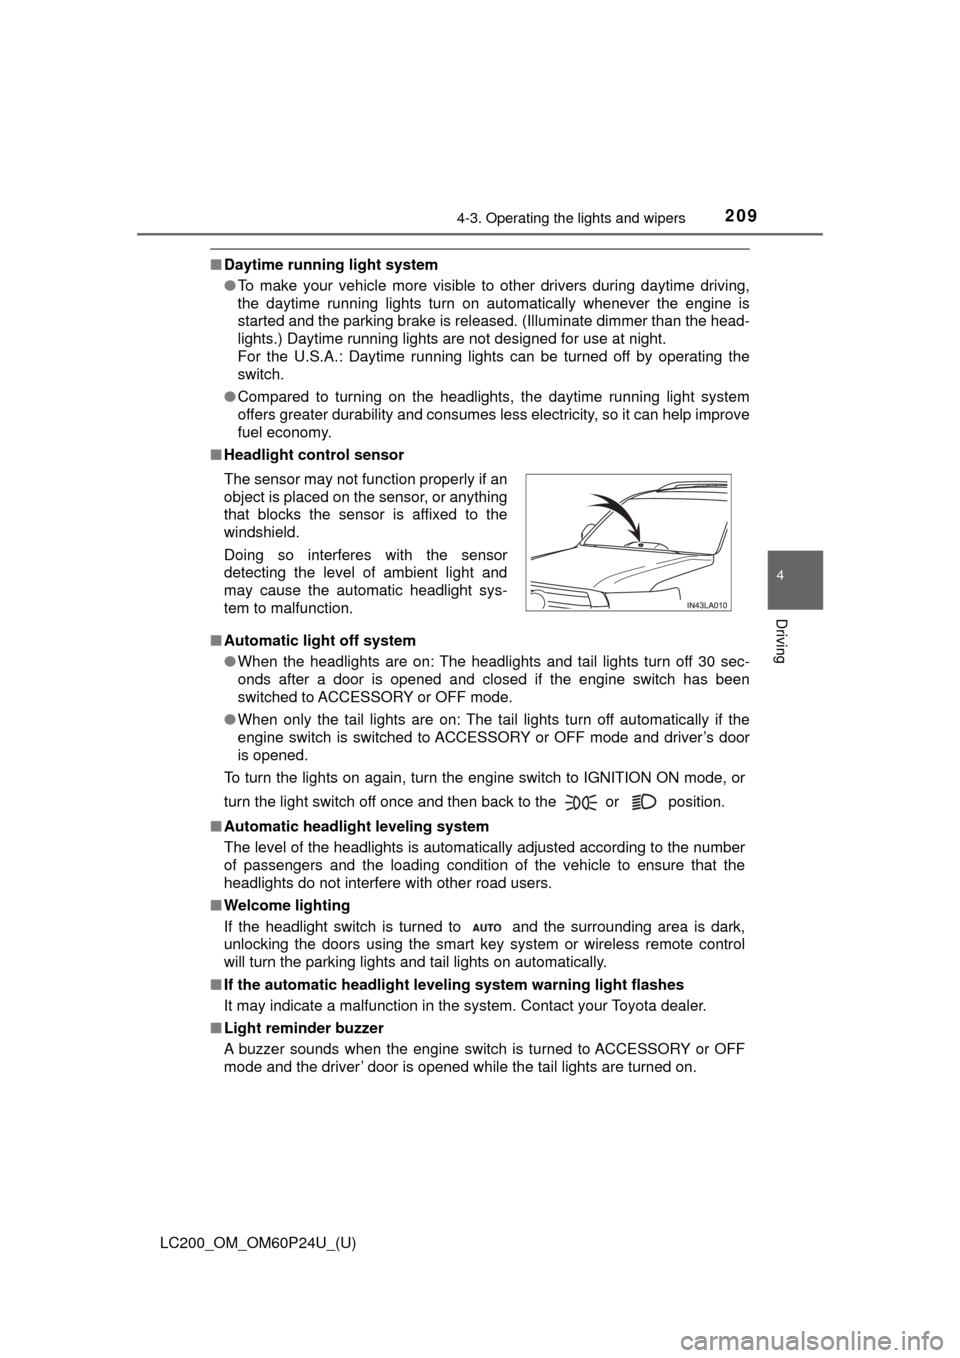
■ Headlight control sensor
■ Automatic light off system
●When the headlights are on: The headlights and tail lights turn off 30 sec-
onds after a door is opened and closed if the engine switch has been
switched to ACCESSORY or OFF mode.
● When only the tail lights are on: The tail lights turn off automatically if the
engine switch is switched to ACCESSORY or OFF mode and driver’s door
is opened.
To turn the lights on again, turn the engine switch to IGNITION ON mode, or
turn the light switch off once and then back to the or position.
■ Automatic headlight leveling system
The level of the headlights is automatically adjusted according to the n\
umber
of passengers and the loading condition of the vehicle to ensure that the
headlights do not interfere with other road users.
■ Welcome lighting
If the headlight switch is turned to and the surrounding area is dark,
unlocking the doors using the smart key system or wireless remote control
will turn the parking lights and tail lights on automatically.
■ If the automatic headlight level ing system warning light flashes
It may indicate a malfunction in the system. Contact your Toyota dealer.
■ Light reminder buzzer
A buzzer sounds when the engine switch is turned to ACCESSORY or OFF
mode and the driver’ door is opened while the tail lights are turned on. The sensor may not function properly if an
object is placed on the sensor, or anything
that blocks the sensor is affixed to the
windshield.
Doing so interferes with the sensor
detecting the level of ambient light and
may cause the automatic headlight sys-
tem to malfunction.
Page 211 of 608
211
LC200_OM_OM60P24U_(U)
4-3. Operating the lights and wipers
4
Driving
Automatic High Beam
The Automatic High Beam uses an in-vehicle camera sensor to
assess the brightness of streetlights, the lights of vehicles
ahead etc., and automatically turns the high beam on or off as
necessary.
WARNING
■ Limitations of the Automatic High Beam
Do not rely on the Automatic High Beam. Always drive safely, taking care to
observe your surroundings and turning the high beam on or off manually if
necessary.
■ To prevent incorrect operation of the Automatic High Beam system
Do not overload the vehicle.
NOTICE
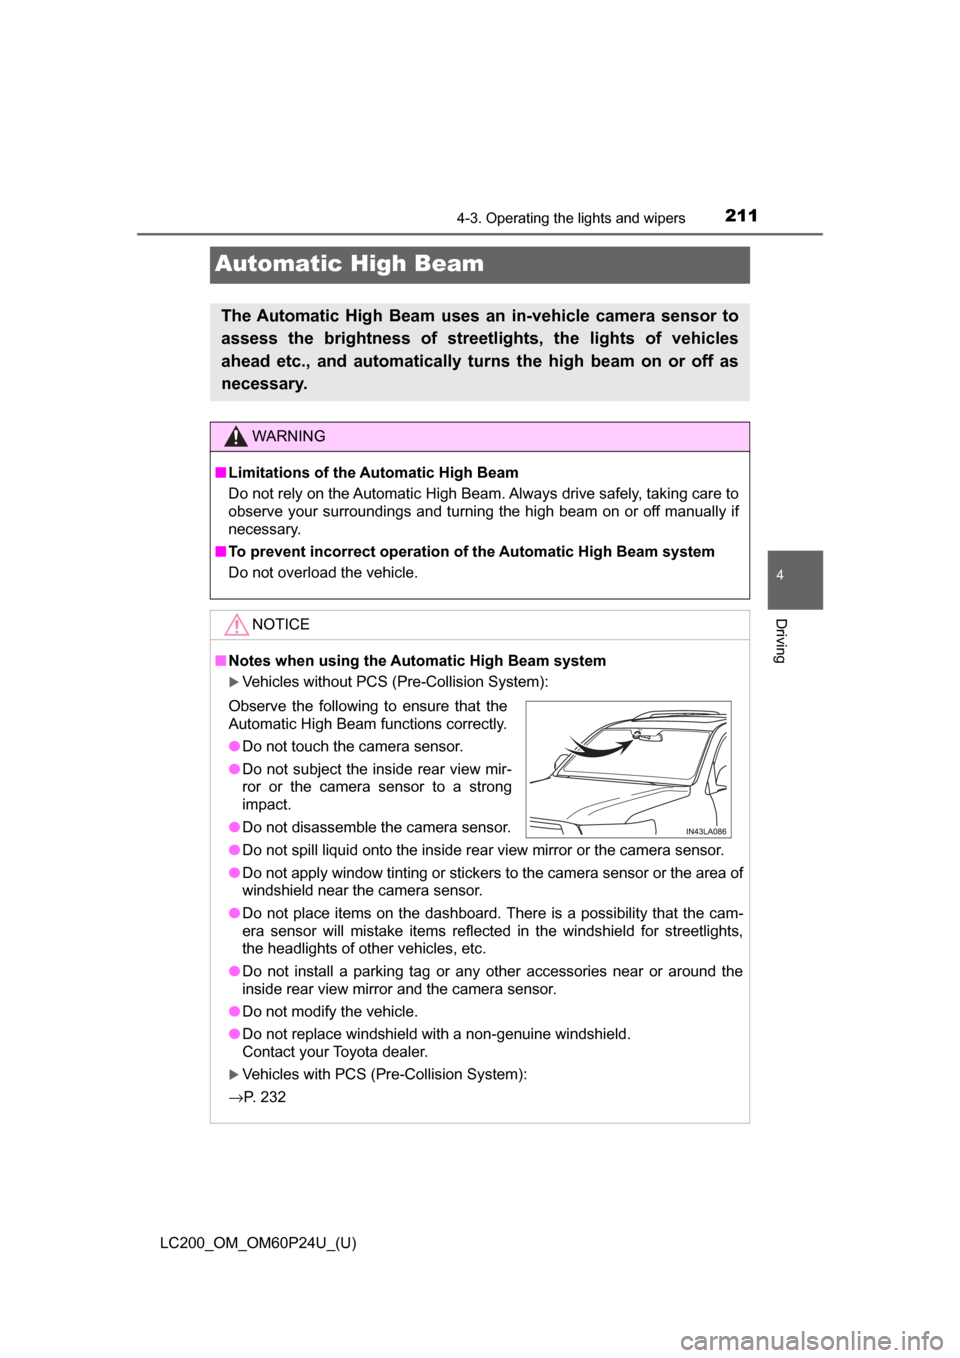
■Notes when using the Automatic High Beam system
Vehicles without PCS (Pre-Collision System):
● Do not spill liquid onto the inside rear view mirror or the camera sensor.
● Do not apply window tinting or stickers to the camera sensor or the area of
windshield near the camera sensor.
● Do not place items on the dashboard. There is a possibility that the cam-
era sensor will mistake items reflected in the windshield for streetlights,
the headlights of other vehicles, etc.
● Do not install a parking tag or any other accessories near or around the
inside rear view mirror and the camera sensor.
● Do not modify the vehicle.
● Do not replace windshield with a non-genuine windshield.
Contact your Toyota dealer.
Vehicles with PCS (Pre-Collision System):
→ P. 232
Observe the following to ensure that the
Automatic High Beam functions correctly.
●Do not touch the camera sensor.
● Do not subject the inside rear view mir-
ror or the camera sensor to a strong
impact.
● Do not disassemble the camera sensor.
Page 214 of 608

214
LC200_OM_OM60P24U_(U)
4-3. Operating the lights and wipers
●In the situations shown below, the system may not be able to accurately
detect surrounding brightness levels. This may cause the low beams to
remain on or the high beams to cause problems for pedestrians, vehicles
ahead or other parties. In these cases, manually switch between the high
and low beams.
• In bad weather (rain, snow, fog, sandstorms etc.)
• The windshield is obscured by fog, mist, ice, dirt etc.
• The windshield is cracked or damaged.
• The inside rear view mirror or ca mera sensor is deformed or dirty.
• The camera sensor temperature is extremely high.
• Surrounding brightness levels are equal to those of headlights, tail lights or fog lights.
• Vehicles ahead have headlights that are either switched off, dirty, are
changing color, or are not aimed properly.
• When driving through an area of in termittently changing brightness and
darkness
• When frequently and repeatedly driving ascending/descending roads, or roads with rough, bumpy or uneven surfaces (such as stone-paved
roads, gravel tracks etc.)
• When frequently and repeatedly taking curves or driving on a winding road
• There is a highly reflective object ahead of the vehicle, such as a sign or
a mirror.
• The back of a vehicle ahead is highly reflective, such as a container on a truck.
• The vehicle’s headlights are damaged or dirty, or are not aimed properly.
• The vehicle is listing or tilting, due to a flat tire, a trailer being towed etc.
• The high beam and low beam are repeatedly being switched between in an abnormal manner.
• The driver believes that the high beam may be causing problems or dis-
tress to other drivers or pedestrians nearby.
■ If a warning message of the Auto matic High Beam is displayed...
It may indicate a malfunction in the system. Contact your Toyota dealer.
Page 220 of 608

220
LC200_OM_OM60P24U_(U)
4-3. Operating the lights and wipers
■If no windshield washer fluid sprays
Check that the washer nozzles are not blocked if there is washer fluid in the
windshield washer fluid reservoir.
WARNING
■Caution regarding the use of windshie ld wipers in “AUTO” mode (vehi-
cles with rain-sensing windshield wipers)
The windshield wipers may operate unexpectedly if the sensor is touched or
the windshield is subject to vibration in “AUTO” mode. Take care that your
fingers etc. anything else does not become caught in the windshield wipers.
■ Caution regarding the use of washer fluid
When it is cold, do not use the washer fluid until the windshield becomes
warm. The fluid may freeze on the windshield and cause low visibility. This
may lead to an accident, resulting in death or serious injury.
NOTICE
■When the windshield is dry
Do not use the wipers, as they may damage the windshield.
■ When the washer fluid tank is empty
Do not operate the switch continually as the washer fluid pump may over-
heat.
■ When there is no washer fluid spray from the nozzle
Damage to the washer fluid pump may be caused if the lever is pulled
toward you and held continually.
■ When a nozzle becomes blocked
Do not try to clear it with a pin or other object. The nozzle will be damaged.
Page 232 of 608
232
LC200_OM_OM60P24U_(U)
4-5. Using the driving support systems
WARNING
■To avoid malfunction of the camera sensor
Observe the following precautions.
Otherwise, the camera sensor may not operate properly, possibly leading to
an accident resulting in death or serious injury.
● Keep the windshield clean at all times.
• If the windshield is dirty or covered with an oily film, water droplets,
snow, etc., clear the windshield.
• If a glass coating agent is applied to the windshield, it will still be neces- sary to use the windshield wipers to remove water droplets, etc. from
the area of the windshield in front of the camera sensor.
• If the inner side of the windshield where the camera sensor is installed is dirty, contact your Toyota dealer.
● If the part of the windshield in front of the camera sensor is fogged up or
covered with condensation or ice, use the windshield defogger to remove
the fog, condensation or ice. ( →P. 374)
● If water droplets cannot be properly removed from the area of the wind-
shield in front of the camera sensor by the windshield wipers, replace the
wiper insert or wiper blade.
If the wiper inserts or wiper blades need to be replaced, contact your
Toyota dealer.
● Do not attach window tinting to the windshield.
● Replace the windshield if it is damaged or cracked.
If the windshield needs to be replaced, contact your Toyota dealer.
● Do not get the camera sensor wet.
● Do not allow bright lights to shine into the camera sensor.
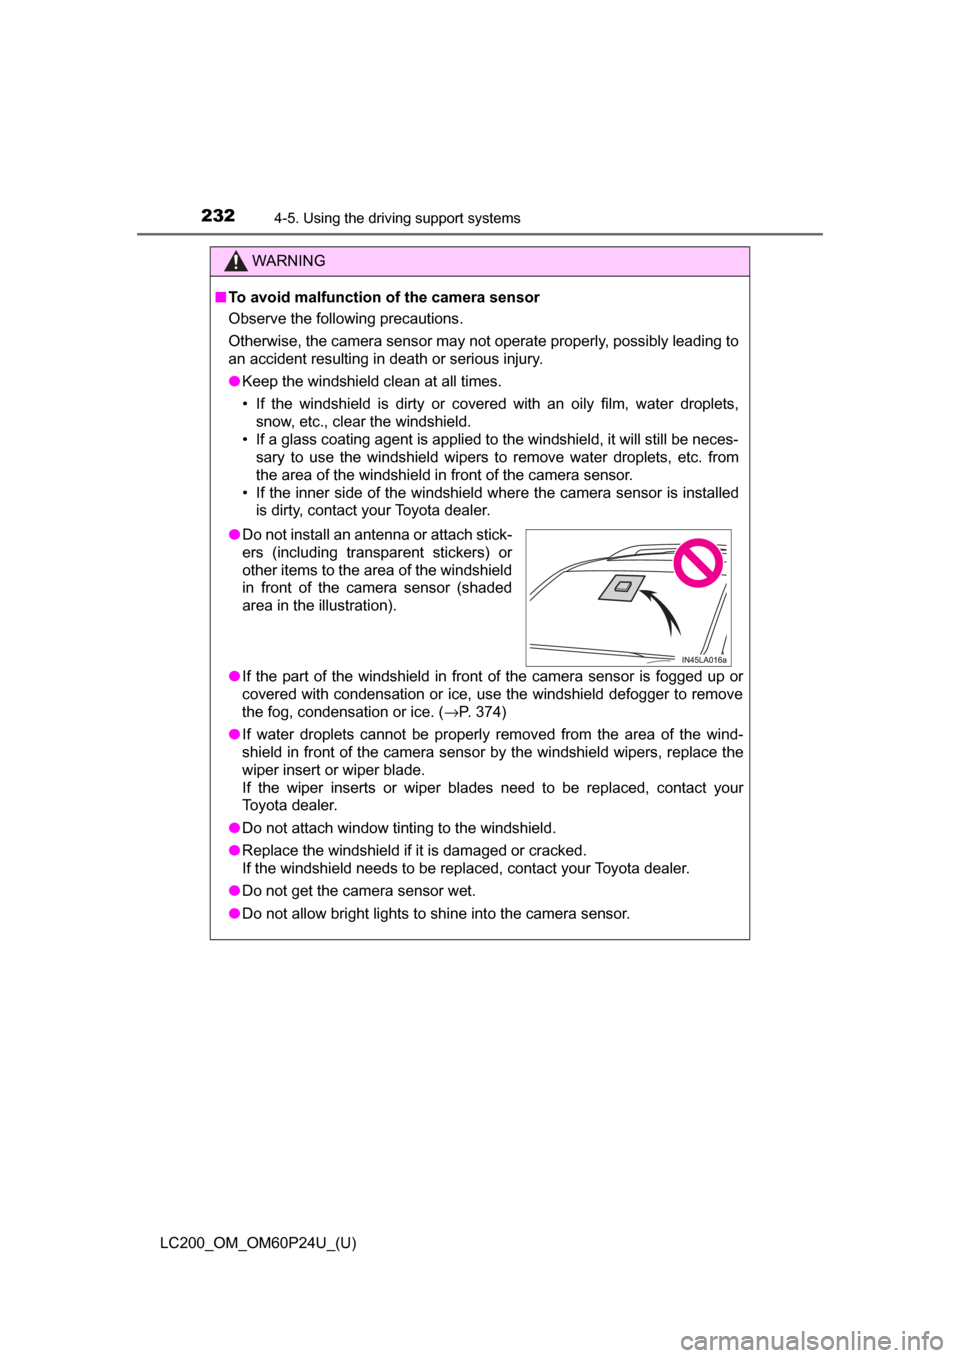
●Do not install an antenna or attach stick-
ers (including transparent stickers) or
other items to the area of the windshield
in front of the camera sensor (shaded
area in the illustration).
Page 233 of 608
LC200_OM_OM60P24U_(U)
2334-5. Using the driving support systems
4
Driving
WARNING
●Do not dirty or damage the camera sensor.
When cleaning the inside of the windshield, do not allow glass cleaner to
contact the lens. Also, do not touch the lens.
If the lens is dirty or damaged, contact your Toyota dealer.
● Do not subject the camera sensor to a strong impact.
● Do not change the installation position or direction of the camera sensor or
remove it.
● Do not disassemble the camera sensor.
● Do not install an electronic device or device that emits strong electric
waves near the camera sensor.
● Do not modify any components of the vehicle around the camera sensor
(inside rear view mirror, etc.) or ceiling.
● Do not attach any accessories that may obstruct the camera sensor to the
hood, front grille or front bumper. Contact your Toyota dealer for details.
● If a surfboard or other long object is to be mounted on the roof, make sure
that it will not obstruct the camera sensor.
● Do not modify the headlights or other lights.
Page 239 of 608
LC200_OM_OM60P24U_(U)
2394-5. Using the driving support systems
4
Driving
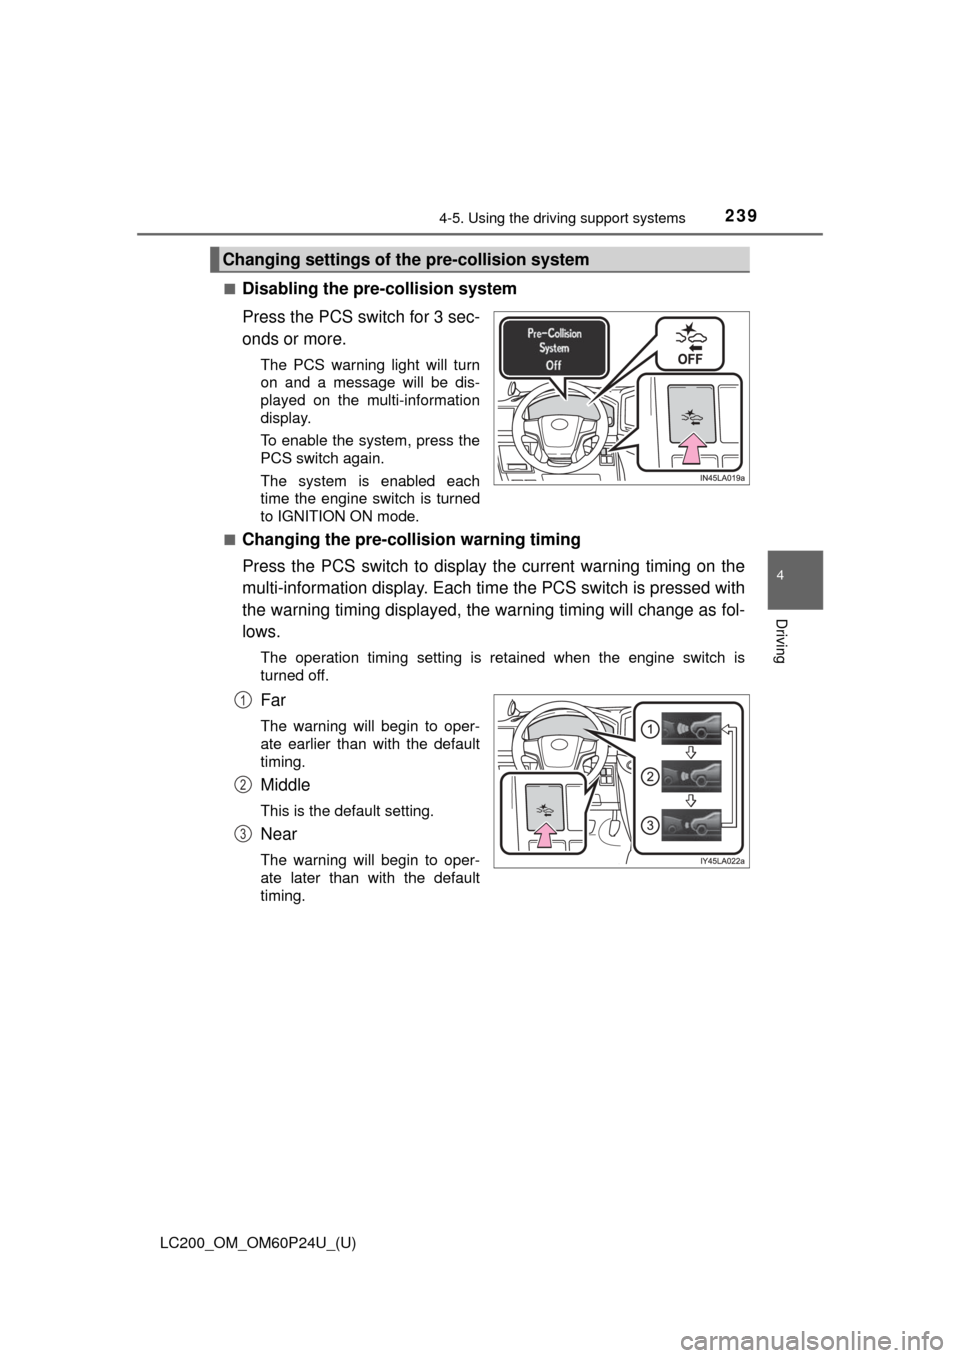
■Disabling the pre-collision system
Press the PCS switch for 3 sec-
onds or more.
The PCS warning light will turn
on and a message will be dis-
played on the multi-information
display.
To enable the system, press the
PCS switch again.
The system is enabled each
time the engine switch is turned
to IGNITION ON mode.
■
Changing the pre-colli sion warning timing
Press the PCS switch to display the current warning timing on the
multi-information display. Each ti me the PCS switch is pressed with
the warning timing displayed, the warning timing will change as fol-
lows.
The operation timing setting is retained when the engine switch is
turned off.
Far
The warning will begin to oper-
ate earlier than with the default
timing.
Middle
This is the default setting.
Near
The warning will begin to oper-
ate later than with the default
timing.
Changing settings of th e pre-collision system
1
2
3