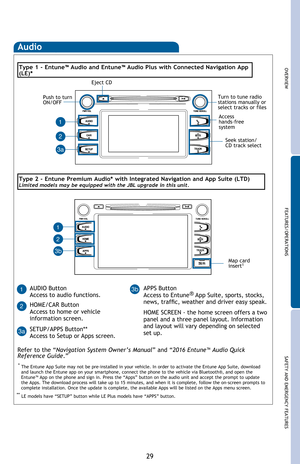
Page 17 of 52
OVERVIEW
FEATURES/OPERATIONS
SAFETY AND EMERGENCY FEATURES
Pull
Seats -Stowing & returning third row seats
(1) Pull(2) Raise
Seats-Head restraints
Lock release button
Height
Lock release buttonLock release button
FrontSecond rowThird row
HeightHeight
15
Seat adjustments-Rear
Seat position (forward/backward)
Seatback angle
Seatback angle adjustment straps
Refer to the Owner’s Manual for more details.
Second row type 1 Second row type 2Third row seat
Page 18 of 52
16
Windshield wipers & washers
FEATURES/OPERATIONS
Power outlets-12V DC & 120V AC
Instrument panel
(12V DC)
The “ENGINE START STOP”/ignition switch must be in the “ACC” or “ON” position
to be used.
Center console
(12V DC)
Rear center console
(120V AC)Rear center console
(12V DC)
Single wipe
Interval wipe
Off
Push to Wash and wipe
Rear
Front-Intermittent
Front-Auto (Rain-sensing)
1 Intermittent windshield
wiper frequency adjustment
Rotate to increase/decrease
wipe frequency.
2 Rain-sensing windshield
wipers Rotate to increase/
decrease sensor sensitivity.
(if equipped)Temporary
operation
Rain sensing
(AUTO)
Low
HighAdjust sensitivity2
Pull to wash
and wipe
Interval wipe Mist
Slow
Fast Adjust frequency
1
Pull to wash
and wipe
Page 19 of 52
OVERVIEW
FEATURES/OPERATIONS
SAFETY AND EMERGENCY FEATURES
17
Lights & turn signals
Front fog lights (if equipped)
Front fog lights come on only when the headlights are on low beam.
Headlights
-Daytime Running Light system (DRL) (if equipped) Automatically turns on the
headlights at a reduced intensity.
-Automatic light cut off system Lights automatically turn off after a delay of 30
seconds, or when lock switch on remote is pushed after all doors are locked.
Low beam
High beam
High beam flasher
Parking lights
Auto
DRL OFF
With DRL OFF switch
Headlights
Turn
Turn signals
Right turn
Lane change
Lane change
Left turn
Page 20 of 52
 (if equipped)
PushPush and hold
Instrument panel Open and close
Open: Push and hold
Close: Push and hold again
NOTE: If battery is disconnected,")
18
FEATURES/OPERATIONS
Door-Power Liftgate (back door) (if equipped)
PushPush and hold
Instrument panel Open and close
Open: Push and hold
Close: Push and hold again
NOTE: If battery is disconnected, the power back door needs to be reinitialized.
Refer to the Owner’s Manual for more details.
Open onlyRemote
control
(with
Smartkey)
Programmable Power Liftgate
1. When the liftgate reaches the desired height, push the rear liftgate close-
button (on the door jam of the liftgate) once. Press and hold the button until
the buzzer sounds.
2. To reset the height, with the liftgate open and not moving, press and hold the
rear liftgate close-button until it buzzes, and continue to hold until it buzzes
again -then let go. Push the same button to close the liftgate. When you next
open the liftgate it will open to the maximum height.
3. The height can also be set through the “Setup” screen on the audio display.
Setup > Vehicle Customization > Other Vehicle Settings > Power Back Door
Opening Adjust. Through this screen, there are 5 height options to choose
from.
NOTE: If the liftgate has stopped operating, check inside the glove box, on the
left side, to ensure the PWR DOOR OFF button has not been pushed.
For detailed instructions, see Owner’s Manual.
Page 21 of 52
(if equipped)
1 The set speed may also be cancelled by depressing the brake pedal.2 The set speed may")
19
OVERVIEW
FEATURES/OPERATIONS
SAFETY AND EMERGENCY FEATURES
Dynamic Radar Cruise Control (DRCC)(if equipped)
1 The set speed may also be cancelled by depressing the brake pedal.2 The set speed may be resumed once vehicle speed exceeds 25 mph. Vehicle will cruise at a set speed, decelerate to maintain selected distance from
a slower vehicle traveling in front and accelerate back up to the selected speed if
the vehicle in front changes lanes or speeds up.
(1) Push the “ON-OFF” button. The “RADAR READY” or “
” indicator will come
on.
(2) Push the lever down to SET speed, push it up to Resume and pull it or depress
brake to Cancel.
(3) Push up to increase the set speed, push down to decrease (1mph increments).
Increase
speed
Decrease
speed
Adjusting set speed
Cancel1
Resume2
Set
(2) (3)
Turning system ON/OFF
(1)
Note: If you hold the ON-OFF
button for 1.5 seconds or
more, the system switches to
constant speed control mode.
Vehicle-to-vehicle
distance button
Display
Set speed
Indicators
Cruise control switch
Vehicle will cruise at a set speed, decelerate to maintain selected distance from
a slower vehicle traveling in front and accelerate back up to the selected speed if
the vehicle in front changes lanes or speeds up. This mode is always selected first
when the cruise control button is depressed. Constant speed cruise control mode
is also available.
Page 22 of 52

MIDD")
20
Adjusting distance
To change the vehicle-to-
vehicle distance
Push the “
” button
to cycle through the
settings, which will change
progressively.
LONG (default setting)
MIDDLE
SHORT.
This mode employs a radar sensor to detect the presence of vehicles up to
approximately 400ft (120m) ahead, determines the current vehicle-to-vehicle
following distance and operates to maintain a suitable following distance from the
vehicle ahead.
(1) Constant speed cruising when there are no vehicles ahead
The vehicle travels at the speed set by the driver. The desired vehicle-to-
vehicle distance can also be set by operating the vehicle-to-vehicle distance
control.
(2) Deceleration cruising and follow-up cruising when a preceding vehicle
driving slower than the set speed appears
When a vehicle is detected running ahead of you, the system automatically
decelerates your vehicle. When a greater reduction in vehicle speed is
necessary, the system applies the brakes (the stop lights will come on at this
time). The system will respond to changes in the speed of the vehicle ahead in
order to maintain the vehicle-to-vehicle distance set by the driver. A warning
tone warns you when the system cannot decelerate sufficiently to prevent your
vehicle from closing in on the vehicle ahead. Note: Vehicle-to-vehicle distance may lessen when traveling on long downhill
slopes.
(1) (2) (2) (3)
Preceding
vehicle mark
FEATURES/OPERATIONS
Page 23 of 52
 Acceleration when there are no longer any preceding vehicles driving
slower than the set speed
The system accelerates until")
21
OVERVIEW
FEATURES/OPERATIONS
SAFETY AND EMERGENCY FEATURES
(3) Acceleration when there are no longer any preceding vehicles driving
slower than the set speed
The system accelerates until the set speed is reached. The system then
returns to constant speed cruising.
Note: When your vehicle is too close to a vehicle ahead, and sufficient automatic
deceleration via the cruise control is not possible, the display will flash and the
buzzer will sound to alert the driver. An example of this would be if another driver
cuts in front of you while you are following a vehicle. Depress the brake pedal to
ensure an appropriate vehicle-to-vehicle distance.
Switching to constant speed control mode
If you are already using DRCC “”, push “ON-OFF” button to turn the system off
first, then push and hold “ON-OFF” button for at least 1.5 seconds to switch.
Note: When the engine is turned off, it will automatically default to Dynamic
Radar Cruise Control.
1.5 seconds
Cruise control (if equipped)
1 The set speed may also be cancelled by depressing the brake pedal.2 The set speed may be resumed once vehicle speed exceeds 25 mph.
Turning system ON/OFF
Functions
System ON/OFFmonchrome
color display
Increase speed
Decrease speed
Cancel1
Resume2
Set
Page 24 of 52
22
FEATURES/OPERATIONS
Lane Departure Alert (LDA)
(if equipped)
The Lane Departure Alert system recognizes visible white or yellow lane markers
via a camera sensor. The system alerts the driver with a warning buzzer sound
and message in the Multi-Information Display (MID) when it detects the vehicle
deviating from or swaying multiple times within its lane.
Press the LDA switch to turn the LDA system on. Depress again to turn it off.
Note: The system will continue in the last state it was in (ON or OFF)
when the engine is started again.
Turning on the LDA system
MonochromeColor display


 Pull(2) Raise
Seats-Head restraints
Lock release button
Height
Lock release buttonLock re")

The “ENGINE START STOP”/ignition switch must be in the “ACC” or “ON” position
t")

Front fog lights come on only when the headlights are on low beam.
Headlights
-Daytim")

(if equipped)
The Lane Departure Alert system recognizes visible white or yellow lane markers
via a camera sensor. The system alerts the driver with")