Page 9 of 52

OVERVIEW
FEATURES/OPERATIONS
SAFETY AND EMERGENCY FEATURES
7
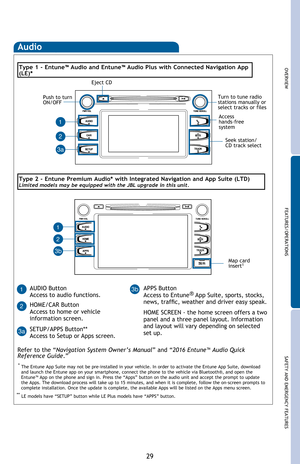
Smart Key system
Start function
All systems OFF.
Accessories such as the radio will operate.
Power ON; the engine not running. NOTE: Parking brake must be set. Shift lever is set to P.
Depress
brake pedal
will be displayed on the
multi-information display. If
it is not displayed, the engine
cannot be started.
Without depressing the brake pedal, pressing the “ENGINE START STOP” switch
will change the operation mode in succession from:
Power (without starting engine)
* Driver door unlocking function can be programmed to unlock driver door only, or
all doors. Grasping passenger door handle will unlock all doors.
NOTE: Doors may also be locked/unlocked using remote.
Glass hatch unlock
Locking operation
Carry remote to lock
Front door lock
Push
1. Push
Back door lock/unlock
Push
Lock
Push Unlock
Carry remote to unlock Carry remote to lock/unlock
Unlocking operation
Carry remote to unlock
Front door unlock*
Grasp
2. Lift
Page 10 of 52
8
Hood release
Fuel tank door release and cap
NOTE: Tighten until one click is
heard. If the cap is not tightened
enough, Check Engine “
”
indicator may illuminate.
Turn to openStore
Engage support rod
OVERVIEW
PullWhen the fuel door
cannot be opened by
pressing the inside
switch. Remove the
cover inside the
luggage compartment
and pull the lever.
Pull up the
auxiliary catch
lever and raise
hood
Page 11 of 52
OVERVIEW
FEATURES/OPERATIONS
SAFETY AND EMERGENCY FEATURES
9 Windshield washer fluid tank
Engine oil level dipstick
Engine oil filler cap
Engine coolant reservoir
NOTE: Regularly scheduled maintenance, including oil changes, will help
extend the life of your vehicle and maintain performance. Please refer
to the “Warranty & Maintenance Guide.”
Engine maintenance
Light control-Instrument cluster
The brightness level of the meters
when the surroundings are bright
(day mode) and dark (night mode)
can be adjusted individually.
However,when in day mode,
adjusting the brightness level will
also change the brightness level of
night mode.
Page 12 of 52
 Put the selector lever in “P.”
(2) Depress the brake pedal, and “
” will be displayed on the Multi-Information
Display.
(3) Press the “POWER” switch briefly and")
10
FEATURES/OPERATIONS
(1) Put the selector lever in “P.”
(2) Depress the brake pedal, and “
” will be displayed on the Multi-Information
Display.
(3) Press the “POWER” switch briefly and firmly.
(4) The “READY” light will blink. After a few seconds, when the light remains
steady and a beep sounds, you may begin driving.
Starting the Hybrid System
The Hybrid Synergy Drive System utilizes a computer-controlled gasoline engine
and electric motor to provide the most efficient combination of power for the
vehicle. To conserve energy, when the brakes are applied the braking force
generates electricity which is then sent to the traction battery. In addition,
the engine shuts off when the vehicle is stopped. The benefits are better fuel
economy, reduced vehicle emissions and improved performance.
NOTE: Fuel consumption and energy information of the Hybrid System are
shown on the Multi-Information Display and/or navigation system
screen (if equipped).
Tips for improved fuel economy
1. Ensure tire pressures are maintained at levels specified in the Owner’s Manual.
2. Link trips to reduce engine cold starts whenever possible.
3. Avoid driving at speeds that are higher than necessary, especially on the highway.
4. When possible, avoid sudden stops to maximize regenerative braking energy.
5. Minimize use of the Air Conditioning.
Hybrid Synergy Drive System
Page 13 of 52
OVERVIEW
FEATURES/OPERATIONS
SAFETY AND EMERGENCY FEATURES
11
ECO drive mode
Use Eco drive mode to help achieve low fuel consumption during trips that involve
frequent accelerating.
EV drive mode
Use EV drive mode when driving short distances to reduce noise late at night in resi-
dential areas or to cut emissions when parking in a small garage or underground car
park.
Hybrid transmission
* The engine switch must be “ON” and the brake pedal depressed to shift from
Park.
Shift the shift lever to “S” position from “D” position.
+: Upshift (push and release)
-: Downshift (pull and release)
Downshifting increases power going uphill, or provides engine braking downhill.
For best fuel economy during normal driving conditions, always drive with the shift
lever in the “D” position.
“S” (Sequential) mode
Park*
Reverse
Neutral
Drive
P
R
N
D
“S” mode
+
-
Page 14 of 52

12
FEATURES/OPERATIONS
Parking brake
Set: Depress
Release: Depress again
Auto lock/unlock
Automatic door locks can be programmed to operate in two different modes, or
turned OFF.
-Doors lock when shifting from Park.
-Doors lock when the vehicle speed goes above approximately 12 mph.
-Doors unlock when shifting into Park.
Vehicles without Smart Key system
-Doors unlock when the ignition switch is set from “ON” to “ACC” or “LOCK” and
driver’s door is opened.
Vehicles with Smart Key system
-Doors unlock when the “ENGINE START STOP” switch is set to OFF and driver’s
door is opened.
Refer to the Owner’s Manual for more details.
Door locks
LockUnlock
Unlock
Lock
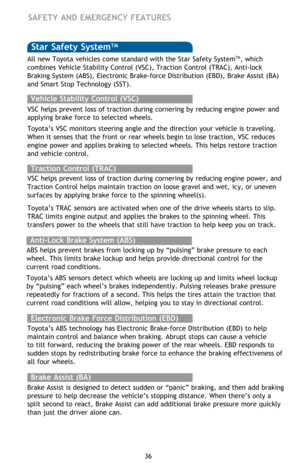
The VSC OFF switch can be used to help free a stuck vehicle in surroundings like
mud, dirt or snow. While car is stopped, press switch to disable the TRAC system.
To disable both VSC and TRAC systems, press the switch for at least 3 seconds.
Refer to the Owner’s Manual for more details.
VSC OFF button
Vehicle Stability Control (VSC)/TRAC OFF switch
Page 15 of 52
OVERVIEW
FEATURES/OPERATIONS
SAFETY AND EMERGENCY FEATURES
13
Moon roof (if equipped)
Sliding operationTilting operation
Tilt
Close
Recommended open position to
minimize wind noise. Push once to open partway;
again to open completely.
Panoramic moon roof (if equipped)
Shade operationTilting operation
If the moon roof is open, pressing the
switch closes it up to the tilt-up position.
If the shade is closed past the half-open
position when the switch is pressed, it will
open up to the half-open position. To stop operation partway, quickly slide
and release the switch again.
Close
Open
Sliding operation
The moon roof stops slightly before the fully open position to reduce wind noise and the
shade opens fully. Slide the switch again to fully open or close the moon roof.
Page 16 of 52
14
FEATURES/OPERATIONS
Driving position memory (if equipped)
Seat position adjustment
Seatback angle adjustment
Lumbar support adjustment
Seat cushion length adjustmentMemory position 1
Memory position 2
Set memory position
Seat adjustments-Front
Hold wheel, push lever down, set angle and length, and return lever.
Lock release
lever
NOTE: Do not attempt to adjust while the vehicle is in motion.
Tilt and telescopic steering wheel
Angle
Length
Steering lock release
Turn
Push
Power seat


Sliding operationTilting operation
Tilt
Close
Recommended open position to
minimize wind noise. Push once to open")

Seat position adjustment
Seatback angle adjustment
Lumbar support adjustment
Seat cushion length adjustmentMemory position 1
Memory posit")