Page 83 of 568

832. Instrument cluster
2
Instrument cluster
CAMRY_U (OM33C64U)
●Average fuel economy*1, 2/Tank average fuel economy*1/Trip aver-
age fuel economy
*1
Displays the average fuel consum ption since the function was
reset, the vehicle was refueled, an d the engine was started, respec-
tively
Use the displayed average fuel consumption as a reference.
● Current fuel economy*1
Displays the current rate of fuel consumption
● Distance to empty
*1/Trip distance*1/Distance*1, 2
Displays the estimated maximum distance that can be driven with
the quantity of fuel remaining, t he distance driven after the engine
was started and the distance since the function was reset, respec-
tively.
• This distance is computed based on your average fuel consumption. As a result, the actual distance that can be driven may differ from that dis-
played.
• When only a small amount of fuel is added to the tank, the display may
not be updated.
When refueling, turn the engine switch off. If the vehicle is refueled with-
out turning the engine switch off, the display may not be updated.
● Trip elapse time*1/Elapse time*1, 2
Displays the engine was started and the elapsed time since the
function was reset, respectively
● Trip average speed
*1/Average speed*1, 2
Displays the engine was started and the average vehicle speed
since the function wa s reset, respectively
● Digital speedometer
*1
●Tire inflation pressure*3
P. 4 0 4
*1: Can be registered to Drive information 1 through 3. ( P. 84)
*2: Resetting procedures:
• Select a function to be reset using the meter control switch and then press and hold to reset.
• If there is more than one function that can be reset, check boxes will be displayed next to those functions.
*3: Vehicles with a tire inflation pressure display function
Drive information
Page 86 of 568

862. Instrument cluster
CAMRY_U (OM33C64U)
WARNING
■The information display at low temperatures
Allow the interior of the vehicle to warm up before using the liquid crystal
information display. At extremely low temperatures, the display monitor may
respond slowly, and display changes may be delayed.
For example, there is a lag between the driver’s shifting and the new gear
number appearing on the display. This l ag could cause the driver to down-
shift again, causing rapid and excessive engine braking and possibly an
accident resulting in death or injury.
■ Cautions during setting up the display
As the engine needs to be running during setting up the display, ensure that
the vehicle is parked in a place with adequate ventilation. In a closed area
such as a garage, exhaust gases including harmful carbon monoxide (CO)
may collect and enter the vehicle. This may lead to death or a serious
health hazard.
NOTICE
■During setting up the display
To prevent battery discharge, ensure that the engine is running while setting
up the display features.
Page 97 of 568

973-1. Key information
3
Operation of each component
CAMRY_U (OM33C64U)■
Confirmation of the registered key number (vehicles with a smart key
system)
The number of keys already registered to the vehicle can be confirmed. Ask
your Toyota dealer for details.
■ If a wrong key is used (vehicles with a smart key system)
The key cylinder rotates freely to isolate inside mechanism.
■ Customization that can be co nfigured at Toyota dealer
Settings (e. g. smart key system) can be changed.
(Customizable features: P. 523)
■ Certification for the wireless remote control (vehicles without a smart
key system)
U.S.A.
FCC ID: HYQ23AAC
FCC ID: HYQ23AAN
FCC ID: HYQ12BDM
NOTE:
This device complies with Part 15 of the FCC Rules. Operation is subject to
the following two conditions: (1) this device may not cause harmful interfer-
ence, and (2) this device must accept any interference received, including
interference that may cause undesired operation.
FCC WARNING:
Changes or modifications not expressly approved by the party responsible for
compliance could void the user's authority to operate the equipment.
Canada
NOTE:
This device complies with Industry Canada licence-exempt RSS standard(s).
Operation is subject to the following two conditions: (1) this device may not
cause interference, and (2) this device must accept any interference, includ-
ing interference that may cause undesired operation of the device.
■ Certification for wireless remote control (vehicles with a smart key sys-
tem)
P. 1 1 8
Page 104 of 568

1043-2. Opening, closing and locking the doors
CAMRY_U (OM33C64U)■
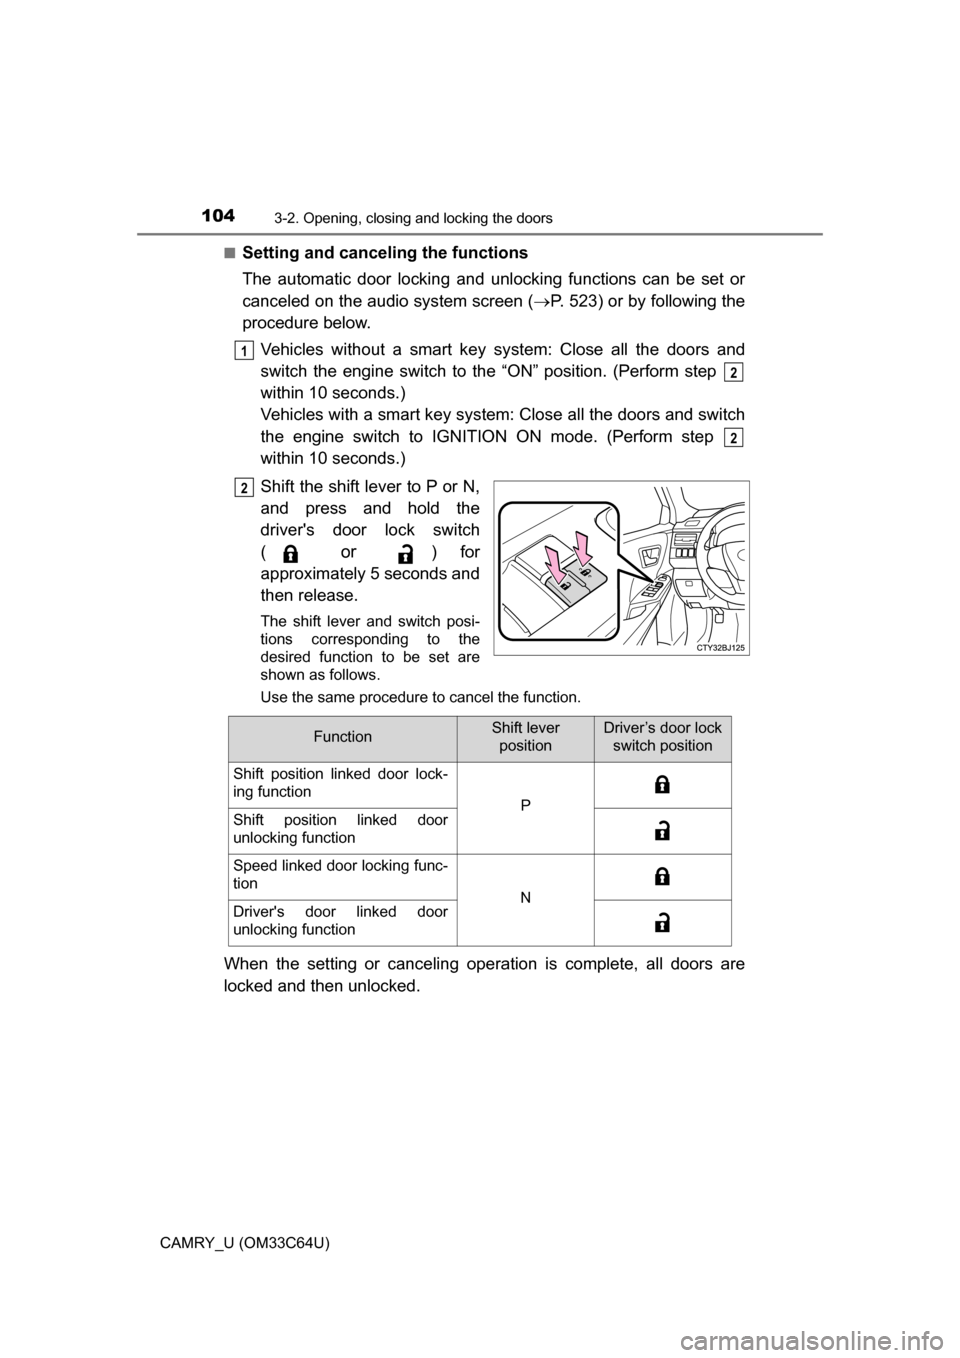
Setting and canceling the functions
The automatic door locking and unlocking functions can be set or
canceled on the audio system screen (
P. 523) or by following the
procedure below.
Vehicles without a smart key sy stem: Close all the doors and
switch the engine switch to the “ON” position. (Perform step
within 10 seconds.)
Vehicles with a smart key system: Close all the doors and switch
the engine switch to IGNITION ON mode. (Perform step
within 10 seconds.)
Shift the shift lever to P or N,
and press and hold the
driver's door lock switch
(
or ) for
approximately 5 seconds and
then release.
The shift lever and switch posi-
tions corresponding to the
desired function to be set are
shown as follows.
Use the same procedure to cancel the function.
When the setting or canceling operation is complete, all doors are
locked and then unlocked.
1
2
2
2
FunctionShift lever positionDriver’s door lock switch position
Shift position linked door lock-
ing function
PShift position linked door
unlocking function
Speed linked door locking func-
tion
NDriver's door linked door
unlocking function
Page 106 of 568
1063-2. Opening, closing and locking the doors
CAMRY_U (OM33C64U)
WARNING
■To prevent an accident
Observe the following precautions while driving the vehicle.
Failure to do so may result in a door opening and an occupant falling out,
resulting in death or serious injury.
● Ensure that all doors are properly closed.
● Do not pull the inside handle of the doors while driving.
Be especially careful for the front doors, as the doors may be opened
even if the inside lock buttons are in locked position.
● Set the rear door child-protector locks when children are seated in the rear
seats.
Page 113 of 568

1133-2. Opening, closing and locking the doors
3
Operation of each component
CAMRY_U (OM33C64U)■
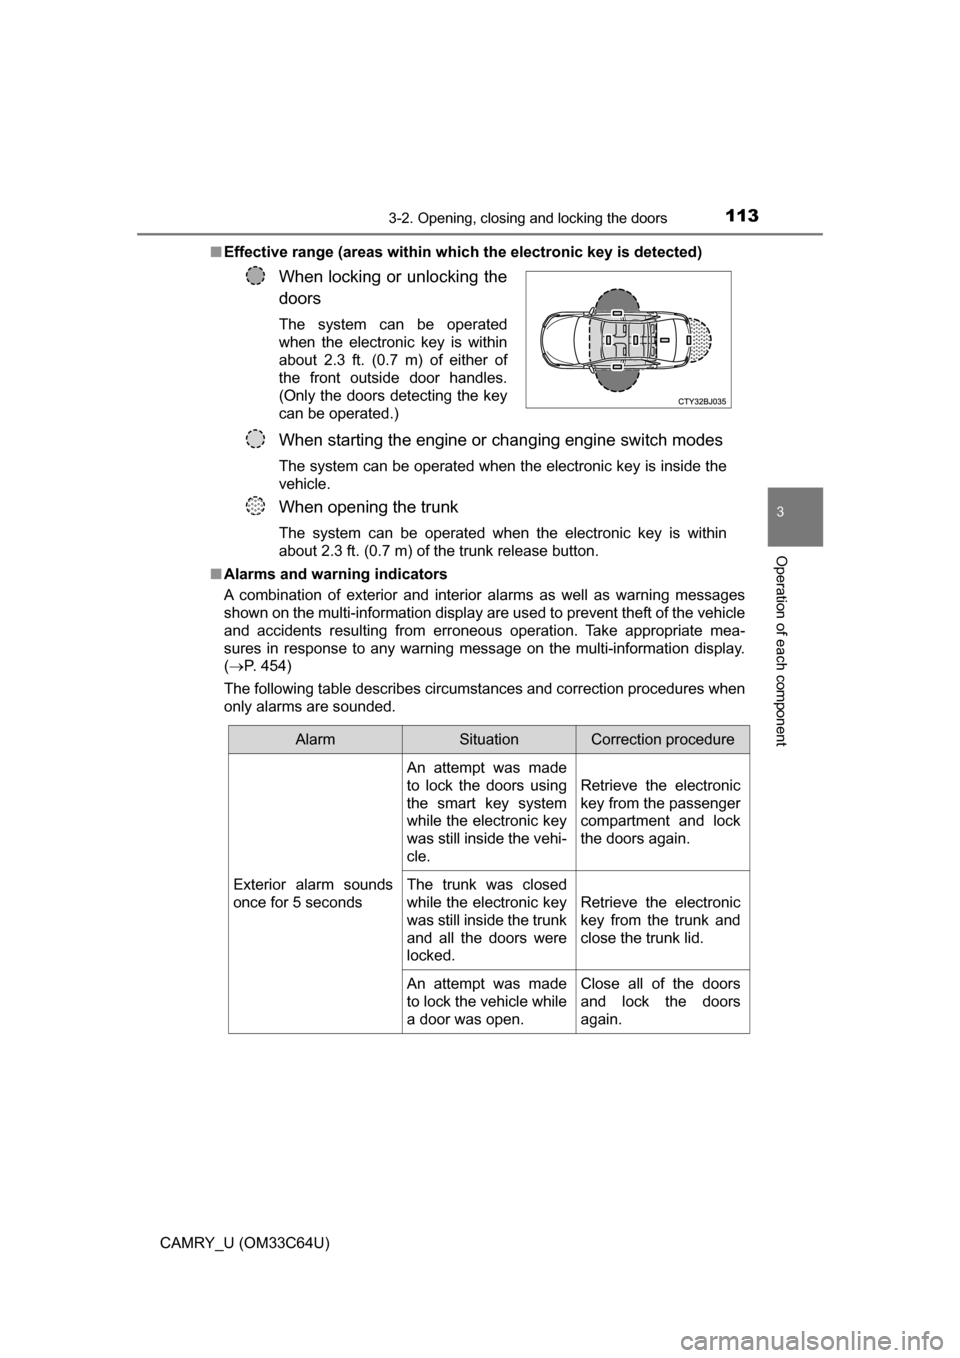
Effective range (areas within whic h the electronic key is detected)
■ Alarms and warning indicators
A combination of exterior and interior alarms as well as warning messages
shown on the multi-information display are used to prevent theft of the vehicle
and accidents resulting from erroneous operation. Take appropriate mea-
sures in response to any warning message on the multi-information display.
(P. 454)
The following table describes circumstances and correction procedures when
only alarms are sounded.
When locking or unlocking the
doors
The system can be operated
when the electronic key is within
about 2.3 ft. (0.7 m) of either of
the front outside door handles.
(Only the doors detecting the key
can be operated.)
When starting the engine or changing engine switch modes
The system can be operated when the electronic key is inside the
vehicle.
When opening the trunk
The system can be operated when the electronic key is within
about 2.3 ft. (0.7 m) of the trunk release button.
AlarmSituationCorrection procedure
Exterior alarm sounds
once for 5 seconds An attempt was made
to lock the doors using
the smart key system
while the electronic key
was still inside the vehi-
cle.
Retrieve the electronic
key from the passenger
compartment and lock
the doors again.
The trunk was closed
while the electronic key
was still inside the trunk
and all the doors were
locked. Retrieve the electronic
key from the trunk and
close the trunk lid.
An attempt was made
to lock the vehicle while
a door was open. Close all of the doors
and lock the doors
again.
Page 118 of 568

1183-2. Opening, closing and locking the doors
CAMRY_U (OM33C64U)■
Certification for the smart key system
U.S.A.
FCC ID: NI4TMLF10-3
FCC ID: NI4TMLF10-51
FCC ID: HYQ23AAP
FCC ID: HYQ14FBA
NOTE:
This device complies with Part 15 of the FCC Rules. Operation is subject to
the following two conditions: (1) this device may not cause harmful interfer-
ence, and (2) this device must accept any interference received, including
interference that may cause undesired operation.
FCC WARNING:
Changes or modifications not expressly approved by the party responsible for
compliance could void the user's authority to operate the equipment.
Canada
NOTE:
This device complies with Industry Canada licence-exempt RSS standard(s).
Operation is subject to the following two conditions: (1) this device may not
cause interference, and (2) this device must accept any interference, includ-
ing interference that may cause undesired operation of the device.
WARNING
■ Caution regarding interfer ence with electronic devices
● People with implantable cardiac pacemakers, cardiac resynchronization
therapy-pacemakers or implantable card ioverter defibrillators should keep
away from the smart key system antennas. ( P. 112)
The radio waves may affect the operation of such devices. If necessary,
the entry function can be disabled. Ask your Toyota dealer for details, such
as the frequency of radio waves and timing of the emitted radio waves.
Then, consult your doctor to see if you should disable the entry function.
● Users of any electrical medical device other than implantable cardiac
pacemakers, cardiac resynchronization therapy-pacemakers or implant-
able cardioverter defibrillators should consult the manufacturer of the
device for information about its operation under the influence of radio
waves.
Radio waves could have unexpected effects on the operation of such
medical devices.
Ask your Toyota dealer for details for disabling the entry function.
Page 124 of 568
1243-3. Adjusting the seats
CAMRY_U (OM33C64U)■
Adjusting the height of the head restraints (front seats)
Make sure that the head restraints are
adjusted so that the center of the head
restraint is closest to the top of your ears.
WARNING
■ Head restraint precautions (front seats)
Observe the following precautions regarding the head restraints. Failure to
do so may result in death or serious injury.
● Use the head restraints designed for each respective seat.
● Adjust the head restraints to the correct position at all times.
● After adjusting the head restraints, push down on them and make sure
they are locked in position.
● Do not drive with the head restraints removed.