Page 201 of 528
2014-2. Driving procedures
4
Driving
4RUNNER (U)_(OM35B37U)
Vehicles without a smart key systemWhile the engine switch is in t he “ON” position, move the shift
lever with the brake pedal depressed.
When shifting the shift lever between P and D, make sure that the
vehicle is completely stopped.
Vehicles with a smart key system
While the engine switch is in IGNITION ON mode, move the
shift lever with the brake pedal depressed.
When shifting the shift lever between P and D, make sure that the
vehicle is completely stopped.
Automatic transmission
Shifting the shift lever
Page 202 of 528

2024-2. Driving procedures
4RUNNER (U)_(OM35B37U)
*1: To improve fuel efficiency and reduce noises, set the shift lever in the Dposition for normal driving.
*2: Selecting shift ranges using S mode restricts the upper limit of the possiblegear ranges, controls engine braking forces, and prevents unnecessary
upshifting
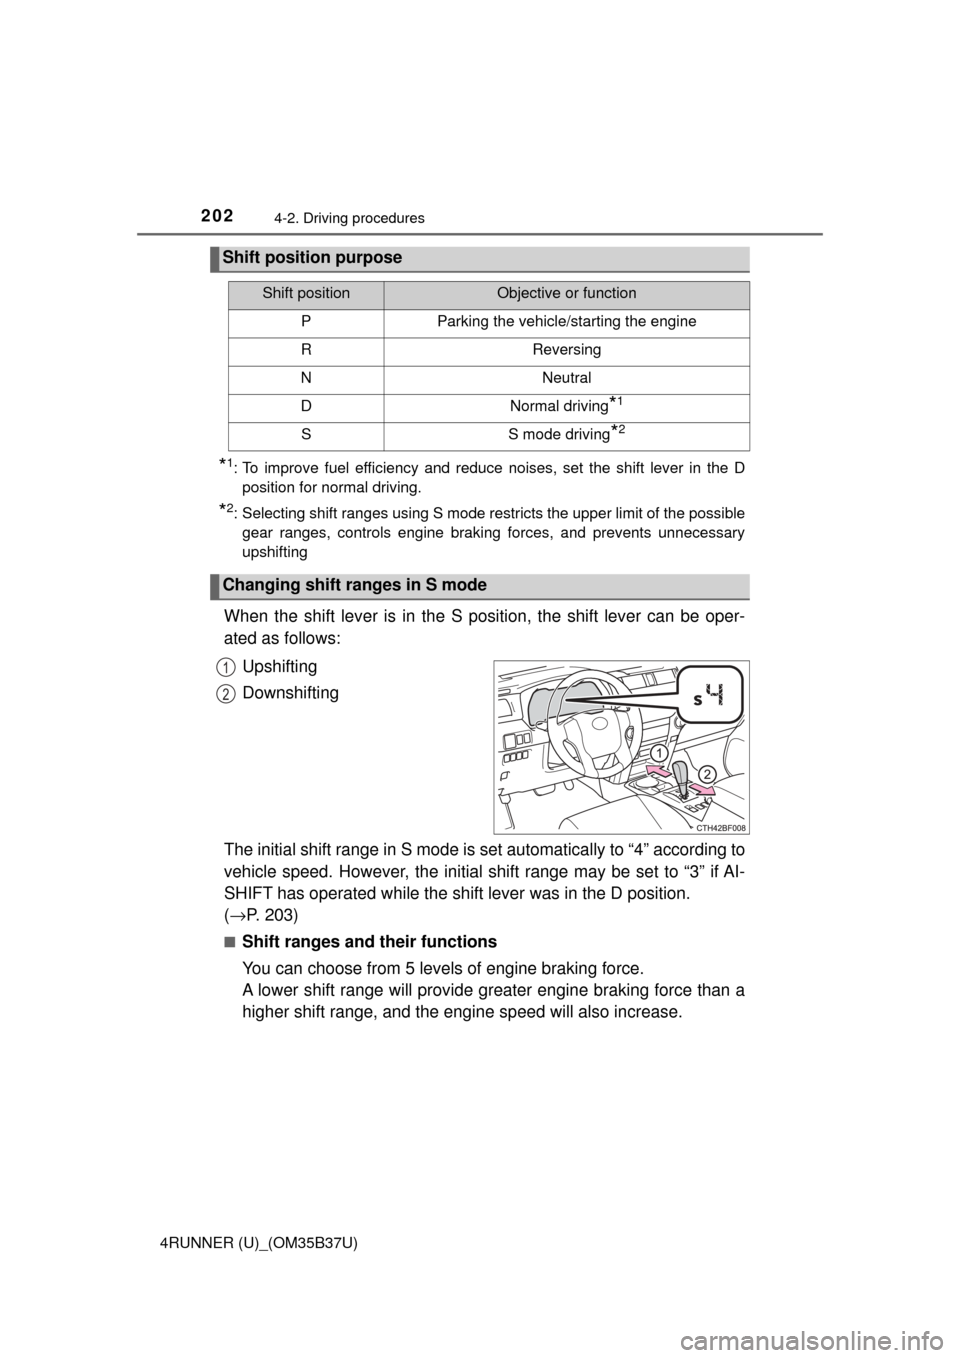
When the shift lever is in the S position, the shift lever can be oper-
ated as follows:
Upshifting
Downshifting
The initial shift range in S mode is set automatically to “4” according to
vehicle speed. However, the initial shift range may be set to “3” if AI-
SHIFT has operated while the shif t lever was in the D position.
( → P. 203)
■Shift ranges and their functions
You can choose from 5 levels of engine braking force.
A lower shift range will provide greater engine braking force than a
higher shift range, and the engine speed will also increase.
Shift position purpose
Shift positionObjective or function
PParking the vehicle/starting the engine
RReversing
NNeutral
DNormal driving*1
SS mode driving*2
Changing shift ranges in S mode
1
2
Page 203 of 528

2034-2. Driving procedures
4
Driving
4RUNNER (U)_(OM35B37U)
■S mode
When the shift range is “3” or lower, holding the shift lever toward “+” sets the
shift range to “5”.
■ AI-SHIFT
AI-SHIFT automatically selects the optimal gear according to driver perfor-
mance and driving conditions.
AI-SHIFT automatically operates when the shift lever is in the D position.
(Shifting the shift lever to the S position or paddle shifting cancels the func-
tion.)
The engine speed may remain high after releasing the accelerator pedal. This
does not indicate a malfunction.
■ When driving with cruise control system
Engine braking will not occur in S mode, even when downshifting to “4”.
(→P. 225)
■ Shift lock system
The shift lock system is a system to prevent accidental operation of the shift
lever in starting.
The shift lever can be shifted from P only when the engine switch is in the
“ON” position (vehicles without a smart key system) or IGNITION ON mode
(vehicles with a smart key system) and the brake pedal is being depressed.
Page 204 of 528

2044-2. Driving procedures
4RUNNER (U)_(OM35B37U)■
If the shift lever canno t be shifted from P
First, check whether the brake pedal is being depressed.
If the shift lever cannot be shifted with your foot on the brake pedal, there may
be a problem with the shift lock system. Have the vehicle inspected by y\
our
Toyota dealer immediately.
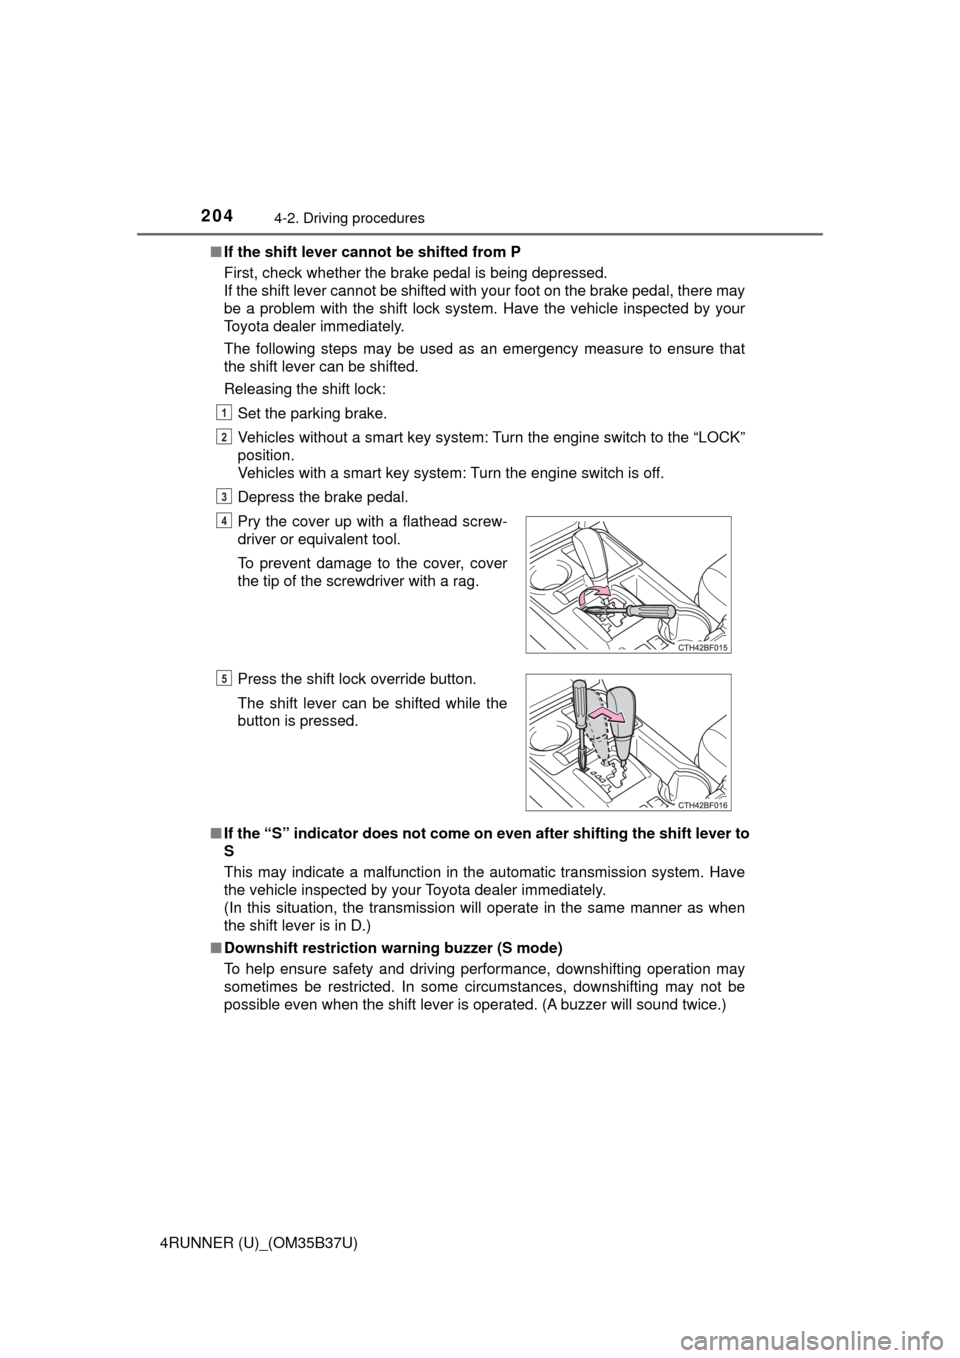
The following steps may be used as an emergency measure to ensure that
the shift lever can be shifted.
Releasing the shift lock:
Set the parking brake.
Vehicles without a smart key system: Turn the engine switch to the “LOCK”
position.
Vehicles with a smart key system: Turn the engine switch is off.
Depress the brake pedal.
■ If the “S” indicator does not come on even after shifting the shift lever to
S
This may indicate a malfunction in the automatic transmission system. Have
the vehicle inspected by your Toyota dealer immediately.
(In this situation, the transmission will operate in the same manner as when
the shift lever is in D.)
■ Downshift restriction warning buzzer (S mode)
To help ensure safety and driving performance, downshifting operation may
sometimes be restricted. In some circumstances, downshifting may not be
possible even when the shift lever is operated. (A buzzer will sound twice.) Pry the cover up with a flathead screw-
driver or equivalent tool.
To prevent damage to the cover, cover
the tip of the screwdriver with a rag.
Press the shift lock override button.
The shift lever can be shifted while the
button is pressed.
1
2
3
4
5
Page 206 of 528
2064-2. Driving procedures
4RUNNER (U)_(OM35B37U)
The lever will return to its original position after operation.
Right turn
Lane change to the right (push
and hold the lever partway)
The right hand signals will flash
until you release the lever.
Lane change to the left (push
and hold the lever partway)
The left hand signals will flash until
you release the lever.
Left turn
■ Turn signals can be operated when
Vehicles without a smart key system
The engine switch is in the “ON” position.
Vehicles with a smart key system
The engine switch is in IGNITION ON mode.
■ If the indicator flashes faster than usual
Check that a light bulb in the front or rear turn signal lights has not burned
out.
Turn signal lever
Operating instructions
1
2
3
4
Page 209 of 528
2094-3. Operating the lights and wipers
4
Driving
4RUNNER (U)_(OM35B37U)
Ty p e BThe headlights, parkinglights, daytime running
lights ( →P. 212) and so
on turn on and off auto-
matically (when the
engine switch is in IGNI-
TION ON mode).
The side marker, park- ing, tail, license plate,
daytime running lights
( → P. 212) and instru-
ment panel lights turn
on.
The headlights and all the lights listed above
(except daytime running
lights) turn on.
The daytime running lights turn off.
1
2
3
4
Page 211 of 528
2114-3. Operating the lights and wipers
4
Driving
4RUNNER (U)_(OM35B37U)
Ty p e DThe headlights, parkinglights, daytime running
lights ( →P. 212) and so
on turn on and off auto-
matically (when the
engine switch is in IGNI-
TION ON mode).
The side marker, park- ing, tail, license plate,
daytime running lights
( → P. 212) and instru-
ment panel lights turn
on.
The headlights and all the lights listed above
(except daytime running
lights) turn on.
The daytime running lights ( →P. 212) turn on.
With the headlights on, push
the lever away from you to turn
on the high beams.
Pull the lever toward you to the
center position to turn the high
beams off.
Pull the lever toward you and
release it to flash the high
beams once.
You can flash the high beams with the headlights on or off.
1
2
3
Turning on the high beam headlights
4
1
2
Page 212 of 528

2124-3. Operating the lights and wipers
4RUNNER (U)_(OM35B37U)
■Daytime running light system
●To make your vehicle more visible to other drivers during daytime driving,
the daytime running lights turn on automatically whenever the engine is
started and the parking brake is released with the headlight switch off or in
the “AUTO” position. (Illuminate dimmer than the headlight high beam.)
Daytime running lights are not designed for use at night.
Type A and B: Daytime running lights can be turned off by operating the
switch.
● Compared to turning on the headlights, the daytime running light system
offers greater durability and consumes less electricity, so it can help improve
fuel economy.
■ Headlight control sensor (if equipped)
■ Automatic light off system
Vehicles without a smart key system
● When the headlights come on: The headlights and tail lights turn off 30 sec-
onds after a door is opened and closed if the engine switch is turned to the
“ACC” or “LOCK” position. (The lights turn off immediately if on the
key is pressed after all the doors are locked.)
● When only the tail lights come on: The tail lights turn off automatically if the
engine switch is turned to the “ACC” or “LOCK” position and the driver’s
door is opened.
To turn the lights on again, turn the engine switch to the “ON” position, or turn
the lights off and then back to or .
Vehicles with a smart key system
● When the headlights come on: The headlights and tail lights turn off 30 sec-
onds after a door is opened and closed if the engine switch is turned to
ACCESSORY mode or turned off. (The lights turn off immediately if
on the key is pressed after all the doors are locked.)
● When only the tail lights come on: The tail lights turn off automatically if the
engine switch is turned off and the driver’s door is opened.
To turn the lights on again, turn the engine switch to IGNITION ON mode, or
turn the light switch off and then back to or . The sensor may not function properly if an
object is placed on the sensor, or anything
that blocks the sensor is affixed to the
windshield.
Doing so interferes with the sensor
detecting the level of ambient light and
may cause the automatic headlight sys-
tem to malfunction.