Page 116 of 198

Customizing Climate ControlThe climate control system is designed to automatically provide optimum comfort in most
situations. All you need to do is set the desired temperature, and the air conditioning, air
recirculation, air distribution, and fan speed automatically maintain your selected temperature.
To override the automatic setting, touch FRONT or REAR to customize individual settings for thefront or rear seating areas. Then touch the setting you want to change. Touch RESET AUTO tochange all settings on the panel back to their defaults. Or, you can touch AUTO associated with
any individual setting to change it back to its default.
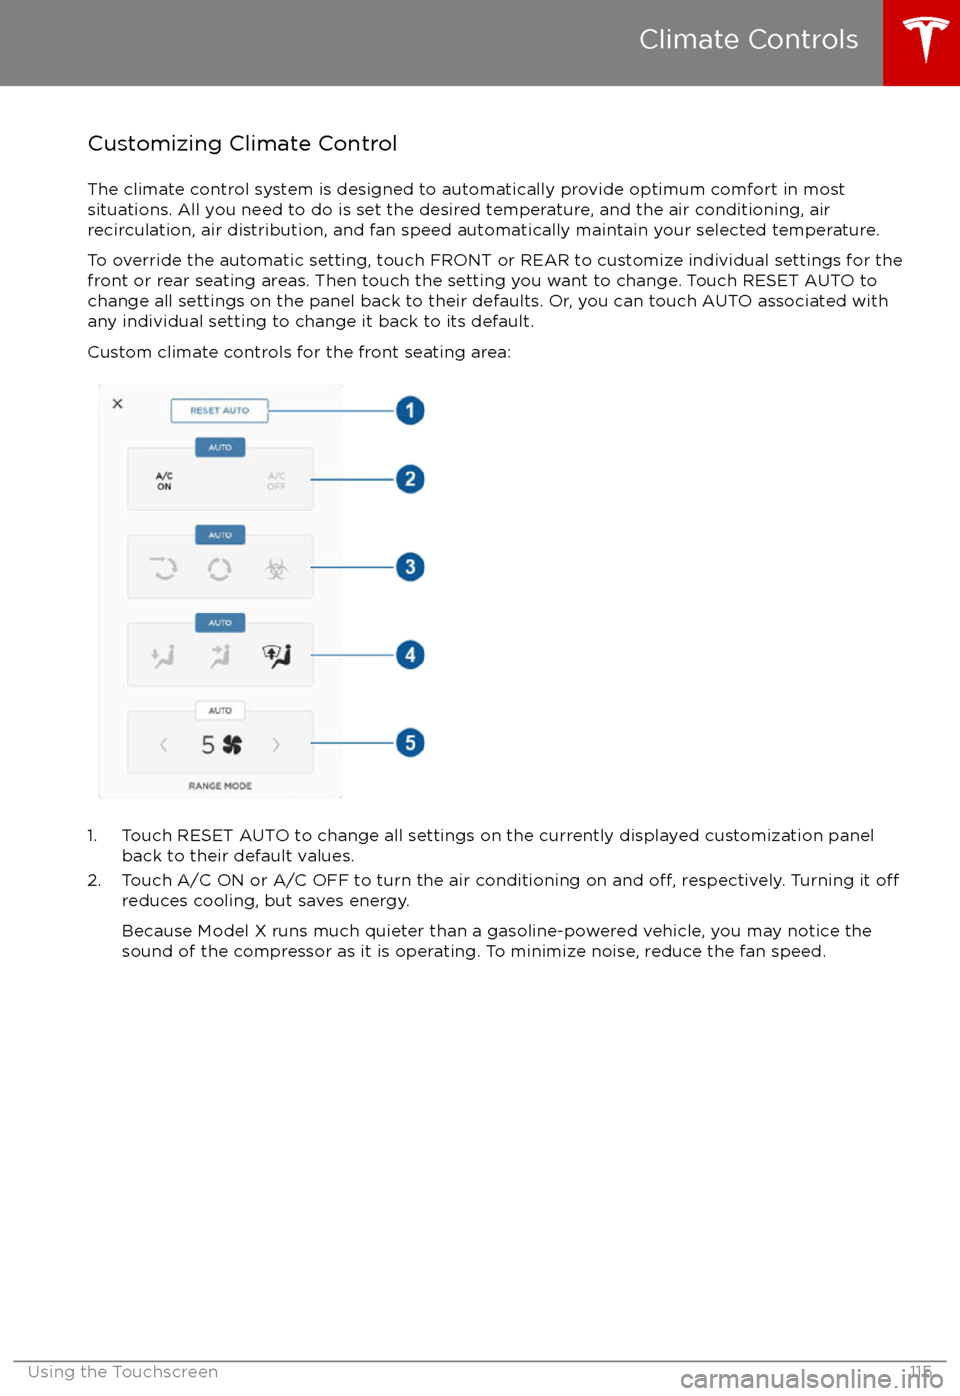
Custom climate controls for the front seating area:
1. Touch RESET AUTO to change all settings on the currently displayed customization panel back to their default values.
2. Touch A/C ON or A/C OFF to turn the air conditioning on and
off, respectively. Turning it offreduces cooling, but saves energy.
Because Model X runs much quieter than a gasoline-powered vehicle, you may notice the
sound of the compressor as it is operating. To minimize noise, reduce the fan speed.
Climate Controls
Using the Touchscreen115
Page 118 of 198
Note: When set to AUTO, the rear heating and air conditioning turn off when Model X detects that
there are no occupants in the second or third row seats. To override this energy saving feature,
touch the AUTO button located above the Climate On/Climate
Off setting. When doing so, the
setting is saved until you manually change it by touching AUTO a second time.
1. Touch RESET AUTO to change all settings on the currently displayed customization panel back to their default values.
2. Touch CLIMATE ON or CLIMATE OFF to turn the air conditioning on and
off, respectively.
Turning it off reduces cooling, but saves energy.
Because Model X runs much quieter than a gasoline-powered vehicle, you may notice the sound of the compressor as it is operating. To minimize noise, reduce the fan speed or
recirculate the air.
3. Touch the arrows to adjust the temperature.
4. Touch the arrows to set the speed of the fan.
Climate Controls
Using the Touchscreen117
Page 164 of 198

Removing the Maintenance Panel
To check
fluid levels, remove the maintenance
panel:
1. Pull the rear edge of the maintenance panel upward to release the
five clips that
hold the panel in place.
2. Maneuver the maintenance panel toward the windshield to remove.
Caution: The maintenance panel protects
the front trunk from water. When re-
attaching, make sure it is fully seated.
Checking Battery Coolant
If the quantity of
fluid in the cooling system
drops below the recommended level, the
instrument panel displays a warning message.
Stop Model X as soon as safety permits and
contact Tesla.
Fluid Level Check
Tesla checks the Battery coolant level at the
regularly scheduled maintenance intervals.
DO NOT ADD FLUID. Doing so can result in
damage not covered by the warranty.
Topping Up the Battery Coolant
Under no circumstances should you add
coolant. If the instrument panel warns you that
the
fluid level is low, contact Tesla
immediately.
To maximize the performance and life of the
Battery, the cooling system uses a
specifictype of G-48 ethylene-glycol coolant (HOAT).
Contact Tesla for more specific information
about the coolant.
Checking Brake FluidWarning: Contact Tesla immediately if you
notice increased movement of the brake
pedal or a
significant loss of brake fluid.Driving under these conditions can result in extended stopping distances or
complete brake failure.
The Brake indicator on the
instrument panel alerts you if the
quantity of
fluid in the brake
reservoir drops below the
recommended level. If it displays
while driving, stop as soon as safety
permits by gently applying the
brakes. Do not continue driving.
Contact Tesla immediately.
Fluid Level Check
Tesla checks the brake
fluid level at the
regularly scheduled maintenance intervals.
Topping Up the Brake Fluid
Do not top up your brake
fluid. Tesla service
does this when you bring Model X in for
regular servicing. The following instructions
are provided for information purposes and future reference only:
1. Clean the
filler cap before removing to
prevent dirt from entering the reservoir.
2. Unscrew the cap and remove.
3. Top up the reservoir to the MAX mark using brake
fluid meeting DOT3specifications.4. Replace the filler cap.
Warning: Only use new fluid from a sealed
air-tight container. Never use previously
used
fluid or fluid from a previously
opened container