2017 SUBARU LEGACY remote control
[x] Cancel search: remote controlPage 228 of 610
NOTE
Some garage door openers may re-
quire you to do the above press-hold-
release sequence a third time to com-
plete the programming.
4. The garage door opener should now
recognize the HomeLink
®Wireless Control
System and your garage door opener
should activate when the HomeLink
®button is pressed.
!Programming for entrance gates
and garage door openers in
Canada
1. Unplug the motor of the entrance gate
or garage door opener from the outlet.
NOTE
If any of the HomeLink®buttons are
already programmed for other devices,
skip step 2 because it clears the
memory of all three buttons.
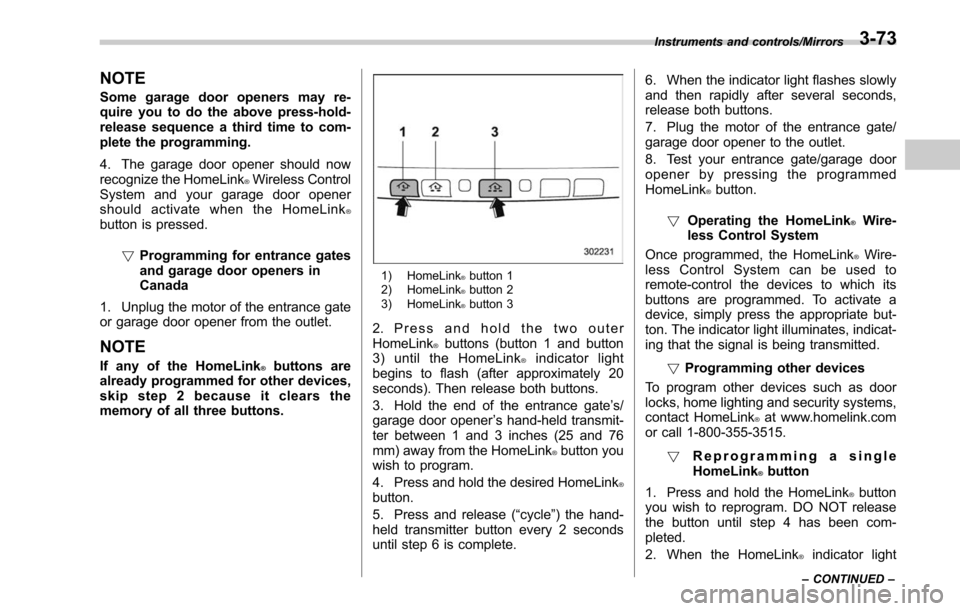
1) HomeLink®button 1
2) HomeLink®button 2
3) HomeLink®button 3
2. Press and hold the two outer
HomeLink®buttons (button 1 and button
3) until the HomeLink®indicator light
begins to flash (after approximately 20
seconds). Then release both buttons.
3. Hold the end of the entrance gate ’s/
garage door opener ’s hand-held transmit-
ter between 1 and 3 inches (25 and 76
mm) away from the HomeLink
®button you
wish to program.
4. Press and hold the desired HomeLink
®button.
5. Press and release (“cycle”) the hand-
held transmitter button every 2 seconds
until step 6 is complete. 6. When the indicator light flashes slowly
and then rapidly after several seconds,
release both buttons.
7. Plug the motor of the entrance gate/
garage door opener to the outlet.
8. Test your entrance gate/garage door
opener by pressing the programmed
HomeLink
®button.
! Operating the HomeLink
®Wire-
less Control System
Once programmed, the HomeLink
®Wire-
less Control System can be used to
remote-control the devices to which its
buttons are programmed. To activate a
device, simply press the appropriate but-
ton. The indicator light illuminates, indicat-
ing that the signal is being transmitted.
!Programming other devices
To program other devices such as door
locks, home lighting and security systems,
contact HomeLink
®at www.homelink.com
or call 1-800-355-3515.
! Reprogramming a single
HomeLink
®button
1. Press and hold the HomeLink
®button
you wish to reprogram. DO NOT release
the button until step 4 has been com-
pleted.
2. When the HomeLink
®indicator light
Instruments and controls/Mirrors
–CONTINUED –3-73
Page 231 of 610
Instruments and controls/Mirrors
new battery be placed in the
hand-held remote (garage door
opener remote) of the device for
quicker and more accurate train-
ing.
. Turn the ignition switch to the
“ ON ”or “ACC ”position before
programming and/or operating
HomeLink
®.
. Keep the hand-held remote (gar-
age door opener remote) of the
device you are programming for
use in other vehicles as well as
for future HomeLink
®program-
ming. It is also suggested that
upon the sale of the vehicle, the
programmed HomeLink
®buttons
be erased for security purposes.
Refer to “Erasing HomeLink
®buttons ”F 3-79. !
Programming a New HomeLink
®button
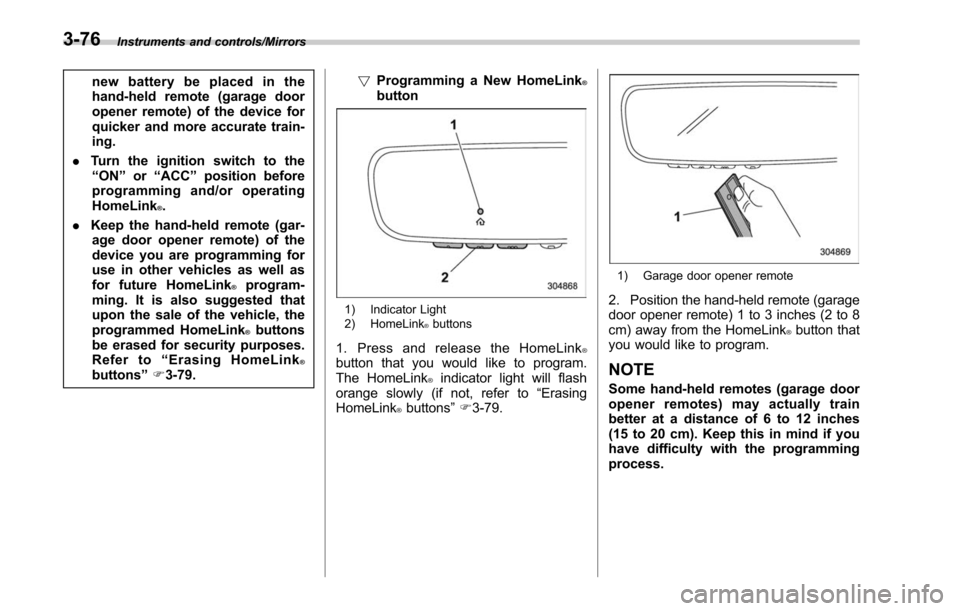
1) Indicator Light
2) HomeLink®buttons
1. Press and release the HomeLink®button that you would like to program.
The HomeLink®indicator light will flash
orange slowly (if not, refer to “Erasing
HomeLink
®buttons ”F 3-79.
1) Garage door opener remote
2. Position the hand-held remote (garage
door opener remote) 1 to 3 inches (2 to 8
cm) away from the HomeLink
®button that
you would like to program.
NOTE
Some hand-held remotes (garage door
opener remotes) may actually train
better at a distance of 6 to 12 inches
(15 to 20 cm). Keep this in mind if you
have difficulty with the programming
process.
3-76
Page 232 of 610
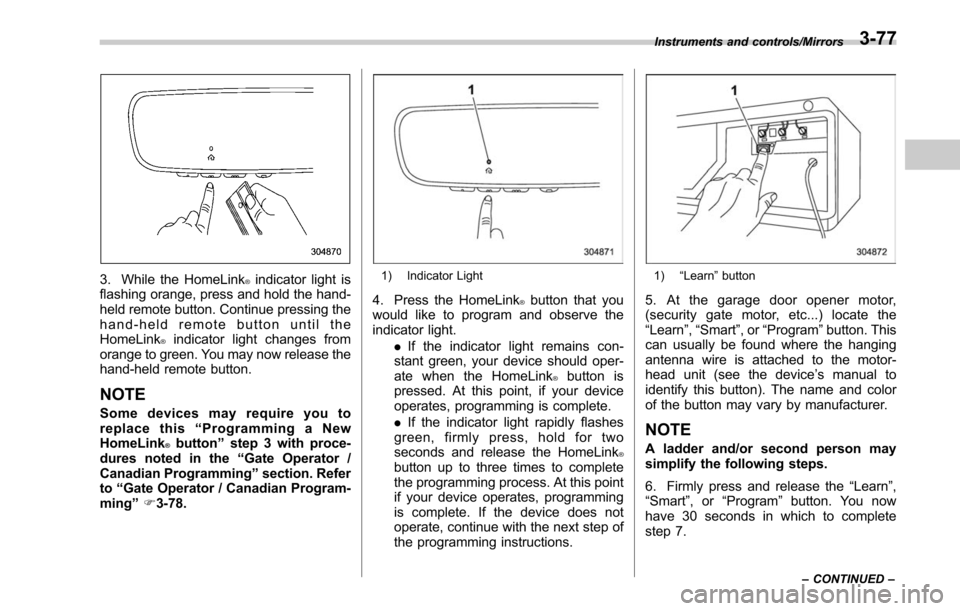
3. While the HomeLink®indicator light is
flashing orange, press and hold the hand-
held remote button. Continue pressing the
hand-held remote button until the
HomeLink
®indicator light changes from
orange to green. You may now release the
hand-held remote button.
NOTE
Some devices may require you to
replace this “Programming a New
HomeLink
®button ”step 3 with proce-
dures noted in the “Gate Operator /
Canadian Programming ”section. Refer
to “Gate Operator / Canadian Program-
ming ”F 3-78.
1) Indicator Light
4. Press the HomeLink®button that you
would like to program and observe the
indicator light.
.If the indicator light remains con-
stant green, your device should oper-
ate when the HomeLink
®button is
pressed. At this point, if your device
operates, programming is complete.
. If the indicator light rapidly flashes
green, firmly press, hold for two
seconds and release the HomeLink
®button up to three times to complete
the programming process. At this point
if your device operates, programming
is complete. If the device does not
operate, continue with the next step of
the programming instructions.
1) “Learn ”button
5. At the garage door opener motor,
(security gate motor, etc...) locate the
“Learn ”,“Smart ”,or “Program ”button. This
can usually be found where the hanging
antenna wire is attached to the motor-
head unit (see the device ’s manual to
identify this button). The name and color
of the button may vary by manufacturer.
NOTE
A ladder and/or second person may
simplify the following steps.
6. Firmly press and release the “Learn”,
“Smart ”,or“Program ”button. You now
have 30 seconds in which to complete
step 7.
Instruments and controls/Mirrors
–CONTINUED –3-77
Page 233 of 610
Instruments and controls/Mirrors
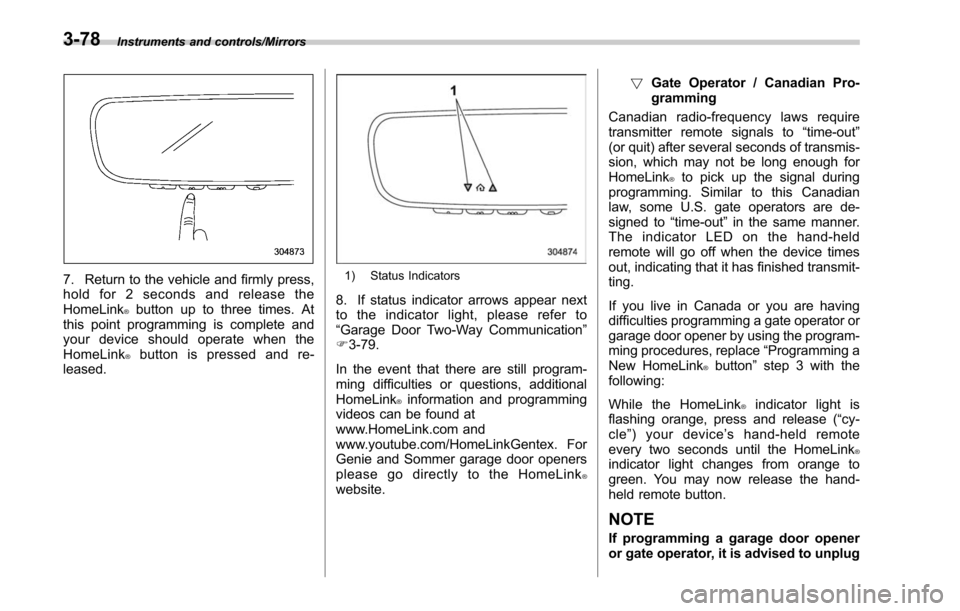
7. Return to the vehicle and firmly press,
hold for 2 seconds and release the
HomeLink
®button up to three times. At
this point programming is complete and
your device should operate when the
HomeLink
®button is pressed and re-
leased.
1) Status Indicators
8. If status indicator arrows appear next
to the indicator light, please refer to
“Garage Door Two-Way Communication ”
F 3-79.
In the event that there are still program-
ming difficulties or questions, additional
HomeLink
®information and programming
videos can be found at
www.HomeLink.com and
www.youtube.com/HomeLinkGentex. For
Genie and Sommer garage door openers
please go directly to the HomeLink
®website. !
Gate Operator / Canadian Pro-
gramming
Canadian radio-frequency laws require
transmitter remote signals to “time-out”
(or quit) after several seconds of transmis-
sion, which may not be long enough for
HomeLink
®to pick up the signal during
programming. Similar to this Canadian
law, some U.S. gate operators are de-
signed to “time-out”in the same manner.
The indicator LED on the hand-held
remote will go off when the device times
out, indicating that it has finished transmit-
ting.
If you live in Canada or you are having
difficulties programming a gate operator or
garage door opener by using the program-
ming procedures, replace “Programming a
New HomeLink
®button ”step 3 with the
following:
While the HomeLink
®indicator light is
flashing orange, press and release (“cy-
cle ”)yourdevice ’s hand-held remote
every two seconds until the HomeLink
®indicator light changes from orange to
green. You may now release the hand-
held remote button.
NOTE
If programming a garage door opener
or gate operator, it is advised to unplug
3-78
Page 234 of 610

the device during the“cycling ”pro-
cess to prevent possible overheating.
Proceed with “Programming a New
HomeLink
®button ”step 4 to complete.
! Using HomeLink
®
To operate, simply press and release the
programmed HomeLink®button. Activa-
tion will now occur for the trained device
(i.e. garage door opener, gate operator,
security system, entry door lock, home/
office lighting, etc.). For convenience, the
hand-held remote of the device may also
be used at any time.
!Erasing HomeLink
®buttons
To erase programming from the three
buttons (individual buttons cannot be
erased but can be “reprogrammed”as
outlined below), follow the step noted:
Press and hold the two outer HomeLink
®buttons for at least 10 seconds. The LED
indicator will change from continuously lit
to rapidly flashing. Release both buttons.
Do not hold for longer than 20 seconds.
HomeLink
®is now ready to be pro-
grammed at any time beginning with
“Programming a New HomeLink
®button ”
- step 1. !
Reprogramming a Single
HomeLink
®button
To program a previously trained button,
follow these steps:
1. Press and hold the desired HomeLink
®button. DO NOT release the button.
2. The indicator light will begin to slowly
flash orange after 20 seconds. The
HomeLink
®button can be released at this
point. Proceed with “Programming a New
HomeLink
®button ”- step 3.
3. If you do not complete the program-
ming of a new device to the button, it will
revert to the previously stored program-
ming.
!Garage Door Two-Way Commu-
nication
HomeLink
®has the capability of commu-
nicating with your garage door opener.
HomeLink
®can receive and display “clos-
ing ”or “opening ”status messages from
compatible garage door opener systems.
At any time, HomeLink
®can also recall
and display the last recorded status
communicated by the garage door opener
to indicate your garage door being
“ closed ”or “opened ”.
HomeLink
®has the capability of receiving
this communication from the garage door
opener at a range up to 820 feet (250 m). Range may be reduced by obstacles such
as houses or trees. You may have to slow
your vehicle speed to successfully receive
the garage door opener communication.
!Programming Two-Way Commu-
nication
1) Status Indicators
Within 5 seconds after programming a
new HomeLink®button, both of Home-
Link ’s garage door status indicators will
flash rapidly green indicating that the
garage door two-way communication has
been enabled. If your garage door status
indicators flashed, two-way communica-
tion programming is complete.
If the garage door status indicators do not
flash, additional HomeLink
®information
and programming videos can be found
Instruments and controls/Mirrors
–CONTINUED –3-79
Page 237 of 610
Instruments and controls/Tilt/telescopic steering wheel
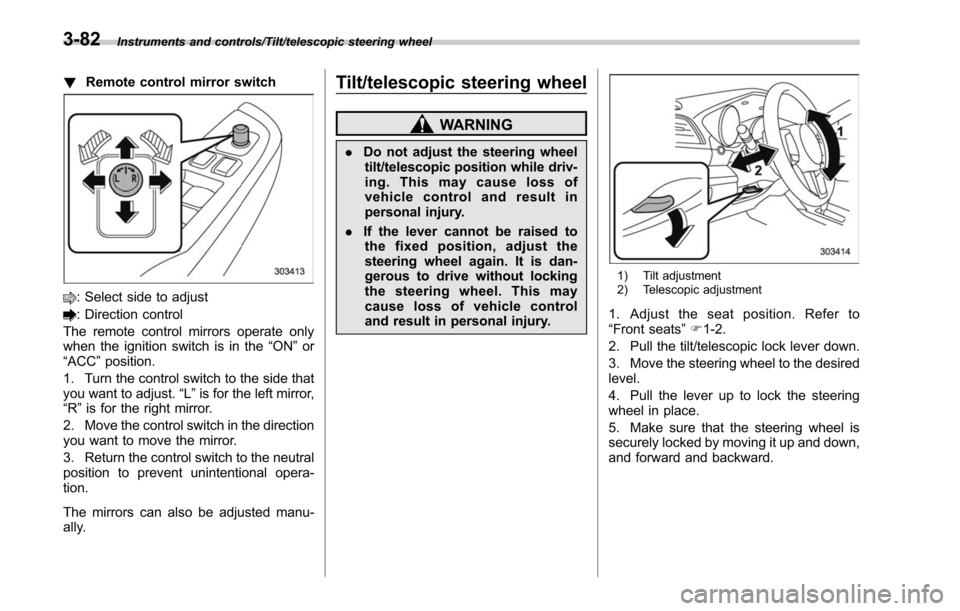
!Remote control mirror switch
: Select side to adjust
: Direction control
The remote control mirrors operate only
when the ignition switch is in the “ON”or
“ACC ”position.
1. Turn the control switch to the side that
you want to adjust. “L”is for the left mirror,
“R ”is for the right mirror.
2. Move the control switch in the direction
you want to move the mirror.
3. Return the control switch to the neutral
position to prevent unintentional opera-
tion.
The mirrors can also be adjusted manu-
ally.
Tilt/telescopic steering wheel
WARNING
. Do not adjust the steering wheel
tilt/telescopic position while driv-
ing. This may cause loss of
vehicle control and result in
personal injury.
. If the lever cannot be raised to
the fixed position, adjust the
steering wheel again. It is dan-
gerous to drive without locking
the steering wheel. This may
cause loss of vehicle control
and result in personal injury.
1) Tilt adjustment
2) Telescopic adjustment
1. Adjust the seat position. Refer to
“Front seats ”F 1-2.
2. Pull the tilt/telescopic lock lever down.
3. Move the steering wheel to the desired
level.
4. Pull the lever up to lock the steering
wheel in place.
5. Make sure that the steering wheel is
securely locked by moving it up and down,
and forward and backward.
3-82
Page 372 of 610

Fuel...................................................................... 7-3
Fuel requirements ............................................... 7-3
Fuel filler lid and cap ........................................... 7-4
State emission testing (U.S. only) ...................... 7-7
Preparing to drive ............................................... 7-8
Starting and stopping the engine (models without push-button ignition switch) .............. 7-9
General precautions when starting/stopping
engine .............................................................. 7-9
Starting engine ................................................... 7-10
Stopping the engine ........................................... 7-11
Steering lock ...................................................... 7-11
Starting and stopping engine (models with
push-button start system) .............................. 7-12
Safety precautions............................................. 7-12
Operating range for push-button start system ............................................................. 7-12
Starting engine ................................................... 7-12
Stopping engine ................................................. 7-14
When access key does not operate properly ....... 7-14
Steering lock ...................................................... 7-14
Remote engine start system (dealer
option) .............................................................. 7-15
Models with “keyless access with push-button
start system ”................................................... 7-16
Models without “keyless access with push-button
start system ”................................................... 7-17
Entering the vehicle while it is running via remote start ................................................................. 7-20
Entering the vehicle following remote engine start shutdown ......................................................... 7-20 Pre-heating or pre-cooling the interior of the
vehicle ............................................................ 7-20
Service mode (models without “keyless access
with push-button start system ”) ....................... 7-20
Remote transmitter program (models without “keyless access with push-button start
system ”).......................................................... 7-20
System maintenance .......................................... 7-21
Manual transmission ......................................... 7-23Selecting reverse gear ....................................... 7-23
Shifting speeds .................................................. 7-24
Driving tips ........................................................ 7-24
Continuously variable transmission ................. 7-25Select lever....................................................... 7-26
Shift lock function ............................................. 7-28
Selection of manual mode .................................. 7-29
Driving tips ........................................................ 7-31
Power steering ................................................... 7-31
Braking ............................................................... 7-32
Braking tips ....................................................... 7-32
Brake system .................................................... 7-32
Disc brake pad wear warning indicators ............. 7-33
ABS (Anti-lock Brake System).......................... 7-33
ABS self-check.................................................. 7-34
ABS warning light .............................................. 7-34
Electronic Brake Force Distribution (EBD)
system ............................................................. 7-34
Steps to take if EBD system malfunctions .......... 7-34
Vehicle Dynamics Control system.................... 7-35Vehicle Dynamics Control system monitor .......... 7-37
Vehicle Dynamics Control OFF switch ................ 7-37
Starting and operating
7
Page 391 of 610
Starting and operating/Remote engine start system (dealer option)
&Entering the vehicle while it
is running via remote start
1. Unlock the vehicle doors using the
keyless access function (if equipped) or
remote keyless entry system, then open
the door(s). If the vehicle ’s doors are
unlocked manually using the key, the
vehicle’ s alarm system will trigger when
a door is opened (if the alarm system is
armed prior to activating the remote
engine start system) and the engine will
turn off. Perform either of the following
procedures to disarm the alarm system.
Refer to “Alarm system ”F 2-28.
. Insert the key into the ignition switch
and turn it to the “ON ”position (models
without “keyless access with push-
button start system ”)
. Push the push-button ignition switch
to the “ACC”or “ON ”position (models
with “keyless access with push-button
start system ”)
. Press any button on the access key/
remote keyless entry transmitter.
2. Enter the vehicle.
3. The engine will shut down when any
door or rear gate is opened.
4. For models without “keyless access
with push-button start system ”, insert the
key into the ignition switch and turn to the
“START ”position to restart the engine. For models with
“keyless access with push-
button start system ”, press the push-
button ignition switch while depressing
the brake pedal to restart the engine.
& Entering the vehicle follow-
ing remote engine start shut-
down
An alarm trigger may occur if the vehicle is
opened by the remote keyless entry
system/keyless access function within a
few seconds immediately following remote
engine start shutdown.
&Pre-heating or pre-cooling
the interior of the vehicle
Before exiting the vehicle, set the tem-
perature controls to the desired setting
and operation. After the system starts the
engine, the heater or air conditioning will
activate and heat or cool the interior to
your setting.
&Service mode (models with-
out “keyless access with
push-button start system ”)
In service mode, the remote engine start
function is temporarily disabled to prevent
the system from unexpectedly starting the
engine while being serviced. To engage or disengage service mode:
1. Enter the vehicle and close all vehicle
doors and the rear gate/trunk lid.
2. Verify that the select lever is in the
“P ”
position (CVT models)
3. Depress and hold the brake pedal
4. Turn the ignition switch to the “ON”
position
5. Press and release the remote engine
start transmitter “
”button three times.
The system will honk the vehicle ’s horn
each time the button is pressed.
6. The system will pause for 1 second
then honk the vehicle’ s horn three times to
indicate that the service mode has been
engaged or honk one time to indicate that
the service mode has been disengaged.
NOTE
When taking your vehicle in for service,
it is recommended that you inform the
service personnel that your vehicle is
equipped with a remote engine start
system.
& Remote transmitter program
(models without “keyless ac-
cess with push-button start
system ”)
New transmitters can be programmed to
the remote engine start system in the
7-20