Page 267 of 610

Audio/Audio set
!Touch screen operation
This system is operated mainly by the
keys on the screen.
When a screen key is touched, a beep
sounds. You can set the beep sound.
Refer to “Unit settings” F5-19.
NOTE
. If the system does not respond to
touching a screen key, move your
finger away from the screen and touch
it again.
. Grayed-out screen keys cannot be
operated.
. The displayed image may become
darkerandmovingimagesmaybe
slightly distorted when the screen is
cold.
. In extremely cold conditions, the
screen may not be displayed correctly.
Also, the screen keys may be less
responsive than usual when pressed.
. When you look at the screen
through polarized material such as
polarized sunglasses, the screen may
be dark and difficult to see. If so, look at
the screen from different angles, adjust
the screen settings or take off your
sunglasses. Refer to “Unit settings ”
F 5-19. !
Entering letters and numbers/list
screen operation
! Entering letters and numbers
When entering the Bluetooth device name
or PIN-code, or the phone number, letters
and numbers can be entered via the
screen.
Enter letters (example: In-Car-Device
setting)
No. Function
&1Enter the desired characters (alpha-
bet key mode).
&2Switch to the screen for characters.
&3Enter a space.
&4Confirm the characters/numbers en-
tered into the window. No. Function
&5Delete a character/number entered
into the window.
!
List screen
Multimedia playlists (example: iPod play-
list)
No. Function
&1Select a category that wants to play
back.
&2Return to the playback display of
each mode.
&3Select to skip to the next or previous
page.
5-16
Page 270 of 610

NOTE
.If the audio control screen appears,
select the “Source ”key on the audio
screen or press the AUDIO/TUNE knob
again.
. When you push the AUDIO/TUNE
knob while any screen other than the
audio control screen is displayed, the
display will return to the audio control
screen.
. When the AUDIO/TUNE knob is
pushed and held, the graphic equalizer
screen will be displayed. Refer to
““Graphic Equalizer ””F5-23.
! Selecting a function menu
Press the HOME button to display home
screen.Item Function
AUDIO Select to display the main
screen of the audio source that
was selected previously.
PHONE Select to display the hands-free
function using your cell phone.
Refer to
“Hands-free phone
system ”F 5-71.
APPS Select to display the functions
linked with a smartphone. Refer
to
“SUBARU STARLINK ”F 5-
26.
SETTINGS Select to display the functions
for performing various settings.
Refer to
“Unit settings ”F 5-19.
& Unit settings
Sound quality adjustment, screen adjust-
ment, and information of the audio unit are
displayed.
1. Press the HOME button on the audio
panel.
2. Touch the “SETTINGS ”key.
3. Select the items to be set.
Available setting:
. General settings: Select the
tab to
check the system software update infor-
mation. Refer to “General settings” F5-20.
. Bluetooth settings: Select the
tab to
set the Bluetooth settings. Refer to “Blue-
tooth settings” F5-20. .
Sound settings: Select the
tab to set
the sound quality settings. Refer to
“Sound settings” F5-20.
. Display settings: Select to the
tab
set the screen settings. Refer to “Display
settings ”F 5-25.
. SUBARU STARLINK settings (if
equipped): Select to the
tab set the
SUBARU STARLINK settings. Refer to
“SUBARU STARLINK settings” F5-26.
Audio/Audio set
–CONTINUED –5-19
Page 273 of 610
Audio/Audio set
!“Balance/Fader ”
A good balance of the left and right stereo
channels and of the front and rear sound
levels is important for good quality audio
program listening.
Keep in mind that when listening to a
stereo recording or broadcast, changing
the right/left balance will increase the
volume of 1 group of sounds while
decreasing the volume of another.
Touch the “Set”key of the “Balance/Fader ”
key. The “Balance/Fader ”screen will
appear.. Volume Balance setting
1. Select the “Volume Balance Control ”
key.
2. Adjust the balance by pressing “”or
“” key.
3. Adjust the fader by pressing “
”or
“” key. .
Vocal image setting
1. Select the “Vocal Image Control ”key.
2. Adjust the balance by pressing “”or
“” key.
3. Adjust the fader by pressing “
”or
“” key.
5-22
Page 274 of 610
!“Speed Volume Control ”
The system adjusts to the optimum
volume and tone quality according to
vehicle speed to compensate for in-
creased vehicle noise.
1. Touch the right side key of the “Speed
Volume Control ”key.
2. Select the desired item. The “High ”
key comes to have a bigger effect. When
the “OFF ”key is selected, speed volume
control function is canceled.! “Graphic Equalizer ”
You can adjust the sound quality by
increasing/decreasing the gain for each
frequency range.
1. Touch the “Set ”key of the “Graphic
Equalizer ”key.
2. In this mode, 6 preset equalizer
patterns (the “Bass ”,“Treble ”, “Acoustic ”,
“Impact ”,“Smooth” and“Flat”key) and 3
customized patterns (the “SET 1”-“SET
3 ” key) are available.
3. When customizing the equalizer pat-
tern, touch among “SET 1”,“SET 2 ”or
“SET 3 ”and then touch the “Adjust”key.
4. Adjust the level of each frequency
band by touching “”or “”key.
Audio/Audio set
–CONTINUED –5-23
Page 275 of 610
Audio/Audio set
!“Sound Restorer ”
You can play compressed audio data with
a sound quality that is close to the original
sound.
Select the “ON”or “OFF ”key by the right
side key of the “Sound Restorer ”key.
! “Volume Smoother”
This function reduces the difference in
volume among the sound sources to be
played.
1. Touch the right side key of the “Volume
Smoother ”key.
2. Select the “OFF ”, “Low ”, “Mid ”or
“High ”key. The “High”key comes to have
a bigger effect. When the “OFF”key is
selected, the volume smoother function is
canceled.
! “Virtual Bass ”
This function enables you to adjust the
bass tone.
1. Touch the right side key of the “Virtual
Bass ”key.
2. Select the “OFF ”, “Low ”, “Mid ”or
“High ”key. The “High”key comes to have
a bigger effect. When the “OFF ”key is
selected, the virtual bass function is
canceled.! “Vocal Image Control ”
Refer to ““Balance/Fader ””F5-22.
5-24
Page 276 of 610

!Display settings
Touch the
tab to set display.
Item Function
Day/Night
Mode The
“Auto ”, “Day ”or “Night ”key
can be selected on the pop-up
screen.
When the “Auto ”key is selected,
the screen changes to day or
night mode depending on the
position of the headlight switch.
Brightness Touch
“+” or“−” to adjust the
brightness.
NOTE
. When the screen is viewed through
polarized sunglasses, a rainbow pat-
tern may appear on the screen due to
optical characteristics of the screen. If
this is disruptive, please operate the screen without polarized sunglasses.
.
If the screen is set to “Day ”mode
with the headlight switch turned on,
this condition is memorized even with
the engine turned off.
! How to adjust the rear view
image
In the camera display, the brightness, tint,
color and black level of the screen can be
adjusted.
1. Depress the brake pedal fully and stop
the vehicle.
2. While the vehicle is stopped, set the
shift lever (MT models) or select lever
(CVT models) in the “R”position, and then
touch the display.
3. Touch the “Display Adjustment ”key.
4. Touch the items to adjust the rear
camera screen.
Camera display
WARNING
When adjusting camera display
screen, make sure to depress the
brake pedal fully to avoid the vehicle
from moving. Failure to do so may
lead to a serious accident.
NOTE
The camera display can be accessed
when the rear camera monitor is dis-
played.
Audio/Audio set
–CONTINUED –5-25
Page 277 of 610

Audio/Audio set
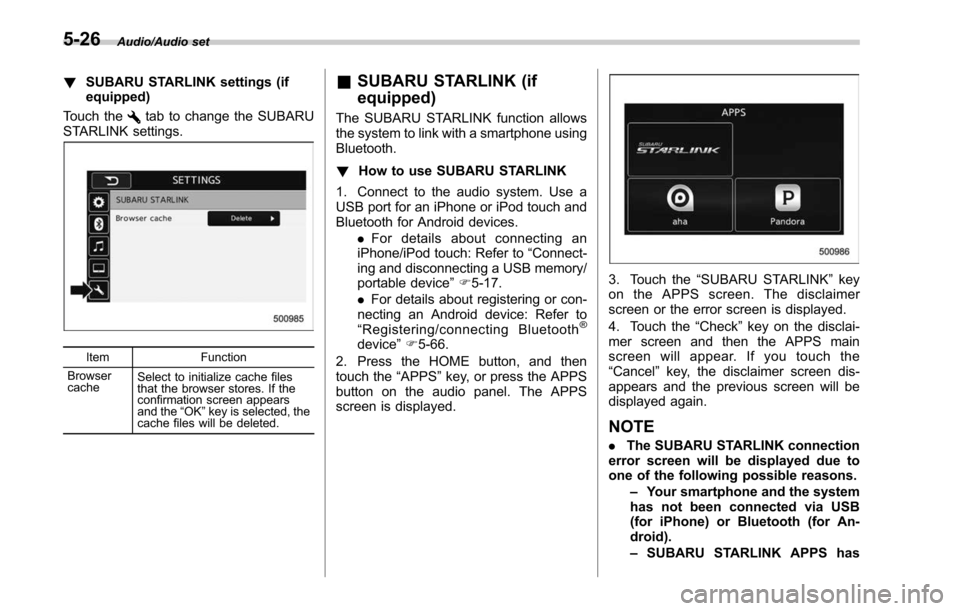
!SUBARU STARLINK settings (if
equipped)
Touch the
tab to change the SUBARU
STARLINK settings.
Item Function
Browser
cache Select to initialize cache files
that the browser stores. If the
confirmation screen appears
and the
“OK ”key is selected, the
cache files will be deleted.
& SUBARU STARLINK (if
equipped)
The SUBARU STARLINK function allows
the system to link with a smartphone using
Bluetooth.
! How to use SUBARU STARLINK
1. Connect to the audio system. Use a
USB port for an iPhone or iPod touch and
Bluetooth for Android devices. .For details about connecting an
iPhone/iPod touch: Refer to “Connect-
ing and disconnecting a USB memory/
portable device ”F 5-17.
. For details about registering or con-
necting an Android device: Refer to
“ Registering/connecting Bluetooth
®
device ”F 5-66.
2. Press the HOME button, and then
touch the “APPS”key, or press the APPS
button on the audio panel. The APPS
screen is displayed.
3. Touch the “SUBARU STARLINK ”key
on the APPS screen. The disclaimer
screen or the error screen is displayed.
4. Touch the “Check”key on the disclai-
mer screen and then the APPS main
screen will appear. If you touch the
“Cancel ”key, the disclaimer screen dis-
appears and the previous screen will be
displayed again.
NOTE
. The SUBARU STARLINK connection
error screen will be displayed due to
one of the following possible reasons.
–Your smartphone and the system
has not been connected via USB
(for iPhone) or Bluetooth (for An-
droid).
– SUBARU STARLINK APPS has
5-26
Page 279 of 610

Audio/Audio set
&AM/FM radio
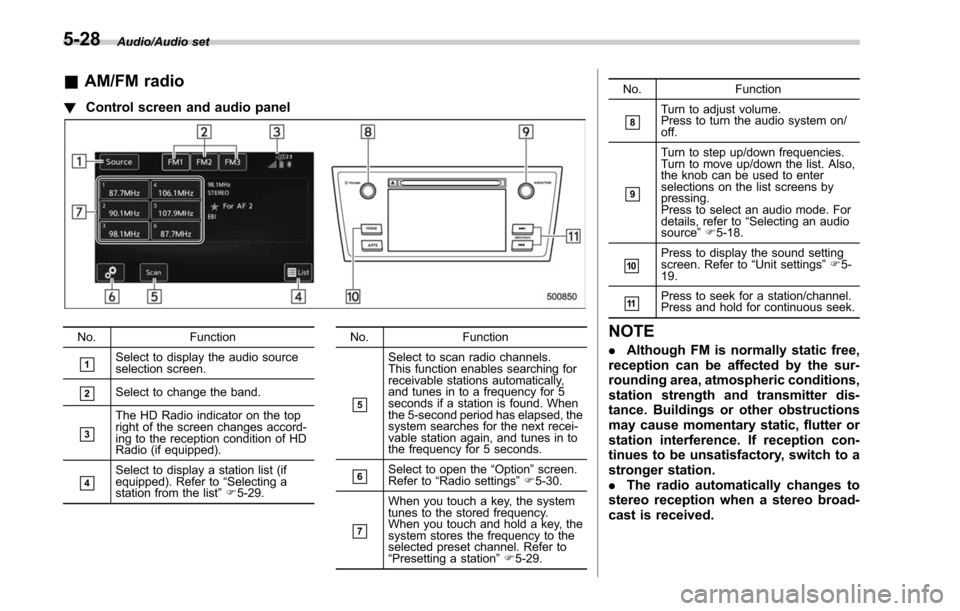
! Control screen and audio panel
No. Function
&1Select to display the audio source
selection screen.
&2Select to change the band.
&3
The HD Radio indicator on the top
right of the screen changes accord-
ing to the reception condition of HD
Radio (if equipped).
&4Select to display a station list (if
equipped). Refer to“Selecting a
station from the list ”F 5-29. No. Function
&5
Select to scan radio channels.
This function enables searching for
receivable stations automatically,
and tunes in to a frequency for 5
seconds if a station is found. When
the 5-second period has elapsed, the
system searches for the next recei-
vable station again, and tunes in to
the frequency for 5 seconds.
&6Select to open the
“Option ”screen.
Refer to “Radio settings ”F 5-30.
&7
When you touch a key, the system
tunes to the stored frequency.
When you touch and hold a key, the
system stores the frequency to the
selected preset channel. Refer to
“Presetting a station ”F 5-29. No. Function
&8Turn to adjust volume.
Press to turn the audio system on/
off.
&9
Turn to step up/down frequencies.
Turn to move up/down the list. Also,
the knob can be used to enter
selections on the list screens by
pressing.
Press to select an audio mode. For
details, refer to
“Selecting an audio
source ”F 5-18.
&10Press to display the sound setting
screen. Refer to “Unit settings ”F 5-
19.
&11Press to seek for a station/channel.
Press and hold for continuous seek.
NOTE
. Although FM is normally static free,
reception can be affected by the sur-
rounding area, atmospheric conditions,
station strength and transmitter dis-
tance. Buildings or other obstructions
may cause momentary static, flutter or
station interference. If reception con-
tinues to be unsatisfactory, switch to a
stronger station.
. The radio automatically changes to
stereo reception when a stereo broad-
cast is received.
5-28