2017 SUBARU FORESTER rear gate
[x] Cancel search: rear gatePage 239 of 634
Instruments and controls/Multi function display
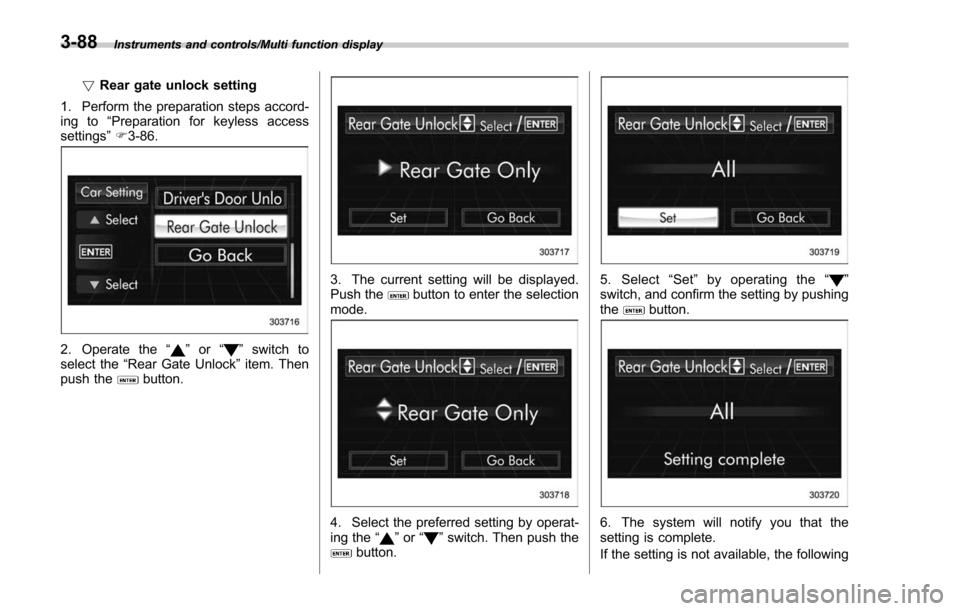
!Rear gate unlock setting
1. Perform the preparation steps accord-
ing to “Preparation for keyless access
settings” F3-86.
2. Operate the “”or “”switch to
select the “Rear Gate Unlock ”item. Then
push the
button.
3. The current setting will be displayed.
Push thebutton to enter the selection
mode.
4. Select the preferred setting by operat-
ing the “”or “”switch. Then push thebutton.
5. Select “Set ”by operating the “”
switch, and confirm the setting by pushing
the
button.
6. The system will notify you that the
setting is complete.
If the setting is not available, the following
3-88
Page 245 of 634

Instruments and controls/Light control switch
“”position: auto on/off headlights (if
equipped)
When the ignition switch is in the “ON ”
position, the instrument panel illumination,
headlights, parking lights, front side mar-
ker lights, rear side marker lights, tail lights
and license plate lights are automatically
on or off depending on the level of the
ambient light.
“
” position
The headlights are all off.
NOTE
The sensitivity of the auto on/off head-
lights can be changed by a SUBARU
dealer. Consult your SUBARU dealer
for details. Also, for models with a multi
function display, the setting can be
changed using the display. For details,
refer to “Auto light sensor sensitivity
setting ”F 3-85.
! Welcome lighting function (if
equipped)
The welcome lighting function turns on the
low beam headlights for smooth ap-
proaching to or exiting from the vehicle
at night or in a dark place.
The function is activated while all of the
following conditions are met.
. The light control switch is in the “AUTO
”position
. It is dark enough to turn on the auto on/
off headlights
When approaching:
While the welcome lighting function is
activated, the low beam headlights will
automatically illuminate when unlocking
the doors (including the rear gate) by
using the remote keyless entry system.
The low beam headlights will remain
illuminated for 30 seconds
*1and then turn
off. However, if any of the following
operations is performed, the low beam
headlights will turn off.
. The doors are locked.
. The light control switch is turned to a
position other than “AUTO”.
. The ignition switch is turned to the “ON”
position.
When exiting:
While the welcome lighting function is
activated, the low beam headlights will
remain illuminated even when either of the
following operations is performed.
. Thepush-buttonignitionswitchis
turned to the “OFF”status (models with
“keyless access with push-button start
system ”)
. The key is pulled out from the ignition switch (models without
“keyless access
with push-button start system ”)
The low beam headlights will turn off
under any of the following conditions.
. 3 minutes have passed since the low
beam headlights were illuminated by the
welcome lighting function.
. 30 seconds have passed since the
door is opened and closed.
*1
. The light control switch is turned to a
position other than “AUTO”.
. The locking procedure is performed
twice. When performing the unlocking
procedure after performing the locking
procedure, perform the locking procedure
twice again.
*1: The setting for the period of time in which
the low beam headlights remain on by the
welcome lighting function can be changed by a
SUBARU dealer. Contact your SUBARU dealer
for details.
3-94
Page 258 of 634
!Rear wiper
To turn the rear wiper on, turn the knob
switch upward.
To turn the wiper off, return the knob
switch to the “
”position.
With the switch turned to the “
”posi-
tion, the rear wiper will operate intermit-
tently at intervals corresponding to the
vehicle speed. In this position, when you
move the select lever to the “R ” position
(CVT models) or the shift lever to the
reverse position (MT models), the rear
wiper will switch to continuous operation.
When you move the select lever/shift lever
from the “R”(reverse) position to another
position, the rear wiper will return to
intermittent operation.
CAUTION
Do not attach anything that disturbs
the rear wiper operation on the rear
gate. Doing so may damage the rear
wiper when it operates.
NOTE
Even if the rear wiper switch is in the
“” position, while the shift lever/
select lever is in the “R ” position with
the windshield wiper operating con-
tinuously, the rear wiper will operate intermittently.
!
Washer
To wash the rear window while the rear
wiper is operating, turn the knob switch
upward to the “
”position. The washer
fluid sprays until you release the knob.
To wash the rear window when the rear
wiper is not in use, turn the knob switch
downward to the “
”position. The washer
fluid sprays and the wiper operates until
you release the knob.
Mirrors
Always check that the inside and outside
mirrors are properly adjusted before you
start driving.
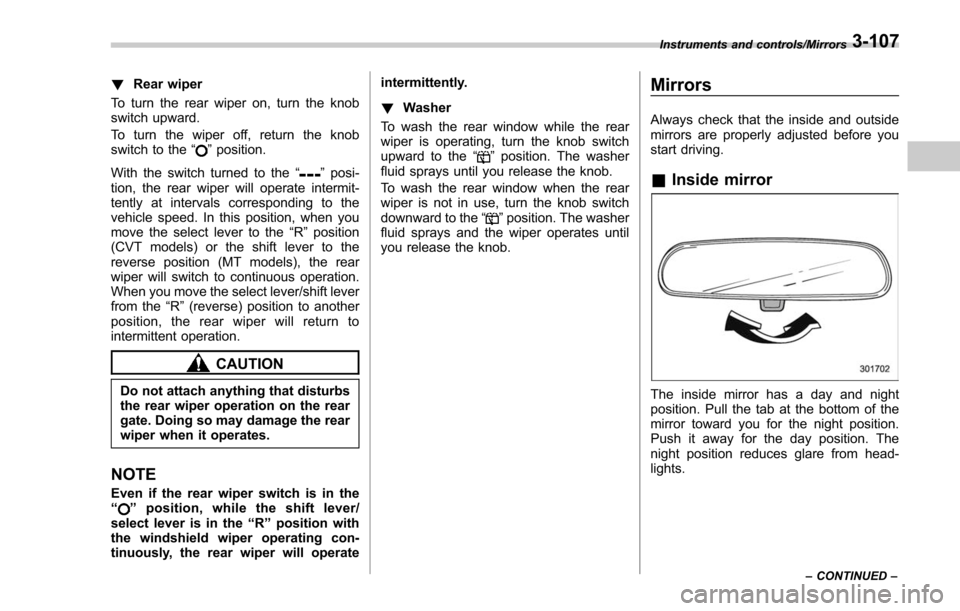
& Inside mirror
The inside mirror has a day and night
position. Pull the tab at the bottom of the
mirror toward you for the night position.
Push it away for the day position. The
night position reduces glare from head-
lights.
Instruments and controls/Mirrors
–CONTINUED –3-107
Page 383 of 634
Interior equipment/Interior lights
Interior lights
CAUTION
When leaving your vehicle, make
sure the lights are turned off to
avoid battery discharge.
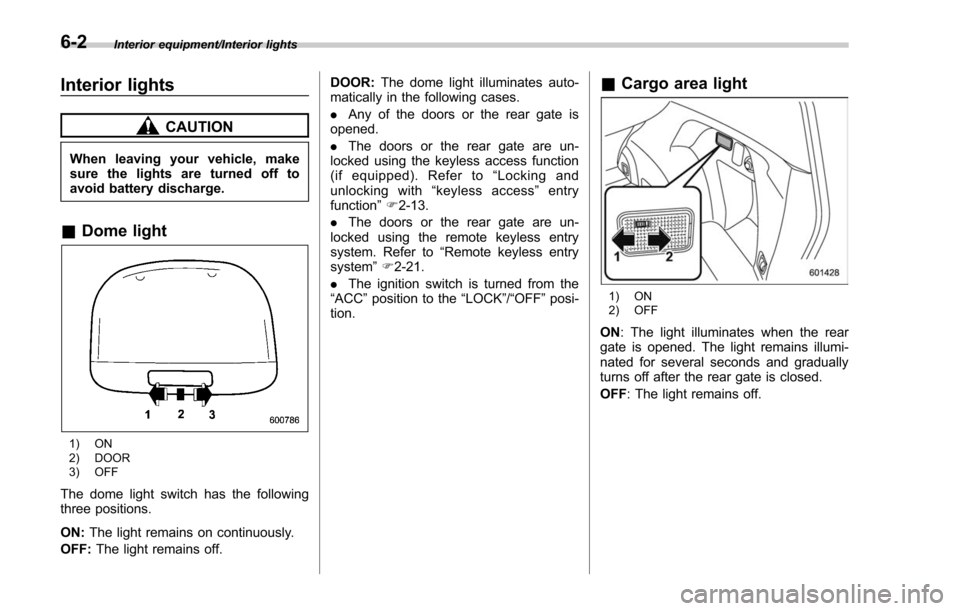
&Dome light
1) ON
2) DOOR
3) OFF
The dome light switch has the following
three positions.
ON: The light remains on continuously.
OFF: The light remains off. DOOR:
The dome light illuminates auto-
matically in the following cases.
. Any of the doors or the rear gate is
opened.
. The doors or the rear gate are un-
locked using the keyless access function
(if equipped). Refer to “Locking and
unlocking with “keyless access” entry
function ”F 2-13.
. The doors or the rear gate are un-
locked using the remote keyless entry
system. Refer to “Remote keyless entry
system ”F 2-21.
. The ignition switch is turned from the
“ACC ”position to the “LOCK”/ “OFF ”posi-
tion.
& Cargo area light
1) ON
2) OFF
ON : The light illuminates when the rear
gate is opened. The light remains illumi-
nated for several seconds and gradually
turns off after the rear gate is closed.
OFF : The light remains off.
6-2
Page 384 of 634
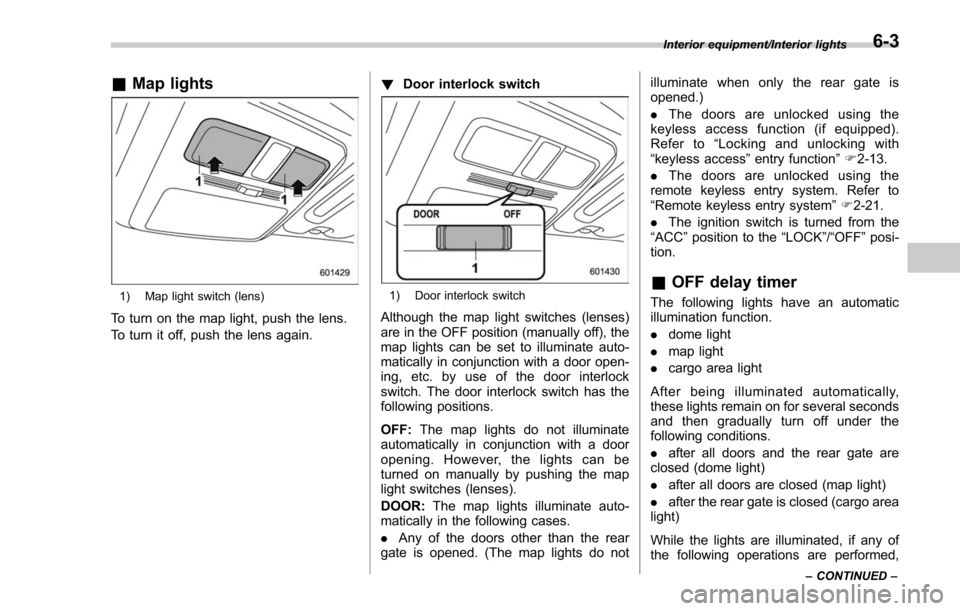
&Map lights
1) Map light switch (lens)
To turn on the map light, push the lens.
To turn it off, push the lens again. !
Door interlock switch
1) Door interlock switch
Although the map light switches (lenses)
are in the OFF position (manually off), the
map lights can be set to illuminate auto-
matically in conjunction with a door open-
ing, etc. by use of the door interlock
switch. The door interlock switch has the
following positions.
OFF: The map lights do not illuminate
automatically in conjunction with a door
opening. However, the lights can be
turned on manually by pushing the map
light switches (lenses).
DOOR: The map lights illuminate auto-
matically in the following cases.
. Any of the doors other than the rear
gate is opened. (The map lights do not illuminate when only the rear gate is
opened.)
.
The doors are unlocked using the
keyless access function (if equipped).
Refer to “Locking and unlocking with
“keyless access ”entry function ”F 2-13.
. The doors are unlocked using the
remote keyless entry system. Refer to
“Remote keyless entry system ”F 2-21.
. The ignition switch is turned from the
“ACC ”position to the “LOCK”/“OFF”posi-
tion.
& OFF delay timer
The following lights have an automatic
illumination function.
. dome light
. map light
. cargo area light
After being illuminated automatically,
these lights remain on for several seconds
and then gradually turn off under the
following conditions.
. after all doors and the rear gate are
closed (dome light)
. after all doors are closed (map light)
. after the rear gate is closed (cargo area
light)
While the lights are illuminated, if any of
the following operations are performed,
Interior equipment/Interior lights
–CONTINUED –6-3
Page 385 of 634
Interior equipment/Sun visors
the lights turn off immediately.
.The ignition switch is turned from the
“LOCK”/ “OFF ”position to the “ACC”or
“ON ”position.
. All doors and the rear gate are locked
using the keyless access function (if
equipped).
. All doors and the rear gate are locked
using the remote keyless entry system.
The setting for the period of time in which
the lights remain on (OFF delay timer) can
be changed by a SUBARU dealer. Con-
tact your SUBARU dealer for details. For
models with multi function display, the
setting can be changed by operating the
multi function display. For details, refer to
“Interior light off delay timer setting ”F 3-
84.Sun visors
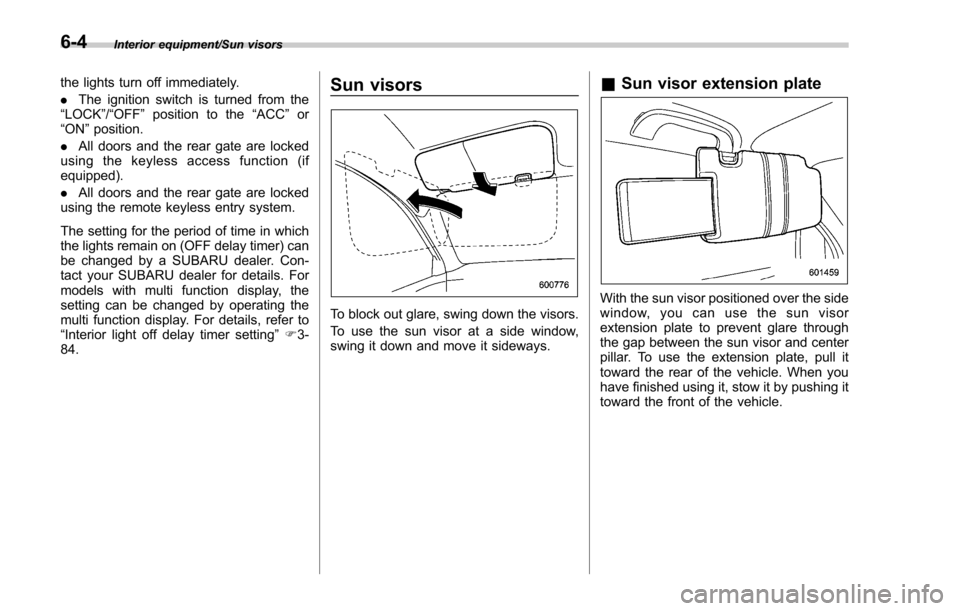
To block out glare, swing down the visors.
To use the sun visor at a side window,
swing it down and move it sideways.
& Sun visor extension plate
With the sun visor positioned over the side
window, you can use the sun visor
extension plate to prevent glare through
the gap between the sun visor and center
pillar. To use the extension plate, pull it
toward the rear of the vehicle. When you
have finished using it, stow it by pushing it
toward the front of the vehicle.
6-4
Page 394 of 634
Shopping bag hook
CAUTION
Do not hang items on the shopping
bag hook that weigh 6 lbs (3 kg) or
more.
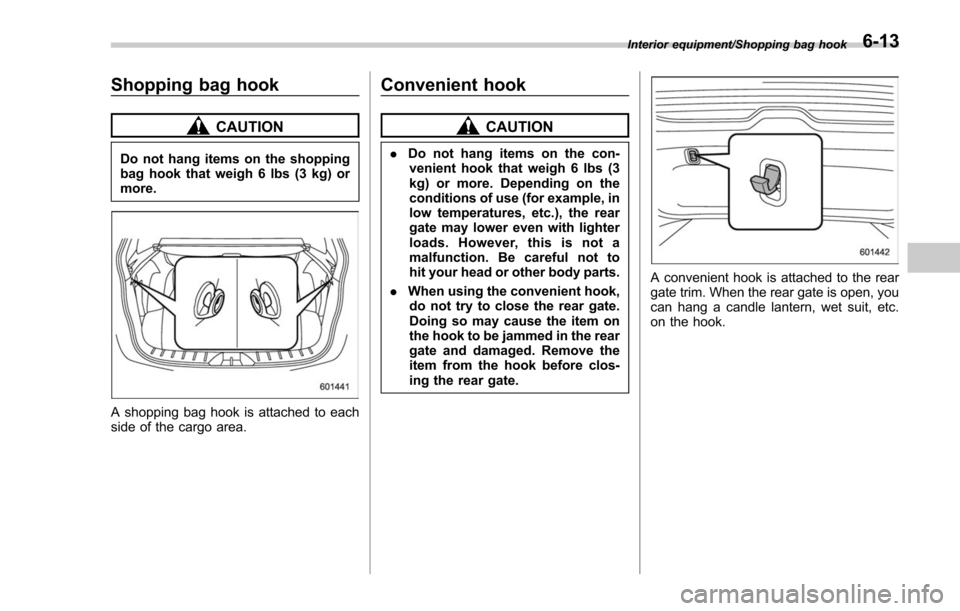
A shopping bag hook is attached to each
side of the cargo area.
Convenient hook
CAUTION
.Do not hang items on the con-
venient hook that weigh 6 lbs (3
kg) or more. Depending on the
conditions of use (for example, in
low temperatures, etc.), the rear
gate may lower even with lighter
loads. However, this is not a
malfunction. Be careful not to
hit your head or other body parts.
. When using the convenient hook,
do not try to close the rear gate.
Doing so may cause the item on
the hook to be jammed in the rear
gate and damaged. Remove the
item from the hook before clos-
ing the rear gate.
A convenient hook is attached to the rear
gate trim. When the rear gate is open, you
can hang a candle lantern, wet suit, etc.
on the hook.
Interior equipment/Shopping bag hook6-13
Page 395 of 634
Interior equipment/Cargo area cover
Cargo area cover (if
equipped)
The cargo area cover is provided for
covering the cargo area and to protect its
contents from direct sunlight. This cover is
detachable to make room for additional
cargo.
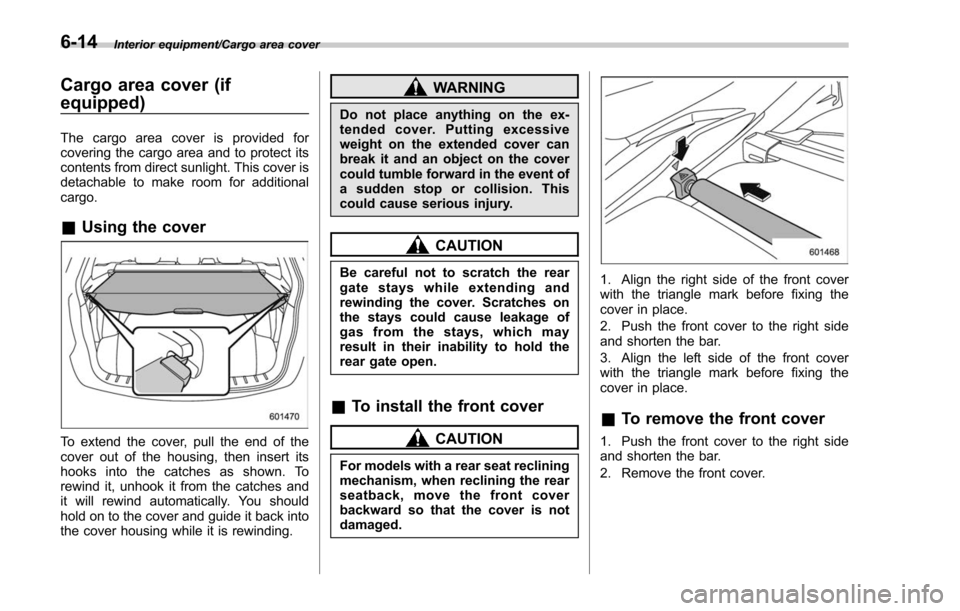
&Using the cover
To extend the cover, pull the end of the
cover out of the housing, then insert its
hooks into the catches as shown. To
rewind it, unhook it from the catches and
it will rewind automatically. You should
hold on to the cover and guide it back into
the cover housing while it is rewinding.
WARNING
Do not place anything on the ex-
tended cover. Putting excessive
weight on the extended cover can
break it and an object on the cover
could tumble forward in the event of
a sudden stop or collision. This
could cause serious injury.
CAUTION
Be careful not to scratch the rear
gate stays while extending and
rewinding the cover. Scratches on
the stays could cause leakage of
gas from the stays, which may
result in their inability to hold the
rear gate open.
&To install the front cover
CAUTION
For models with a rear seat reclining
mechanism, when reclining the rear
seatback, move the front cover
backward so that the cover is not
damaged.
1. Align the right side of the front cover
with the triangle mark before fixing the
cover in place.
2. Push the front cover to the right side
and shorten the bar.
3. Align the left side of the front cover
with the triangle mark before fixing the
cover in place.
&To remove the front cover
1. Push the front cover to the right side
and shorten the bar.
2. Remove the front cover.
6-14