2017 SUBARU FORESTER rear gate
[x] Cancel search: rear gatePage 147 of 634

Keys and doors/Rear gate
from approximately 12 in (30 cm) or
more from the completely closed posi-
tion.
.Before closing the rear gate in step
4, it is possible to register the height
many times through step 3. Therefore,
the registered height can easily be fine-
tuned.
Retrieval of the rear gate height:
To open the rear gate and stop it at the
registered height, perform the following
procedure.
1. Press the memory switch to select the
ON status.
2. Press and hold any of the power rear
gate switches.
Even if any of the power rear gate
switches are pressed and held while the
memory switch is in the OFF status, you
can stop it at the registered height by
pressing the memory switch to select the
ON status before the rear gate reaches
the registered height.
NOTE
. The rear gate will open to the
position that is stored in the memory
function even if the rear gate is opened
by the reverse function.
. If the rear gate is opened manually
while the memory function is activated, you cannot close it by pressing the
power rear gate button on the rear gate.
To close it, press the other power rear
gate button or close it manually.
!
Reverse function
WARNING
.Do not let parts of your body be
caught intentionally to operate
the reverse function. If the re-
verse function does not operate
for some reason, this may lead to
serious injury or accidents.
. The reverse function may not
operate if foreign objects are
caught in the rear gate just
before it closes completely. Be
careful not to catch your fingers
and other body parts.
. The reverse function may not
operate depending on the object
shape and the manner in which it
was caught. Be careful not to
catch your fingers and other
body parts.
CAUTION
. If the reverse function is operated
3 times consecutively, automatic
opening and closing of the power
rear gate function will be can-
celed and the rear gate can be
opened and closed normally.
Whether the rear gate opens or
closes depends on the rear gate
height when automatic operation
is ceased. Be careful that the rear
gate does not hit anyone ’s head
or face, etc. and that fingers and
baggage, etc. are not caught in it.
. Take care not to damage the
touch sensors. Otherwise, the
reverse function may cease to
operate.
If, while opening or closing using power
rear gate, the rear gate catches persons
or baggage or hits an obstacle, an
electronic chirp will sound 3 times and
the rear gate will operate as follows.
When opening the rear gate: The rear
gate will automatically close.
When closing the rear gate: The rear
gate will automatically open.
2-44
Page 148 of 634

1) Touch sensor
Touch sensors are attached on the left
and right edges of the rear gate. If the
touch sensors detect fingers, baggage,
etc. while closing by the power rear gate
function, an electronic chirp will sounds 3
times and the rear gate will open auto-
matically.
NOTE
When the rear gate is opened using the
reverse function, it will be opened fully
or to the height registered in the
memory function.!
Rear gate drop prevention function
If, while fully opened via the power rear
gate function, the rear gate is lowered by
the weight of snow and such, an electronic
chirp will sound and the rear gate will
close automatically.
NOTE
. If there is snow on the rear gate,
only use the power rear gate function
after removing the snow.
. If you close the rear gate manually
just after the rear gate is fully opened
using the power rear gate function, the
rear gate drop prevention function will
operate to close the rear gate automa-
tically. In this case, this is not a
malfunction.
Moonroof (if equipped)
WARNING
Never let anyone ’shands,arms,
head or any objects protrude from
the moonroof. A person could be
seriously injured if any of the follow-
ing conditions occur.
. The vehicle stops suddenly.
. The vehicle turns sharply.
. The vehicle is involved in an
accident.
. Body parts protruding from the
vehicle are struck by outside
objects.
To avoid serious personal injury
caused by entrapment, always con-
form to the following instructions
without exception.
. Before closing the moonroof,
make sure that no one ’s hands,
arms, head or other objects will
be accidentally caught in the
moonroof.
. Always carry the key when you
leave the vehicle for safety rea-
sons and never allow an unat-
tended child to remain in the
Keys and doors/Moonroof
–CONTINUED –2-45
Page 157 of 634

Instruments and controls/Push–button ignition switch (models with push –button start system)
& Ignition switch light (if
equipped)
For easy access to the ignition switch in
the dark, the ignition switch light illumi-
nates when the driver ’s door is opened or
when the driver ’s door is unlocked using
the remote keyless entry transmitter.
The light remains illuminated for several
tens of seconds and then gradually turns
off under the following conditions.
. when the driver ’s door is closed
. when the doors are unlocked using the
remote keyless entry transmitter
The light turns off immediately under the
following conditions.
. when the ignition switch is turned to the
“ ON ”position
. when all doors and the rear gate are
locked using the remote keyless entry
transmitter
Push-button ignition switch
(models with push-button
start system)
& Safety precautions
Refer to “Safety precautions” F2-10.
& Operating range for push-
button start system
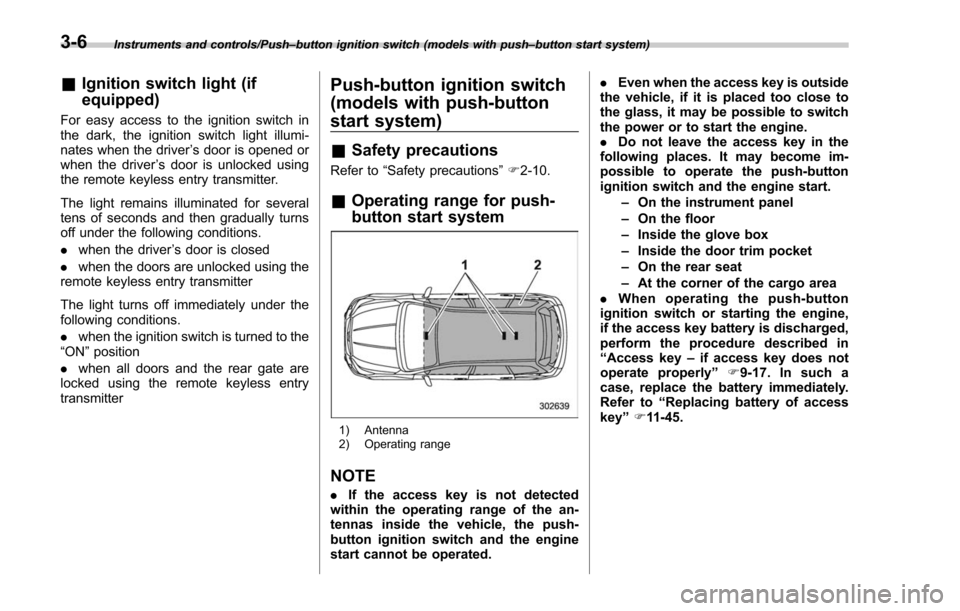
1) Antenna
2) Operating range
NOTE
. If the access key is not detected
within the operating range of the an-
tennas inside the vehicle, the push-
button ignition switch and the engine
start cannot be operated. .
Even when the access key is outside
the vehicle, if it is placed too close to
the glass, it may be possible to switch
the power or to start the engine.
. Do not leave the access key in the
following places. It may become im-
possible to operate the push-button
ignition switch and the engine start.
–On the instrument panel
– On the floor
– Inside the glove box
– Inside the door trim pocket
– On the rear seat
– At the corner of the cargo area
. When operating the push-button
ignition switch or starting the engine,
if the access key battery is discharged,
perform the procedure described in
“ Access key –if access key does not
operate properly ”F9-17. In such a
case, replace the battery immediately.
Refer to “Replacing battery of access
key ”F 11-45.
3-6
Page 174 of 634

&Hill start assist warning
light/Hill start assist
OFF indicator light
!Hill start assist warning light
While the engine is running, if there are
any malfunctions in the Hill start assist
system, the warning light will illuminate.
WARNING
When the Hill start assist warning
light illuminates, have the vehicle
inspected at an authorized SUBARU
dealer.
! Hill start assist OFF indicator light
While the Hill start assist system is
deactivated, the Hill start assist OFF
indicator light illuminates continuously to
inform the driver that the Hill start assist
system is not operational.
&Door open warning
light
The warning light illuminates if any door or
the rear gate is not fully closed. This
function is effective even if the ignition
switch is in the “LOCK”/ “OFF”or “ACC ”
position, or the key is removed from the ignition switch.
Always make sure this light is not illumi-
nated before you start to drive.
&All-Wheel Drive warn-
ing light (CVT models)
This light flashes if the vehicle is driven
with tires of differing diameters fitted on
the wheels or with an excessively low air
pressure in any of the tires.
WARNING
If the AWD warning light flashes,
promptly park in a safe location then
check whether all four tires are the
same diameter and whether any of
the tires has a puncture or has lost
air pressure for some other reason.
Continuing to drive with the AWD
warning light flashing can lead to
powertrain damage.
&Power steering warn-
ing light
This warning light illuminates when the
ignition switch is turned to the
“ON ”
position and turns off after the engine
has started. This indicates that the warn-
ing system is working properly. While the engine is running, this warning
light illuminates when a malfunction has
been detected in the electric power steer-
ing system.
CAUTION
When the power steering warning
light is illuminated, there may be
more resistance when the steering
wheel is operated. Drive carefully to
the nearest SUBARU dealer and
have the vehicle inspected immedi-
ately.
NOTE
If the steering wheel is operated in the
following ways, the power steering
control system may temporarily limit
the power assist in order to prevent the
system components, such as the con-
trol computer and drive motor, from
overheating.
.
The steering wheel is operated fre-
quently and turned sharply while the
vehicle is maneuvered at extremely low
speeds, such as while frequently turn-
ing the steering wheel during parallel
parking.
. The steering wheel remains in the
fully turned position for a long period
of time.
Instruments and controls/Warning and indicator lights
–CONTINUED –3-23
Page 178 of 634

Inside warningchime Outside warning
chime Access key
warning light on
meter Operation indica-
tor on push-button
ignition switch Status Action
Ding,
ding ...
(intermittent) —— — The driver
’s door was opened while
the push-button ignition switch is
“ ACC ”and the select lever is in the
“ P ”position. Switch the push-button ignition
switch to
“OFF ”, or close the
driver ’s door.
*When exiting the vehicle, be sure
to switch the push-button ignition
switch to “OFF ”.
The push-button ignition switch
was switched to “OFF ”while the
driver ’s door is open. Close the driver
’s door.
Ding Short beep
(2 seconds) —— Lockout warning:
An attempt was made to lock all
doors while the access key is left
inside the vehicle. Take out the access key from the
vehicle, and lock the doors.
*The doors cannot be locked while
the access key is inside the vehicle.
*A chirp sound will be heard, and all
doors will be unlocked.
— Short beep
(2 seconds) —— Access key lock-in warning:
The door lock sensor was touched
while the push-button ignition
switch is
“OFF ”and the access key
is inside the vehicle. Take out the access key from the
vehicle, and lock the doors.
*If the access key is inside the
vehicle, the doors cannot be
locked.
— Beep, beep ...
(5 beeps) —— Door ajar warning:
The door lock sensor is touched
while the push-button ignition
switch is in the
“OFF ”position and
one of the doors including the rear
gate is opened. Close the doors securely and lock
them.
*If one of the doors including the
rear
gate is opened, the doors
cannot be locked.
Ding Long beep (60
seconds max.)
—— Power warning:
The door lock sensor was touched
while carrying the access key and
the push-button ignition switch is in
a position other than
“OFF ”and the
select lever is in the “P ”position. Return the access key inside the
vehicle, or switch the push-button
ignition switch to
“OFF ”.
*If the push-button ignition switch is
not switched to “OFF ”, the doors
cannot be locked.
Instruments and controls/Warning and indicator lights
–CONTINUED –
3-27
Page 191 of 634

Instruments and controls/Multi information display (models with type B combination meter)
5) Select lever/gear position indicator (refer to“Select lever/gear position indicator
(CVT models) ”F 3-31.)
6) Odometer (refer to “Odometer ”F 3-10.)/
double trip meter (refer to “Double trip
meter ”F 3-10.)
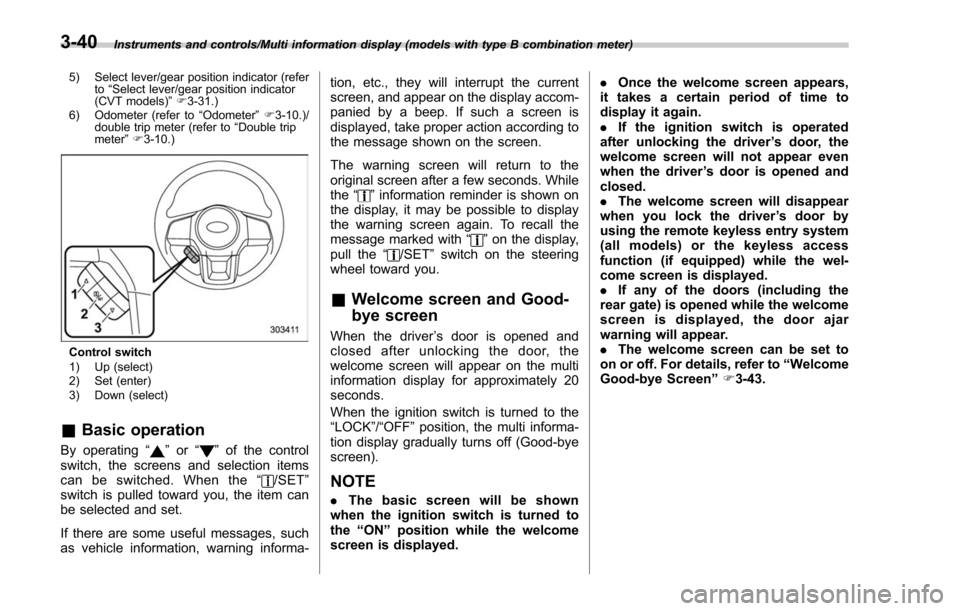
Control switch
1) Up (select)
2) Set (enter)
3) Down (select)
& Basic operation
By operating “”or “”of the control
switch, the screens and selection items
can be switched. When the “
/SET”
switch is pulled toward you, the item can
be selected and set.
If there are some useful messages, such
as vehicle information, warning informa- tion, etc., they will interrupt the current
screen, and appear on the display accom-
panied by a beep. If such a screen is
displayed, take proper action according to
the message shown on the screen.
The warning screen will return to the
original screen after a few seconds. While
the
“
”information reminder is shown on
the display, it may be possible to display
the warning screen again. To recall the
message marked with “
”on the display,
pull the “/SET”switch on the steering
wheel toward you.
& Welcome screen and Good-
bye screen
When the driver ’s door is opened and
closed after unlocking the door, the
welcome screen will appear on the multi
information display for approximately 20
seconds.
When the ignition switch is turned to the
“LOCK”/ “OFF ”position, the multi informa-
tion display gradually turns off (Good-bye
screen).
NOTE
. The basic screen will be shown
when the ignition switch is turned to
the “ON ”position while the welcome
screen is displayed. .
Once the welcome screen appears,
it takes a certain period of time to
display it again.
. If the ignition switch is operated
after unlocking the driver ’s door, the
welcome screen will not appear even
when the driver ’s door is opened and
closed.
. The welcome screen will disappear
when you lock the driver ’s door by
using the remote keyless entry system
(all models) or the keyless access
function (if equipped) while the wel-
come screen is displayed.
. If any of the doors (including the
rear gate) is opened while the welcome
screen is displayed, the door ajar
warning will appear.
. The welcome screen can be set to
on or off. For details, refer to “Welcome
Good-bye Screen ”F 3-43.
3-40
Page 196 of 634

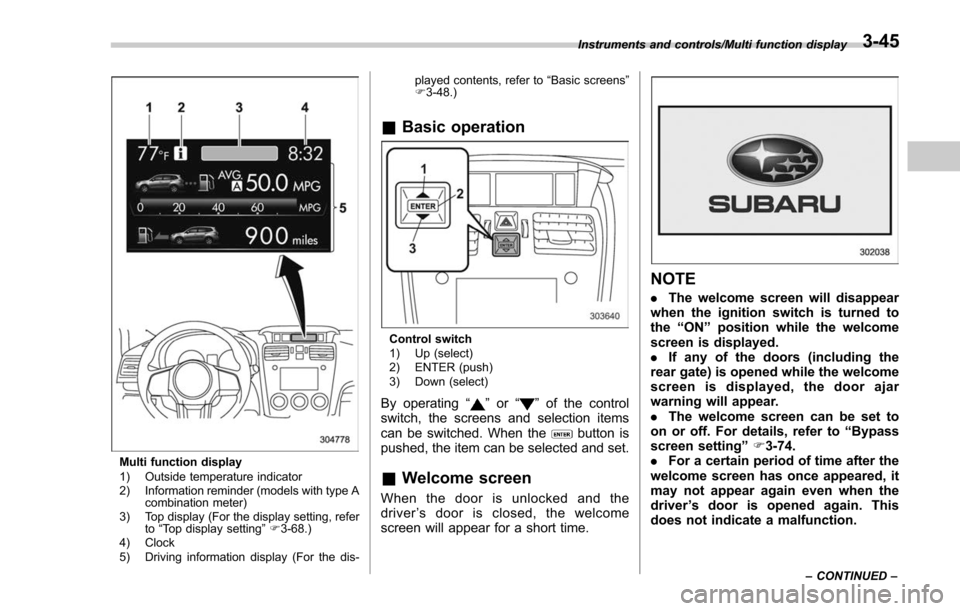
Multi function display
1) Outside temperature indicator
2) Information reminder (models with type Acombination meter)
3) Top display (For the display setting, refer to“Top display setting ”F 3-68.)
4) Clock
5) Driving information display (For the dis- played contents, refer to
“Basic screens ”
F 3-48.)
& Basic operation
Control switch
1) Up (select)
2) ENTER (push)
3) Down (select)
By operating “”or “”of the control
switch, the screens and selection items
can be switched. When the
button is
pushed, the item can be selected and set.
& Welcome screen
When the door is unlocked and the
driver ’s door is closed, the welcome
screen will appear for a short time.
NOTE
. The welcome screen will disappear
when the ignition switch is turned to
the “ON ”position while the welcome
screen is displayed.
. If any of the doors (including the
rear gate) is opened while the welcome
screen is displayed, the door ajar
warning will appear.
. The welcome screen can be set to
on or off. For details, refer to “Bypass
screen setting ”F 3-74.
. For a certain period of time after the
welcome screen has once appeared, it
may not appear again even when the
driver ’s door is opened again. This
does not indicate a malfunction.
Instruments and controls/Multi function display
–CONTINUED –3-45
Page 208 of 634

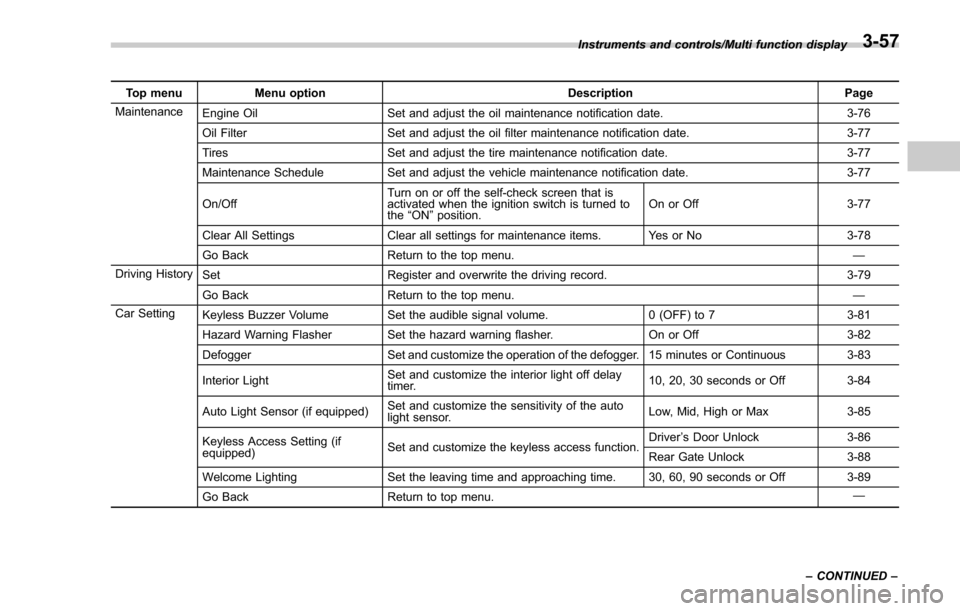
Top menuMenu option DescriptionPage
Maintenance Engine Oil Set and adjust the oil maintenance notification date. 3-76
Oil Filter Set and adjust the oil filter maintenance notification date. 3-77
Tires Set and adjust the tire maintenance notification date. 3-77
Maintenance Schedule Set and adjust the vehicle maintenance notification date. 3-77
On/Off Turn on or off the self-check screen that is
activated when the ignition switch is turned to
the
“ON ”position. On or Off
3-77
Clear All Settings Clear all settings for maintenance items. Yes or No 3-78
Go Back Return to the top menu. —
Driving History Set Register and overwrite the driving record. 3-79
Go Back Return to the top menu. —
Car Setting Keyless Buzzer Volume Set the audible signal volume. 0 (OFF) to 73-81
Hazard Warning Flasher Set the hazard warning flasher. On or Off3-82
Defogger Set and customize the operation of the defogger. 15 minutes or Continuous 3-83
Interior Light Set and customize the interior light off delay
timer. 10, 20, 30 seconds or Off
3-84
Auto Light Sensor (if equipped) Set and customize the sensitivity of the auto
light sensor. Low, Mid, High or Max
3-85
Keyless Access Setting (if
equipped) Set and customize the keyless access function. Driver
’s Door Unlock 3-86
Rear Gate Unlock 3-88
Welcome Lighting Set the leaving time and approaching time. 30, 60, 90 seconds or Off 3-89
Go Back Return to top menu. —
Instruments and controls/Multi function display
–CONTINUED –
3-57