2017 SUBARU FORESTER check engine
[x] Cancel search: check enginePage 501 of 634

Driving tips/Trailer towing
refer to“BSD/RCTA OFF switch ”
F 7-64.
. For models equipped with RAB
(Reverse Automatic Braking)
system, consult your SUBARU
dealer for additional information
about towing a trailer.
. Never exceed 45 mph (72 km/h)
when towing a trailer in hilly
country on hot days.
. When towing a trailer, steering,
stability, stopping distance and
braking performance will be dif-
ferent when compared to normal
operation. You should never
drive at excessive speeds but
always employ extra caution
when towing a trailer. You should
also keep the following tips in
mind.
! Before starting out on a trip
. Check that the vehicle and vehicle-to-
hitch mounting are in good condition. If
any problems are apparent, do not tow the
trailer.
. Check that the vehicle rests horizon-
tally with the trailer attached. If the vehicle
is tipped sharply up at the front and down
at the rear, check the total trailer weight,
GVW, GAWs and tongue load again, then confirm that the load and its distribution
are acceptable.
.
Check that the tire rating and pressures
are correct.
. Check that the vehicle and trailer are
connected properly. Confirm that:
–the trailer tongue is connected
properly to the hitch ball.
– the trailer lights connector is con-
nected properly and trailer ’sbrake
lights illuminate when the vehicle ’s
brake pedal is pressed, and that the
trailer ’s turn signal lights flash when
the vehicle’ s turn signal lever is oper-
ated.
– the safety chains are connected
properly.
– all cargo in the trailer is secured
safety in position.
– the side mirrors provide a good
rearward field of view without a sig-
nificant blind spot.
. Sufficient time should be taken to learn
the “feel ”of the vehicle/trailer combination
before starting out on a trip. In an area free
of traffic, practice turning, stopping and
backing up.
! Driving with a trailer
. You should allow for considerably more
stopping distance when towing a trailer.
Avoid sudden braking because it may result in skidding or jackknifing and loss of
control.
.
Avoid abrupt starts and sudden accel-
erations. If your vehicle has a manual
transmission, always start out in first gear
and release the clutch at moderate engine
revolution.
. Avoid uneven steering, sharp turns and
rapid lane changes.
. Slow down before turning. Make a
longer than normal turning radius because
the trailer wheels will be closer than the
vehicle wheels to the inside of the turn. In
a tight turn, the trailer could hit your
vehicle.
. Crosswinds will adversely affect the
handling of your vehicle and trailer, caus-
ing sway. Crosswinds can be due to
weather conditions or the passing of large
trucks or buses. If swaying occurs, firmly
grip the steering wheel and promptly begin
decelerating your vehicle at a gradual
pace.
. When passing other vehicles, consid-
erable distance is required because of the
added weight and length caused by
attaching the trailer to your vehicle.
8-24
Page 515 of 634

In case of emergency/Engine overheating
Engine overheating
WARNING
Never attempt to remove the radia-
tor cap until the engine has been
shut off and has fully cooled down.
When the engine is hot, the coolant
is under pressure. Removing the
cap while the engine is still hot
could release a spray of boiling hot
coolant, which could burn you very
seriously.
If the engine overheats, safely pull off the
road and stop the vehicle in a safe
location.
& If steam is coming from the
engine compartment
. Turn off the engine and get everyone
away from the vehicle until it cools down.
. Contact an authorized SUBARU deal-
er.
& If no steam is coming from
the engine compartment
1. Keep the engine running at idling
speed.
2. Open the engine hood to ventilate the engine compartment. Refer to
“Engine
hood ”F 11-7.
Confirm that the cooling fan is turning. If
the fan is not turning, immediately turn off
the engine and contact an authorized
SUBARU dealer for repair.
3. After the coolant temperature high
warning light that has blinked or illumi-
nated in REDturns off, turn off the engine.
For details about the warning light, refer to
“Coolant temperature low indicator light/
Coolant temperature high warning light ”
F 3-17.
4. After the engine has fully cooled down,
check the coolant level in the reserve
tank. If the coolant level is below the
“LOW ”mark, add coolant up to the “FULL ”
mark.
NOTE
For details about how to check the
coolant level or how to add coolant,
refer to “Engine coolant ”F 11-13.
5. If there is no coolant in the reserve
tank, add coolant to the reserve tank.
Then remove the radiator cap and fill the
radiator with coolant.
If you remove the radiator cap from a hot
radiator, first wrap a thick cloth around the
radiator cap, then turn the cap counter-
clockwise slowly without pressing down until it stops. Release the pressure from
the radiator. After the pressure has been
fully released, remove the cap by pressing
down and turning it.
9-12
Page 532 of 634

Maintenance schedule....................................... 11-3
Maintenance precautions ................................... 11-3
Before checking or servicing in the engine
compartment .................................................... 11-4
When checking or servicing in the engine compartment while the engine is running .......... 11-5
Maintenance tips................................................ 11-5Removing and reinstalling clips .......................... 11-5
Engine hood....................................................... 11-7
Engine compartment overview .......................... 11-8
Non-turbo models.............................................. 11-8
Turbo models ..................................................... 11-9
Engine oil.......................................................... 11-10Engine oil consumption .................................... 11-10
Checking the oil level ....................................... 11-10
Changing the oil and oil filter ............................ 11-11
Recommended grade and viscosity .................. 11-11
Synthetic oil ..................................................... 11-12
Cooling system ................................................ 11-12Cooling fan, hose and connections ................... 11-12
Engine coolant ................................................. 11-13
Air cleaner element .......................................... 11-14Replacing the air cleaner element ..................... 11-14
Spark plugs...................................................... 11-16Recommended spark plugs .............................. 11-16
Drive belts........................................................ 11-16
Manual transmission oil .................................. 11-17
Recommended grade and viscosity .................. 11-17
Continuously variable transmission fluid ....... 11-17Front differential gear oil (CVT models) and
rear differential gear oil ................................ 11-17
Recommended grade and viscosity .................. 11-17
Brake fluid........................................................ 11-18Checking the fluid level .................................... 11-18
Recommended brake fluid ............................... 11-18
Clutch fluid (MT models)................................. 11-19Checking the fluid level.................................... 11-19
Recommended clutch fluid ............................... 11-19
Brake booster.................................................. 11-20
Brake pedal ...................................................... 11-20
Checking the brake pedal free play .................. 11-20
Checking the brake pedal reserve distance ....... 11-20
Clutch pedal (MT models) ............................... 11-21Checking the clutch function ............................ 11-21
Checking the clutch pedal free play .................. 11-21
Hill start assist system.................................... 11-21
Replacement of brake pad and lining ............ 11-22
Breaking-in of new brake pads and linings ....... 11-22
Parking brake stroke ....................................... 11-23
Tires and wheels .............................................. 11-23
Types of tires................................................... 11-23
Tire pressure monitoring system (TPMS) (if equipped) ...................................................... 11-23
Tire inspection ................................................. 11-25
Tire pressures and wear .................................. 11-25
Wheel balance ................................................. 11-27
Wear indicators ............................................... 11-27
Tire rotation direction mark .............................. 11-28
Tire rotation ..................................................... 11-28
Maintenance and service
11
Page 535 of 634

Maintenance and service/Maintenance precautions
erative. NEVER use a circuit
tester for this wiring. If your
SRS airbag or seatbelt preten-
sioner needs service, consult
your nearest SUBARU dealer.
NOTE
SUBARU does not endorse the use of
non-SUBARU approved flushing sys-
tems and strongly advises against
performing these services on a
SUBARU vehicle. Non-SUBARU ap-
proved flushing systems use chemi-
cals and/or solvents which have not
been tested or approved by SUBARU.
SUBARU warranties do not cover any
part of the vehicle which is damaged by
adding or applying chemicals and/or
solvents other than those approved or
recommended by SUBARU.
&Before checking or servicing
in the engine compartment
WARNING
. Always stop the engine and set
the parking brake firmly to pre-
vent the vehicle from moving.
. Always let the engine cool down.
Engine parts become very hot when the engine is running and
remain hot for some time after
the engine has stopped.
. Do not spill engine oil, engine
coolant, brake fluid or any other
fluid on hot engine components.
This may cause a fire.
. Always remove the key from the
ignition switch. When the ignition
switch is in the “ON ”position,
thecoolingfanmayoperate
suddenly even when the engine
is stopped. If your body or
clothes come into contact with a
rotating fan, that could result in
serious injury.
. Before performing any servicing
on a vehicle equipped with a
remote engine start system (a
dealer option), temporarily place
the remote engine start system in
service mode to prevent it from
unexpectedly starting the engine.
CAUTION
. Do not contact the drive belt
cover while checking the compo-
nents in the engine compart-
ment. Doing so may cause your
hand to slip off the cover and
result in an unexpected injury.
. Do not touch the oil filter until the
engine has cooled down comple-
tely. Doing so may result in a
burn or other injury. Note that the
oil filter becomes very hot when
the engine is running and re-
mains hot for some time after
the engine has stopped.
11-4
Page 536 of 634

&When checking or servicing
in the engine compartment
while the engine is running
WARNING
A running engine can be dangerous.
Keep your fingers, hands, clothing,
hair and tools away from the cooling
fan, drive belt and any other moving
engine parts. Removing rings,
watches and ties is advisable.
Maintenance tips
Some clips and fender linings must be
removed before replacing the air cleaner
elements or specific bulbs.
&Removing and reinstalling
clips
! Removing clips
There are several types of clips used for
your vehicle.
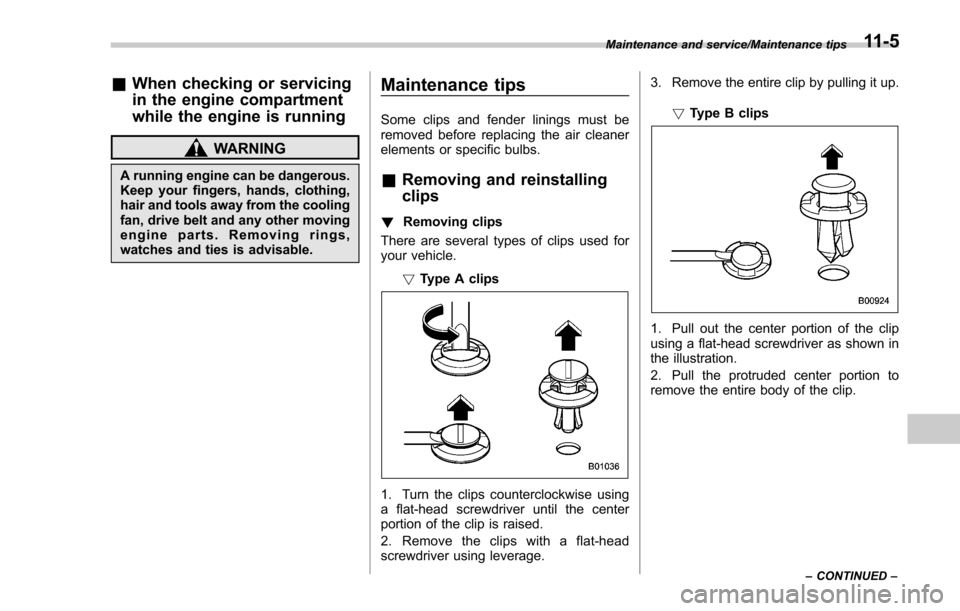
!Type A clips
1. Turn the clips counterclockwise using
a flat-head screwdriver until the center
portion of the clip is raised.
2. Remove the clips with a flat-head
screwdriver using leverage. 3. Remove the entire clip by pulling it up.
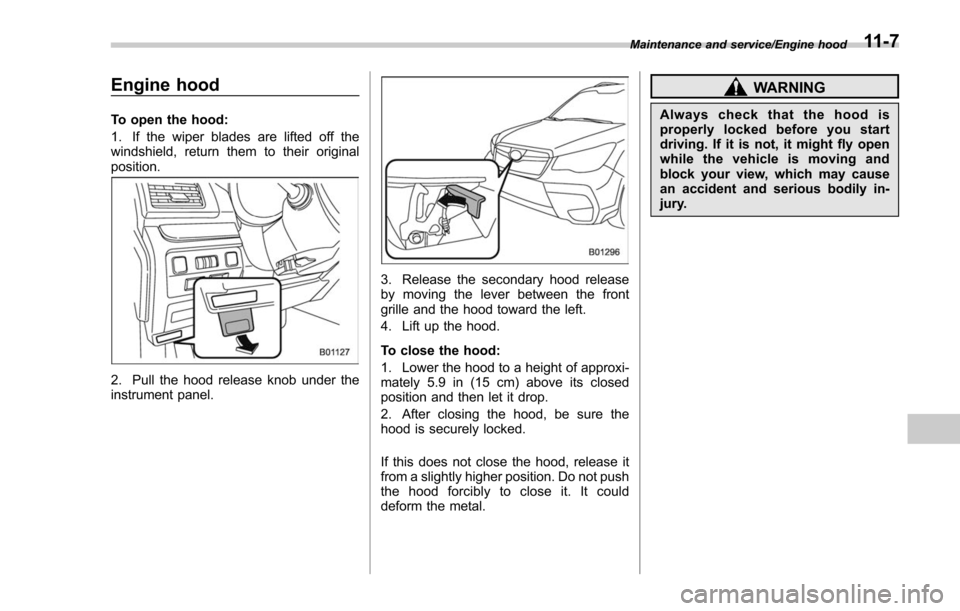
!Type B clips
1. Pull out the center portion of the clip
using a flat-head screwdriver as shown in
the illustration.
2. Pull the protruded center portion to
remove the entire body of the clip.
Maintenance and service/Maintenance tips
–CONTINUED –11-5
Page 538 of 634

Engine hood
To open the hood:
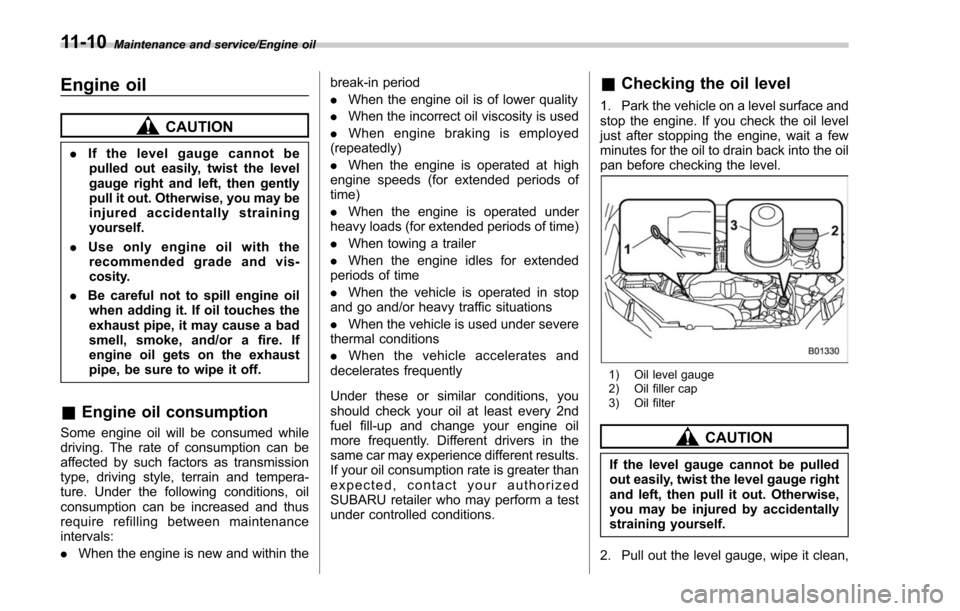
1. If the wiper blades are lifted off the
windshield, return them to their original
position.
2. Pull the hood release knob under the
instrument panel.
3. Release the secondary hood release
by moving the lever between the front
grille and the hood toward the left.
4. Lift up the hood.
To close the hood:
1. Lower the hood to a height of approxi-
mately 5.9 in (15 cm) above its closed
position and then let it drop.
2. After closing the hood, be sure the
hood is securely locked.
If this does not close the hood, release it
from a slightly higher position. Do not push
the hood forcibly to close it. It could
deform the metal.
WARNING
Always check that the hood is
properly locked before you start
driving. If it is not, it might fly open
while the vehicle is moving and
block your view, which may cause
an accident and serious bodily in-
jury.
Maintenance and service/Engine hood11-7
Page 541 of 634

Maintenance and service/Engine oil
Engine oil
CAUTION
.If the level gauge cannot be
pulled out easily, twist the level
gauge right and left, then gently
pull it out. Otherwise, you may be
injured accidentally straining
yourself.
. Use only engine oil with the
recommended grade and vis-
cosity.
. Be careful not to spill engine oil
when adding it. If oil touches the
exhaust pipe, it may cause a bad
smell, smoke, and/or a fire. If
engine oil gets on the exhaust
pipe, be sure to wipe it off.
& Engine oil consumption
Some engine oil will be consumed while
driving. The rate of consumption can be
affected by such factors as transmission
type, driving style, terrain and tempera-
ture. Under the following conditions, oil
consumption can be increased and thus
require refilling between maintenance
intervals:
. When the engine is new and within the break-in period
.
When the engine oil is of lower quality
. When the incorrect oil viscosity is used
. When engine brakin g is employed
(repeatedly)
. When the engine is operated at high
engine speeds (for extended periods of
time)
. When the engine is operated under
heavy loads (for extended periods of time)
. When towing a trailer
. When the engine idles for extended
periods of time
. When the vehicle is operated in stop
and go and/or heavy traffic situations
. When the vehicle is used under severe
thermal conditions
. When the vehicle accelerates and
decelerates frequently
Under these or similar conditions, you
should check your oil at least every 2nd
fuel fill-up and change your engine oil
more frequently. Different drivers in the
same car may experience different results.
If your oil consumption rate is greater than
expected, contact your authorized
SUBARU retailer who may perform a test
under controlled conditions.
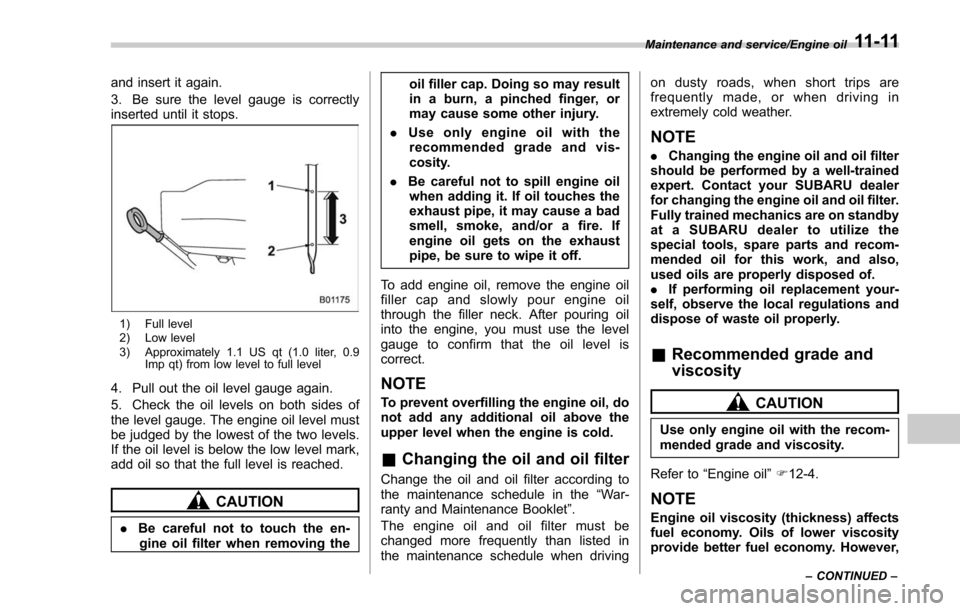
& Checking the oil level
1. Park the vehicle on a level surface and
stop the engine. If you check the oil level
just after stopping the engine, wait a few
minutes for the oil to drain back into the oil
pan before checking the level.
1) Oil level gauge
2) Oil filler cap
3) Oil filter
CAUTION
If the level gauge cannot be pulled
out easily, twist the level gauge right
and left, then pull it out. Otherwise,
you may be injured by accidentally
straining yourself.
2. Pull out the level gauge, wipe it clean,
11-10
Page 542 of 634

and insert it again.
3. Be sure the level gauge is correctly
inserted until it stops.
1) Full level
2) Low level
3) Approximately 1.1 US qt (1.0 liter, 0.9Imp qt) from low level to full level
4. Pull out the oil level gauge again.
5. Check the oil levels on both sides of
the level gauge. The engine oil level must
be judged by the lowest of the two levels.
If the oil level is below the low level mark,
add oil so that the full level is reached.
CAUTION
.Be careful not to touch the en-
gine oil filter when removing the oil filler cap. Doing so may result
in a burn, a pinched finger, or
may cause some other injury.
. Use only engine oil with the
recommended grade and vis-
cosity.
. Be careful not to spill engine oil
when adding it. If oil touches the
exhaust pipe, it may cause a bad
smell, smoke, and/or a fire. If
engine oil gets on the exhaust
pipe, be sure to wipe it off.
To add engine oil, remove the engine oil
filler cap and slowly pour engine oil
through the filler neck. After pouring oil
into the engine, you must use the level
gauge to confirm that the oil level is
correct.
NOTE
To prevent overfilling the engine oil, do
not add any additional oil above the
upper level when the engine is cold.
& Changing the oil and oil filter
Change the oil and oil filter according to
the maintenance schedule in the “War-
ranty and Maintenance Booklet ”.
The engine oil and oil filter must be
changed more frequently than listed in
the maintenance schedule when driving on dusty roads, when short trips are
frequently made, or when driving in
extremely cold weather.
NOTE
.
Changing the engine oil and oil filter
should be performed by a well-trained
expert. Contact your SUBARU dealer
for changing the engine oil and oil filter.
Fully trained mechanics are on standby
at a SUBARU dealer to utilize the
special tools, spare parts and recom-
mended oil for this work, and also,
used oils are properly disposed of.
. If performing oil replacement your-
self, observe the local regulations and
dispose of waste oil properly.
& Recommended grade and
viscosity
CAUTION
Use only engine oil with the recom-
mended grade and viscosity.
Refer to “Engine oil ”F 12-4.
NOTE
Engine oil viscosity (thickness) affects
fuel economy. Oils of lower viscosity
provide better fuel economy. However,
Maintenance and service/Engine oil
–CONTINUED –11-11