2017 SUBARU FORESTER steering wheel
[x] Cancel search: steering wheelPage 364 of 634
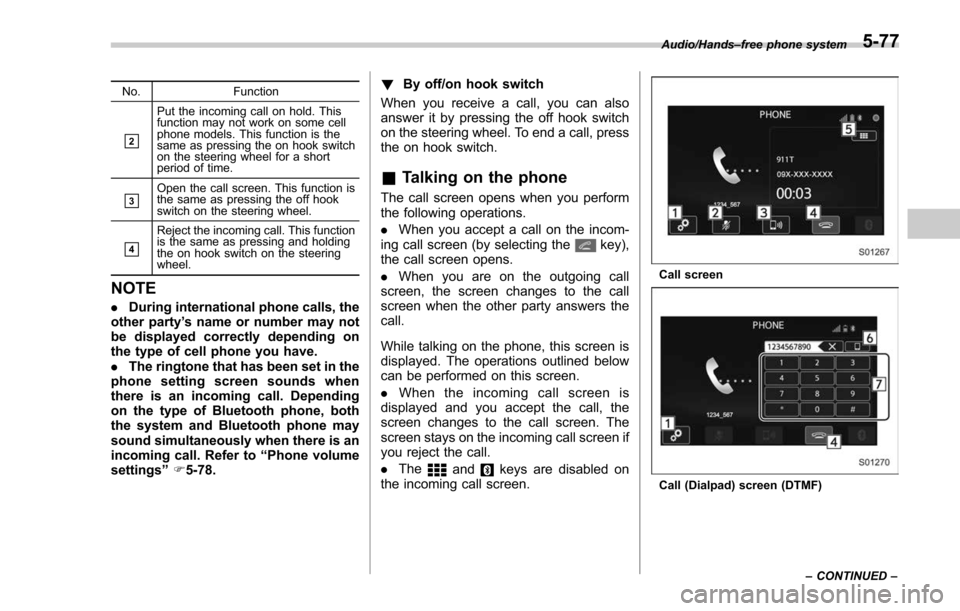
No.Function
&2
Put the incoming call on hold. This
function may not work on some cell
phone models. This function is the
same as pressing the on hook switch
on the steering wheel for a short
period of time.
&3Open the call screen. This function is
the same as pressing the off hook
switch on the steering wheel.
&4
Reject the incoming call. This function
is the same as pressing and holding
the on hook switch on the steering
wheel.
NOTE
.During international phone calls, the
other party’ s name or number may not
be displayed correctly depending on
the type of cell phone you have.
. The ringtone that has been set in the
phone setting screen sounds when
there is an incoming call. Depending
on the type of Bluetooth phone, both
the system and Bluetooth phone may
sound simultaneously when there is an
incoming call. Refer to “Phone volume
settings ”F 5-78. !
By off/on hook switch
When you receive a call, you can also
answer it by pressing the off hook switch
on the steering wheel. To end a call, press
the on hook switch.
& Talking on the phone
The call screen opens when you perform
the following operations.
. When you accept a call on the incom-
ing call screen (by selecting the
key),
the call screen opens.
. When you are on the outgoing call
screen, the screen changes to the call
screen when the other party answers the
call.
While talking on the phone, this screen is
displayed. The operations outlined below
can be performed on this screen.
. When the incoming call screen is
displayed and you accept the call, the
screen changes to the call screen. The
screen stays on the incoming call screen if
you reject the call.
. The
andkeys are disabled on
the incoming call screen.
Call screen
Call (Dialpad) screen (DTMF) Audio/Hands
–free phone system
–CONTINUED –
5-77
Page 365 of 634
Audio/Hands–free phone system
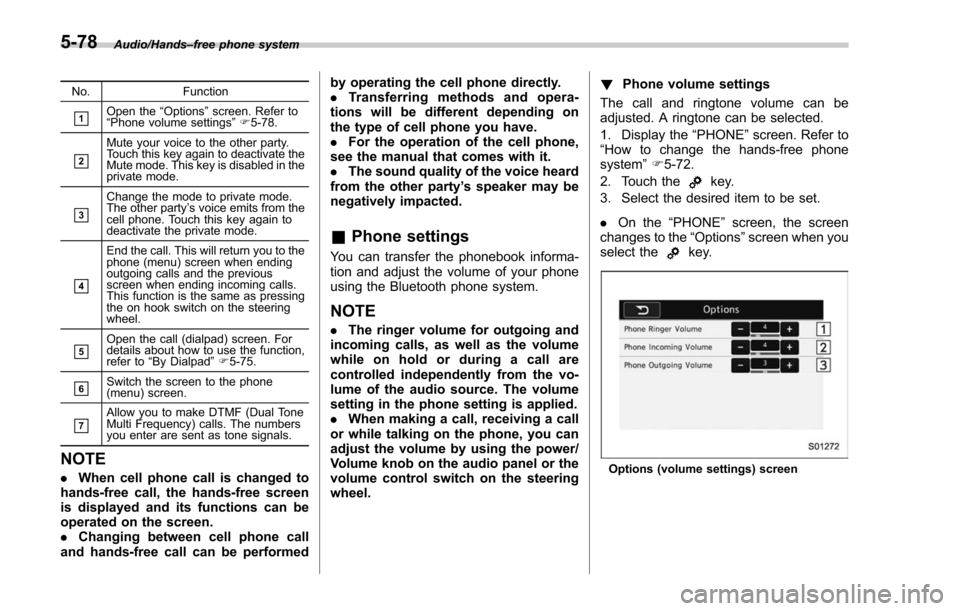
No. Function
&1Open the“Options ”screen. Refer to
“ Phone volume settings ”F 5-78.
&2
Mute your voice to the other party.
Touch this key again to deactivate the
Mute mode. This key is disabled in the
private mode.
&3
Change the mode to private mode.
The other party ’s voice emits from the
cell phone. Touch this key again to
deactivate the private mode.
&4
End the call. This will return you to the
phone (menu) screen when ending
outgoing calls and the previous
screen when ending incoming calls.
This function is the same as pressing
the on hook switch on the steering
wheel.
&5Open the call (dialpad) screen. For
details about how to use the function,
refer to “By Dialpad ”F 5-75.
&6Switch the screen to the phone
(menu) screen.
&7Allow you to make DTMF (Dual Tone
Multi Frequency) calls. The numbers
you enter are sent as tone signals.
NOTE
. When cell phone call is changed to
hands-free call, the hands-free screen
is displayed and its functions can be
operated on the screen.
. Changing between cell phone call
and hands-free call can be performed by operating the cell phone directly.
.
Transferring methods and opera-
tions will be different depending on
the type of cell phone you have.
. For the operation of the cell phone,
see the manual that comes with it.
. The sound quality of the voice heard
from the other party’ s speaker may be
negatively impacted.
& Phone settings
You can transfer the phonebook informa-
tion and adjust the volume of your phone
using the Bluetooth phone system.
NOTE
. The ringer volume for outgoing and
incoming calls, as well as the volume
while on hold or during a call are
controlled independently from the vo-
lume of the audio source. The volume
setting in the phone setting is applied.
. When making a call, receiving a call
or while talking on the phone, you can
adjust the volume by using the power/
Volume knob on the audio panel or the
volume control switch on the steering
wheel. !
Phone volume settings
The call and ringtone volume can be
adjusted. A ringtone can be selected.
1. Display the “PHONE ”screen. Refer to
“How to change the hands-free phone
system ”F 5-72.
2. Touch the
key.
3. Select the desired item to be set.
. On the “PHONE ”screen, the screen
changes to the “Options ”screen when you
select the
key.
Options (volume settings) screen
5-78
Page 369 of 634

Audio/Voice command system
&Voice command system op-
eration
1. Press the talk switch on the steering
wheel.
After the voice command top screen has
been displayed, speech guidance will
commence.
NOTE
When the voice command mode is
audio mode, voice guidance for the
voice command system can be skipped
by pressing the talk switch on the
steering wheel.
2. Say the command.
Example (Say “PHONE ”)
NOTE
. Commands related with each func-
tion are displayed on the screen of the
each function tab. Some commonly
used commands are displayed on the
screen of the main tab. Even if any tab
is selected, all commands can be
operated.
. Saying
“Help ”prompts guidance to
offer examples of commands and op-
eration methods.
. To cancel voice recognition, select
“ 6 ”, or press and hold the talk switch
on the steering wheel.
. If the system does not respond or
the confirmation screen does not dis-
appear, press the talk switch on the steering wheel and try again.
.
The notations used in the com-
mands are as follows.
–< >: Numbers, titles or names to
be spoken
! Voice command example: Call
name
1. Press the talk switch on the steering
wheel.
2. Say
“ Call
. A confirmation screen will be dis-
played showing the recognition re-
sults. If multiple matching items are
found, a selection screen will be
displayed. Say
“
the number.
NOTE
. In the same manner as it is dis-
played on the screen, “Call
“Call a contact ”say the name of a contact. For exam-
ple:“Call a contact ”,“John Smith ”or“Call a contact ”,“Mary Davis ”.Short or abbreviated names in the
contacts list may not be recognized.
Change names in the contacts list to
full names.
. Sometimes a voice recognition re-
sult confirmation screen will be dis-
played. After confirming the result, say
5-82
Page 370 of 634

“Ye s ”or“No”.
. When the system recognizes multi-
ple names from the contacts list, a
name candidate list will be displayed
on the screen. If the desired name is
not displayed on the top of the screen,
say or select the number of the name
from the candidate list (number 1,
number 2, etc.) to select a name from
the candidate list.
. When a contact has multiple phone
numbers registered in the contacts list,
a candidate list will be displayed. If the
desired phone number is not displayed
on the top of the screen, say or select
the number of the desired phone
number from the candidate list (num-
ber 1, number 2, etc.) to select a phone
number from the candidate list.
! Voice command example: Dial
number
1. Press the talk switch on the steering
wheel.
2. Say
“ Dial number ”.
3. Say
“ Dial
For example, if the phone number is
2345678:
Say
“ two three four five six seven
eight”
Do not say“ twenty three forty five sixty
seven eight ”
4. Say“Dial ”or press the off hook switch
on the steering wheel.
NOTE
. When the system recognizes multi-
ple phone numbers, a phone number
candidate list will be displayed on the
screen. Pressing the off hook switch on
the steering wheel makes a call to the
top entry on the list. If the desired
phone number is not displayed on the
top of the screen, say the number of
the desired phone number from the
candidate list to select a phone number
from the candidate list.
. Calling to the following phone num-
bers
–3 digit numbers (911, 411, 611)
– 7 digit numbers (Local phone
numbers)
– 10 digit numbers (Area code +
Local phone number)
– 11 digit phone numbers (1 + Area
code + Local phone number)
. As the system cannot recognize
additional numbers, say the complete
number without stopping. !
Casual speech recognization
Due to natural language speech recogni-
tion technology, this system enables re-
cognition of a command when spoken
naturally. However, the system cannot
recognize every variation of each com-
mand. In some situations, it is possible to
omit the command for the procedure and
directly state the desired operation. Not all
voice commands are displayed in the
function menu.
NOTE
If the command cannot be recognized
completely, the command input screen
will be displayed. (Search results will
be shown based on the part of the
command that was recognized.)
! Expression examples for each
function
Command Expression examples
“ Dial
Phone
Audio/Voice command system
–CONTINUED –5-83
Page 414 of 634

position and check the operation of the
warning and indicator lights. Refer to
“Warning and indicator lights”F 3-13.
5. Turn the ignition switch to the “START”
position without depressing the accelera-
tor pedal. Release the key immediately
after the engine has started.
If the engine does not start, try the
following procedure.
(1) Turn the ignition switch to the
“OFF ”position and wait for at least
10 seconds. After checking that the
parking brake is firmly set, turn the
ignition switch to the “START”position
while depressing the accelerator pedal
slightly (approximately a quarter of the
full stroke). Release the accelerator
pedal as soon as the engine starts.
(2) If this fails to start the engine, turn
the ignition switch back to the “OFF”
position and wait for at least 10
seconds. Then fully depress the accel-
erator pedal and turn the ignition
switch to the “START ”position. If the
engine starts, quickly release the
accelerator pedal.
(3) If this fails to start the engine, turn
the ignition switch again to the “OFF”
position. After waiting for 10 seconds
or longer, turn the ignition switch to the
“START ”position without depressing
the accelerator pedal. (4) If the engine still does not start,
contact your nearest SUBARU dealer
for assistance.
6. Confirm that all warning and indicator
lights have turned off after the engine has
started. The fuel injection system auto-
matically lowers the idle speed as the
engine warms up.
While the engine is warming up, make
sure that the select lever is at the “P ” or
“N ”position and that the parking brake is
applied.
CAUTION
If you restart the engine while the
vehicle is moving, shift the select
lever into the “N ” position. Do not
attempt to place the select lever of a
moving vehicle into the “P ” posi-
tion.
& Stopping the engine
The ignition switch should be turned off
only when the vehicle is stopped and the
engine is idling.
WARNING
Do not stop the engine when the
vehicle is moving. This will cause
loss of power to the power steering and the brake booster, making steer-
ing and braking more difficult. It
could also result in accidental acti-
vation of the
“LOCK ”position on the
ignition switch, causing the steering
wheel to lock.
Starting and operating/Starting and stopping the engine (models without push –button start system)7-11
Page 415 of 634
Starting and operating/Starting and stopping engine (models with push–button start system)
Starting and stopping engine
(models with push-button
start system)
& Safety precautions
Refer to “Safety precautions ”F 2-10.
& Operating range for push-
button start system
Refer to “Operating range for push-button
start system ”F 3-6.
& Starting engine
WARNING
. There are some general precau-
tions when starting the engine.
Carefully read the precautions
described in “Starting engine ”
F 7-9.
. If the indicator on the push-
button ignition switch flashes in
green after the engine has
started, never drive the vehicle.
The steering is still locked, and it
may result in an accident.
CAUTION
. When the operation indicator on
the push-button ignition switch is
flashing in orange, there may be
a malfunction with the vehicle.
Contact a SUBARU dealer imme-
diately.
. If the indicator on the push-
button ignition switch is flashing
in green after the engine has
started, it means that the steering
is still locked. Depress the brake
pedal while moving the steering
wheel to the right and left, and
press the push-button ignition
switch.
. Do not continue pressing the
push-button ignition switch for
more than 10 seconds. Doing so
could cause a malfunction. If the
engine does not start, stop
pressing the push-button ignition
switch. Instead, press the push-
button ignition switch without
depressing the brake pedal to
switch the power status to
“ OFF ”. Wait 10 seconds, and
then press the push-button igni-
tion switch to start the engine.
NOTE
. When the push-button ignition
switch is pressed while depressing
the brake pedal, the engine starter
operates for a maximum of 10 seconds
and after starting the engine, the starter
stops automatically.
. When the push-button ignition
switch is pressed while depressing
the brake pedal, the engine can be
started regardless of the status of the
push-button ignition switch.
. If the security indicator light illumi-
nates when you attempt to start the
engine but the engine does not start,
press the push-button ignition switch
to switch the power to “OFF”and then
try to start the engine again.
. If the engine does not start, press
the push-button ignition switch without
depressing the brake pedal to switch
the power to “OFF ”. Then, while de-
pressing the brake pedal more force-
fully, press the push-button ignition
switch.
. The engine start procedures may
not function depending on the radio
wave conditions around the vehicle. In
such a case, refer to “Starting engine ”
F 9-18.
. If the vehicle battery is discharged,
the steering cannot be unlocked.
7-12
Page 430 of 634
or foot brake is applied.
Avoid coasting with the transmission in
neutral. Engine braking has no effect in
this condition.
WARNING
Do not drive the vehicle with the
select lever in the“N ” (neutral)
position. Engine braking has no
effect in this condition and the risk
of an accident is consequently in-
creased.
NOTE
If the select lever is in the “N ” position
when you stop the engine for parking,
you may not subsequently be able to
move it to the “R ” and “P ” positions. If
this happens, turn the ignition switch to
the “ON ”position. You will then be able
to move the select lever to the “P ”
position.
! D (Drive)
This position is for normal driving. The
transmission shifts automatically and con-
tinuously into a suitable gear according to
the vehicle speed and the acceleration
you require. Also, while driving up and
down a hill, the transmission assists and controls the driving performance and
engine braking while corresponding to
the road grade.
When more acceleration is required in the
“
D ” position, depress the accelerator
pedal fully to the floor and hold that
position. The transmission will automati-
cally downshift. In this case, the transmis-
sion will operate lik e a conventional
automatic transmission. When you re-
lease the pedal, the transmission will
return to the original gear position.
For models with manual mode, if one of
the shift paddles behind the steering
wheel is operated while driving in the “D”
position, the transmission will temporarily
switch to the manual mode. In this mode,
you can shift into any gear position using
the shift paddles. For details about the
manual mode, refer to “Selection of
manual mode” F7-27. Once the vehicle
speed stabilizes, the transmission will
switch from the manual mode back to
the “D”position for normal driving.
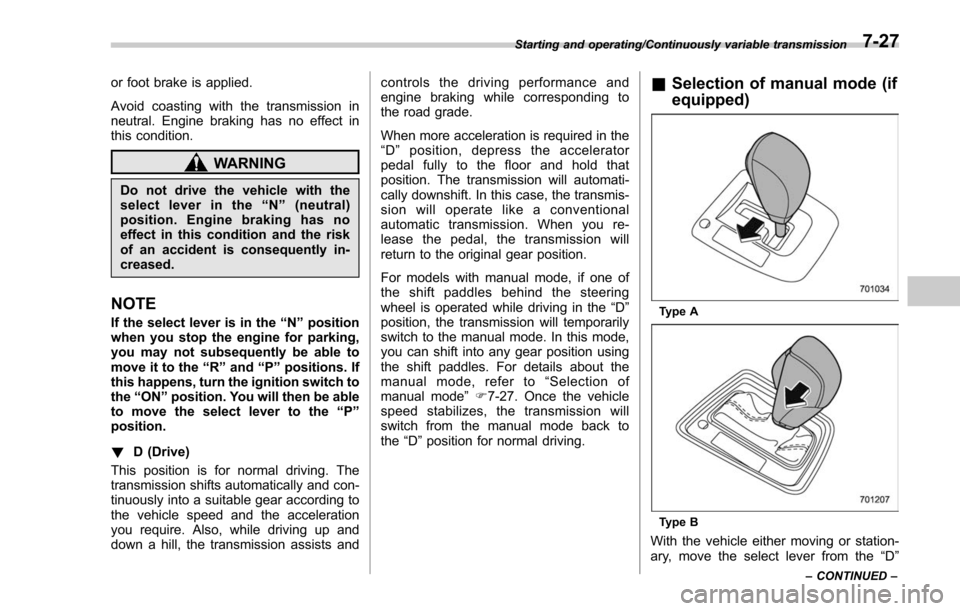
& Selection of manual mode (if
equipped)
Type A
Type B
With the vehicle either moving or station-
ary, move the select lever from the “D”
Starting and operating/Continuously variable transmission
–CONTINUED –7-27
Page 431 of 634
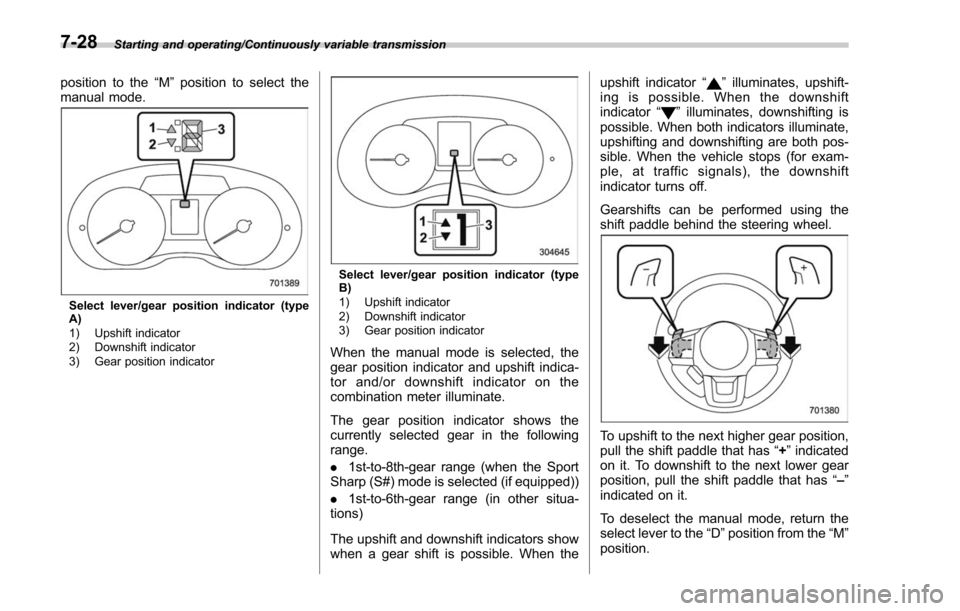
Starting and operating/Continuously variable transmission
position to the“M”position to select the
manual mode.
Select lever/gear position indicator (type
A)
1) Upshift indicator
2) Downshift indicator
3) Gear position indicator
Select lever/gear position indicator (type
B)
1) Upshift indicator
2) Downshift indicator
3) Gear position indicator
When the manual mode is selected, the
gear position indicator and upshift indica-
tor and/or downshift indicator on the
combination meter illuminate.
The gear position indicator shows the
currently selected gear in the following
range.
. 1st-to-8th-gear range (when the Sport
Sharp (S#) mode is selected (if equipped))
. 1st-to-6th-gear range (in other situa-
tions)
The upshift and downshift indicators show
when a gear shift is possible. When the upshift indicator
“
”illuminates, upshift-
ing is possible. When the downshift
indicator “
”illuminates, downshifting is
possible. When both indicators illuminate,
upshifting and downshifting are both pos-
sible. When the vehicle stops (for exam-
ple, at traffic signals), the downshift
indicator turns off.
Gearshifts can be performed using the
shift paddle behind the steering wheel.
To upshift to the next higher gear position,
pull the shift paddle that has “+”indicated
on it. To downshift to the next lower gear
position, pull the shift paddle that has “–”
indicated on it.
To deselect the manual mode, return the
select lever to the “D”position from the “M”
position.
7-28