2017 SUBARU FORESTER key battery
[x] Cancel search: key batteryPage 383 of 634
Interior equipment/Interior lights
Interior lights
CAUTION
When leaving your vehicle, make
sure the lights are turned off to
avoid battery discharge.
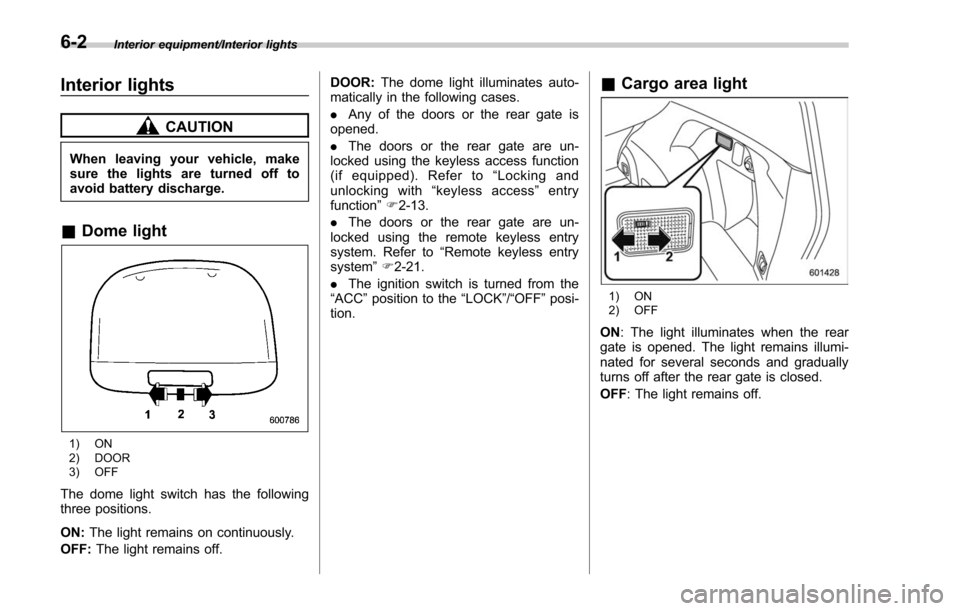
&Dome light
1) ON
2) DOOR
3) OFF
The dome light switch has the following
three positions.
ON: The light remains on continuously.
OFF: The light remains off. DOOR:
The dome light illuminates auto-
matically in the following cases.
. Any of the doors or the rear gate is
opened.
. The doors or the rear gate are un-
locked using the keyless access function
(if equipped). Refer to “Locking and
unlocking with “keyless access” entry
function ”F 2-13.
. The doors or the rear gate are un-
locked using the remote keyless entry
system. Refer to “Remote keyless entry
system ”F 2-21.
. The ignition switch is turned from the
“ACC ”position to the “LOCK”/ “OFF ”posi-
tion.
& Cargo area light
1) ON
2) OFF
ON : The light illuminates when the rear
gate is opened. The light remains illumi-
nated for several seconds and gradually
turns off after the rear gate is closed.
OFF : The light remains off.
6-2
Page 416 of 634
Charge the battery.
.After the engine starts, the engine
speed will be kept high until the engine
has warmed up sufficiently.
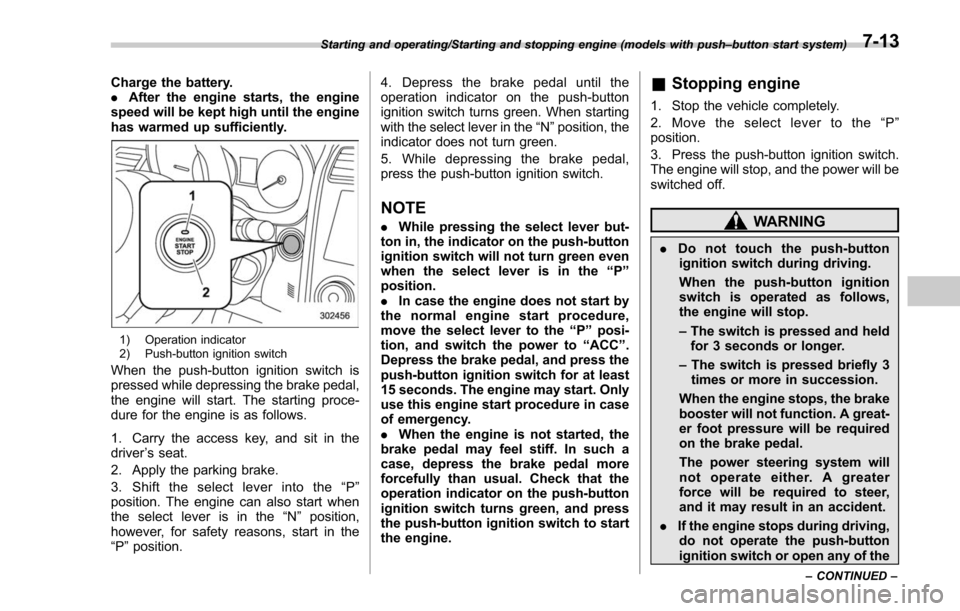
1) Operation indicator
2) Push-button ignition switch
When the push-button ignition switch is
pressed while depressing the brake pedal,
the engine will start. The starting proce-
dure for the engine is as follows.
1. Carry the access key, and sit in the
driver ’s seat.
2. Apply the parking brake.
3. Shift the select lever into the “P ”
position. The engine can also start when
the select lever is in the “N”position,
however, for safety reasons, start in the
“P ”position. 4. Depress the brake pedal until the
operation indicator on the push-button
ignition switch turns green. When starting
with the select lever in the
“N”position, the
indicator does not turn green.
5. While depressing the brake pedal,
press the push-button ignition switch.
NOTE
. While pressing the select lever but-
ton in, the indicator on the push-button
ignition switch will not turn green even
when the select lever is in the “P”
position.
. In case the engine does not start by
the normal engine start procedure,
move the select lever to the “P”posi-
tion, and switch the power to “ACC ”.
Depress the brake pedal, and press the
push-button ignition switch for at least
15 seconds. The engine may start. Only
use this engine start procedure in case
of emergency.
. When the engine is not started, the
brake pedal may feel stiff. In such a
case, depress the brake pedal more
forcefully than usual. Check that the
operation indicator on the push-button
ignition switch turns green, and press
the push-button ignition switch to start
the engine.
& Stopping engine
1. Stop the vehicle completely.
2. Move the select lever to the “P ”
position.
3. Press the push-button ignition switch.
The engine will stop, and the power will be
switched off.
WARNING
. Do not touch the push-button
ignition switch during driving.
When the push-button ignition
switch is operated as follows,
the engine will stop.
– The switch is pressed and held
for 3 seconds or longer.
– The switch is pressed briefly 3
times or more in succession.
When the engine stops, the brake
booster will not function. A great-
er foot pressure will be required
on the brake pedal.
The power steering system will
not operate either. A greater
force will be required to steer,
and it may result in an accident.
. If the engine stops during driving,
do not operate the push-button
ignition switch or open any of the
Starting and operating/Starting and stopping engine (models with push –button start system)
–CONTINUED –7-13
Page 417 of 634
Starting and operating/Remote engine start system (dealer option)
doors until the vehicle is stopped
in a safe location. It is dangerous
because the steering lock may be
activated. Stop the vehicle in a
safe location, and contact a
SUBARU dealer immediately.
CAUTION
.Do not stop the engine while the
select lever is in a position other
than the “P ” position.
. If the engine is stopped while the
select lever is in a position other
than the “P ” position, the power
will be in “ACC ”. If the vehicle is
left in this condition, the battery
may be discharged.
NOTE
Although you can stop the engine by
operating the push-button ignition
switch, do not stop the engine during
driving except in an emergency.
& When access key does not
operate properly
Refer to “Access key –if access key does
not operate properly ”F 9-17.
Remote engine start system
(dealer option)
WARNING
. There are some general precau-
tions when starting the engine.
Carefully read the precautions
described in “General precau-
tions when starting engine ”F 7-
9.
. Do not remote start a vehicle in
an enclosed environment (e.g.
closed garage). Prolonged opera-
tion of a motor vehicle in an
enclosed environment can cause
a harmful build-up of Carbon
Monoxide. Carbon Monoxide is
harmful to your health. Exposure
to high levels of Carbon Monox-
ide can cause headaches, dizzi-
ness or in extreme cases uncon-
sciousness and/or death.
. Before performing any servicing
of the vehicle, temporarily place
the remote engine start system in
service mode to prevent the
system from unexpectedly start-
ing the engine.
The remote engine start system allows you to start the engine from outside the
vehicle. In addition, the remote engine
start system can activate the heater or air
conditioner, providing you with a comfor-
table cabin upon entry.&
Models with “keyless access
with push-button start sys-
tem”
NOTE
For more details, refer to the Owner ’s
Manual supplement for the remote
engine start system.
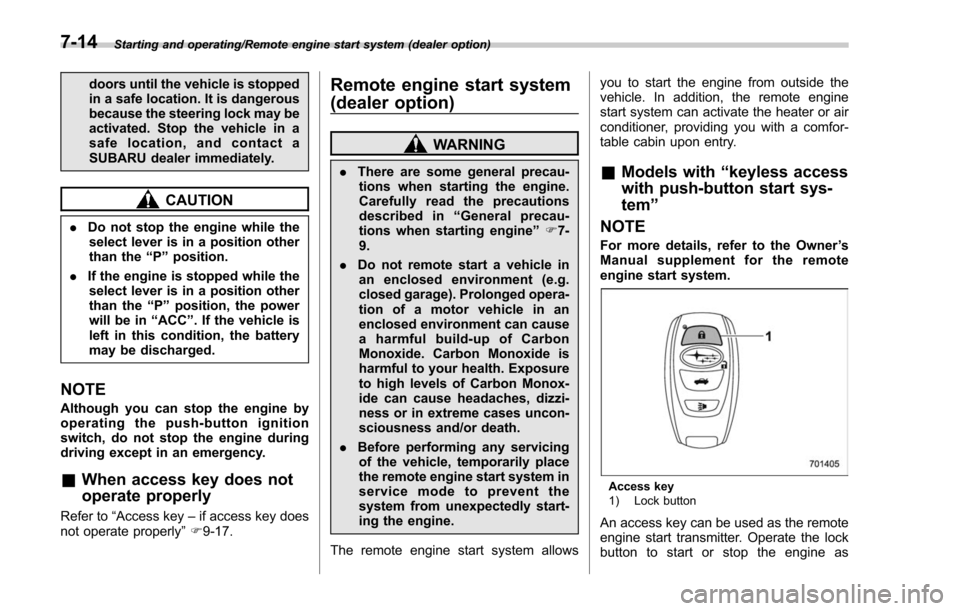
Access key
1) Lock button
An access key can be used as the remote
engine start transmitter. Operate the lock
button to start or stop the engine as
7-14
Page 423 of 634
Starting and operating/Remote engine start system (dealer option)
&Remote transmitter program
(models without “keyless ac-
cess with push-button start
system ”)
New transmitters can be programmed to
the remote engine start system in the
event that a transmitter is lost, stolen,
damaged or additional transmitters are
desired (the system will accept up to eight
transmitters). New remote engine start
transmitters can be programmed accord-
ing to the following procedure.
1. Open the driver ’s door (the driver ’s
door must remain opened throughout the
entire process).
2. Depress and hold the brake pedal.
3. Turn the ignition switch to “ON”then
“LOCK” , back to “ON”then “LOCK ”, back
to “ON ”then “LOCK”, then back to “ON”
again and leave the ignition “ON”through-
out the programming process.
4. The system will flash the side marker
lights, tail lights and parking lights and
honk the horn three times, indicating that
the system has entered the transmitter
learn mode.
5. Press and release the “
”button on
the transmitter that you want to program.
6. The system will flash the side marker
lights, tail lights and parking lights and honk the horn one time, indicating that the
system has learned the transmitter. Upon
successful programming, the remote start
confirmation transmitter button will flash
one time.
7. Repeat step 5 for any additional
transmitters (the system will accept up to
eight transmitters).
8. The system will exit the transmitter
learn mode if the key is turned to the
“LOCK”
position, the door is closed or
after 2 minutes.
& System maintenance
NOTE
For models without “keyless access
with push-button start system ”:
In the event that the vehicle ’s battery is
replaced, discharged or disconnected,
it will be necessary to start the vehicle
a minimum of one time using the key
prior to activating the remote engine
start system. This is required to allow
the vehicle electronic systems to re-
synchronize. !
Changing the battery
CAUTION
.Do not let dust, oil or water get on
or in the remote engine start
transmitter when replacing the
battery.
. Be careful not to damage the
printed circuit board in the re-
mote engine start transmitter
when replacing the battery.
. Be careful not to allow children to
touch the battery and any re-
moved parts; children could
swallow them.
. There is a danger of explosion if
an incorrect replacement battery
is used. Replace only with the
same or equivalent type of bat-
tery.
. Batteries should not be exposed
to excessive heat such as sun-
shine, fire or the like.
For models with “keyless access with
push-button start system ”:
Perform the procedure described in “Re-
placing battery of access key ”F 11-45.
7-20
Page 424 of 634
For models without“keyless access
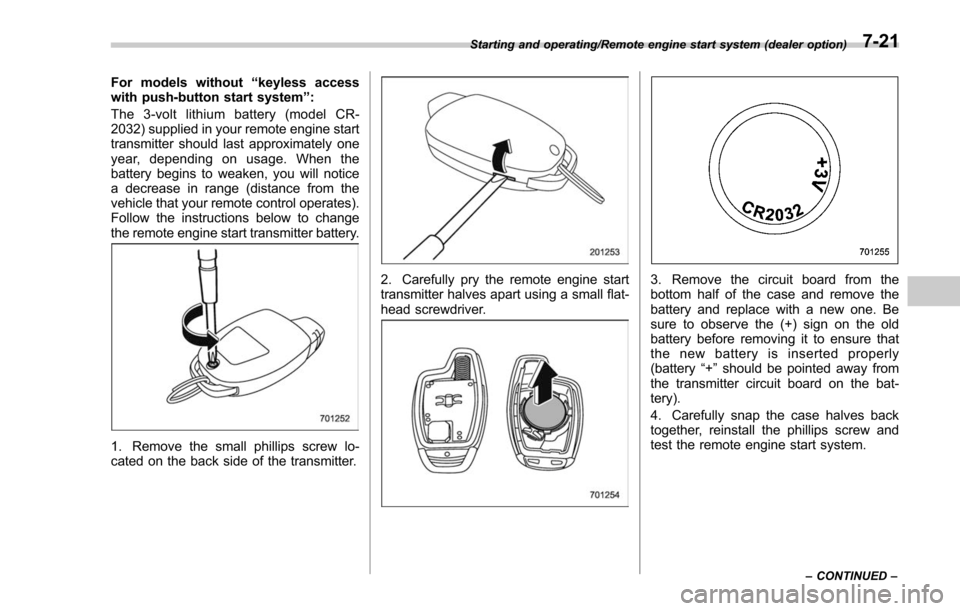
with push-button start system ”:
The 3-volt lithium battery (model CR-
2032) supplied in your remote engine start
transmitter should last approximately one
year, depending on usage. When the
battery begins to weaken, you will notice
a decrease in range (distance from the
vehicle that your remote control operates).
Follow the instructions below to change
the remote engine start transmitter battery.
1. Remove the small phillips screw lo-
cated on the back side of the transmitter.
2. Carefully pry the remote engine start
transmitter halves apart using a small flat-
head screwdriver.3. Remove the circuit board from the
bottom half of the case and remove the
battery and replace with a new one. Be
sure to observe the (+) sign on the old
battery before removing it to ensure that
the new battery is inserted properly
(battery “+”should be pointed away from
the transmitter circuit board on the bat-
tery).
4. Carefully snap the case halves back
together, reinstall the phillips screw and
test the remote engine start system.
Starting and operating/Remote engine start system (dealer option)
–CONTINUED –7-21
Page 520 of 634
Access key–if access key
does not operate properly
CAUTION
Keep metallic objects, magnetic
sources and signal transmitters
away from the area between the
access key and the push-button
ignition switch. They may interfere
with the communication between
the access key and the push-button
ignition switch.
The following functions may be inoperable
because of strong radio signals in the
surrounding area or the access key
battery being low.
. Locking/unlocking doors including the
rear gate
. Switching power status
. Starting the engine
In such cases, perform the following
procedure. When the battery of the access
key is discharged, replace it with a new
one. Refer to “Replacing battery of access
key ”F 11-45.
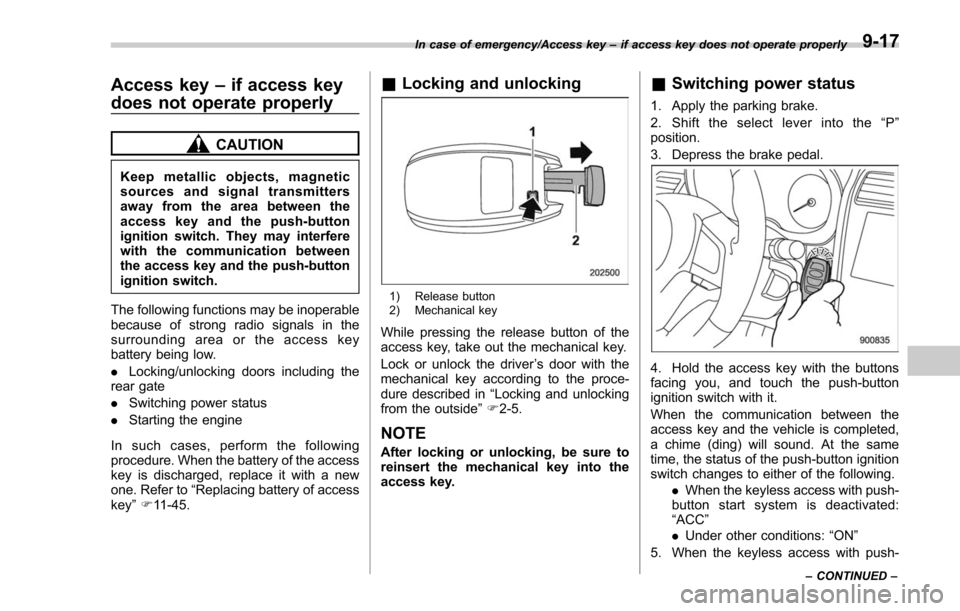
& Locking and unlocking
1) Release button
2) Mechanical key
While pressing the release button of the
access key, take out the mechanical key.
Lock or unlock the driver ’s door with the
mechanical key according to the proce-
dure described in “Locking and unlocking
from the outside ”F 2-5.
NOTE
After locking or unlocking, be sure to
reinsert the mechanical key into the
access key.
& Switching power status
1. Apply the parking brake.
2. Shift the select lever into the “P ”
position.
3. Depress the brake pedal.
4. Hold the access key with the buttons
facing you, and touch the push-button
ignition switch with it.
When the communication between the
access key and the vehicle is completed,
a chime (ding) will sound. At the same
time, the status of the push-button ignition
switch changes to either of the following.
.When the keyless access with push-
button start system is deactivated:
“ACC ”
. Under other conditions: “ON ”
5. When the keyless access with push-
In case of emergency/Access key –if access key does not operate properly
–CONTINUED –9-17
Page 533 of 634

Maintenance and service
Tire replacement.............................................. 11-29
Wheel replacement ........................................... 11-30
Aluminum wheels............................................. 11-30
Windshield washer fluid .................................. 11-30
Replacement of wiper blades .......................... 11-32
Windshield wiper blade assembly ..................... 11-33
Windshield wiper blade rubber ......................... 11-33
Rear window wiper blade assembly .................. 11-34
Rear window wiper blade rubber ....................... 11-35
Battery............................................................... 11-36
Fuses ................................................................ 11-37
Installation of accessories ............................... 11-38 Replacing bulbs
............................................... 11-39
Headlights (models with LED headlights) .......... 11-39
Headlights (models with halogen headlights) .................................................... 11-39
Front turn signal light, front side marker light and parking light ........................................... 11-41
Front fog light (if equipped) .............................. 11-42
Rear combination lights ................................... 11-42
License plate light ........................................... 11-44
Other bulbs ..................................................... 11-44
Replacing key battery ...................................... 11-44Replacing battery of access key ....................... 11-45
Replacing transmitter battery ........................... 11-46
Page 575 of 634
Maintenance and service/Replacing key battery
7. Tighten the upper and lower screws.
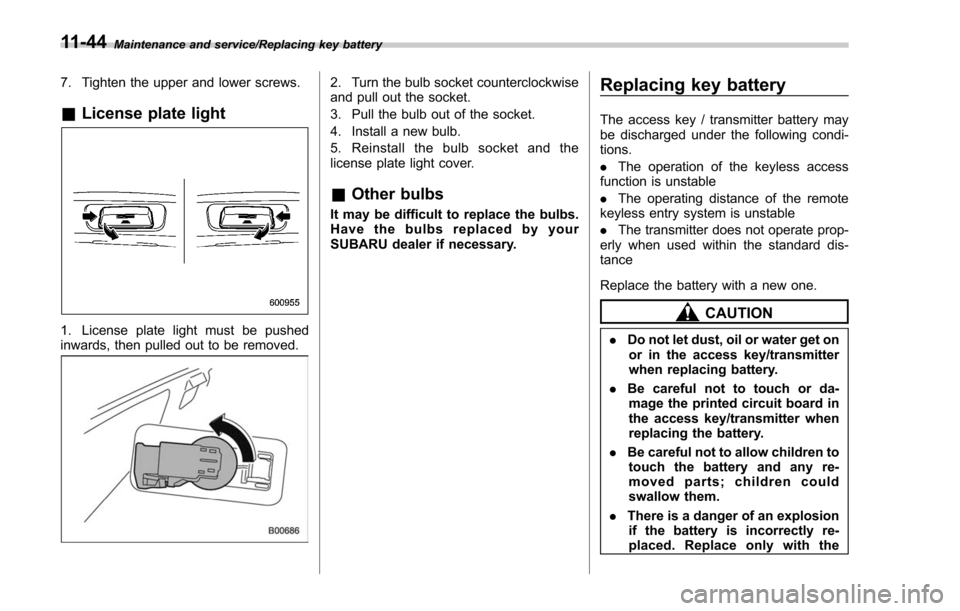
&License plate light
1. License plate light must be pushed
inwards, then pulled out to be removed.
2. Turn the bulb socket counterclockwise
and pull out the socket.
3. Pull the bulb out of the socket.
4. Install a new bulb.
5. Reinstall the bulb socket and the
license plate light cover.
&Other bulbs
It may be difficult to replace the bulbs.
Have the bulbs replaced by your
SUBARU dealer if necessary.
Replacing key battery
The access key / transmitter battery may
be discharged under the following condi-
tions.
. The operation of the keyless access
function is unstable
. The operating distance of the remote
keyless entry system is unstable
. The transmitter does not operate prop-
erly when used within the standard dis-
tance
Replace the battery with a new one.
CAUTION
. Do not let dust, oil or water get on
or in the access key/transmitter
when replacing battery.
. Be careful not to touch or da-
mage the printed circuit board in
the access key/transmitter when
replacing the battery.
. Be careful not to allow children to
touch the battery and any re-
moved parts; children could
swallow them.
. There is a danger of an explosion
if the battery is incorrectly re-
placed. Replace only with the
11-44