2017 SUBARU FORESTER turn signal
[x] Cancel search: turn signalPage 251 of 634
Instruments and controls/Turn signal lever
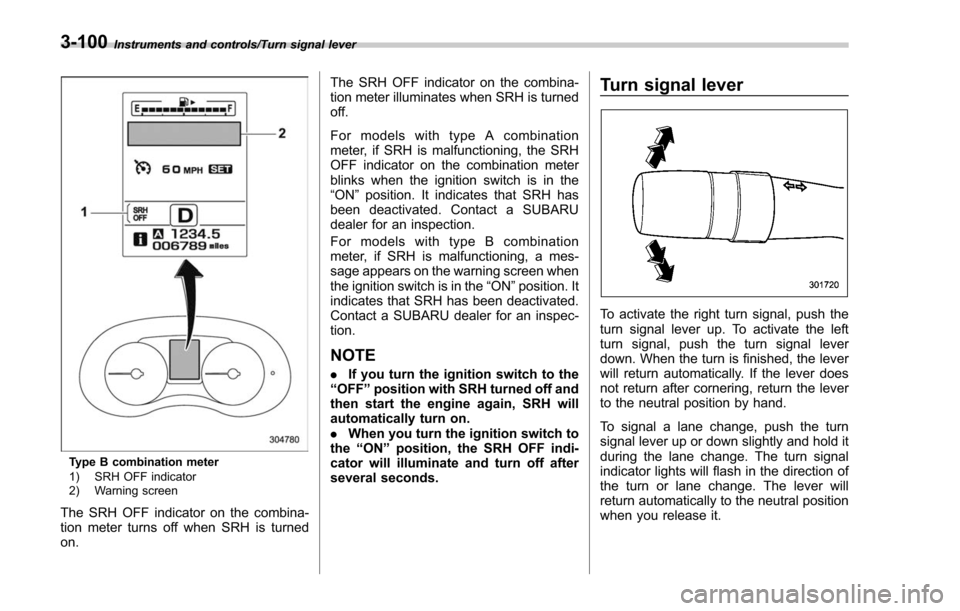
Type B combination meter
1) SRH OFF indicator
2) Warning screen
The SRH OFF indicator on the combina-
tion meter turns off when SRH is turned
on.The SRH OFF indicator on the combina-
tion meter illuminates when SRH is turned
off.
For models with type A combination
meter, if SRH is malfunctioning, the SRH
OFF indicator on the combination meter
blinks when the ignition switch is in the
“ON
”position. It indicates that SRH has
been deactivated. Contact a SUBARU
dealer for an inspection.
For models with type B combination
meter, if SRH is malfunctioning, a mes-
sage appears on the warning screen when
the ignition switch is in the “ON”position. It
indicates that SRH has been deactivated.
Contact a SUBARU dealer for an inspec-
tion.
NOTE
. If you turn the ignition switch to the
“ OFF ”position with SRH turned off and
then start the engine again, SRH will
automatically turn on.
. When you turn the ignition switch to
the “ON ”position, the SRH OFF indi-
cator will illuminate and turn off after
several seconds.
Turn signal lever
To activate the right turn signal, push the
turn signal lever up. To activate the left
turn signal, push the turn signal lever
down. When the turn is finished, the lever
will return automatically. If the lever does
not return after cornering, return the lever
to the neutral position by hand.
To signal a lane change, push the turn
signal lever up or down slightly and hold it
during the lane change. The turn signal
indicator lights will flash in the direction of
the turn or lane change. The lever will
return automatically to the neutral position
when you release it.
3-100
Page 252 of 634
&One-touch lane changer
To flash the turn signal and turn signal
indicator light three times, push the turn
signal lever up or down slightly and
immediately release it.
The operational/non-operational setting of
the one-touch lane changer can be
changed by a SUBARU dealer. Contact
your nearest SUBARU dealer for details.
Illumination brightness con-
trol
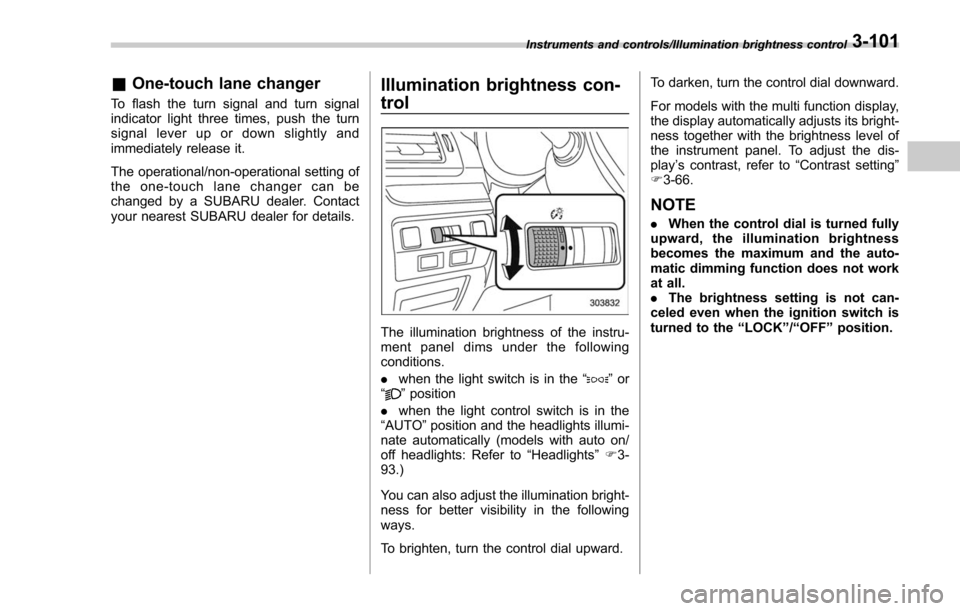
The illumination brightness of the instru-
ment panel dims under the following
conditions.
. when the light switch is in the “
”or
“” position
. when the light control switch is in the
“AUTO ”position and the headlights illumi-
nate automatically (models with auto on/
off headlights: Refer to “Headlights”F 3-
93.)
You can also adjust the illumination bright-
ness for better visibility in the following
ways.
To brighten, turn the control dial upward. To darken, turn the control dial downward.
For models with the multi function display,
the display automatically adjusts its bright-
ness together with the brightness level of
the instrument panel. To adjust the dis-
play
’s contrast, refer to “Contrast setting”
F 3-66.
NOTE
. When the control dial is turned fully
upward, the illumination brightness
becomes the maximum and the auto-
matic dimming function does not work
at all.
. The brightness setting is not can-
celed even when the ignition switch is
turned to the “LOCK ”/“ OFF ”position.
Instruments and controls/Illumination brightness control3-101
Page 261 of 634
Instruments and controls/Mirrors
until a“C”appears in the display. Once a
“C ”appears in the display, slowly drive the
vehicle in circles until compass is cali-
brated.
! HomeLink
®Wireless Control Sys-
tem
The HomeLink
®Wireless Control System
provides a convenient way to replace up
to three hand-held radio-frequency re-
motes used to activate devices such as
gate operators, garage door openers,
entry door locks, security systems, even
home lighting. The below steps are
generic programming instructions; for
Genie and Sommer garage door openers
please go directly to the HomeLink web-
site. Additional information and program-
ming videos can be found at
www.HomeLink.com and
www.youtube.com/HomeLinkGentex.
CAUTION
. Before programming HomeLink
to a garage door opener or gate
operator, make sure that people
and objects are out of the way of
the device to prevent potential
harm or damage.
. When programming a garage
door opener, it is advised to park outside of the garage.
. Do not use HomeLink with any
garage door opener that lacks
safety stop and reverse features
as required by U.S. federal safety
standards (this includes any gar-
age door opener model manufac-
tured before April 1, 1982). A
garage door that cannot detect
an object signaling the door to
stop and reverse does not meet
current U.S. federal safety stan-
dards.
. It is also recommended that a
new battery be placed in the
hand-held remote (garage door
opener remote) of the device for
quicker and more accurate train-
ing.
. Some vehicles may require the
ignition switch to be turned to the
“ON ”or “ACC ”position for pro-
gramming and/or operation of
HomeLink.
. Keep the hand-held remote (gar-
age door opener remote) of the
device you are programming for
use in other vehicles as well as
for future HomeLink program-
ming. It is also suggested that
upon the sale of the vehicle, the programmed HomeLink buttons
be erased for security purposes.
Refer to
“Erasing HomeLink But-
tons ”F 3-113.
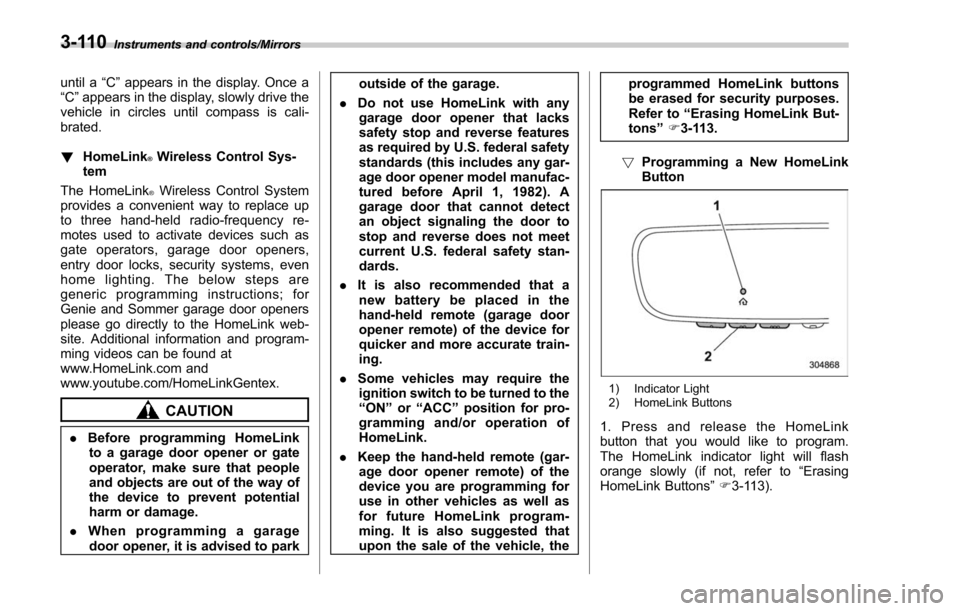
! Programming a New HomeLink
Button
1) Indicator Light
2) HomeLink Buttons
1. Press and release the HomeLink
button that you would like to program.
The HomeLink indicator light will flash
orange slowly (if not, refer to “Erasing
HomeLink Buttons ”F 3-113).
3-110
Page 318 of 634
select the desired multicast channel.
NOTE
.HD RadioTMstations can be preset.
. An orangewill be displayed on
the screen when in digital. Thewill
first appear in a gray color indicating
the station is indeed (an analog and) a
digital station. Once the digital signal is
acquired, the logo will change to a
bright orange color.
. The song title and artist name will
appear on the screen when available by
the radio station. The radio station can
send album pictures when available.
. As a user works through the analog
radio stations, (where applicable) the
radio receiver will automatically tune
from an analog signal to a digital signal
within 5 seconds.
!Preserving a music information
Tag information in the music broadcasting
is preserved in the system and transmits
to an iPod.
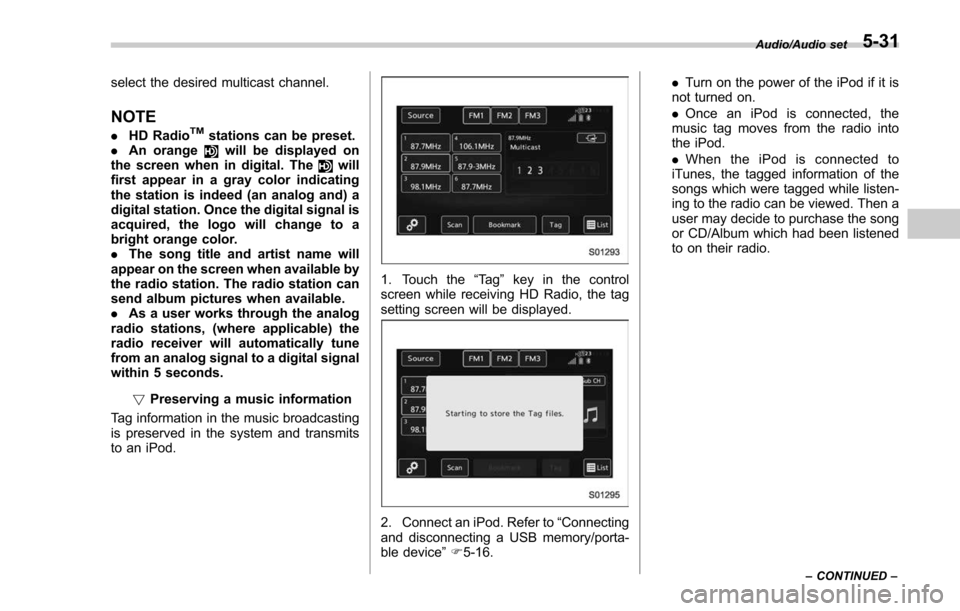
1. Touch the “Ta g”key in the control
screen while receiving HD Radio, the tag
setting screen will be displayed.
2. Connect an iPod. Refer to “Connecting
and disconnecting a USB memory/porta-
ble device ”F 5-16. .
Turn on the power of the iPod if it is
not turned on.
. Once an iPod is connected, the
music tag moves from the radio into
the iPod.
. When the iPod is connected to
iTunes, the tagged information of the
songs which were tagged while listen-
ing to the radio can be viewed. Then a
user may decide to purchase the song
or CD/Album which had been listened
to on their radio.
Audio/Audio set
–CONTINUED –5-31
Page 321 of 634
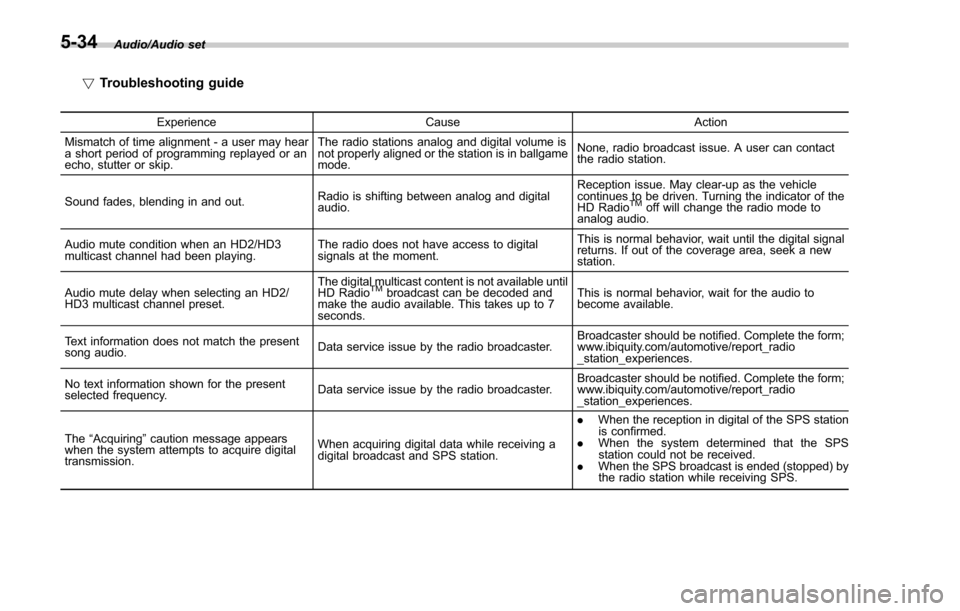
Audio/Audio set
!Troubleshooting guide
Experience CauseAction
Mismatch of time alignment - a user may hear
a short period of programming replayed or an
echo, stutter or skip. The radio stations analog and digital volume is
not properly aligned or the station is in ballgame
mode.
None, radio broadcast issue. A user can contact
the radio station.
Sound fades, blending in and out. Radio is shifting between analog and digital
audio. Reception issue. May clear-up as the vehicle
continues to be driven. Turning the indicator of the
HD Radio
TMoff will change the radio mode to
analog audio.
Audio mute condition when an HD2/HD3
multicast channel had been playing. The radio does not have access to digital
signals at the moment. This is normal behavior, wait until the digital signal
returns. If out of the coverage area, seek a new
station.
Audio mute delay when selecting an HD2/
HD3 multicast channel preset. The digital multicast content is not available until
HD Radio
TMbroadcast can be decoded and
make the audio available. This takes up to 7
seconds. This is normal behavior, wait for the audio to
become available.
Text information does not match the present
song audio. Data service issue by the radio broadcaster. Broadcaster should be notified. Complete the form;
www.ibiquity.com/automotive/report_radio
_station_experiences.
No text information shown for the present
selected frequency. Data service issue by the radio broadcaster. Broadcaster should be notified. Complete the form;
www.ibiquity.com/automotive/report_radio
_station_experiences.
The “Acquiring ”caution message appears
when the system attempts to acquire digital
transmission. When acquiring digital data while receiving a
digital broadcast and SPS station. .
When the reception in digital of the SPS station
is confirmed.
. When the system determined that the SPS
station could not be received.
. When the SPS broadcast is ended (stopped) by
the radio station while receiving SPS.
5-34
Page 332 of 634
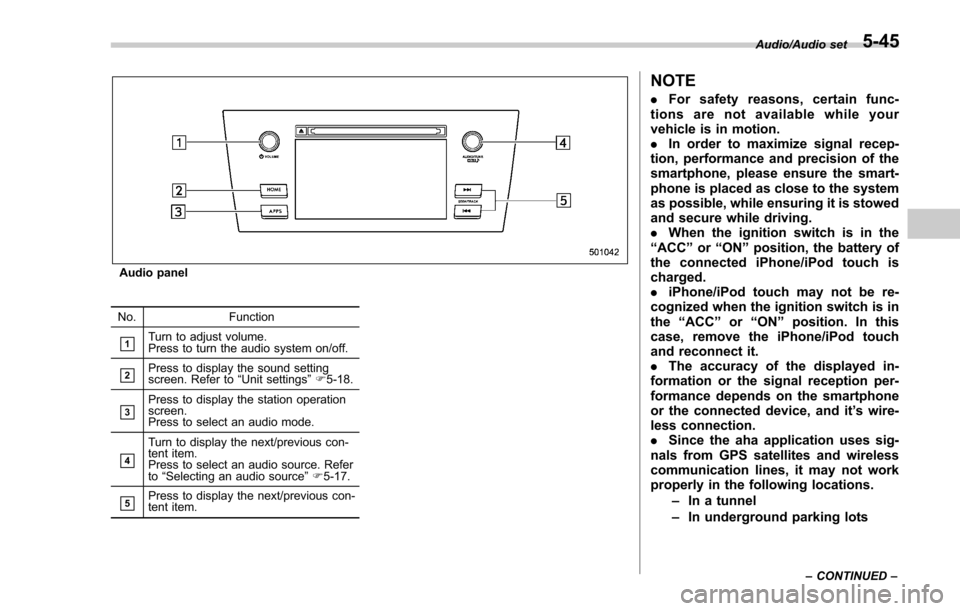
Audio panel
No. Function
&1Turn to adjust volume.
Press to turn the audio system on/off.
&2Press to display the sound setting
screen. Refer to“Unit settings ”F 5-18.
&3Press to display the station operation
screen.
Press to select an audio mode.
&4
Turn to display the next/previous con-
tent item.
Press to select an audio source. Refer
to “Selecting an audio source ”F 5-17.
&5Press to display the next/previous con-
tent item.
NOTE
. For safety reasons, certain func-
tions are not available while your
vehicle is in motion.
. In order to maximize signal recep-
tion, performance and precision of the
smartphone, please ensure the smart-
phone is placed as close to the system
as possible, while ensuring it is stowed
and secure while driving.
. When the ignition switch is in the
“ ACC ”or “ON ”position, the battery of
the connected iPhone/iPod touch is
charged.
. iPhone/iPod touch may not be re-
cognized when the ignition switch is in
the “ACC ”or “ON ”position. In this
case, remove the iPhone/iPod touch
and reconnect it.
. The accuracy of the displayed in-
formation or the signal reception per-
formance depends on the smartphone
or the connected device, and it ’s wire-
less connection.
. Since the aha application uses sig-
nals from GPS satellites and wireless
communication lines, it may not work
properly in the following locations.
–In a tunnel
– In underground parking lots
Audio/Audio set
–CONTINUED –5-45
Page 365 of 634
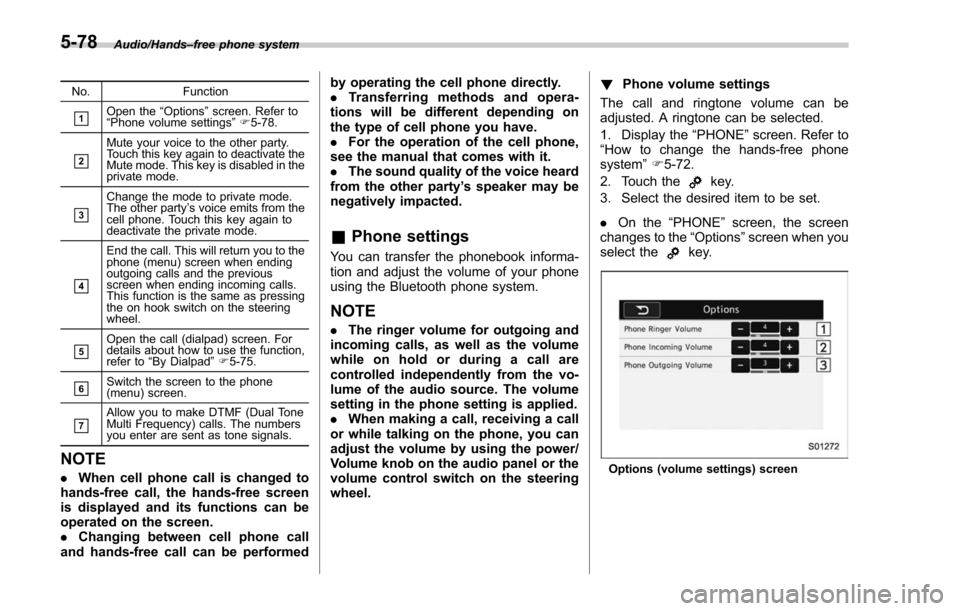
Audio/Hands–free phone system
No. Function
&1Open the“Options ”screen. Refer to
“ Phone volume settings ”F 5-78.
&2
Mute your voice to the other party.
Touch this key again to deactivate the
Mute mode. This key is disabled in the
private mode.
&3
Change the mode to private mode.
The other party ’s voice emits from the
cell phone. Touch this key again to
deactivate the private mode.
&4
End the call. This will return you to the
phone (menu) screen when ending
outgoing calls and the previous
screen when ending incoming calls.
This function is the same as pressing
the on hook switch on the steering
wheel.
&5Open the call (dialpad) screen. For
details about how to use the function,
refer to “By Dialpad ”F 5-75.
&6Switch the screen to the phone
(menu) screen.
&7Allow you to make DTMF (Dual Tone
Multi Frequency) calls. The numbers
you enter are sent as tone signals.
NOTE
. When cell phone call is changed to
hands-free call, the hands-free screen
is displayed and its functions can be
operated on the screen.
. Changing between cell phone call
and hands-free call can be performed by operating the cell phone directly.
.
Transferring methods and opera-
tions will be different depending on
the type of cell phone you have.
. For the operation of the cell phone,
see the manual that comes with it.
. The sound quality of the voice heard
from the other party’ s speaker may be
negatively impacted.
& Phone settings
You can transfer the phonebook informa-
tion and adjust the volume of your phone
using the Bluetooth phone system.
NOTE
. The ringer volume for outgoing and
incoming calls, as well as the volume
while on hold or during a call are
controlled independently from the vo-
lume of the audio source. The volume
setting in the phone setting is applied.
. When making a call, receiving a call
or while talking on the phone, you can
adjust the volume by using the power/
Volume knob on the audio panel or the
volume control switch on the steering
wheel. !
Phone volume settings
The call and ringtone volume can be
adjusted. A ringtone can be selected.
1. Display the “PHONE ”screen. Refer to
“How to change the hands-free phone
system ”F 5-72.
2. Touch the
key.
3. Select the desired item to be set.
. On the “PHONE ”screen, the screen
changes to the “Options ”screen when you
select the
key.
Options (volume settings) screen
5-78
Page 431 of 634
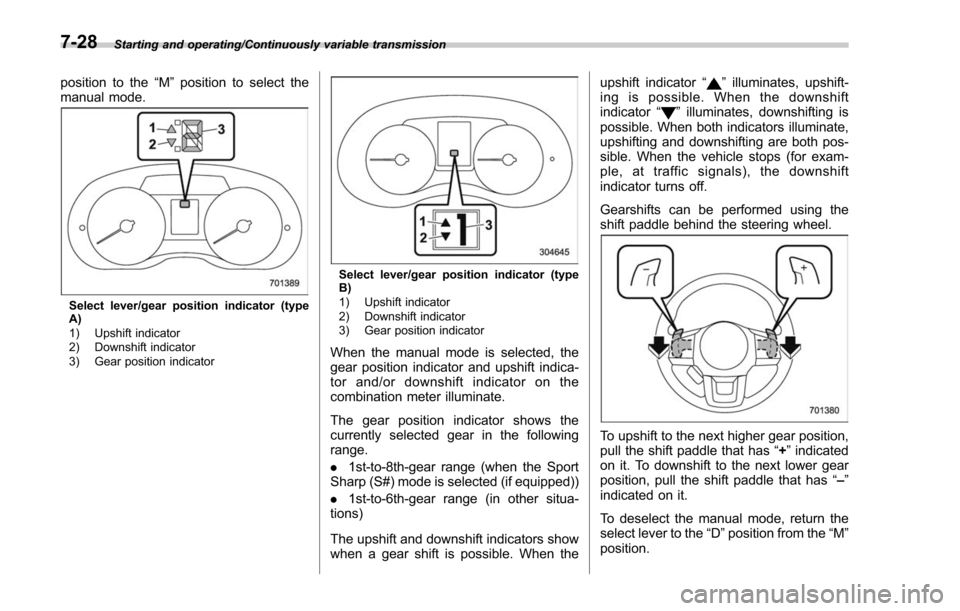
Starting and operating/Continuously variable transmission
position to the“M”position to select the
manual mode.
Select lever/gear position indicator (type
A)
1) Upshift indicator
2) Downshift indicator
3) Gear position indicator
Select lever/gear position indicator (type
B)
1) Upshift indicator
2) Downshift indicator
3) Gear position indicator
When the manual mode is selected, the
gear position indicator and upshift indica-
tor and/or downshift indicator on the
combination meter illuminate.
The gear position indicator shows the
currently selected gear in the following
range.
. 1st-to-8th-gear range (when the Sport
Sharp (S#) mode is selected (if equipped))
. 1st-to-6th-gear range (in other situa-
tions)
The upshift and downshift indicators show
when a gear shift is possible. When the upshift indicator
“
”illuminates, upshift-
ing is possible. When the downshift
indicator “
”illuminates, downshifting is
possible. When both indicators illuminate,
upshifting and downshifting are both pos-
sible. When the vehicle stops (for exam-
ple, at traffic signals), the downshift
indicator turns off.
Gearshifts can be performed using the
shift paddle behind the steering wheel.
To upshift to the next higher gear position,
pull the shift paddle that has “+”indicated
on it. To downshift to the next lower gear
position, pull the shift paddle that has “–”
indicated on it.
To deselect the manual mode, return the
select lever to the “D”position from the “M”
position.
7-28