2017 SUBARU FORESTER park assist
[x] Cancel search: park assistPage 438 of 634

switch is turned to the“ON”position, the
power steering warning light on the
combination meter illuminates to inform
the driver that the warning system is
functioning properly. Then, if the engine
started, the warning light turns off to inform
the driver that the steering power assist is
operational.
CAUTION
When the power steering warning
light is illuminated, there may be
more resistance when the steering
wheel is operated. Drive carefully to
the nearest SUBARU dealer and
have the vehicle inspected immedi-
ately.
NOTE
If the steering wheel is operated in the
following ways, the power steering
control system may temporarily limit
the power assist in order to prevent the
system components, such as the con-
trol computer and drive motor, from
overheating.
. The steering wheel is operated fre-
quently and turned sharply while the
vehicle is maneuvered at extremely low
speeds, such as while frequently turn-
ing the steering wheel during parallel parking.
.
The steering wheel remains in the
fully turned position for a long period
of time.
At this time, there will be more resis-
tance when steering. However this is
not a malfunction. Normal steering
force will be restored after the steering
wheel is not operated for a while and
the power steering control system has
an opportunity to cool down. However,
if the power steering is operated in a
non-standard way which causes power
assist limitation to occur too fre-
quently, this may result in a malfunc-
tion of the power steering control
system.
Braking
& Braking tips
WARNING
Never rest your foot on the brake
pedal while driving. This can cause
dangerous overheating of the
brakes and needless wear on the
brake pads and linings.
! When the brakes get wet
When driving in rain or after washing the
vehicle, the brakes may get wet. As a
result, brake stopping distance will be
longer. To dry the brakes, drive the vehicle
at a safe speed while lightly depressing
the brake pedal to heat up the brakes.
! Use of engine braking
Remember to make use of engine braking
in addition to foot braking. When descend-
ing a grade, if only the foot brake is used,
the brakes may start working improperly
because of brake fluid overheating,
caused by overheated brake pads. To
help prevent this, shift into a lower gear to
get stronger engine braking.
! Braking when a tire is punctured
Do not depress the brake pedal suddenly
when a tire is punctured. This could cause
Starting and operating/Braking
–CONTINUED –7-35
Page 452 of 634

and other obstructions on the
ground when parking. The under-
spoilers could be damaged by con-
tact with them.Hill start assist system
WARNING
.The Hill start assist system is a
device only for helping the driver
to START the vehicle on an uphill
grade. To prevent accidents
when the vehicle is parked on a
slope, be sure to firmly set the
parking brake. When setting the
parking brake, make sure that the
vehicle remains stationary when
the clutch pedal (MT models) and
brake pedal (both MT and CVT
models) are released.
. Do not turn the ignition switch to
the “LOCK ”/“ OFF ”position while
the Hill start assist system is
operating. The Hill start assist
system will be deactivated and
may lead to an accident.
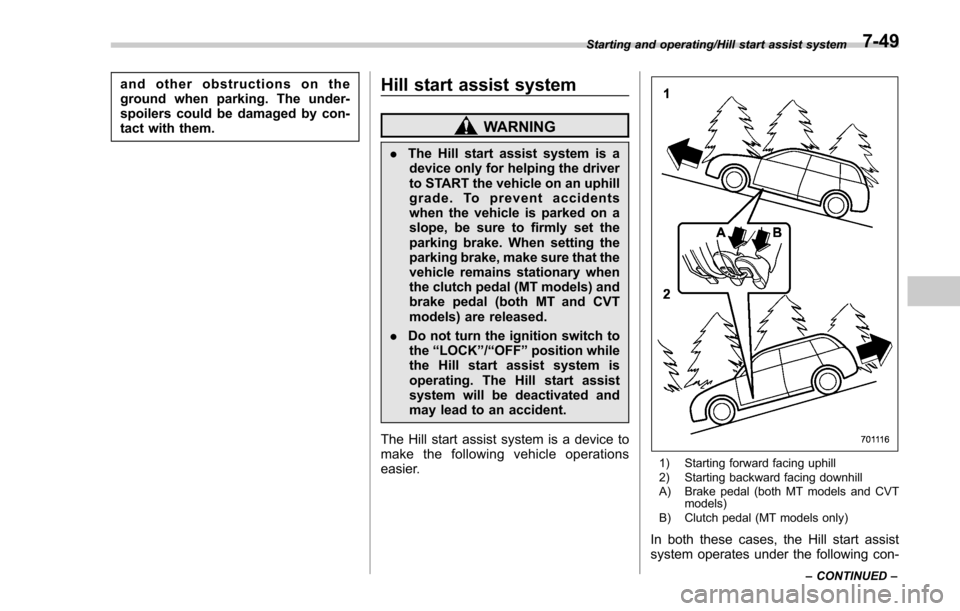
The Hill start assist system is a device to
make the following vehicle operations
easier.
1) Starting forward facing uphill
2) Starting backward facing downhill
A) Brake pedal (both MT models and CVT models)
B) Clutch pedal (MT models only)
In both these cases, the Hill start assist
system operates under the following con-
Starting and operating/Hill start assist system
–CONTINUED –7-49
Page 453 of 634

Starting and operating/Hill start assist system
ditions.
.when the clutch pedal is depressed
while the brake pedal is also depressed
(MT models)
. when the vehicle has stopped with the
brake pedal depressed (CVT models)
Braking power is maintained temporarily
(for approximately 2 seconds) by the Hill
start assist system after the brake pedal is
released. The driver is therefore able to
start the vehicle in the same way as on a
level grade, just using the clutch pedal
(MT models only) and accelerator pedal
(all models).
If the braking power of the Hill start assist
system is insufficient after the brake pedal
is released, apply more braking power by
depressing the brake pedal again.
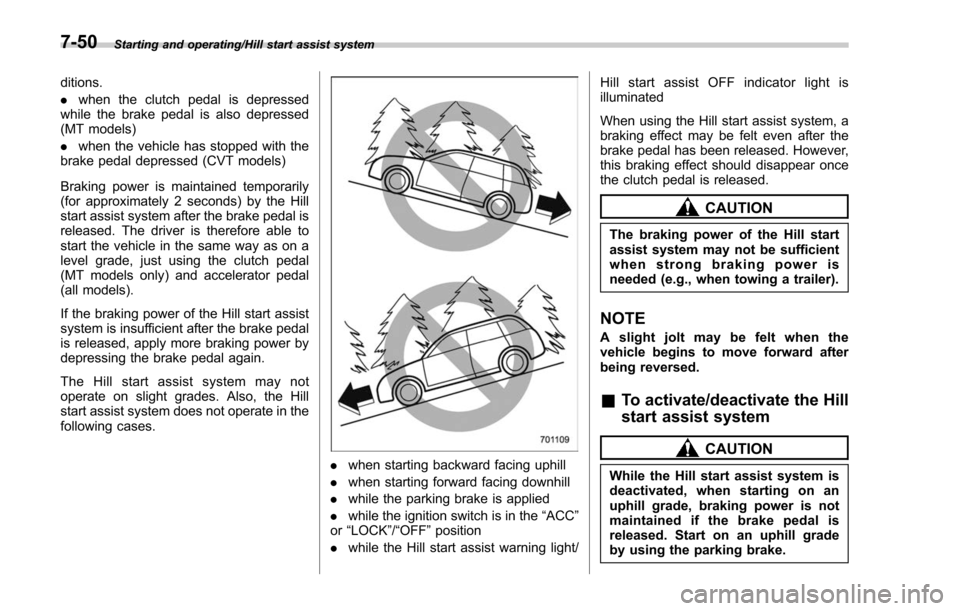
The Hill start assist system may not
operate on slight grades. Also, the Hill
start assist system does not operate in the
following cases.
. when starting backward facing uphill
. when starting forward facing downhill
. while the parking brake is applied
. while the ignition switch is in the “ACC”
or “LOCK”/ “OFF”position
. while the Hill start assist warning light/ Hill start assist OFF indicator light is
illuminated
When using the Hill start assist system, a
braking effect may be felt even after the
brake pedal has been released. However,
this braking effect should disappear once
the clutch pedal is released.
CAUTION
The braking power of the Hill start
assist system may not be sufficient
when strong braking power is
needed (e.g., when towing a trailer).
NOTE
A slight jolt may be felt when the
vehicle begins to move forward after
being reversed.
&
To activate/deactivate the Hill
start assist system
CAUTION
While the Hill start assist system is
deactivated, when starting on an
uphill grade, braking power is not
maintained if the brake pedal is
released. Start on an uphill grade
by using the parking brake.
7-50
Page 454 of 634

You can activate/deactivate the Hill start
assist system according to the following
procedure.
NOTE
If you make an error when performing
any steps in the following procedure,
placetheignitionswitchinthe
“LOCK ”/“OFF ”position once and then
start over again.
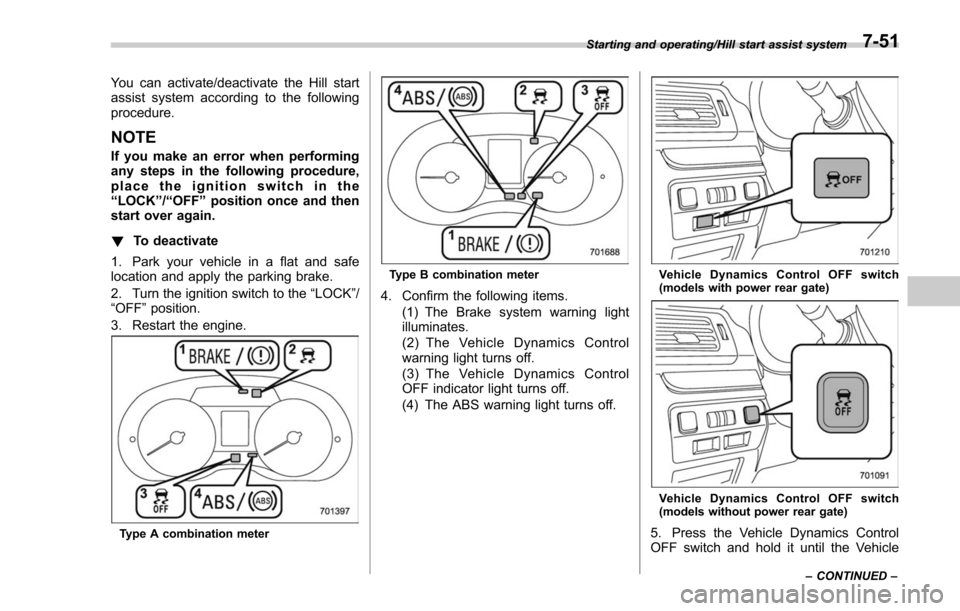
! To deactivate
1. Park your vehicle in a flat and safe
location and apply the parking brake.
2. Turn the ignition switch to the “LOCK” /
“OFF ”position.
3. Restart the engine.
Type A combination meter
Type B combination meter
4. Confirm the following items. (1) The Brake system warning light
illuminates.
(2) The Vehicle Dynamics Control
warning light turns off.
(3) The Vehicle Dynamics Control
OFF indicator light turns off.
(4) The ABS warning light turns off.
Vehicle Dynamics Control OFF switch
(models with power rear gate)
Vehicle Dynamics Control OFF switch
(models without power rear gate)
5. Press the Vehicle Dynamics Control
OFF switch and hold it until the Vehicle
Starting and operating/Hill start assist system
–CONTINUED –7-51
Page 462 of 634

!Lane Change Assist (LCA)
1) Operating range
The system notifies the driver of vehicles
approaching at a high speed in the
neighboring lanes. If the system detects
a vehicle approaching at a high speed in
the neighboring lanes, it warns the driver
of dangers by illuminating the BSD/RCTA
approach indicator light(s) on the outside
mirror(s). If the driver operates the turn
signal lever in the direction where the
BSD/RCTA approach indicator light is
illuminating, the system warns the driver
of dangers by flashing the BSD/RCTA
approach indicator light. !
Rear Cross Traffic Alert (RCTA)
1) Operating range
The system notifies the driver of another
vehicle approaching from either side when
driving in reverse. This feature helps the
driver check the rear and side areas of the
vehicle when moving backward.
If the system detects a vehicle approach-
ing from either side while moving back-
ward, it warns the driver of dangers in the
following way.
.The BSD/RCTA approach indicator
light(s) on the outside mirror(s) flashes.
. A warning buzzer sounds.
1) The detection range of the radar sensors
A) Vehicle that may be detected
WARNING
In parking areas in which parking
lots are located diagonally to driving
lanes as indicated in the illustration
above, the system may detect a
vehicle (A) that is coming across
the front of your vehicle in some
cases. Always be sure to check the
surroundings with your eyes when
reversing the vehicle, because the
detectability of RCTA is limited.
Starting and operating/BSD/RCTA
–CONTINUED –7-59
Page 530 of 634

of maintenance and treatment if you need
assistance.
Repair chips and scratches in the paint as
soon as you find them.
Check the interior of the vehicle for water
and dirt accumulation under the floor mats
because that could cause corrosion.
Occasionally check under the mats to
make sure the area is dry.
Keep your garage dry. Do not park your
vehicle in a damp, poorly ventilated
garage. In such a garage, corrosion can
be caused by dampness. If you wash the
vehicle in the garage or put the vehicle
into the garage when wet or covered with
snow, that can cause dampness.
If your vehicle is operated in cold weather
and/or in areas where road salts and other
corrosive materials are used, the door
hinges and locks, and hood latch should
be inspected and lubricated periodically.Cleaning the interior
Use a soft, damp cloth to clean the climate
control panel, audio equipment, instru-
ment panel, center console, combination
meter panel, and switches. (Do not use
organic solvents.)
&Seat fabric
Remove loose dirt, dust or debris with a
vacuum cleaner. If the dirt is caked on the
fabric or hard to remove with a vacuum
cleaner, use a soft brush then vacuum it.
Wipe the fabric surface with a tightly
wrung cloth and dry the seat fabric
thoroughly. If the fabric is still dirty, wipe
using a solution of mild soap and luke-
warm water then dry thoroughly.
If the stain does not come out, try a
commercially-available fabric cleaner. Use
the cleaner on a hidden place and make
sure it does not affect the fabric adversely.
Use the cleaner according to its instruc-
tions.
CAUTION
When cleaning the seat, do not use
benzine, paint thinner, or any similar
materials. Doing so could damage
the surface and cause the color to deteriorate.
&
Leather seat materials
The leather used by SUBARU is a high
quality natural product which will retain its
distinctive appearance and feel for many
years with proper care.
Allowing dust or road dirt to build up on the
surface can cause the material to become
brittle and to wear prematurely. Regular
cleaning with a soft, moist, natural fiber
cloth should be performed monthly, taking
care not to soak the leather or allow water
to penetrate the stitched seams.
A mild detergent suitable for cleaning
woolen fabrics may be used to remove
difficult dirt spots, rubbing with a soft, dry
cloth afterwards to restore the luster. If
your SUBARU is to be parked for a long
time in bright sunlight, it is recommended
that the seats and head restraints be
covered, or the windows shaded, to
prevent fading or shrinkage. Seat covers
and head restraint covers should be
removed before operating the vehicle.
Minor surface blemishes or bald patches
may be treated with a commercial leather
spray lacquer. You will discover that each
leather seat section will develop soft folds
or wrinkles, which is characteristic of
genuine leather.
Appearance care/Cleaning the interior
–CONTINUED –10-5
Page 532 of 634

Maintenance schedule....................................... 11-3
Maintenance precautions ................................... 11-3
Before checking or servicing in the engine
compartment .................................................... 11-4
When checking or servicing in the engine compartment while the engine is running .......... 11-5
Maintenance tips................................................ 11-5Removing and reinstalling clips .......................... 11-5
Engine hood....................................................... 11-7
Engine compartment overview .......................... 11-8
Non-turbo models.............................................. 11-8
Turbo models ..................................................... 11-9
Engine oil.......................................................... 11-10Engine oil consumption .................................... 11-10
Checking the oil level ....................................... 11-10
Changing the oil and oil filter ............................ 11-11
Recommended grade and viscosity .................. 11-11
Synthetic oil ..................................................... 11-12
Cooling system ................................................ 11-12Cooling fan, hose and connections ................... 11-12
Engine coolant ................................................. 11-13
Air cleaner element .......................................... 11-14Replacing the air cleaner element ..................... 11-14
Spark plugs...................................................... 11-16Recommended spark plugs .............................. 11-16
Drive belts........................................................ 11-16
Manual transmission oil .................................. 11-17
Recommended grade and viscosity .................. 11-17
Continuously variable transmission fluid ....... 11-17Front differential gear oil (CVT models) and
rear differential gear oil ................................ 11-17
Recommended grade and viscosity .................. 11-17
Brake fluid........................................................ 11-18Checking the fluid level .................................... 11-18
Recommended brake fluid ............................... 11-18
Clutch fluid (MT models)................................. 11-19Checking the fluid level.................................... 11-19
Recommended clutch fluid ............................... 11-19
Brake booster.................................................. 11-20
Brake pedal ...................................................... 11-20
Checking the brake pedal free play .................. 11-20
Checking the brake pedal reserve distance ....... 11-20
Clutch pedal (MT models) ............................... 11-21Checking the clutch function ............................ 11-21
Checking the clutch pedal free play .................. 11-21
Hill start assist system.................................... 11-21
Replacement of brake pad and lining ............ 11-22
Breaking-in of new brake pads and linings ....... 11-22
Parking brake stroke ....................................... 11-23
Tires and wheels .............................................. 11-23
Types of tires................................................... 11-23
Tire pressure monitoring system (TPMS) (if equipped) ...................................................... 11-23
Tire inspection ................................................. 11-25
Tire pressures and wear .................................. 11-25
Wheel balance ................................................. 11-27
Wear indicators ............................................... 11-27
Tire rotation direction mark .............................. 11-28
Tire rotation ..................................................... 11-28
Maintenance and service
11
Page 618 of 634

Bottle holder................................................................ 6-9
Brake Assist ................................................................... 7-36
Booster ........................................................ 7-36, 11-20
Disc .................................................................... 12-11
Fluid ............................................................ 11-18, 12-9
Pad and lining ...................................................... 11-22
Parking ........................................................ 7-47, 11-23
Pedal .................................................................. 11-20
System ................................................................. 7-36
Brake pedal Free play ............................................................. 11-20
Reserve distance .................................................. 11-20
Brake system ............................................................ 7-36
Warning light ......................................................... 3-21
Braking ..................................................................... 7-35
Tips...................................................................... 7-35
Breaking-in of new brake pads and linings ................... 11-22
BSD/RCTA ................................................................ 7-58
Approach indicator light/warning buzzer .................... 7-61
OFF indicator ................................................ 3-34, 7-64
OFF switch ........................................................... 7-64
Warning indicator ........................................... 3-33, 7-63
Warning volume ............................................. 3-43, 7-62
Bulb Chart .................................................................. 12-16
Replacing ............................................................. 11-39
C
Cargo area Cover ................................................................... 6-14 Light
...................................................................... 6-2
Tie-down hooks ...................................................... 6-16
Catalytic converter ....................................................... 8-3
Center console ............................................................ 6-6
Changing Coolant ............................................................... 11-14
Flat tire .................................................................. 9-5
Oil and oil filter ..................................................... 11-11
Charge warning light ................................................... 3-18
CHECK ENGINE warning light/Malfunction indicator light ....................................................................... 3-16
Checking Brake pedal free play ............................................ 11-20
Brake pedal reserve distance ................................. 11-20
Clutch function ..................................................... 11-21
Clutch pedal free play ........................................... 11-21
Coolant level ........................................................ 11-13
Fluid level (brake fluid) .......................................... 11-18
Fluid level (clutch fluid) .......................................... 11-19
Fluid level (washer fluid) ........................................ 11-30
Oil level (engine oil) .............................................. 11-10
Child restraint systems ................................................ 1-29
Installation of a booster seat .................................... 1-36
Installation with ALR/ELR seatbelt ............................ 1-32
Lower and tether anchorages ................................... 1-37
Top tether anchorages ............................................
1-40
Child safety ................................................................... 4
Locks .................................................................... 2-32
Chime
Key........................................................................\
3-5
Light ..................................................................... 3-93
Index14-3