Page 210 of 634

&Date and time settings
The items in the date and time settings
can be set. To change the items, operate
the “
”or “”switch.
NOTE
. The “Time/Date ”item must be set to
display the “Birthday ”, “Anniversary ”
and notifications for vehicle mainte-
nance.
. The “Birthday ”and “Anniversary ”
items can be entered after the “Time/
Date ”item has been set.
. Dates that do not exist in the
Gregorian calendar cannot be set (for
example, April 31).
. If your vehicle is equipped with
genuine SUBARU navigation system,
the clock of navigation system must be
set separately.
! Preparation for date setting
1. Turn the ignition switch to the “ON”
position.
2. Push and hold the
button to show
the selection screen.
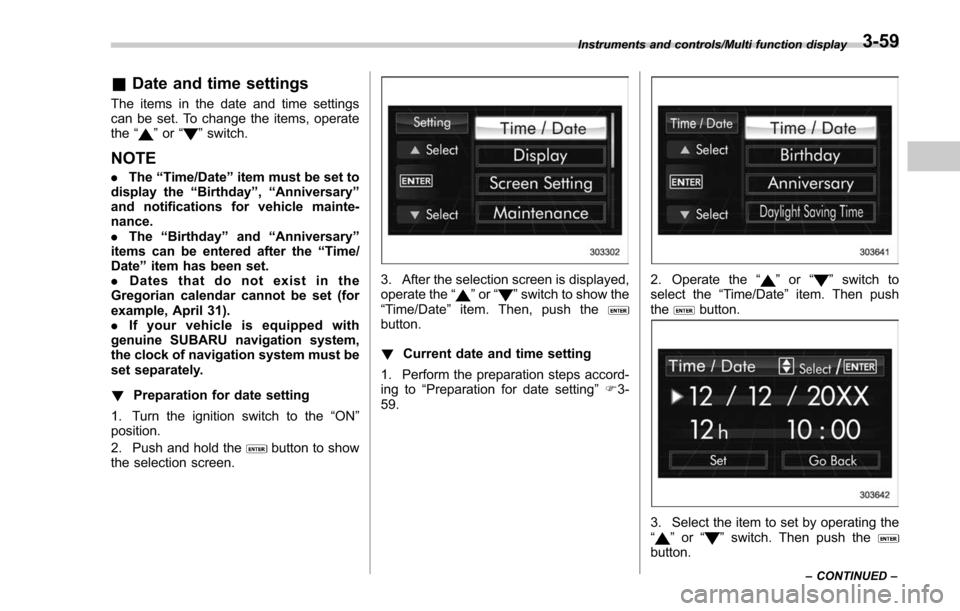
3. After the selection screen is displayed,
operate the “”or “”switch to show the
“Time/Date ”item. Then, push the
button.
! Current date and time setting
1. Perform the preparation steps accord-
ing to “Preparation for date setting ”F 3-
59.
2. Operate the “”or “”switch to
select the “Time/Date”item. Then push
the
button.
3. Select the item to set by operating the
“” or “”switch. Then push thebutton.
Instruments and controls/Multi function display
–CONTINUED –3-59
Page 211 of 634
Instruments and controls/Multi function display
4. Select a number by operating the“”
or “”switch. Then push thebutton.
When “12 h”is selected, the clock will be
set to a 12-hour display. When “24 h”is
selected, the clock will be set to a 24-hour
display.
5. After entering the date and time, select
“Set ”by operating the “”switch and
confirm the setting by pushing the
button.
6. The system will notify you that the
setting is complete.
! Birthday setting
1. Perform the preparation steps accord-
ing to “Preparation for date setting ”F 3-
59.
2. Operate the “”or “”switch to
select the “Birthday ”item. Then push the
button.
3. Select an entry in the list to set by
operating the “”or “”switch. Then
push thebutton.
3-60
Page 224 of 634
switch, and confirm the setting by pushing
thebutton.
6. The system will notify you that the
setting is complete.
!Clock/calendar screen setting
1. Perform the preparation steps accord-
ing to “Preparation for screen settings ”
F 3-68.
2. Operate the “”or “”switch to
select the “Clock”item. Then push the
button.
3. Push thebutton once more.
4. Select “Type A clock” ,“Type B clock”,
“Calendar ”or “Off ”by operating the “”
switch. Then push thebutton.
5. Select “Set ”by operating the “”
switch, and confirm the setting by pushing
the
button.
Instruments and controls/Multi function display
–CONTINUED –3-73
Page 337 of 634

Audio/Audio set
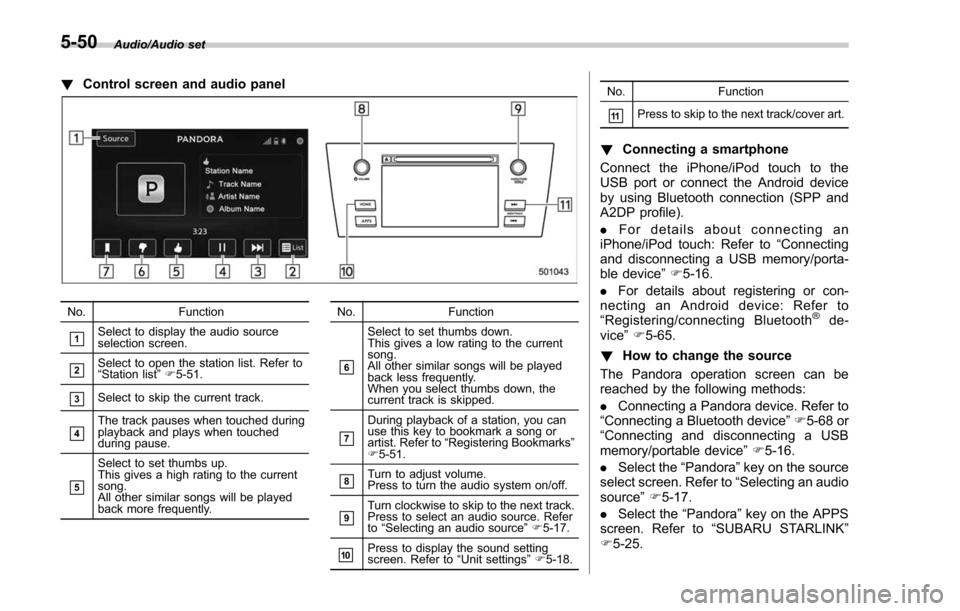
!Control screen and audio panel
No. Function
&1Select to display the audio source
selection screen.
&2Select to open the station list. Refer to
“Station list ”F 5-51.
&3Select to skip the current track.
&4The track pauses when touched during
playback and plays when touched
during pause.
&5
Select to set thumbs up.
This gives a high rating to the current
song.
All other similar songs will be played
back more frequently. No. Function
&6
Select to set thumbs down.
This gives a low rating to the current
song.
All other similar songs will be played
back less frequently.
When you select thumbs down, the
current track is skipped.
&7
During playback of a station, you can
use this key to bookmark a song or
artist. Refer to
“Registering Bookmarks ”
F 5-51.
&8Turn to adjust volume.
Press to turn the audio system on/off.
&9Turn clockwise to skip to the next track.
Press to select an audio source. Refer
to “Selecting an audio source ”F 5-17.
&10Press to display the sound setting
screen. Refer to “Unit settings ”F 5-18. No. Function
&11Press to skip to the next track/cover art.
!
Connecting a smartphone
Connect the iPhone/iPod touch to the
USB port or connect the Android device
by using Bluetooth connection (SPP and
A2DP profile).
. For details about connecting an
iPhone/iPod touch: Refer to “Connecting
and disconnecting a USB memory/porta-
ble device ”F 5-16.
. For details about registering or con-
necting an Android device: Refer to
“ Registering/connecting Bluetooth
®de-
vice” F5-65.
! How to change the source
The Pandora operation screen can be
reached by the following methods:
. Connecting a Pandora device. Refer to
“ Connecting a Bluetooth device ”F 5-68 or
“ Connecting and disconnecting a USB
memory/portable device ”F 5-16.
. Select the “Pandora”key on the source
select screen. Refer to “Selecting an audio
source” F5-17.
. Select the “Pandora”key on the APPS
screen. Refer to “SUBARU STARLINK ”
F 5-25.
5-50