2017 SUBARU FORESTER buttons
[x] Cancel search: buttonsPage 264 of 634
!Gate Operator / Canadian Pro-
gramming
Canadian radio-frequency laws require
transmitter remote signals to “time-out ”
(or quit) after several seconds of transmis-
sion, which may not be long enough for
HomeLink to pick up the signal during
programming. Similar to this Canadian
law, some U.S. gate operators are de-
signed to “time-out”in the same manner.
The indicator LED on the hand-held
remote will go off when the device times
out, indicating that it has finished transmit-
ting.
If you live in Canada or you are having
difficulties programming a gate operator or
garage door opener by using the program-
ming procedures, replace “Programming a
New HomeLink Button ”step 3 with the
following:
While the HomeLink indicator light is
flashing orange, press and release (“cy-
cle ”) your device ’s hand-held remote
every two seconds until the HomeLink
indicator light changes from orange to
green. You may now release the hand-
held remote button.
NOTE
If programming a garage door opener
or gate operator, it is advised to unplug the device during the
“cycling ”pro-
cess to prevent possible overheating.
Proceed with “Programming a New
HomeLink Button ”step 4 to complete.
! Using HomeLink
To operate, simply press and release the
programmed HomeLink button. Activation
will now occur for the trained device (i.e.
garage door opener, gate operator, secur-
ity system, entry door lock, home/office
lighting, etc.). For convenience, the hand-
held remote of the device may also be
used at any time.
!Erasing HomeLink Buttons
To erase programming from the three
buttons (individual buttons cannot be
erased but can be “reprogrammed”as
outlined below), follow the step noted:
Press and hold the two outer HomeLink
buttons for at least 10 seconds. The LED
indicator will change from continuously lit
to rapidly flashing. Release both buttons.
Do not hold for longer than 20 seconds.
HomeLink is now ready to be programmed
at any time beginning with “Programming
a New HomeLink Button ”- step 1. !
Reprogramming a Single
HomeLink Button
To program a previously trained button,
follow these steps:
1. Press and hold the desired HomeLink
button. DO NOT release the button.
2. The indicator light will begin to slowly
flash orange after 20 seconds. The
HomeLink button can be released at this
point. Proceed with “Programming a New
HomeLink Button ”- step 3.
3. If you do not complete the program-
ming of a new device to the button, it will
revert to the previously stored program-
ming.
!Garage Door Two-Way Commu-
nication
HomeLink has the capability of commu-
nicating with your garage door opener.
HomeLink can receive and display “clos-
ing ”or “opening ”status messages from
compatible garage door opener systems.
At any time, HomeLink can also recall and
display the last recorded status commu-
nicated by the garage door opener to
indicate your garage door being “closed”
or “opened ”.
HomeLink has the capability of receiving
this communication from the garage door
opener at a range up to 820 feet (250 m).
Instruments and controls/Mirrors
–CONTINUED –3-113
Page 265 of 634
Instruments and controls/Mirrors
Range may be reduced by obstacles such
as houses or trees. You may have to slow
your vehicle speed to successfully receive
the garage door opener communication.!Programming Two-Way Commu-
nication
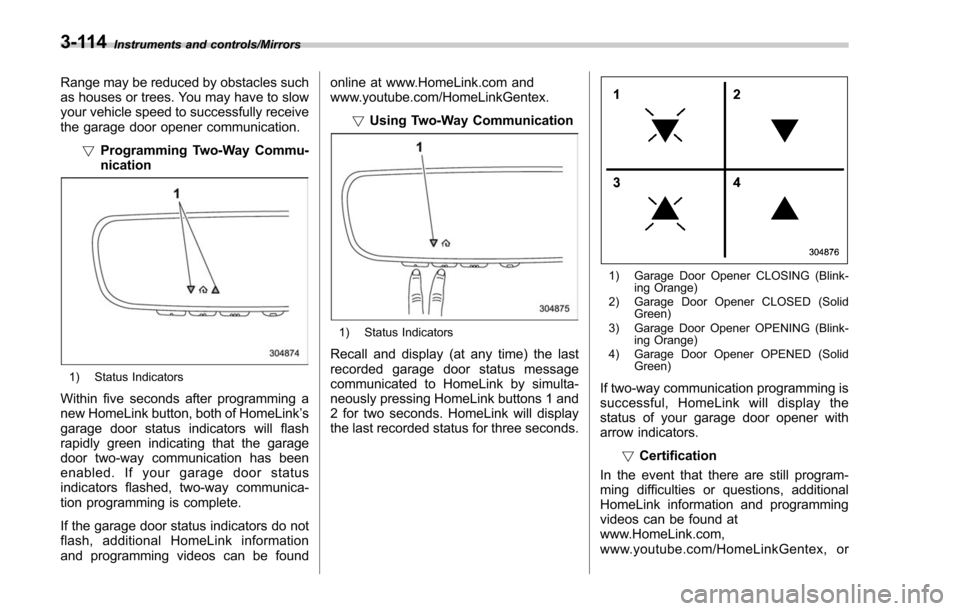
1) Status Indicators
Within five seconds after programming a
new HomeLink button, both of HomeLink ’s
garage door status indicators will flash
rapidly green indicating that the garage
door two-way communication has been
enabled. If your garage door status
indicators flashed, two-way communica-
tion programming is complete.
If the garage door status indicators do not
flash, additional HomeLink information
and programming videos can be found online at www.HomeLink.com and
www.youtube.com/HomeLinkGentex.
!Using Two-Way Communication
1) Status Indicators
Recall and display (at any time) the last
recorded garage door status message
communicated to HomeLink by simulta-
neously pressing HomeLink buttons 1 and
2 for two seconds. HomeLink will display
the last recorded status for three seconds.
1) Garage Door Opener CLOSING (Blink-
ing Orange)
2) Garage Door Opener CLOSED (Solid Green)
3) Garage Door Opener OPENING (Blink- ing Orange)
4) Garage Door Opener OPENED (Solid Green)
If two-way communication programming is
successful, HomeLink will display the
status of your garage door opener with
arrow indicators.
!Certification
In the event that there are still program-
ming difficulties or questions, additional
HomeLink information and programming
videos can be found at
www.HomeLink.com,
www.youtube.com/HomeLinkGentex, or
3-114
Page 278 of 634
Automatic climate control
operation (type B, C and D)
When this mode is selected, the fan
speed, airflow distribution, air-inlet control,
and air conditioner compressor operation
are automatically controlled. To activate
this mode, perform the following.
NOTE
.Operate the automatic climate con-
trol system when the engine is running.
. Even when cooling is not necessary,
setting the temperature much lower
than the current outlet air temperature
turns on the air conditioner compres-
sor automatically and the “A/C ”indi-
cator light on the control panel illumi-
nates.
& Type B
1. Turn the airflow mode selection dial
and fan speed control dial to the “AUTO”
position.
2. Set the preferred temperature using
the temperature control dial.
NOTE
. Each function can be individually
set to the AUTO mode independently of
the other functions. Any function set to the AUTO mode is controlled automa-
tically. Any function not set to the
AUTO mode can be manually adjusted
as desired.
.
The controllable temperature range
may vary depending on the regional
specifications of the vehicle.
3. To turn off the climate control system,
turn the fan speed control dial to the “OFF”
position. Then the air inlet selection will be
set as follows.
. when the AUTO mode is selected: OFF
(outside air)
. when the AUTO mode is not selected:
the mode that was selected when turning
off the climate system will be selected.
& Type C and D
1. Depress the “AUTO ”button. The
indicator light “FULL AUTO ”on the display
illuminates.
2. Set the preferred temperature using
the temperature control dial.
NOTE
. The controllable temperature range
may vary depending on the regional
specifications of the vehicle.
. During FULL AUTO mode operation,
a small amount of air may flow from the
foot outlets when ventilation mode is displayed.
.
If you operate any of the buttons on
the control panel other than the “OFF ”
button, rear window defogger button
and temperature control dial(s) during
FULL AUTO mode operation, the
“ FULL ”indicator light on the control
panel will turn off and the “AUTO ”
indicator light will remain illuminated.
You can then manually control the
system as desired using the button
you operated. To change the system
back to the FULL AUTO mode, press
the “AUTO ”button.
3. To turn off the climate control system,
press the “OFF ”button. Then the air inlet
selection will be set to OFF (outside air).
Climate control/Automatic climate control operation (type B, C and D)
–CONTINUED –4-7
Page 290 of 634
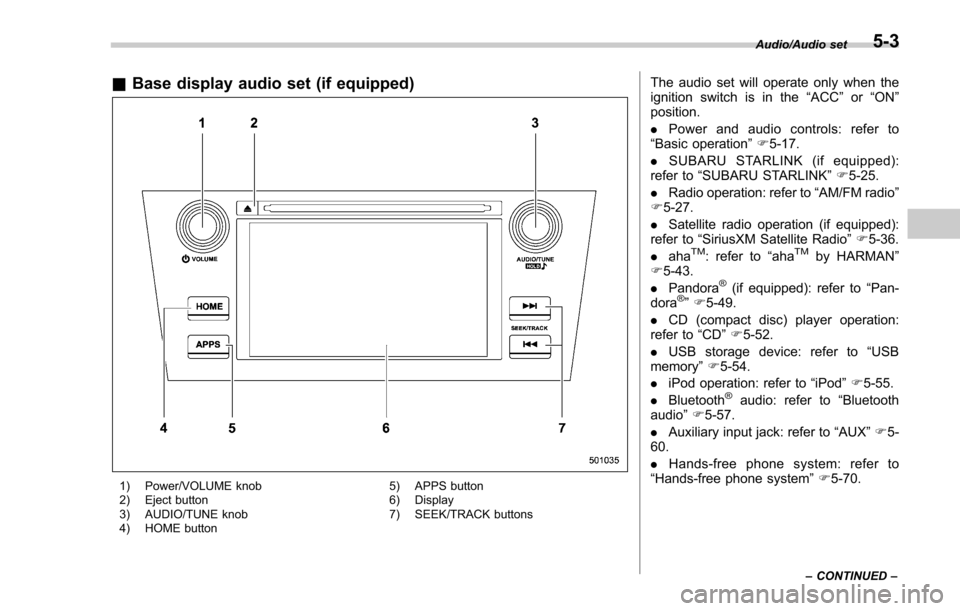
&Base display audio set (if equipped)
1) Power/VOLUME knob
2) Eject button
3) AUDIO/TUNE knob
4) HOME button 5) APPS button
6) Display
7) SEEK/TRACK buttons
The audio set will operate only when the
ignition switch is in the
“ACC”or “ON ”
position.
. Power and audio controls: refer to
“Basic operation ”F 5-17.
. SUBARU STARLINK (if equipped):
refer to “SUBARU STARLINK ”F 5-25.
. Radio operation: refer to “AM/FM radio ”
F 5-27.
. Satellite radio operation (if equipped):
refer to “SiriusXM Satellite Radio” F5-36.
. aha
TM: refer to “ahaTMby HARMAN ”
F 5-43.
. Pandora
®(if equipped): refer to “Pan-
dora®” F 5-49.
. CD (compact disc) player operation:
refer to “CD”F 5-52.
. USB storage device: refer to “USB
memory ”F 5-54.
. iPod operation: refer to “iPod”F 5-55.
. Bluetooth
®audio: refer to “Bluetooth
audio ”F 5-57.
. Auxiliary input jack: refer to “AUX”F 5-
60.
. Hands-free phone system: refer to
“Hands-free phone system ”F 5-70.
Audio/Audio set
–CONTINUED –5-3
Page 520 of 634
Access key–if access key
does not operate properly
CAUTION
Keep metallic objects, magnetic
sources and signal transmitters
away from the area between the
access key and the push-button
ignition switch. They may interfere
with the communication between
the access key and the push-button
ignition switch.
The following functions may be inoperable
because of strong radio signals in the
surrounding area or the access key
battery being low.
. Locking/unlocking doors including the
rear gate
. Switching power status
. Starting the engine
In such cases, perform the following
procedure. When the battery of the access
key is discharged, replace it with a new
one. Refer to “Replacing battery of access
key ”F 11-45.
& Locking and unlocking
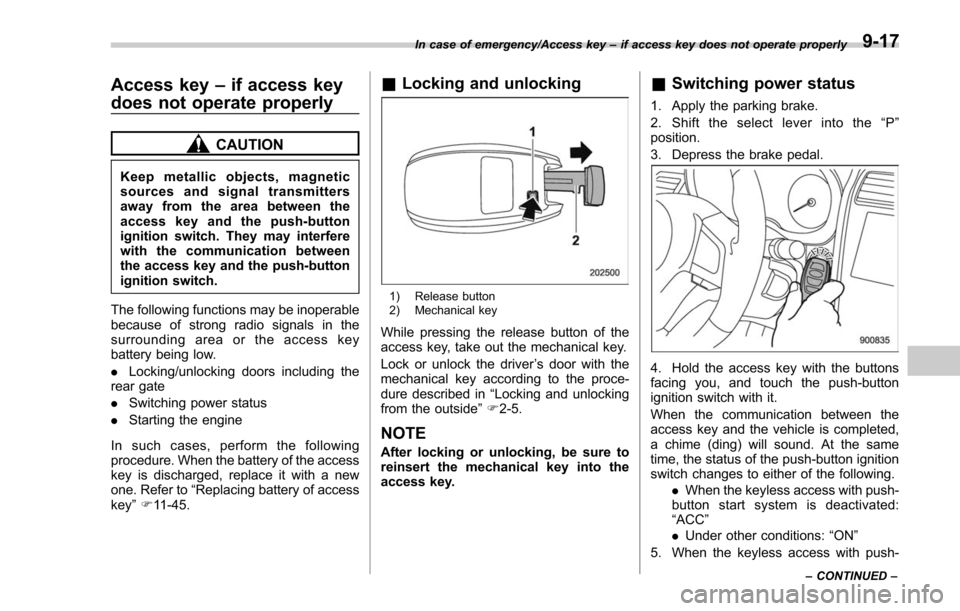
1) Release button
2) Mechanical key
While pressing the release button of the
access key, take out the mechanical key.
Lock or unlock the driver ’s door with the
mechanical key according to the proce-
dure described in “Locking and unlocking
from the outside ”F 2-5.
NOTE
After locking or unlocking, be sure to
reinsert the mechanical key into the
access key.
& Switching power status
1. Apply the parking brake.
2. Shift the select lever into the “P ”
position.
3. Depress the brake pedal.
4. Hold the access key with the buttons
facing you, and touch the push-button
ignition switch with it.
When the communication between the
access key and the vehicle is completed,
a chime (ding) will sound. At the same
time, the status of the push-button ignition
switch changes to either of the following.
.When the keyless access with push-
button start system is deactivated:
“ACC ”
. Under other conditions: “ON ”
5. When the keyless access with push-
In case of emergency/Access key –if access key does not operate properly
–CONTINUED –9-17
Page 521 of 634
In case of emergency/Rear gate–if the rear gate cannot be opened
button start system is deactivated, press
the push-button ignition switch with the
brake pedal released. The status of the
push-button ignition switch then changes
to “ON ”.
NOTE
If the power does not switch even
though the above procedure was fol-
lowed precisely, contact your SUBARU
dealer.
&Starting engine
1. Apply the parking brake.
2. Shift the select lever into the “P ”
position.
3. Depress the brake pedal.
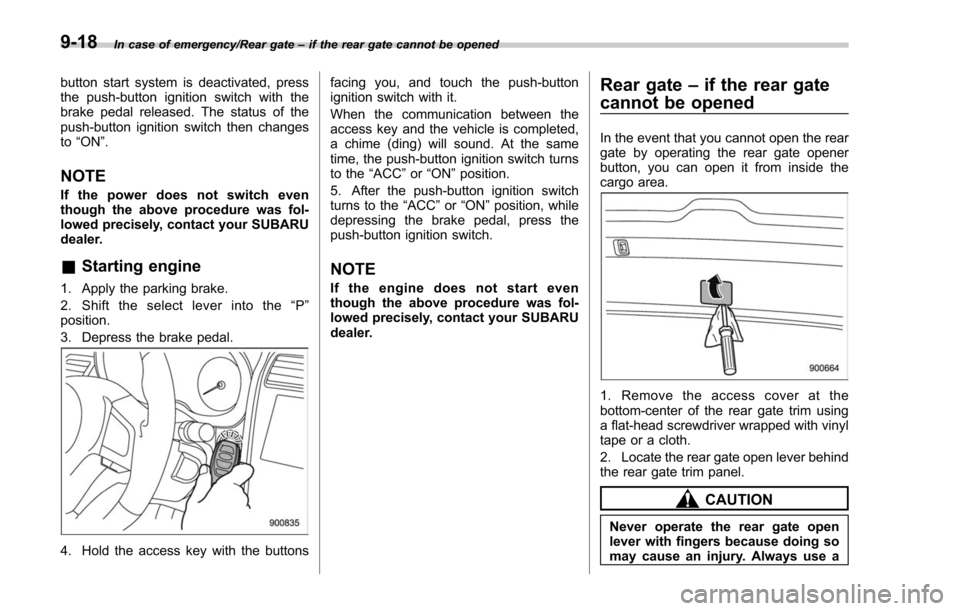
4. Hold the access key with the buttons facing you, and touch the push-button
ignition switch with it.
When the communication between the
access key and the vehicle is completed,
a chime (ding) will sound. At the same
time, the push-button ignition switch turns
to the
“ACC”or “ON ”position.
5. After the push-button ignition switch
turns to the “ACC”or “ON ”position, while
depressing the brake pedal, press the
push-button ignition switch.
NOTE
If the engine does not start even
though the above procedure was fol-
lowed precisely, contact your SUBARU
dealer.
Rear gate –if the rear gate
cannot be opened
In the event that you cannot open the rear
gate by operating the rear gate opener
button, you can open it from inside the
cargo area.
1. Remove the access cover at the
bottom-center of the rear gate trim using
a flat-head screwdriver wrapped with vinyl
tape or a cloth.
2. Locate the rear gate open lever behind
the rear gate trim panel.
CAUTION
Never operate the rear gate open
lever with fingers because doing so
may cause an injury. Always use a
9-18
Page 523 of 634
In case of emergency/Power rear gate–if power rear gate does not operate properly
In order for the rear gate to open and close
automatically, carry out the following
operation. If the rear gate does not open
and close automatically after carrying out
this operation, we recommend that you
have the vehicle checked at a SUBARU
dealer.
! When the rear gate is closed
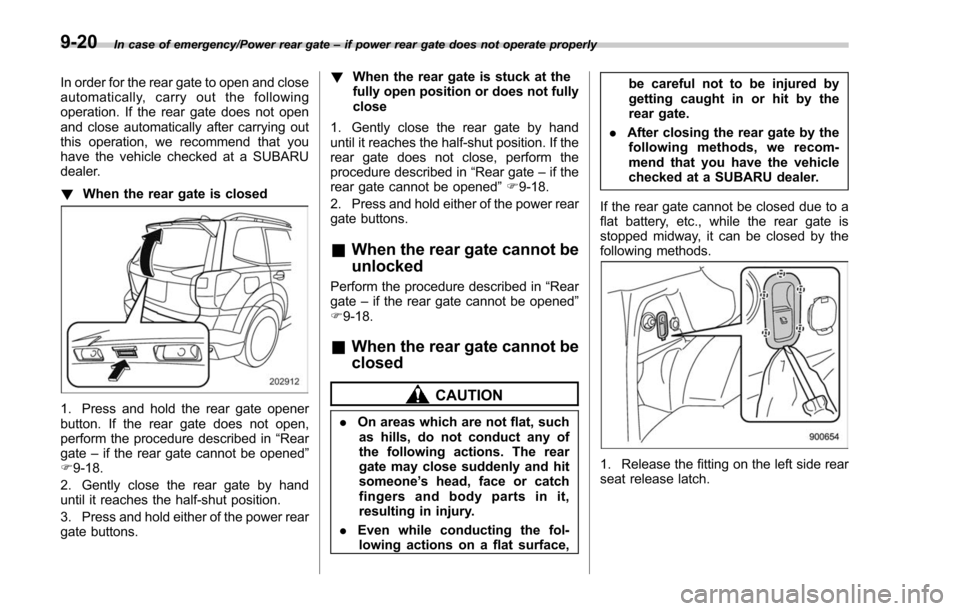
1. Press and hold the rear gate opener
button. If the rear gate does not open,
perform the procedure described in “Rear
gate –if the rear gate cannot be opened ”
F 9-18.
2. Gently close the rear gate by hand
until it reaches the half-shut position.
3. Press and hold either of the power rear
gate buttons. !
When the rear gate is stuck at the
fully open position or does not fully
close
1. Gently close the rear gate by hand
until it reaches the half-shut position. If the
rear gate does not close, perform the
procedure described in “Rear gate–if the
rear gate cannot be opened ”F 9-18.
2. Press and hold either of the power rear
gate buttons.
& When the rear gate cannot be
unlocked
Perform the procedure described in “Rear
gate –if the rear gate cannot be opened ”
F 9-18.
& When the rear gate cannot be
closed
CAUTION
. On areas which are not flat, such
as hills, do not conduct any of
the following actions. The rear
gate may close suddenly and hit
someone ’s head, face or catch
fingers and body parts in it,
resulting in injury.
. Even while conducting the fol-
lowing actions on a flat surface, be careful not to be injured by
getting caught in or hit by the
rear gate.
. After closing the rear gate by the
following methods, we recom-
mend that you have the vehicle
checked at a SUBARU dealer.
If the rear gate cannot be closed due to a
flat battery, etc., while the rear gate is
stopped midway, it can be closed by the
following methods.
1. Release the fitting on the left side rear
seat release latch.
9-20