2017 SUBARU FORESTER buttons
[x] Cancel search: buttonsPage 19 of 634

&Interior
! Passenger compartment area
1) Lower anchorages for child restraint
system (page 1-37)
2) Seatbelt (page 1-16)
3) Front seat (page 1-2)
4) Rear seat heater switch (page 1-10)
5) Rear seat (page 1-11)
6) Buttons for SUBARU STARLINK
NOTE
For U.S.-spec. models with SUBARU
STARLINK: Refer to the Owner ’s Man-
ual supplement for SUBARU
STARLINK.
14
Page 113 of 634

Keys and doors/Keyless access with push–button start system
detailed information, refer to “Starting and
stopping engine (models with push-button
start system) ”F 7-12.
. Arming and disarming the alarm sys-
tem. For detailed information, refer to
“ Alarm system ”F 2-25.
Locking and unlocking by the remote
keyless entry system can also be con-
trolled with the buttons on the access key.
For detailed information, refer to “Remote
keyless entry system ”F 2-21.
A mechanical key is attached to each
access key. The mechanical key is used
for the following operations.
. Locking and unlocking the driver ’s door
. Locking and unlocking the glove box
You cannot unlock the glove box without
using the mechanical key. You can keep
the glove box locked when you leave your
vehicle and the access key (with the
mechanical key removed) at a parking
facility.
1) Release button
2) Mechanical key
While pressing the release button of the
access key, take out the mechanical key.
& Safety precautions
WARNING
If you wear an implanted pacemaker
or an implanted defibrillator, stay at
least 8.7 in (22 cm) away from the
transmitting antennas installed on
the vehicle.
The radio waves from the transmit-
ting antennas on the vehicle could
adversely affect the operation of
implanted pacemakers and im-
planted defibrillators. If you wear electric medical equip-
ment other than an implanted pace-
maker or an implanted defibrillator,
before using the keyless access
with push-button start system, refer
to
“Radio waves used for the key-
less access with push-button start
system ”mentioned later, and con-
tact the electric medical equipment
manufacturer for more information.
The radio waves from the transmit-
ting antennas on the vehicle could
adversely affect the operation of the
electric medical equipment.
“ Radio waves used for the keyless
access with push-button start sys-
tem ”
. The keyless access with push-
button start system uses radio
waves of the following fre-
quency* in addition to the radio
waves used for the remote key-
less entry system. The radio
waves are periodically output
from the antennas installed on
the vehicle as shown in the
following illustrations.
* Radio frequency: 134 kHz
2-10
Page 114 of 634
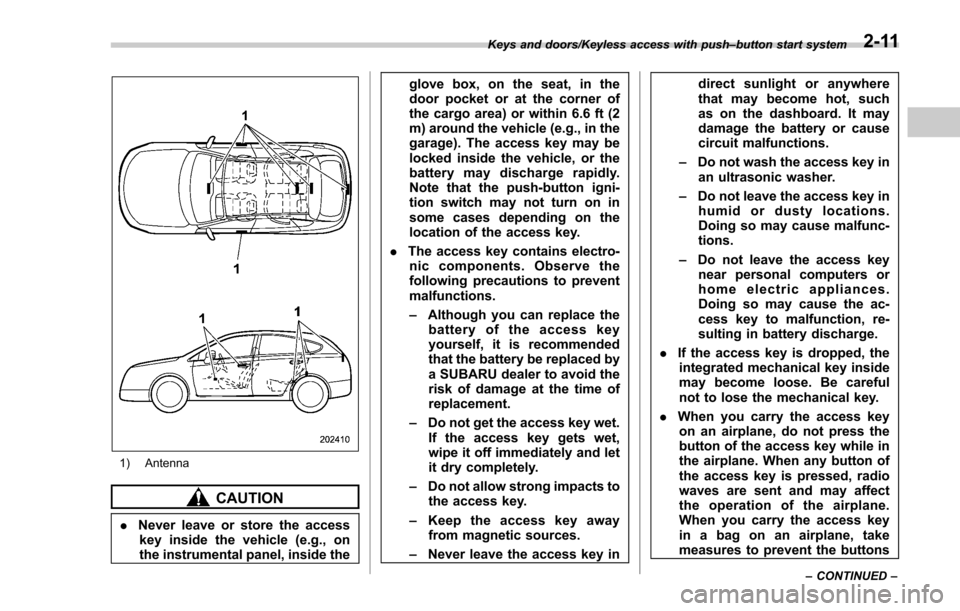
1) Antenna
CAUTION
.Never leave or store the access
key inside the vehicle (e.g., on
the instrumental panel, inside the glove box, on the seat, in the
door pocket or at the corner of
the cargo area) or within 6.6 ft (2
m) around the vehicle (e.g., in the
garage). The access key may be
locked inside the vehicle, or the
battery may discharge rapidly.
Note that the push-button igni-
tion switch may not turn on in
some cases depending on the
location of the access key.
. The access key contains electro-
nic components. Observe the
following precautions to prevent
malfunctions.
– Although you can replace the
battery of the access key
yourself, it is recommended
that the battery be replaced by
a SUBARU dealer to avoid the
risk of damage at the time of
replacement.
– Do not get the access key wet.
If the access key gets wet,
wipe it off immediately and let
it dry completely.
– Do not allow strong impacts to
the access key.
– Keep the access key away
from magnetic sources.
– Never leave the access key in direct sunlight or anywhere
that may become hot, such
as on the dashboard. It may
damage the battery or cause
circuit malfunctions.
– Do not wash the access key in
an ultrasonic washer.
– Do not leave the access key in
humid or dusty locations.
Doing so may cause malfunc-
tions.
– Do not leave the access key
near personal computers or
home electric appliances.
Doing so may cause the ac-
cess key to malfunction, re-
sulting in battery discharge.
. If the access key is dropped, the
integrated mechanical key inside
may become loose. Be careful
not to lose the mechanical key.
. When you carry the access key
on an airplane, do not press the
button of the access key while in
the airplane. When any button of
the access key is pressed, radio
waves are sent and may affect
the operation of the airplane.
When you carry the access key
in a bag on an airplane, take
measures to prevent the buttons
Keys and doors/Keyless access with push –button start system
–CONTINUED –2-11
Page 124 of 634
&Unlocking
Perform steps 1 to 5 described in “Regis-
tration ”.
NOTE
. You cannot unlock by PIN Code
Access in the following cases.
–when the access key is within the
operating ranges
– when the ignition switch is in the
“ ACC ”or “ON ”position
. If you make an operation error
during the unlocking procedure, start
over with the unlocking procedure after
waiting for 5 seconds or longer.
. To protect your vehicle from theft, a
buzzer will sound if incorrect PIN codes
are entered five times continuously. If
this occurs, you cannot unlock the
doors by PIN Code Access for 5
minutes.
Remote keyless entry system
CAUTION
. Do not expose the remote trans-
mitter to severe shocks, such as
those experienced as a result of
dropping or throwing.
. Do not take the remote transmit-
ter apart except when replacing
the battery.
. Do not get the remote transmitter
wet. If it gets wet, wipe it dry with
a cloth immediately.
. When you carry the remote trans-
mitteronanairplane,donot
press the button of the remote
transmitter while in the airplane.
When any button of the remote
transmitter is pressed, radio
waves are sent and may affect
the operation of the airplane.
When you carry the remote trans-
mitter in a bag on an airplane,
take measures to prevent the
buttons of the remote transmitter
from being pressed.
. FCC WARNING
Changes or modifications not
expressly approved by the party responsible for compliance
could void the user
’s authority
to operate the equipment.
FCC ID: CWTWB1U811
FCC ID: CWTWD1U781
This device complies with Part 15 of
the FCC Rules. Operation is subject to
the following two conditions: (1) This
device may not cause harmful inter-
ference, and (2) this device must
accept any interference received, in-
cluding interference that may cause
undesired operation.
NOTE
This device complies with Industry
Canada licence-exempt RSS standard
(s). Operation is subject to the follow-
ing two conditions: (1) this device may
not cause interference, and (2) this
device must accept any interference,
including interference that may cause
undesired operation of the device.
NOTE
Le présent appareil est conforme aux
CNR d’ Industrie Canada applicables
aux appareils radio exempts de licence.
L ’exploitation est autorisée aux deux
conditions suivantes: (1) l ’appareil ne
doit pas produire de brouillage, et (2)
Keys and doors/Remote keyless entry system
–CONTINUED –2-21
Page 143 of 634

Keys and doors/Rear gate
The power rear gate operates only when
all of the following conditions are satisfied.
.The vehicle is stopped completely.
. The outside temperature is within a
range from −22 8F to 1588 F (from−30 8Cto
70 8C).
. The ignition switch is in the “LOCK”/
“OFF ”or “ACC ”position. Or, the ignition
switch is in the “ON”position and the
parking brake is applied (MT models)/the
select lever is in the “P”position (CVT
models).
NOTE
. If the button is pressed repeatedly
while the power rear gate is operating,
the system may ignore the button
operation in order to avoid being
damaged. Do not press the button
unnecessarily.
. It is not possible to stop the rear
gate temporarily while opening be-
tween the completely closed position
and approximately 12 in (30 cm) open.
If you press one of the power rear gate
buttons briefly during this range, the
rear gate will be closed.
. If the vehicle starts to move while
the power rear gate is operating, the
system sounds a buzzer and closes the
rear gate automatically. At this time, if
the system detects jamming, it will deactivate the power rear gate and the
rear gate will not be closed. If this
occurs, close the rear gate via regular
procedures.
.
If you try to open the rear gate using
the power rear gate function immedi-
ately after closing the rear gate using
the power rear gate function, an elec-
tronic chirp will sound and the rear
gate will not open. Wait for a while
before trying to open the rear gate via
the power rear gate function. If you
wish to open it right away, it can be
opened manually. !
Operation by the button on the
instrument panelPower rear gate button
To open the rear gate:
Press and hold the power rear gate button
when the rear gate is closed. Then an
electronic chirp will sound twice and the
hazard warning flashers will flash twice.
The rear gate will open automatically.
To stop the rear gate midway:
Briefly press the power rear gate button
while the rear gate is being opened. Then
the hazard warning flashers will flash
twice. If the button is pressed again, the
rear gate will close. If the button is briefly
pressed while the gate is closed, the rear
gate can be opened. However, the rear
gate cannot be stopped again while it is
2-40
Page 144 of 634
opening.
To close the rear gate:
Press and hold the power rear gate
button. Then an electronic chirp will sound
twice and the hazard warning flashers will
flash twice. If the button is briefly pressed
again, the rear gate will open. However,
you cannot stop the rear gate midway
even if you press the button again.
!Operation by the button on the
access key/transmitter
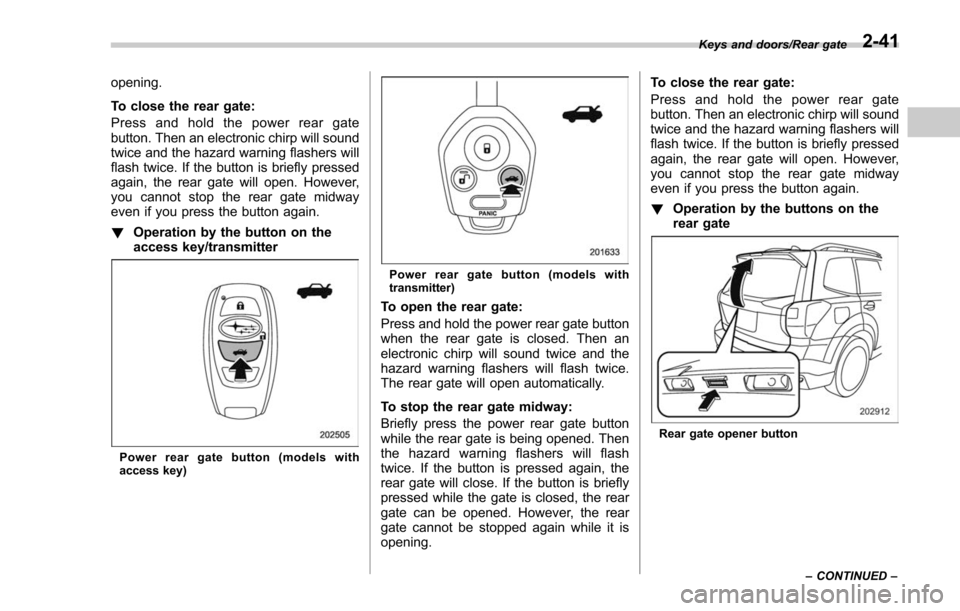
Power rear gate button (models with
access key)
Power rear gate button (models with
transmitter)
To open the rear gate:
Press and hold the power rear gate button
when the rear gate is closed. Then an
electronic chirp will sound twice and the
hazard warning flashers will flash twice.
The rear gate will open automatically.
To stop the rear gate midway:
Briefly press the power rear gate button
while the rear gate is being opened. Then
the hazard warning flashers will flash
twice. If the button is pressed again, the
rear gate will close. If the button is briefly
pressed while the gate is closed, the rear
gate can be opened. However, the rear
gate cannot be stopped again while it is
opening. To close the rear gate:
Press and hold the power rear gate
button. Then an electronic chirp will sound
twice and the hazard warning flashers will
flash twice. If the button is briefly pressed
again, the rear gate will open. However,
you cannot stop the rear gate midway
even if you press the button again.
!
Operation by the buttons on the
rear gate
Rear gate opener button Keys and doors/Rear gate
–CONTINUED –
2-41
Page 260 of 634
&Auto-dimming mirror/com-
pass with HomeLink
®(if
equipped)
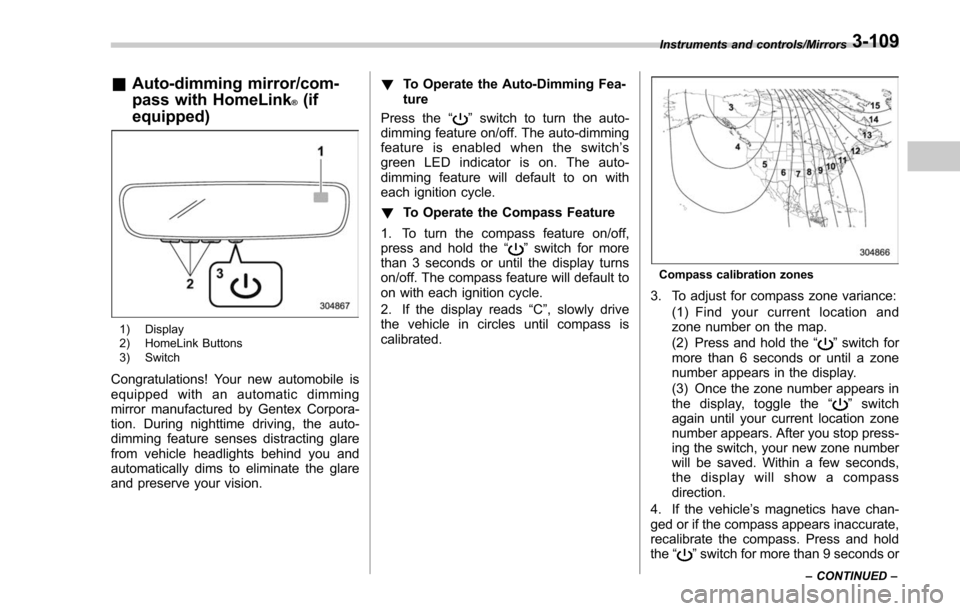
1) Display
2) HomeLink Buttons
3) Switch
Congratulations! Your new automobile is
equipped with an automatic dimming
mirror manufactured by Gentex Corpora-
tion. During nighttime driving, the auto-
dimming feature senses distracting glare
from vehicle headlights behind you and
automatically dims to eliminate the glare
and preserve your vision. !
To Operate the Auto-Dimming Fea-
ture
Press the “
”switch to turn the auto-
dimming feature on/off. The auto-dimming
feature is enabled when the switch’ s
green LED indicator is on. The auto-
dimming feature will default to on with
each ignition cycle.
! To Operate the Compass Feature
1. To turn the compass feature on/off,
press and hold the “
”switch for more
than 3 seconds or until the display turns
on/off. The compass feature will default to
on with each ignition cycle.
2. If the display reads “C”, slowly drive
the vehicle in circles until compass is
calibrated.
Compass calibration zones
3. To adjust for compass zone variance:
(1) Find your current location and
zone number on the map.
(2) Press and hold the “
”switch for
more than 6 seconds or until a zone
number appears in the display.
(3) Once the zone number appears in
thedisplay,togglethe “
”switch
again until your current location zone
number appears. After you stop press-
ing the switch, your new zone number
will be saved. Within a few seconds,
the display will show a compass
direction.
4. If the vehicle’ s magnetics have chan-
ged or if the compass appears inaccurate,
recalibrate the compass. Press and hold
the “
”switch for more than 9 seconds or
Instruments and controls/Mirrors
–CONTINUED –3-109
Page 261 of 634
Instruments and controls/Mirrors
until a“C”appears in the display. Once a
“C ”appears in the display, slowly drive the
vehicle in circles until compass is cali-
brated.
! HomeLink
®Wireless Control Sys-
tem
The HomeLink
®Wireless Control System
provides a convenient way to replace up
to three hand-held radio-frequency re-
motes used to activate devices such as
gate operators, garage door openers,
entry door locks, security systems, even
home lighting. The below steps are
generic programming instructions; for
Genie and Sommer garage door openers
please go directly to the HomeLink web-
site. Additional information and program-
ming videos can be found at
www.HomeLink.com and
www.youtube.com/HomeLinkGentex.
CAUTION
. Before programming HomeLink
to a garage door opener or gate
operator, make sure that people
and objects are out of the way of
the device to prevent potential
harm or damage.
. When programming a garage
door opener, it is advised to park outside of the garage.
. Do not use HomeLink with any
garage door opener that lacks
safety stop and reverse features
as required by U.S. federal safety
standards (this includes any gar-
age door opener model manufac-
tured before April 1, 1982). A
garage door that cannot detect
an object signaling the door to
stop and reverse does not meet
current U.S. federal safety stan-
dards.
. It is also recommended that a
new battery be placed in the
hand-held remote (garage door
opener remote) of the device for
quicker and more accurate train-
ing.
. Some vehicles may require the
ignition switch to be turned to the
“ON ”or “ACC ”position for pro-
gramming and/or operation of
HomeLink.
. Keep the hand-held remote (gar-
age door opener remote) of the
device you are programming for
use in other vehicles as well as
for future HomeLink program-
ming. It is also suggested that
upon the sale of the vehicle, the programmed HomeLink buttons
be erased for security purposes.
Refer to
“Erasing HomeLink But-
tons ”F 3-113.
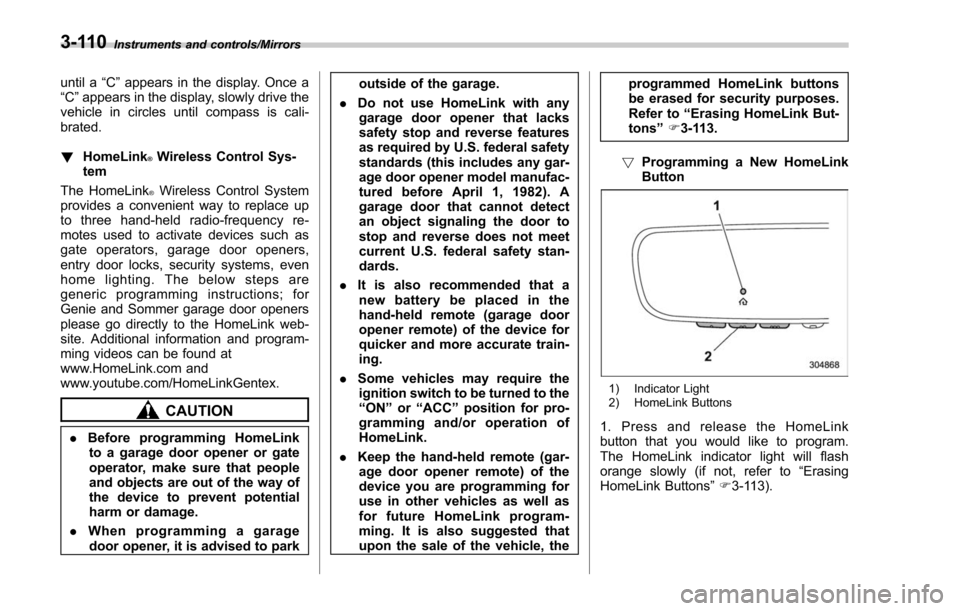
! Programming a New HomeLink
Button
1) Indicator Light
2) HomeLink Buttons
1. Press and release the HomeLink
button that you would like to program.
The HomeLink indicator light will flash
orange slowly (if not, refer to “Erasing
HomeLink Buttons ”F 3-113).
3-110