2017 SUBARU FORESTER mirror
[x] Cancel search: mirrorPage 17 of 634

Illustrated index
&Exterior
1) Engine hood (page 11-7)
2) Headlight (page 3-93)
3) Replacing bulbs (page 11-39)
4) Front wiper (page 3-105)
5) Moonroof (page 2-45)
6) Roof rails (page 8-14)
7) Door locks (page 2-5)
8) Outside mirrors (page 3-115)
9) Tire pressure (page 11-25)
10) Flat tires (page 9-5)
11) Snow tires (page 8-11)
12) Fog light (page 3-102)
13) Tie-down hooks (page 9-13)
14) Towing hook (page 9-13)
12
Page 21 of 634

&Instrument panel1) Outside mirror switch (page 3-115)
2) Seat position memory switch (page 1-5)
3) Steering Responsive Headlight OFF
switch (models with Steering Respon-
sive Headlight) (page 3-99)/Steering re-
sponsive fog light off switch (if equipped)
(page 3-103)
4) Illumination brightness control (page 3-101)
5) BSD/RCTA OFF switch (page 7-58)
6) Vehicle Dynamics Control OFF switch (models without power rear gate)
(page 7-41)/Memory switch (models with
power rear gate) (page 2-42)
7) Combination meter (page 3-9)
8) Information display (page 3-34)/Multi function display (page 3-44)
9) Hazard warning flasher switch (models with multi function display) (page 3-8)
10) Hazard warning flasher switch (models without multi function display) (page 3-8)
11) Multi function display control switch (page 3-44)
12) Audio (page 5-1)
13) Climate control (page 4-1)
14) Power rear gate switch (page 2-39)
15) Fuse box (page 11-37)
16) Hood lock release (page 11-7)
17) Vehicle Dynamics Control OFF switch (models with power rear gate)
(page 7-41)
16
Page 30 of 634

Function settings
A SUBARU dealer can change the settings of the functions shown in the following table to meet your personal requirements. Contact
the nearest SUBARU dealer for details. If your vehicle is equipped with a multi function display, the settings for some of these functions
can be changed using the display. For details, refer to“Multi function display”F 3-44.
Item Function Possible settingsDefault setting
Alarm system Alarm system Operation/Non-operation Operation
Monitoring start delay time (after closure of doors) 0 seconds/30 seconds 30 seconds
Impact sensor operation (only models with shock
sensors (dealer option)) Operation/Non-operation Non-operation
Passive arming (models without “keyless access with
push-button start system ”) Operation/Non-operation Non-operation
Dome light and map lights illumination ON/OFFOFF
Keyless access (if equipped) Hazard warning flasher Operation/Non-operation Operation
Audible signal Operation/Non-operation Operation
Audible signal volume Level 1 to 7Level 5
Door unlock selection function (driver ’s door unlock) Driver ’s door only/All doors Driver ’s door only
Door unlock selection function (rear gate unlock) Rear gate only/All doors Rear gate only
Remote keyless entry system Hazard warning flasher Operation/Non-operation Operation
Audible signal Operation/Non-operation Operation
Audible signal volume Level 1 to 7Level 5
Key lock-in prevention Key lock-in prevention Operation/Non-operation Operation
Defogger and deicer system for models
with the automatic climate control system Rear window defogger, outside mirror defogger and
windshield wiper deicer Operation for 15 minutes/
Continuous operationOperation for 15
minutes
– CONTINUED –
25
Page 75 of 634
Seat, seatbelt and SRS airbags/*SRS airbag (Supplemental Restraint System airbag)
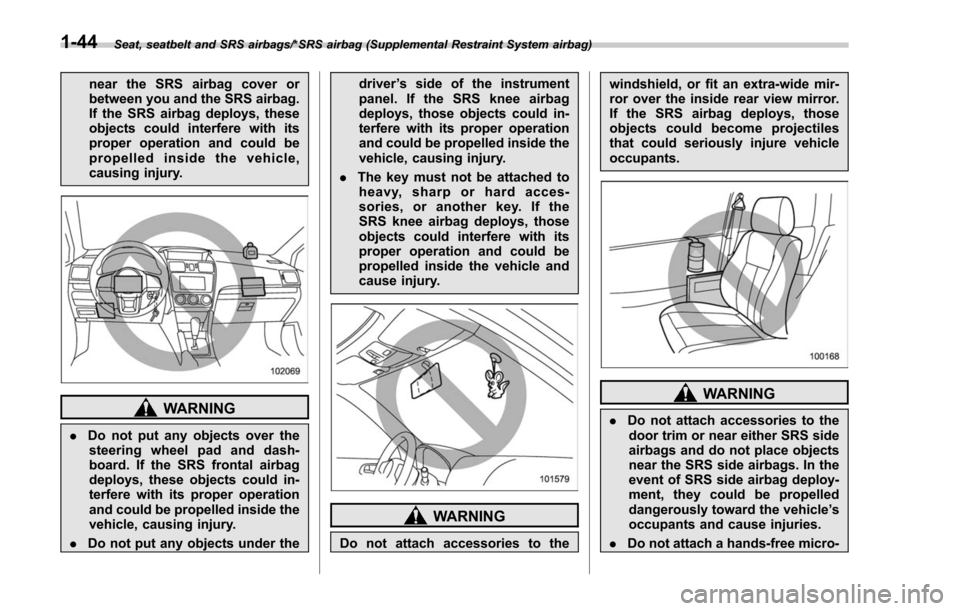
near the SRS airbag cover or
between you and the SRS airbag.
If the SRS airbag deploys, these
objects could interfere with its
proper operation and could be
propelled inside the vehicle,
causing injury.
WARNING
.Do not put any objects over the
steering wheel pad and dash-
board. If the SRS frontal airbag
deploys, these objects could in-
terfere with its proper operation
and could be propelled inside the
vehicle, causing injury.
. Do not put any objects under the driver
’s side of the instrument
panel. If the SRS knee airbag
deploys, those objects could in-
terfere with its proper operation
and could be propelled inside the
vehicle, causing injury.
. The key must not be attached to
heavy, sharp or hard acces-
sories, or another key. If the
SRS knee airbag deploys, those
objects could interfere with its
proper operation and could be
propelled inside the vehicle and
cause injury.
WARNING
Do not attach accessories to the windshield, or fit an extra-wide mir-
ror over the inside rear view mirror.
If the SRS airbag deploys, those
objects could become projectiles
that could seriously injure vehicle
occupants.
WARNING
.
Do not attach accessories to the
door trim or near either SRS side
airbags and do not place objects
near the SRS side airbags. In the
event of SRS side airbag deploy-
ment, they could be propelled
dangerously toward the vehicle ’s
occupants and cause injuries.
. Do not attach a hands-free micro-
1-44
Page 154 of 634
Instruments and controls
Fog light switch (if equipped)......................... 3-102Steering responsive fog lights system (if
equipped) ....................................................... 3-103
Wiper and washer ............................................ 3-104Windshield wiper and washer switches ............. 3-105
Rear window wiper and washer switch .............. 3-106
Mirrors............................................................... 3-107Inside mirror .................................................... 3-107
Auto-dimming mirror/compass (if equipped) ...... 3-108Auto-dimming mirror/compass with HomeLink
®(if equipped)
.................................................. 3-109
Outside mirrors ............................................... 3-115
Defogger and deicer ........................................ 3-116
Tilt/telescopic steering wheel ......................... 3-118
Horn .................................................................. 3-118
Heated Steering Wheel system (if equipped) ...................................................... 3-119
Page 248 of 634
NOTE
.After manually changing the head-
light mode to the high beam, if you turn
on the high beam assist function,
return the light control switch to the
“ AUTO ”position.
. When manually changing the head-
light mode to the high beam, if you turn
the light control switch to the “
”
position, the instrument panel illumina-
tion, parking lights, front side marker
lights, rear side marker lights, tail lights
and license plate lights will be on.
! Tips for the high beam assist
system
. The high beam assist function recog-
nizes the condition surrounding the vehi-
cle based on the brightness of illumination
ahead of your vehicle, etc. Therefore, the
headlight mode may switch in some
situations that do not match to the driver ’s
sense.
. A bicycle or cargo cycle may not be
detected.
. Under the following situations, the
brightness of ambient illumination may
not be detected correctly and the high
beam assist function may not work prop-
erly. As a result, the glare of the high beam
may disturb the driving of an oncoming
vehicle or vehicle ahead. Also, the low beam mode may continue although there
are no oncoming vehicles and vehicles
ahead. In the such cases, change the
headlight mode manually.
–In bad weather (fog, snow, sand
storm, heavy rain, etc.)
– When the windshield glass is dirty
or fogged
– When the windshield is cracked or
damaged
– When the stereo camera is de-
formed or the stereo camera lenses
are dirty
– If there are lights similar to the
headlights or the tail lights in the
surrounding area
– When an oncoming vehicle or ve-
hicle ahead is driven without its head-
lights and tail lights on
– If the headlights of an oncoming
vehicle or the tail lights of a vehicle
ahead are dirty or discolored, or if the
light beams are not aimed correctly
– When a rapid change of brightness
continues while driving
– When driving on a road with many
ups and downs or uneven surfaces
– When driving on a road with many
curves
– When there are some objects that
reflect light strongly, such as a road
sign or a mirror in vehicle ahead –
When the rear part of the vehicle
ahead, such as a container, reflects
light strongly
– When the headlights of your vehicle
are damaged or dirty
– When your vehicle is tilted, such as
in case the vehicle has a flat tire or is
being towed
– Immediately after the engine has
started
. In the following conditions, the head-
light mode will not be automatically chan-
ged from the high beam to the low beam.
–When your vehicle passes an on-
coming vehicle suddenly in a blind
curve
– When another vehicle passes in
front of your vehicle
– When an oncoming vehicle or ve-
hicle ahead comes in and out of view
because of continuous curves, median
strips, roadside trees, etc.
. If the stereo camera detects the light of
the front fog lights of an oncoming vehicle,
the headlight mode may change from the
high beam to the low beam automatically.
. The headlight mode may change from
the high beam to the low beam, or the low
beam mode may continue, when affected
by a street light, traffic signal, illumination
of an advertisement board, or a reflective
object such as a road sign and signboard.
Instruments and controls/Light control switch
–CONTINUED –3-97
Page 258 of 634
!Rear wiper
To turn the rear wiper on, turn the knob
switch upward.
To turn the wiper off, return the knob
switch to the “
”position.
With the switch turned to the “
”posi-
tion, the rear wiper will operate intermit-
tently at intervals corresponding to the
vehicle speed. In this position, when you
move the select lever to the “R ” position
(CVT models) or the shift lever to the
reverse position (MT models), the rear
wiper will switch to continuous operation.
When you move the select lever/shift lever
from the “R”(reverse) position to another
position, the rear wiper will return to
intermittent operation.
CAUTION
Do not attach anything that disturbs
the rear wiper operation on the rear
gate. Doing so may damage the rear
wiper when it operates.
NOTE
Even if the rear wiper switch is in the
“” position, while the shift lever/
select lever is in the “R ” position with
the windshield wiper operating con-
tinuously, the rear wiper will operate intermittently.
!
Washer
To wash the rear window while the rear
wiper is operating, turn the knob switch
upward to the “
”position. The washer
fluid sprays until you release the knob.
To wash the rear window when the rear
wiper is not in use, turn the knob switch
downward to the “
”position. The washer
fluid sprays and the wiper operates until
you release the knob.
Mirrors
Always check that the inside and outside
mirrors are properly adjusted before you
start driving.
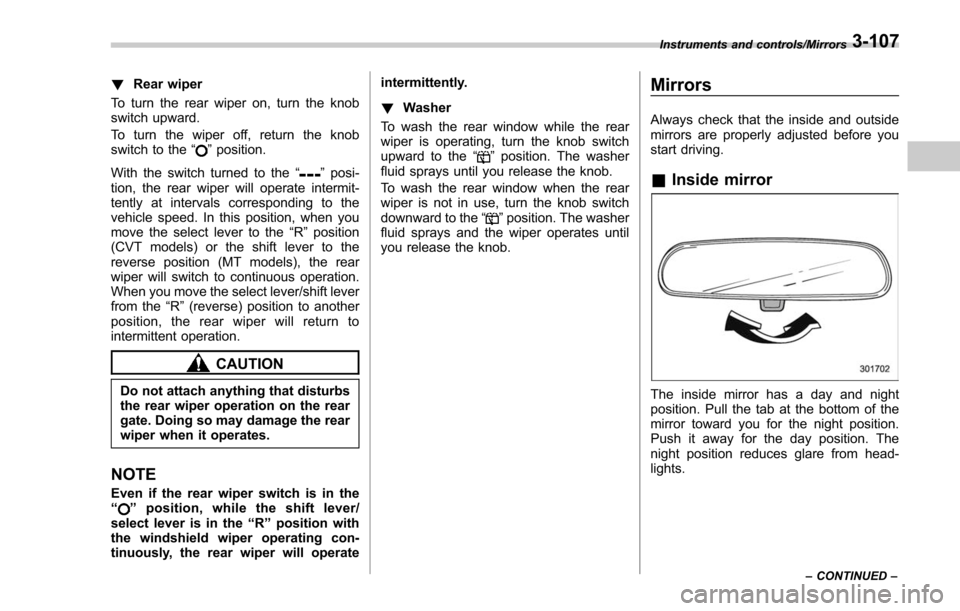
& Inside mirror
The inside mirror has a day and night
position. Pull the tab at the bottom of the
mirror toward you for the night position.
Push it away for the day position. The
night position reduces glare from head-
lights.
Instruments and controls/Mirrors
–CONTINUED –3-107
Page 259 of 634
Instruments and controls/Mirrors
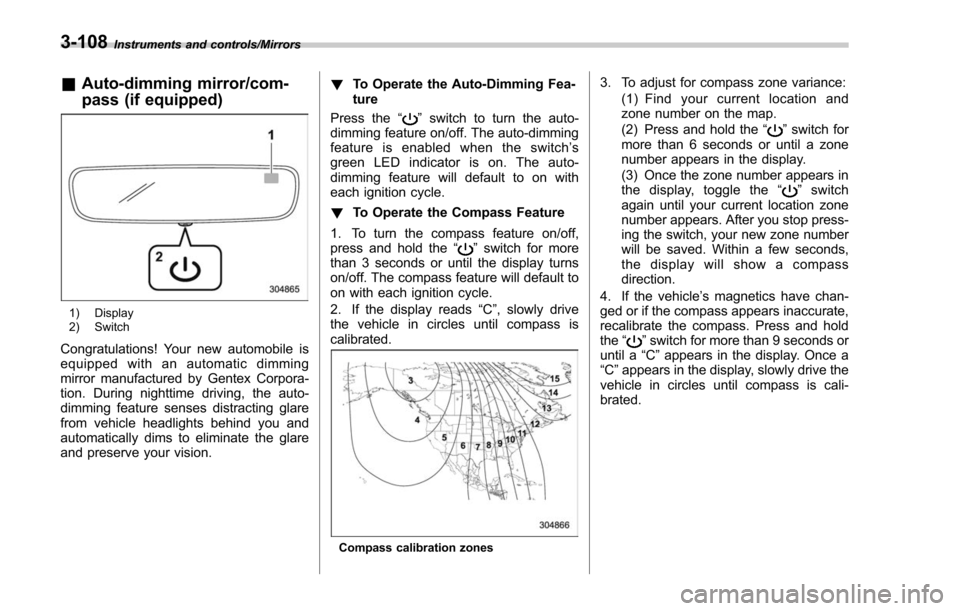
&Auto-dimming mirror/com-
pass (if equipped)
1) Display
2) Switch
Congratulations! Your new automobile is
equipped with an automatic dimming
mirror manufactured by Gentex Corpora-
tion. During nighttime driving, the auto-
dimming feature senses distracting glare
from vehicle headlights behind you and
automatically dims to eliminate the glare
and preserve your vision. !
To Operate the Auto-Dimming Fea-
ture
Press the “
”switch to turn the auto-
dimming feature on/off. The auto-dimming
feature is enabled when the switch’ s
green LED indicator is on. The auto-
dimming feature will default to on with
each ignition cycle.
! To Operate the Compass Feature
1. To turn the compass feature on/off,
press and hold the “
”switch for more
than 3 seconds or until the display turns
on/off. The compass feature will default to
on with each ignition cycle.
2. If the display reads “C”, slowly drive
the vehicle in circles until compass is
calibrated.
Compass calibration zones
3. To adjust for compass zone variance:
(1) Find your current location and
zone number on the map.
(2) Press and hold the “
”switch for
more than 6 seconds or until a zone
number appears in the display.
(3) Once the zone number appears in
thedisplay,togglethe “
”switch
again until your current location zone
number appears. After you stop press-
ing the switch, your new zone number
will be saved. Within a few seconds,
the display will show a compass
direction.
4. If the vehicle’ s magnetics have chan-
ged or if the compass appears inaccurate,
recalibrate the compass. Press and hold
the “
”switch for more than 9 seconds or
until a “C”appears in the display. Once a
“C ”appears in the display, slowly drive the
vehicle in circles until compass is cali-
brated.
3-108