Page 145 of 312

Opening and closing
Convenience opening and closing Use the convenience opening/closing func-
tion to e
a
sily open/close all the windows and
the sliding/tilting sunroof* from the outside.
Convenience open function
– Press and hold the button on the r
emote
control key until all the windows and the
sliding/tilting sunroof* have reached the
desired position, or
– First unlock the vehicle using the button
on the r
emote control key and then keep
the key in the driver door lock until all the
windows and the sliding/tilting sunroof*
have reached the required position.
Convenience close function
– Press and hold button on the remote
c
ontrol key until all the windows and the
sliding/tilting sunroof* are closed ››› , or
– Keep the key in the driver door in the "lock"
po s
ition u
ntil all the windows and the slid-
ing/tilting sunroof* are closed.
Programming convenience opening in the
Easy Connect*
– Select: button > SETTINGS
fu
nction
b
utton > Opening and closing > Elec-
tric windows > Convenience open-
ing , to choose between all the windows (All
), only the driver’s window ( Driver)
or none (Deactivated ). WARNING
● Tak e c
are when closing the sliding/tilting
sunroof* and windows. There is a risk of suf-
fering injury.
● For safety reasons, you should only use the
remote c
ontrol open and close functions with-
in about 2 metres of the vehicle. To avoid in-
juries, always keep an eye on the windows
and the sliding/tilting sunroof* when press-
ing the button to close them. The windows
stop moving as soon as the button is re-
leased. One-touch opening and closing*
One-touch opening and closing means you
do not
h
av
e to hold down the button.
Buttons ›››
Fig. 146 1 ,
2 ,
3 and
4 have
tw o po
s
itions for opening windows and two
for closing them. This makes it easier to open
and close windows to the desired position.
One-touch closing
– Pull up the window button briefly up to the
second pos
ition. The window closes fully. One-touch opening
– Push down the window button briefly up to
the second pos
ition. The window opens
fully.
Resetting one-touch opening and closing
– The automatic open and close function will
not work
if the battery has been temporari-
ly disconnected. The function can be re-
stored as follows:
– Close the window as far as it will go by lift-
ing and hol
ding the electric window switch.
– Release the switch and then lift it again for
1 second. Thi
s will re-enable the automatic
function.
If you push (or pull) a button to the first
stage, the window will open (or close) until
you release the button. If you push or lift the
button briefly to the second stage, the win-
dow will open (one-touch opening) or close
(one-touch closing) automatically. If you op-
erate the button while the window is opening
or closing, it stops at this position.
143
Technical data
Advice
Operation
Emergencies
Safety
Page 146 of 312

Operation
Sunroof* Intr oduction WARNING
If the sunroof is used negligently or without
pa y
ing due attention, it can cause serious in-
jury.
● Open or close the sunroof and the sun blind
only when no one i
s in their path of move-
ment.
● Never leave any key inside the vehicle
when exitin
g.
● Never leave a child or any other person who
may
need help in the vehicle, especially if
they have access to the vehicle key. If using
they key unattended, they could lock the ve-
hicle, start the engine, switch on the ignition
and activate the sunroof.
● After switching off, it is still possible to
open or close the s
unroof during a short
space of time provided that neither the driver
nor passenger door is opened. CAUTION
● To pr ev
ent damage, during winter tempera-
tures remove any ice or snow that might be
on the car roof before opening the sunroof or
adjusting the tilt position.
● Before leaving the vehicle or in case of rain-
fal
l, always close the sunroof. With the sun-
roof open or in a tilted position, water can en- ter the interior and can cause considerable
dam
ag
e to the electrical system. As a result,
other damage can occur in the vehicle. Note
● Le av
es and other loose objects that accu-
mulate on the sunroof rails should be regular-
ly cleaned away either by hand or with a vac-
uum.
● If the sunroof does not work correctly, the
anti-trap fu
nction will not work either. Con-
tact a specialised workshop. Opening and closing the sunroof
Fig. 147
On the interior roof lining: sunroof
b utt
on. The sunroof only works when the ignition is
sw
it
c
hed on. Once the ignition has been
switched off, you can still open or close the
sunroof for a few minutes provided the driver door and the front passenger door are not
opened.
The button
›
›› Fig. 147 has two levels. The
first level switches the sunroof to the tilted
position, opening or closing it fully or partial-
ly.
On the second level, the sunroof automatical-
ly moves to the corresponding final position
after briefly pressing the button. Activating
the button again stops the automatic func-
tion.
Adjusting the tilt position of the sunroof
● Press the rear part of the button B to the
fir s
t
level.
● Automatic operation: briefly press the rear
part
of button B to the second level.
C lo
s
ing the sunroof from a tilted position
● Press the front part of the button A to the
fir s
t
level.
● Automatic operation: briefly press the front
part
of the button A to the second level.
St op
pin
g the automatic operation by adjust-
ing the tilted position of the sunroof or by
closing the sunroof
● Press button A or
B again.
144
Page 147 of 312

Opening and closing
Opening the sunroof
● Press button C backwards to the first lev-
el .
● Aut om
atic operation to comfort position:
briefly pre
ss button C backwards to the sec-
ond l ev
el
.
Closing the sunroof
● Press button D forwards to the first level.
● Automatic operation: briefly press button
D forwards to the second level.
St op
pin
g the automatic operation during the
opening or closing
● Press button C or
D again.
S u
n b
lind
The sun blind is opened and closed manually
(independently of the sliding sunroof).
Convenience function to open or close the
sunroof*
The sunroof can be opened and closed with
the convenience function, just like the win-
dows:
Using the door lock *
● Hold the key in the door lock of the driver
door in either the unloc
king or locking posi-
tion to open or close the roof in the tilted po-
sition. ●
Rele
ase the key to interrupt this function.
Using the remote control ● Keep the locking/unlocking button pressed
to open/clo
se the roof; if you stop pressing
the button, the opening/closing function is
stopped.
Once all the windows and the sunroof have
closed, all the turn signals flash. During con-
venience closing, the windows and the sun-
roof close at the same time.
Anti-trap function of the panoramic
sliding s
unroof The anti-trap function can reduce the risk of
injur
y
when c
losing the sunroof ››› . If the
s u
nr
oof encounters resistance or an obstacle
when closing, it reopens immediately.
● Check why the sunroof did not close.
● Try to close the sunroof again.
● If the sunroof cannot be closed due to an
obs
tacle or some resistance, it stops at the
corresponding position and then reopens.
For automatic closing, a new closing attempt
might take place.
● If the sunroof is still unable to close, close
it without
the anti-trap function. Closing the sunroof without the anti-trap
function
●
B
efore approx. 5 seconds of having activa-
ted the ro
ll-back function, press the but-
ton ››› Fig. 147 to the second level in the di-
rection of arrow ››› Fig. 147 D until the sun-
r oof
c
loses completely.
● The sunroof closes without the anti-trap
function int
ervening!
● If the sunroof will still not close, visit a spe-
ciali
sed workshop. WARNING
Closing the sunroof without the anti-trap
fu nction c
an cause serious injuries.
● Always be careful when closing the sun-
roof.
● No per
son should ever remain in the way of
the sunr
oof, especially when closing without
the anti-trap function.
● The anti-trap function does not prevent fin-
gers
or other parts of the body from becom-
ing trapped against the roof frame and inju-
ries occurring. 145
Technical data
Advice
Operation
Emergencies
Safety
Page 148 of 312

Operation
Lights and visibility Light s
C ontr
ol lamps
It lights up
Rear fog light switched on
››› page 147.
It lights up
Left or right turn signal.
The control lamp flashes twice as fast when a turn signal
is faulty.
It lights up
Main beam on or flasher on
››› page 147. Several warning and control lamps light up
f
or a f
ew sec
onds when the ignition is switch-
ed on, signalling that the function is being
verified. They will switch off after a few sec-
onds. WARNING
Observe the safety warnings ›››
in Warning
symbol s on p
age 122. Switching lights on and off
Read the additional information carefully
›› ›
page 31
The driver is personally responsible for the
correct use and adjustment of the lights in all
situations. Note
● The le g
al requirements regarding the use of
vehicle lights in each country must be ob-
served.
● The dipped beam headlights will only work
with the ignition on. The s
ide lights come on
automatically when the ignition is turned off.
● If the lights are left on after the key has
been taken out
of the ignition lock, an audi-
ble warning sounds while the driver door re-
mains open. This is a reminder to switch the
lights off.
● The use of the lighting described here is
subj
ect to the relevant statutory require-
ments. Automatic lighting*
Activation
– Rotate the switch to the po
s
ition, this
indication will light up. Deactivation
– Turn the light switch to .
Automatic
lighting
If automatic headlight control is switched on,
dipped beam headlights are automatically
switched on by a photosensor if you drive in-
to a tunnel, for example. WARNING
● Ev en if
the automatic headlight control is
switched on, the dipped beam headlights will
not be switched on with fog. Therefore, the
dipped beam must be switched on manually. Note
● For v
ehicles with the automatic headlight
system, when the key is removed from the ig-
nition, the audible warning will only sound if
the light knob is in position .
● The use of the lighting described here is
subj
ect to the relevant statutory require-
ments.
● Do not put stickers on the windscreen in
front of
the sensor. This may cause disrup-
tions or faults in the automatic lighting sys-
tem.
● The rain sensor switches on the dipped
beam hea
dlights when the windscreen wipers
have been operating continuously for a few
seconds and it switches the lights off when
the continuous or interval wipe is switched
off for some minutes. 146
Page 149 of 312

Lights and visibility
Daytime running lights The daytime running lights consist of individ-
ual lights, int
e
grated in the front headlights.
By connecting the daytime running lights,
these lights are switched on 1)
››› .
The da ytime ru
nning lights switch on every
time the ignition is switched on, if the switch
is in positions or , according to the level
of exterior lighting.
When the light switch is in position , a
light sensor automatically switches dipped
beam on and off (including the control and
instrument lighting) or the daytime running
lights depending on the level of exterior
lighting. WARNING
● Never driv e w
ith daytime lights if the road
is not well lit due to weather or lighting con-
ditions. Daytime lights do not provide
enough light to illuminate the road properly
or be seen by other road users.
● On vehicles with rear lights with bulbs,
when activating the d
aytime running light
the rear lights are not switched on. A vehicle
which does not have the rear lights on may
not be visible to other drivers in the dark-
ness, in the case of heavy rain or in condi-
tions of poor visibility. Fog lights
Fig. 148
Dash panel: light control. Switching on the front fog lights*
● Pull the light switch to the first point
› ›
›
Fig. 148 1 , from positions
, or .
The symbo l
in the light switch lights up.
Switching on the rear fog light (vehicles with
front fog lights)
● Completely pull the light switch 2 from
po s
ition
, or . The lamp on the in-
strument panel lights up.
Switching on the rear fog light (vehicles with
no front fog lights)
● Completely pull the light switch 2 from
po s
ition
, or . This type of switch only has one position. The
lamp on the in-
strument
panel lights up.
Turn signal and main beam lever Read the additional information carefully
›› ›
page 32
Parking lights
● Switch the ignition off and remove the key
from the lock.
● Mo
ve the turn signal lever up or down to
turn the right or l
eft-hand parking lights on,
respectively.
Convenience turn signals
For the one-touch signalling, when the igni-
tion is switched on, move the lever as far as
possible upwards or downwards and release
the lever. The turn signal will flash three
times.
One-touch signalling is activated and deacti-
vated in the Easy Connect system via the button and the function button SETTINGS >
Lights > One-touch signalling
› ›
›
page 34. »1)
On vehicles equipped with rear LED lights, the rear
side light i
s switched on as well. 147
Technical data
Advice
Operation
Emergencies
Safety
Page 150 of 312

Operation
In vehicles that do not have the correspond-
in g menu, thi
s
function can be deactivated in
a specialised workshop. WARNING
The main beam can dazzle other drivers. Risk
of ac c
ident! Never use the main beam head-
lights or the headlight flasher if they could
dazzle other drivers. Note
● If the c on
venience turn signals are operat-
ing (three flashes) and the other convenience
turn signals are switched on, the active part
stops flashing and only flashes once in the
new part selected.
● The turn signals only
work when the igni-
tion is switched on. The corresponding warn-
ing lamp flashes in the instrument pan-
el. The control lamp flashes when the turn
signals are operated, provided a trailer is cor-
rectly attached and connected to the vehicle.
If a turn signal bulb is defective, the control
lamp flashes at double speed. If the trailer
turn signal bulbs are defective, the control
lamp does not light up. Change the bulb.
● The main beam headligh
ts can only be
switched on if the dipped beam headlights
are already on. The warning lamp then
comes on in the instrument panel.
● The headlight flasher come
s on for as long
as you pull the lever – even if no other lights
are switched on. The warning lamp then
comes on in the instrument panel. ●
When the parkin g ligh
ts are switched on,
the headlight and the tail light on the corre-
sponding side of the vehicle light up. The
parking lights will only work with the ignition
off. If said light is on, an audible warning will
be emitted while the driver door is open.
● If the turn signal lever is left on after the
key h
as been taken out of the ignition lock,
an acoustic signal sounds when the driver
door is opened. This is intended as a remind-
er to switch off the turn signal, unless you
wish to leave the parking light on. Coming Home/Leaving Home Func-
tion*
Fig. 149
Related video The Leaving Home function is controlled with
a phot
o
sen
sor.
If the Coming Home or Leaving Home func-
tion is connected, the front side and dipped
lights, the tail lights and the number plate
light will light up to provide assistance. Coming home function
The Coming Home f
unction is activated by
switching off the ignition. When the driver
door is opened, the Coming Home lighting
comes on.
The Coming Home lighting switches off in the
following cases:
● If, 30 seconds after being connected, any
doors or the r
ear lid remain open.
● If the light switch is turned to position .
● If the ignition is switched on.
Automatic
Leaving Home function
The Leaving Home function is activated when
the vehicle is unlocked if:
● the light control is in position and
● the photo
sensor detects “darkness”.
The Leav
ing Home lighting switches off in the
following cases:
● If the time period for the delay in switching
off the hea
dlights has ended
● If the vehicle is locked again.
● If the light switch is turned to position .
● If the ignition is switched on.
148
Page 151 of 312

Lights and visibility
Note
● To activ at
e the Coming/Leaving home func-
tion, the rotary light switch must be in posi-
tion and the light sensor must detect
darkness. Fog lights with cornering function*
This is an additional light source to dipped
beam he
a
dlights to light up the road as a
bend is taken.
The cornering light operates with the lights
switched on and when driving at less than
40 Km/h (25 mph). Ignition occurs by turning
the steering or connecting the turn signal.
Forward gear
● If the steering wheel is turned to the right,
or the right-h and t
urn signal operated, the
right-hand fog light turns on.
● If the steering wheel is turned to the left, or
the left
-hand turn signal operated, the left-
hand fog light turns on.
In reverse, both fog lights turn on. Note
When the fog lamps are on, the cornering
fu nction i
s activated and both headlights are
continuously on. Motorway light*
The motorway light is available on vehicles
equipped w
ith f
ull-LED lights.
The function is connected/disconnected via
the corresponding Easy Connect system
menu.
● Activation: when going abo
ve 110 km/h
(68 mph) for more than 10 seconds, the dip-
ped beam raises slightly to increase the driv-
er's visibility distance.
● Deactivation: when reduc in
g the speed of
the car below 100 km/h (62 mph), the dip-
ped beam returns to its normal position.
Headlight range control Fig. 150
Dash panel: headlight range control. The lights range control adapts according to
the
v
alue of
the headlight beam and the ve- hicle load status. This offers the driver opti-
mum vi
sibility and the headlights do not daz-
zle oncoming drivers ››› .
The he a
dlights
can only be adjusted when
the dipped beam is switched on.
To reset, turn switch ››› Fig. 150:
ValueVehicle load status a)
Two front occupants, luggage compart-
ment empty
All seats occupied, luggage compartment
empty
All seats occupied, luggage compartment
full. With trailer and minimum drawbar
load.
Driver only, luggage compartment full With
trailer and maximum drawbar load.
a)
If the vehicle load does not correspond to those shown in the
table, it is possible to select intermediary positions.
Dynamic headlight range control
The control is not mounted in vehicles with
dynamic headlight range control. The head-
light range is automatically adjusted accord-
ing to the vehicle load status when they are
switched on. »
149
Technical data
Advice
Operation
Emergencies
Safety
Page 152 of 312

Operation
WARNING
Heavy objects in the vehicle may mean that
the hea dlight
s dazzle and distract other driv-
ers. This could result in a serious accident.
● Adjust the light beam to the vehicle load
stat
us so that it does not blind other drivers. Hazard warning lights
Read the additional information carefully
›› ›
page 32
The hazard warning lights are used to draw
the attention of other road users to your vehi-
cle in emergencies.
If your vehicle breaks down:
1. Park your vehicle at a safe distance from mov in
g traffic.
2. Press the button to switch on the hazard warning lights
››› .
3. Switch the ignition off.
4. Apply the handbrake.
5. For a manual gearbox, engage 1st gear; for an aut
om
atic gearbox, move the gear
lever to P.
6. Use the warning triangle to draw the atten- tion of other ro
ad users to your vehicle.
7. Always take the vehicle key with you when you le
ave the vehicle. All turn signals flash simultaneously when
the hazar
d warning lights are switched on.
The two turn signal turn signal lamps
and the turn signal lamp in the switch will
flash at the same time. The simultaneous
hazard warning lights also work when the ig-
nition is switched off. WARNING
● The risk of
an accident increases if your ve-
hicle breaks down. Always use the hazard
warning lights and a warning triangle to draw
the attention of other road users to your sta-
tionary vehicle.
● Due to the high temperatures that the cata-
lytic con
verter can reach, never park in an
area where the catalytic converter could come
into contact with highly inflammable materi-
als, for example dry grass or spilt petrol. This
could start a fire. Note
● The batt er
y will run down if the hazard
warning lights are left on for a long time,
even if the ignition is switched off.
● The use of the hazard warning lights de-
scribed her
e is subject to the relevant statu-
tory requirements. Interior lights
R el
at
ed video Fig. 151
Convenience Lighting of instruments and controls
The lighting level of instruments, controls
and di
s
p
lays can be adjusted through the
Easy Connect system using the button
and the S
ET
TINGS function button
› ›
›
page 34.
The instrument lighting (some dials and nee-
dles), the centre console lighting and the
lighting of the displays are regulated by a
photodiode incorporated in the instrument
panel.
The instrument lighting (needles) is switched
on when the ignition is on and the light is
off. The instrument lighting is dimmed auto-
matically as the daylight starts to fade. It
goes out completely when ambient light is
very low. This function is intended to remind
the driver to switch on the dipped beam
150
 1
1 2
2 3
3 4
4 5
5 6
6 7
7 8
8 9
9 10
10 11
11 12
12 13
13 14
14 15
15 16
16 17
17 18
18 19
19 20
20 21
21 22
22 23
23 24
24 25
25 26
26 27
27 28
28 29
29 30
30 31
31 32
32 33
33 34
34 35
35 36
36 37
37 38
38 39
39 40
40 41
41 42
42 43
43 44
44 45
45 46
46 47
47 48
48 49
49 50
50 51
51 52
52 53
53 54
54 55
55 56
56 57
57 58
58 59
59 60
60 61
61 62
62 63
63 64
64 65
65 66
66 67
67 68
68 69
69 70
70 71
71 72
72 73
73 74
74 75
75 76
76 77
77 78
78 79
79 80
80 81
81 82
82 83
83 84
84 85
85 86
86 87
87 88
88 89
89 90
90 91
91 92
92 93
93 94
94 95
95 96
96 97
97 98
98 99
99 100
100 101
101 102
102 103
103 104
104 105
105 106
106 107
107 108
108 109
109 110
110 111
111 112
112 113
113 114
114 115
115 116
116 117
117 118
118 119
119 120
120 121
121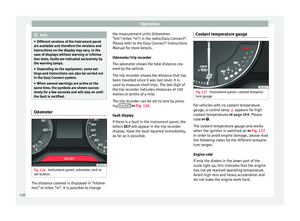 122
122 123
123 124
124 125
125 126
126 127
127 128
128 129
129 130
130 131
131 132
132 133
133 134
134 135
135 136
136 137
137 138
138 139
139 140
140 141
141 142
142 143
143 144
144 145
145 146
146 147
147 148
148 149
149 150
150 151
151 152
152 153
153 154
154 155
155 156
156 157
157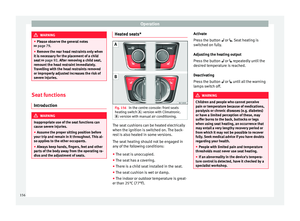 158
158 159
159 160
160 161
161 162
162 163
163 164
164 165
165 166
166 167
167 168
168 169
169 170
170 171
171 172
172 173
173 174
174 175
175 176
176 177
177 178
178 179
179 180
180 181
181 182
182 183
183 184
184 185
185 186
186 187
187 188
188 189
189 190
190 191
191 192
192 193
193 194
194 195
195 196
196 197
197 198
198 199
199 200
200 201
201 202
202 203
203 204
204 205
205 206
206 207
207 208
208 209
209 210
210 211
211 212
212 213
213 214
214 215
215 216
216 217
217 218
218 219
219 220
220 221
221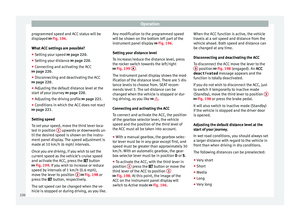 222
222 223
223 224
224 225
225 226
226 227
227 228
228 229
229 230
230 231
231 232
232 233
233 234
234 235
235 236
236 237
237 238
238 239
239 240
240 241
241 242
242 243
243 244
244 245
245 246
246 247
247 248
248 249
249 250
250 251
251 252
252 253
253 254
254 255
255 256
256 257
257 258
258 259
259 260
260 261
261 262
262 263
263 264
264 265
265 266
266 267
267 268
268 269
269 270
270 271
271 272
272 273
273 274
274 275
275 276
276 277
277 278
278 279
279 280
280 281
281 282
282 283
283 284
284 285
285 286
286 287
287 288
288 289
289 290
290 291
291 292
292 293
293 294
294 295
295 296
296 297
297 298
298 299
299 300
300 301
301 302
302 303
303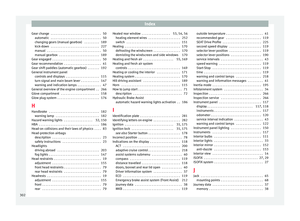 304
304 305
305 306
306 307
307 308
308 309
309 310
310 311
311